Adobe After Effects for Photoshop, Illustrator, and Animate Users
Tools, Tips, and Techniques
After Effects is a COMPOSITING TOOL for videos, audio files, images, text, and 3D to generate creative content. It uses a host of other tools, plug-ins, scripts, and effects to output mainly to a video format.
composition [kom-puh-zish-un] noun – the act of combing parts or elements to form a whole.
If you know Photoshop, it is helpful to think of After Effects as “Photoshop Effects in Motion.” Everything you learned in Photoshop can be ANIMATED in After Effects:
- Lights, Cameras, and Actions (Effects/Filters)
- Objects:
- Bitmaps/Vectors
- Text/3D
- Masks/Mattes
After Effects can also do any animation Adobe Animate can do faster but with more features. Some features in After Effects are also like Adobe Illustrator.
These features are referred to as TRANSFERABLE SKILLS. Transferable skills are concepts you learn in one application that is similar in another application, so you don’t have to relearn them, or there is not much more to learn. For example, you cut, copy, and paste (e.g., CMD/CTRL+X, CMD/CTRL+C, CMD/CTRL+V) the same way in all applications, par none. Or, you select all (e.g., CMD/CTRL+A) the same way in most applications, but what you select may differ (e.g., in Photoshop, it is pixels; in Illustrator, it is vectors).
The table below shows standard features and functions shared among these applications, but they may be called by another name:
The table below shows standard features and functions shared among these applications, but they may be called by another name:
FEATURE OR FUNCTIONS |
AFTER EFFECTS |
PHOTOSHOP |
ILLUSTRATOR |
ANIMATE |
Display Area |
Y (Called Composition |
Y (Called Canvas) |
Y (Called Artboard) |
Y (Called Stage) |
Embedded objects |
Y (Called Pre-composition) |
Y (Called Smart Objects |
Y (Called Symbols and Isolation Mode) |
Y (Called Symbols) |
Script or programming |
Y (Called Expressions) |
Y (Called Actions or Droplets) |
Y (Called Actions) |
Y (Called Action Script or JavaScript) |
Import |
Y |
Y |
Y (Called Place) |
Y |
Filters |
Y (Called Effects) |
Y |
Y |
Y |
Bitmaps |
Y (Called Solids) |
Y |
Y |
Y |
Vectors |
Y (Called Shapes) |
Y |
Y |
Y |
Gradients |
Y (Called Ramps) |
Y |
Y |
Y |
Content Aware Fill |
Y (Across multiple frames) |
Y |
N |
N |
Cloning |
Y (Across multiple frames) |
Y |
N |
N |
Layer Styles |
Y |
Y |
Y |
N |
Character |
Y |
Y |
Y |
Y |
Paragraph |
Y |
Y |
Y |
Y |
Animation |
Y |
Y |
Y |
Y |
Blend Modes |
Y |
Y |
Y |
Y |
Presets |
Y |
Y |
Y |
Y |
Timeline |
Y |
Y |
N |
Y |
Pen Tool |
Y |
Y |
Y |
Y |
Mask |
Y |
Y |
Y |
Y |
Keyframes |
Y |
Y |
N |
Y |
3D Extrude |
Y |
Y |
Y |
N |
Light |
Y |
Y |
Y |
N |
Camera |
Y |
Y |
N |
Y |
Audio |
Y |
N |
N |
Y |
Transformation |
Y |
Y |
Y |
Y |
Paint |
Y |
Y |
Y |
Y |
Brushes |
Y |
Y |
Y |
Y |
Align |
Y |
Y |
Y |
Y |
Workspaces |
Y |
Y |
Y |
Y |
Extensions |
Y |
Y |
Y |
Y |
Info Panel |
Y |
Y |
Y |
Y |
Libraries |
Y |
Y |
Y |
Y |
Ruler, Grid, and Guides |
Y |
Y |
Y |
Y |
Clipping Mask |
Y |
Y |
Y |
Y |
Learn |
Y |
Y |
Y |
Y |
Group function |
Y |
Y |
Y |
Y |
NOTE: Besides the few “N” listed above, all these applications have a lot of common features and functions that you do not have to relearn.
TESTIMONY: I delayed learning After Effects for a long time thinking that it was a hard program to learn. However, once I started to learn it, I found that it had so many common tasks that I have been performing in other programs listed above for years. As a result, it is not only easy for me to learn but I am having fun learning it.
At first glance, all the panels within After Effects can be very intimidating. However, there are only four main panels used most of the time:
- Project – where all the project assets are imported and organized
- Timeline – where the project timeline events are arranged and manipulated
- Composite – where the timeline layers appear as a preview
- Effects and Presets – where effects are added
NOTE: Most other panels are also like Photoshop, Illustrator, and Animate (e.g., Character, Paragraph, Brushes, Paint, Align, Workspace, etc.) So, if you know about those panels, they are similar in After Effects.
THREE COOL PANEL FEATURES UNIQUE TO AFTER EFFECTS:
(1.) PRO TIP: To TOGGLE any panel from standard to full screen:
- press ~ key with a panel selected (highlighted with a light blue border) (preferred)
- Double-click the panel’s title
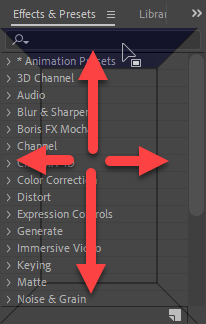
(2.) To MOVE any panel to a new location, drag it by the title within another panel until a 3D Box appears and then move it to one SIDE of the box to reposition the panel to the top, bottom, right, or left of the target panel.
The example below will place the moved panel on TOP of the current Effects & Presets panel (see arrow and highlight below)
PRO TIP: To ADD a panel as a TAB to a target panel group, drag a panel to the CENTER of the target panel instead of one of its sides.
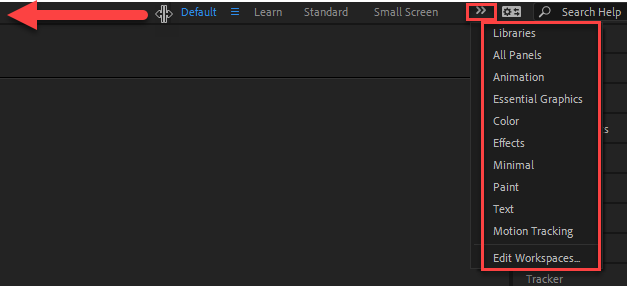
(3.) To CHANGE the type of panels displayed depending on what is being done (e.g., Animation, Paint, etc.), change the workspace in one of the following ways:
- Click one of the workspace names at the top of the screen (preferred)
PRO TIP: If a workspace is not visible, hover to the left of the current workspace links until the cursor changes to a double arrow, then drag it to the left to reveal more workspace options or to the right to hide workspace options. Otherwise, click the overflow menu (>>) and select a workspace from the list.
NOTE: Like many other applications, you can create or edit your own workspaces as well as reset workspaces.
- Select Window > Workspace > [Workspace Name]. There are three workspaces with keyboard shortcuts:
- Default (SHIFT+F10)
- Learn (SHIFT+F11)
- Standard (SHIFT+F12)
Project Panel
The Project panel is where content is imported for a project. There are several ways to import assets into the Project panel:
- Double-click in the Project panel to open the File Explorer/Finder, navigate to an asset, and then click the Import button (preferred).
- With File Explorer/Finder already opened, drag asset(s) from it to the Project panel area.
- Select File > Import > File… (CMD/CTRL+I) for a single file or File > File > Multiple Files… (CMD/CTRL+ALT/OPTION+I) for multiple files.
- PRO TIP: It is best practice to create folders (e.g., videos, audio, PS, AI, etc.) in the Project panel to organize assets and drag-and-drop content into them. You can also select one or more assets of the same type (e.g., video) and drag them to the New Folder icon at the bottom of the Project panel and then give the folder a new name (e.g., Videos).
- PRO TIP: To preview an asset in the Project panel, double-click it to preview it as a FOOTAGE in the Composition panel.
Composition Panel
A composition is a CONTAINER for a collection of assets that will appear in the Project folder once created alone side of other assets. A composition is like a symbol in Adobe Animate. There are serval ways to create a composition:
- Open the Composition Settings dialog box to create a composition, then:
- Click the New Composition button on the opening screen. (preferred)
- Select Composition > New Composition… (CMD/CTRL+N)
NOTE: This is like creating a new file in many applications.
- Click the Create New Composition icon at the bottom of the Project window.
Then, after the Composition Settings dialog box opens, give the composition a name, edit settings, and then click the OK button.
- Drag-and-drop an asset(s) to the:
- new composition icon at the bottom of the Project panel
- top of a composition layer in the Project panel
- Composite panel
- Timeline panel
NOTE: The advantage of this method is that After Effects will create a composition based on the footage (e.g., frame rate, resolution, etc.)
- Click the New Composition from Footage button in the opening screen, select one or more footage file and then click the Import button. The advantage of this approach is that it will create a composition AND add it to the timeline at the same time.
NOTES:
- All files imported into the Project panel, don’t have to reside in a composition.
- To update Composition settings (e.g., resolution, duration, background color, etc.), press CMD/CTRL+K.
- There can be more than one composition in a project. In fact, a pre-composition can be created and then added to another composition (see how to create a pre-composition later).
Timeline Panel
The timeline is where you manage when events (e.g., animation, effects) take place in a composition. Layers in the timeline can be hidden, and they will be hidden in the composition because the two are TIED together. When content ADDED to the Composition is ADDED to the timeline. Likewise, content ADDED to the timeline is ADDED to the Composition. Below are some tips when using the Timeline:
- To navigate the Current Time Indicator (CTI) along the TOP of the timeline:
- To move the CTI to the BEGINNING of the timeline, press the HOME key.
- To move the CTI to the END of the timeline, press the END key.
- To move the CTI 1 frame at a time, press the PAGE UP or PAGE DOWN key.
- PRO TIP: To move the CTI 10 frames at a time, hold the SHIFT key and press the PAGE UP or PAGE DOWN key.
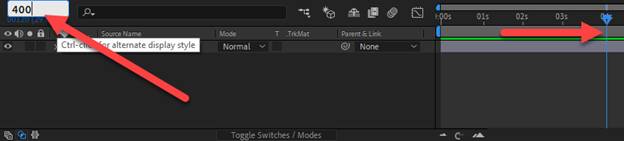
- TIMESAVING PRO TIP: To move the CTI down the timeline for a specific amount of time, type a value (e.g., 400 represents 400ms or 4s) into the time indicator text field at the top of the timeline and then press the ENTER key. This also works with frames (See below).
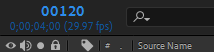
- PRO TIP: To TOGGLE the time indicator from time codes to frames per second (fps), hold down the CMD/CTRL key, and click on it. Changing to fps is useful when you want to create an animation and you like to work with frames instead of time.
From: 4 seconds
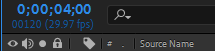
To: 120 frames (30 fps x 4 seconds = 120 frames)
- Because the Timeline has a default length of time (e.g., 30 seconds) associated with it, it can be TRIMMED to match the length of the CURRENT content by:
- moving the Work Area handle at the top of the timeline to the desired length
- right-clicking on the Work Area and select Trim Composition to Work Area or selecting Composition > Trim Composition to Work Area (CMD/CTRL+SHIFT+X).
- To open an image in the Layers panel as a tab in the Composition panel, double-click on an IMAGE layer in the timeline.
- To show or hide an object in the composition, press the show/hide eye icon on the far left of the timeline panel.
- To solo (turn off all other layers except an already solo layer), press the solo icon on the left side of the timeline for each layer that you would like to solo.
- To perform edits to clips on the timeline:
- To split a clip on the timeline, press CMD/CTRL+SHIFT+D. This will split the clip into TWO LAYERS so that:
- The remainder of the clip to be deleted
- The other clip can be move along the timeline
- To snap to the closest keyframe or edge of another clip in the timeline, hold down the SHIFT key and then drag a clip to the left or right of the timeline.
- To split a clip on the timeline, press CMD/CTRL+SHIFT+D. This will split the clip into TWO LAYERS so that:
- To distinguish layers with the same type of content, select multiple layers in the timeline, and give them the same color from the color swatches in the timeline. Also, note that the selection handles in the Composition panel will be the same color as the label.
- To select layers with the same color, right-click or control-click on any one of the color swatches and choose Select Label Group.
Effects & Presets Panel
Effects are like Filters in Photoshop, Illustrator, or Animate. There are several ways to apply an effect to a layer:
PRO TIP: Since there are so many effects, use the Search feature to find the effect name (e.g., Drop Shadow, Blur, Tiler) to apply.
- Open the Effects & Presets panel and drag-and-drop an effect (e.g., Bezier Warp) to (preferred):
- a layer in the timeline or in the timeline itself
- within the Composition window
- the Effect Control panel, if it is open
- With a layer active, select Effect > [Effect Category] > [Effect] (CMD/CTRL+5) from the menu at the top of the screen.
- PRO TIP: Double-click an effect in the Effects and Presets panel to apply it to a selected layer.
- To TOGGLE effect properties in the timeline on a selected layer, press the E key (E for Effects).
- To TOGGLE an effect on or off, click the f/x icon:
- in the left corner of the Effect Control panel (preferred)
- in the switches section of the timeline
- to the left of the timeline in the Effect sub-layer
- PRO TIP: Since an effect gets applied to the entire layer. If you want to hide a portion of an effect, simply add a mask to that layer. This is like creating a layer or vector mask in Photoshop (See Masks for details).
Search Function for Panels
Except for the Composite panel, a SEARCH can be performed for an asset related to that specific panel. This technique is particularly useful with the Effects & Presets and Timeline panels. When using the timeline panel:
- If one layer is selected, the search (e.g., Position) will be only for that layer.
- If multiple layers are selected, the search (e.g., Position) will be for those layers.
PRO TIMESAVING TIP: If multiple layers are selected and a key pressed (e.g., S for Scale, for example) all layers will open up that matches that key option (e.g., in this case, the scale parameter for ALL Layers) and ALL layers will be affected at one time. This is faster than using the search function because you only have to press a SINGLE key.
- If no layer is selected, the search (e.g., Position) will be for all layers, BUT only the layer that is then selected will be affected.
NOTE: The Search Help on the top-right of the menu can also be used to conduct a search (e.g., mask) on the Adobe website.

Before getting started, there are several tasks that are good to remember and do in After Effects because they are common to most projects. While they may not be evident now, they will become apparent once they are used.
- Before getting started with a project, it is best to:
- create and organize assets on hard drive BEFORE creating a project.
- set the resolution to a Third instead of Full by selecting it from the dropdown at the bottom of the Composition window. Then, when the project is completed, set it to Full resolution. This will speed up the preview process.
- There are one-to-many ways (menu, drag-and-drop, double-click, etc.) to perform the SAME TASK in After Effects for a host of operations (e.g., creating a composition, importing asset, adding effects, etc.). Pick the ones that you are comfortable with and use them.
- In this training, the menus and keyboard shortcuts are shown together in most cases. For example: Composition > Trim Composition to Work Area (CMD/CTRL+SHIFT+X). Choose the ones that you are most comfortable using.
- It is helpful to think of EFFECTS (e.g., Effects, Repeaters, Animators, etc.) as OBJECTS with PROPERTIES that are ATTACHED to a layer in the timeline. However, once created, they can be DISABLED or DELETED independently of the layer they are ATTACHED to on the timeline. This is like the Layer styles in the Layers panel in Photoshop where it can be disabled by clicking the show/hide icon or deleted by selecting it and pressing the DELETE key.
- Because Layers in the timeline can get busy, with the Selection Tool active, it is best to click an object (e.g., shape, text) in the Composition window to highlight the layer that you want to work within the timeline.
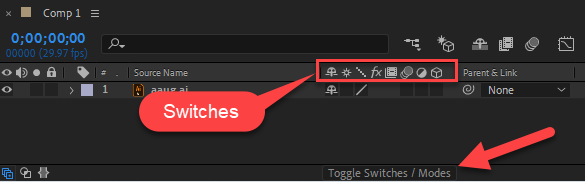
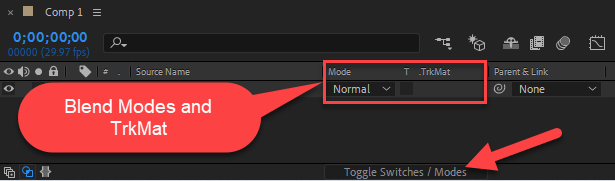
- Because the Switches and Modes (Blend Modes) views in the Timeline are not apparent, it is important to note how to TOGGLE between them. To do so, click the link at the bottom of the Timeline. Blend modes are like Photoshop, Illustrator, and Animate.
Switches:
Modes (Blend) and TrkMat:
- With a layer selected, instead of dragging to TRIM a clip in the Timeline, you can use ALT/OPTION + left/right square bracket to trim the clip to the CTI.
- Double-click an image layer and then with the Brush Tool active, press and hold down BOTH the CMD/CTRL key AND the LEFT-MOUSE button and then drag UP or DOWN to increase or decrease the size of the brush stroke BEFORE using it.
CAUTION: Don’t use the mouse scroll wheel; otherwise, you will zoom in and out instead. - With a shape tool selected, you can press the ALT/OPTION key repeatedly on the Fill or Stroke swatches at the top of the screen to TOGGLE between the various options.
- Any blue parameter value can be scrubbed in the timeline to change that parameter value and to preview the result in the Composition panel. Click the blue Reset link to reset value to defaults.
- To deselect all layers, click in the empty area at the bottom of the timeline.
- To preview and stop the composition from playing, press the SPACEBAR key.
- TIMESAVING TIP: If the SHIFT key is held down while scrubbing a property value, it will move 10px at a time (or 10x as fast). Also, while using the arrow keys, holding down the SHIFT key will move an object 10 pixels at a time instead of 1 pixel.
- When dealing with some videos, specific effects requires the selected range of video frames to be analyzed because the effect must be applied to all the frames (images) in the video. Some of these effects include:
- Cloning
- Rotoscoping
- Track Matting
- Tracking
- Trim
- There are a host of LAYERS that are AUTOMATICALLY created from the Layers menu:

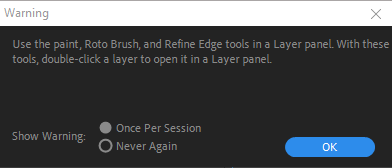
- To use the Paint, Roto Brush, or Refine Edges tools, double-click a layer in the timeline to open it in a Layer panel; otherwise, the warning below will be displayed.
Using Assets
After assets are imported, they can be added to the timeline in several ways:
PLACED ANYWHERE:
- Drag-and-drop the asset to the composition window ANYWHERE to place it. (preferred)
NOTE: A bounding box will appear to indicate the original asset size.
- Select a Composition in the Project panel and then drag-and-drop the asset to the composition window ANYWHERE to place it.
PLACED IN CENTER:
- Drag-and-drop the asset on the LEFT of the timeline to place the asset ABOVE or BELOW an existing layer if necessary.
NOTE: A blue line indicating WHERE the asset will be placed on the layer in the timeline will be seen.
- Drag-and-drop the asset on TOP of the timeline to place the asset WHERE you want it to appear at a SPECIFIC TIME on the timeline.
NOTE: You will see a second current timeline indicator (CTI) to let you know where the asset will be placed on the timeline.
- PRO TIP: Select the asset in the Project panel and then press CMD/CTRL+?.
Accessing Transformation Properties
There are several common TRANSFORMATION properties that every visible asset has that can be changed. Select the asset layer in the timeline and press a single key:
- A for Anchor Point
- S for Scale
- T for Transparency/Opacity
- R for Rotate
- P for Position
NOTE: To open multiple property settings, hold the SHIFT key first. Also, press the same key again to hide the property.
Shortcut Keys
Before getting started too far alone with After Effect, it is helpful to remember some important shortcut keys that are used often:
- PAGE UP = move back one frame on the timeline
- PAGE DOWN = move forward one frame on the timeline
- CMD/CTRL+A = select all layers
- CMD/CTRL+D = duplicate layer
- O = go to the end of image or video
- I = go to the start of image or video
- Period (.) and Comma (,) keys = zoom in and out in the Composition window
- U = show all keyframes of an animation
- UU = show all properties that have been modified
- F9 = apply Easy Ease to selected keyframes
EXAMPLE: 20 Tricks in After Effects for 2020
Like Photoshop, Illustrator, and Animate, shape layers are vectors, and solid layers are bitmaps.
Shapes
A VECTOR shape layer can be CREATED and ADDED to the content of that layer like Photoshop or Illustrator. Vector shapes are resolution-independent, which means that they can scaled without losing any quality.
Like a composition, it is helpful to think that when a shape layer is created, that shape layer is only the CONTAINER for the shape or shapes that will be ADDED to it.
There are several ways to create a (vector) shape:
- use Shape Tool
- use Pen Tool
- use Text Tool (then convert it to a shape)
- import an Adobe Illustrator file (then convert it to a shape)
- use a Repeater to create a complex shape
How to create a simple shape with the shape tool
- Make sure no layer is selected in the timeline.
CAUTION: When using any of the shape tools, if a layer is selected, a mask will be created instead of a shape. To deselect ALL the layers in the timeline, click anywhere BELOW the layers in the timeline. - Select a shape type from the top of the window and then set its fill and stroke options.
TIPS: - Hold down ALT/OPTION key and repeatedly click the Shape, Fill or Stroke options in the Tool panel to cycle through the different options available for the shape type, filling, and stroke options.
- Hold down the SHIFT key to constrain a rectangle to a square and an ellipse to a circle.
- To change the angle of the lines between the points (e.g., star), drag the mouse while pressing the CMD/CTRL-key.

- Hold down the UP/DOWN keys while drawing to increase or decrease the number of points using the Star or Polygon tools and the radius using the Rounded Rectangle tool.
- Drag to draw a shape in the Composition window.
There are some essential concepts that you need to be aware of when creating shapes:
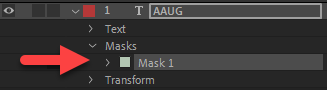
- IMPORTANT NOTE 1: If you don’t deselect ALL layers in the timeline, you will create a Mask sub-layer for that layer instead of a separate shape layer.
No layer selected: A Shape Layer will be created
A layer selected: A Mask will be created instead of a shape layer
- IMPORTANT NOTE 2:There are TWO TRANSFORMATION PROPERTIES for shapes that can get a little confusing. Below are some guidelines to follow:
- The first Transformation (e.g., Contents > [Shape Name #] > Transform: [Shape Name #]) is for the shape itself and will rotate the shape from the center of the shape. To rotate the shape, either:
- Select the Rotation Tool, DOUBLE-CLICK the shape in the Composition to drill down into it, hover WITHIN the shape until a rotate icon appears next to the cursor, and then rotate the shape.
- Change the FIRST Rotation property in the timeline for that shape.
- The second Transformation (e.g., Transform) will rotate the shape around the center of the composition. To rotate the composition (of shapes), either:
- Select the Rotation Tool, SINGLE-CLICK the shape in the Composition, hover WITHIN the shape until a rotate icon appears next to the cursor, and then rotate the shape.
- Change the SECOND Rotation property in the timeline under second Transform property for that layer (not shape).
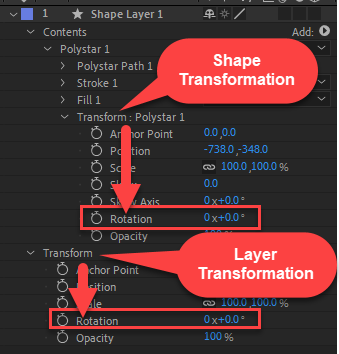
NOTE: The Composition Transform will ALWAYS be labeled just Transform; whereas, the Shape Transform will be labeled Transform: Shape Name #
NOTE: To change the Anchor Point for either of the techniques above, select the shape or the layer as mentioned above and then click the Pan Behind (Anchor Point) Tool (Y) from the main menu and then move the anchor point to a new location.
- IMPORTANT NOTE 3: Like Adobe Illustrator, if you create MULTIPLE shapes, they will all appear on the SAME layer unless you MANUALLY create another layer. To create a shape in After Effects on DIFFERENT a layer:
- Deselect all layers by clicking below them in the timeline and then create a new shape (Preferred). This will AUTOMATICALLY create a shape layer.
- Right-click BELOW the layer in the timeline and select New > Shape Layer and then create a shape. This will create a blank shape layer that you will have to add a shape onto.
- Select Layer > New > Shape Layer from the main menu and then create a shape. This will create a blank shape layer that you will have to add a shape onto.
- IMPORTANT NOTE 4: If you create multiple shapes on a single layer, unlike Adobe Illustrator where you must MANUALLY group all shapes (e.g., CMD/CTRL+G), in After Effects, ALL of the shapes will be encapsulated in a GROUP AUTOMATICALLY. After creating multiple shapes AND deselecting the layer, if you click any one of them in the Composition panel you will see ALL the shapes in that group surrounded by eight bounding box handles so that you can transform them (e.g., scale, rotate, move) all of them at the same time. If you want to access a SINGLE shape, DOUBLE-CLICK on it to drill down into the group of shapes and then perform the transformation on just that one.
- PRO TIP: Once the Rectangle or Star option is set, double-click on the shape tool to add the shape to the composition at the same size as the composition.
How to convert text to a Shape Layer
Converting a text to a shape layer is rather easy. The advantage is it allows you to have more control over the individual LETTERS in the text.
Several things will happen when text is converted to a Shape Layer:
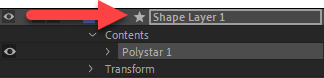
- It will create a Shape layer with the name of the original layer and the word Outlines but keep the original layer and turn its visibility off.
- The Shape layer will have a star icon in the layer.
- You will now see a Content layer that shows all the LETTERS of the text.
- Double-click on the text in the Composition to select it.
- Select Create > Create from Text by:
- Right-clicking the text layer in the timeline
- Right-clicking the text object in the composition
- Selecting Layer from the main menu
How to convert an Illustrator layer to a Shape Layer
Converting an Illustrator file to a shape layer is rather easy as well. The advantage is it allows more control over the individual SHAPES in the file.
Like converting text to a shape layer, several things will happen when an Adobe Illustrator file is converted to a Shape Layer:
- It will create a Shape layer with the name of the original layer and the word Outlines but keep the original layer and turn its visibility off.
- The Shape layer will have a star icon in the layer.
- You will now see a Content layer that shows all the GROUPS of a layer.
- Import an Illustrator file and add it to the Timeline.
- Select Create Shapes from Vector Layer from the main menu Layer’s option or right-click and select it from the layer in the timeline.
How to create a complex shape with the Pen tool
Create a custom shape with the Pen tool
- Make sure no layers are selected in the timeline and choose the Pen Tool from the Toolbar. Select a Fill but No Stroke for the shape (See above for detail).

- In the lower-left corner of the Composition panel, click the Title Safe/Action Save so that the composition is marked by a large plus sign (+).
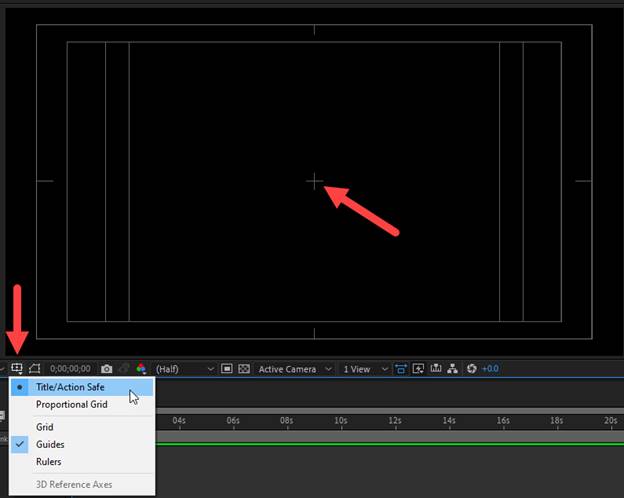
NOTE: This will enable the shape to be transformed from the composition’s center later. The shape layer (not the shape) is rotated via the center of the composition. - Click in the Composition panel to add points that define the shape. Ensure that the bottom of the shape is at the center of the composition—the plus sign.
NOTE: This will allow the shape to rotate from this point later.

Add complexity to a shape using the Merge Paths command
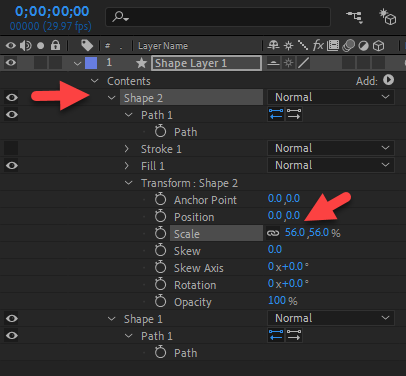
- Press UU to open any previously customized parameters and then select the shape name (e.g., Shape 1) and NOT the shape layer (Shape Layer 1) in the timeline.
CAUTION: Notice that the shape itself is DUPLICATED not the Shape Layer. - With the shape name selected, press CMD/CTRL+D to duplicate the shape (e.g., Shape 2).

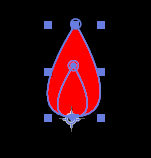
- Adjust the Transform: Shape 2 > Scale property of the duplicated shape (Shape 2) to make it smaller to fit within the center and bottom of the original shape.
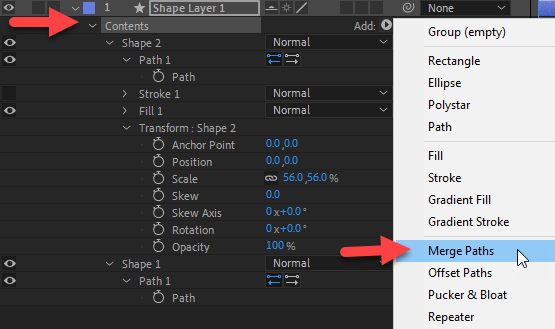
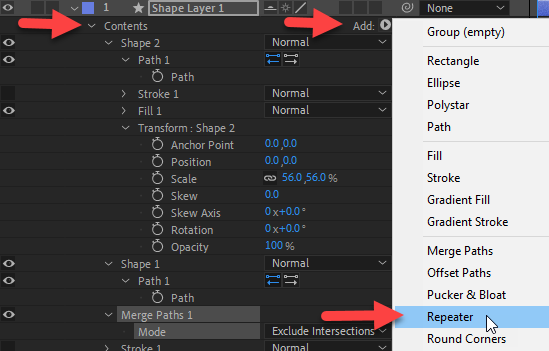
- Select Contents on the Shape 2, then choose the Merge Paths command from the Add button in the timeline.
CAUTION: It is crucial to select Contents and not Shape 1 or Shape 2; otherwise, the Merge Paths command will not work.
NOTE: Merge Paths will merge the paths of any shape above the merged path command if it in in the same group. Merge Paths is like using Compound Path or the Pathfinder Tool in Illustrator.
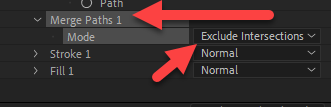
- In the Merge Paths command, change the Mode dropdown menu to Exclude Intersection to specify how the overlapping paths will interact with each other.
How to create a complex shape using a repeater
The Repeater operation allows you to REPEAT an object multiple times without having to create a layer for each. Hence, more complex shapes can be created.
- Create a simple shape (the shape from the previous section is used in this example).
- Select Contents from the shape layer and choose Repeater from the Add button in the timeline.
NOTE: This will add three repeated shapes by default.
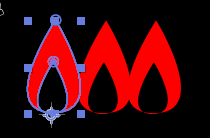
- Adjust the Repeater transform options to customize the appearance of the duplicate shapes created by the Repeater. In this example:
- Set the x and y position to zero to have all three shapes stacked on top of one another.
- Change the Repeater’s Transform Rotation property to rotate the other two shapes as show in the screenshot example.
NOTE: Once a Repeater is applied to a shape, if you attempt to select all three shapes in the Composition window, only the original shape will be selected.
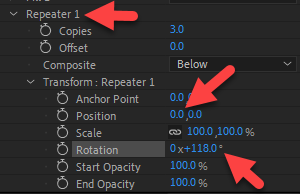

- To animate the repeated shape, keyframe the Offset property for Repeater 1.
- Optionally, animate any properties you want.
EXAMPLE: Create complex shapes with shape layers using path operations.
Solids
A solid is a color bitmap layer that can be created. It can be used to create bitmap shapes and masks.
How to create a solid (bitmap)
Creating a solid is like filling a blank layer in Photoshop with a solid color (e.g., ALT+BACKSPACE or CTRL+BACKSPACE)
- Select New > Solid… (CMD/CTRL+Y) from the main menu Layer’s option or right-click BELOW the layers in the timeline and select it.
- In the Solid Layer dialog box that appears, select a color and a size (or click Make Comp size) and then click the OK button.
- After Effects will AUTOMATICALLY create a folder called Solids in the Project panel and place any solid layer, null object, or adjustment layer in it.
- You will see later how a solid layer can be used to create a mask.
Text / Text Animation
It is easy to create and animate text in After Effects.
IMPORTANT NOTE: Text objects do not show up in the Project panel because they are created WITHIN After Effects. Besides the properties in the Character and Paragraph panels, there are some additional text properties (e.g., Paths and Grouping options) in the timeline.
Create Text
Creating text is not much different from Photoshop, Illustrator, Animate, or many other applications.
How to Create Text Layer
- Select the Horizontal or Vertical Type Tool, click in the Composition window, and type the desired text.
- Double-click the text to select it and then in the Character or Paragraph panel, make whatever change (e.g., font color/size/weight, etc.) needed.
PRO TIP: If a lot of text will be used in a project, switch to the Text Workspace to show the Character and Paragraph panels.
Create Simple Text Animation
While more advanced ways of creating animations will be explained later, the following techniques will be used in this Section:
- Build-in text animation presets
- Animator menu
NOTE: These techniques will buy you some time to learn more advanced techniques later in this course. So, for now, you can employ a technique I am fond of in this industry: “fake it until you make it.”
How to Create A Simple Text Animation
There are several pre-built text animations that come with After Effects. To preview them before you apply them, you need Adobe Bridge.
NOTE: The animation will start at the location of the CTI on the timeline for all techniques below:
Technique 1: Use Adobe After Effect Animation Presets from Adobe Bridge
- Create text in the Composition window (See the previous section).
- Select Animation > Browse Presets… to open Adobe Bridge.
- Double-click the Text folder to open it.
- Double-click on an animation folder type (e.g., Animate In).
- Preview any animation preset by selecting one of them and then clicking the Play button.
- Double-click on a preset, and it will be applied to that layer in After Effects.
TIP: Previewing the built-in text animation properties can help you see how to create your own animation. - Preview the animation by pressing the SPACEBAR key.
Technique 2: Use After Effects Animation Presets from the Effects & Preset panel
While it may not be evident that you can double-click an animation preset, you can also access the text animation presets by:
- Open the Effects & Presets panel, click to expand the Animation Presets folder, then select a folder (e.g., Text > Organic) and a preset (e.g., Hummingbird).
- Drag and drop the animation preset directly on to:
- the text object in the Composition panel or
- a layer in the timeline
NOTE: You can also double-click an animation preset, which will create an empty text layer. Then, select the text object and type some text. - Preview the animation by clicking the SPACEBAR key.
Technique 3: Use After Effects Animator Menu
Another way to animate text is to use the Animator menu that is designed to animate letter-by-letter and is available for all Text layer.
To animate ALL CHARACTERS TOGETHER:
- Create text in the Composition window (See the previous section).
- Expand the Text layer in the timeline, click the button next to the word animate and select an animation property (e.g., Position) that you would like to use and, then set a keyframe by clicking the stopwatch icon next to that property (e.g., Position).
NOTE: Notice that the Animator 1 object along with the Range Selector and whatever property selected in step 2 are sub-properties of the Animator 1. They work together: The Range Selector set the range of whatever property is selected (e.g., Position).
NOTE: The advantage of using the Animator object is that gives more animation options than the traditional keyframe approach. - Move the CTI along the timeline and set another keyframe for the same property to a different value by changing the property (e.g., Position) either from the Composition window or Timeline property (e.g., Position).
- Press the SPACEBAR key to see the animation. Notice that the whole text animates at once.
To animate ONE CHARACTER AT A TIME (Stagger Animation):
- Move the CTI BACK to the beginning of the animation, expand the Range selector, and set a keyframe for the Offset property. (e.g., 0%)
- Move the CTI to the end of the animation and set another keyframe for the Offset property (e.g., 100%).
NOTE: You can also click the selector in the Composition to change their values by clicking and dragging the vertical line. - Press the SPACEBAR to see the animation. Notice that the whole text animates one character at a time.
- Experiment with the other properties and scrub the CTI to see how they behave.
Below is a list of additional resources that you can view: