Android Tips, Techniques and Theory
PART 2: Creating Content with Java with Android Studio (Programming required)
With Simple Recipes
Version Control
Android Studio integrates with one of the most popular online open-source (free) Version Control System—GitHub. However, Git must be installed on your computer in order to use the online GitHub service.
Install Git
First, find out if you already have Git installed on your computer or if you just want to install a new version:
MAC: Open the Terminal window and type git --version.
- If you see git version 2.5.4 (Apple Git-61), you have the version that comes with Apple’s development command line tools.
- If you see a message that Git is not recognized or something similar to this, than type cd /usr/bin to switch directory and then type ls git and press the Return key and if you see a git command type ./git and press the Return key and you should see a prompt to install the Apple specific version. However, if you want to install the industry standard version, you will have to download it.
- Go to git-scm.com and click on the Latest Source Release button for Mac to download Git.
- Once download, you will be opening a *.dmg file. Double-click to open the installer and then click the Continue and then the Run button.
- Click the Next button several times to accept all of the defaults except when you have to type your administration password.
- Once the installation is done, click the Close button.
- CHECK POINT: To test installation, go to a Terminal window again and type Git --version and you should see the Git and its version number listed.
WINDOWS: Open the Command Prompt and type git --version.
- If you get the message “’git’ is not recognized…” than you will have to install it.
- Go to git-scm.com and click on the Latest Source Release button for Windows to download Git.
- Once download, you will be opening an *.exe file. Double-click to open the installer and then click the Run button.
- Click the Yes button and the Next button several times to accept all of the defaults and then on the last screen click the Install button to launch the installer and to copy environment variables to your system.
- Once the installation is done, you can uncheck the option to View Release Notes and click the Finish button.
- CHECK POINT: To test the installation, go to a Command Prompt again and type Git --version and you should see the Git and its version number listed in the command prompt. If you have any trouble, manual check your environment variables:
- Go to the Control Panel and type environment
- Click Edit the system environment variables
- Click the Environment Variables button and check both the user and system path to see if they include a path to the Git folder. If not, you will have to manually include them.
Config Git
Once Git is installed, you must configure it for use with Android Studio.
- Close all projects so that you can get to the Android Studio Welcome screen and select Configure… and then Settings from the menu on Windows or Configure... and Preferences on Mac.
- Windows: Click on Version Control > Git and ensure that the Path to Git executable text field is git.exe.
- Mac: Click on Version Control > Git and ensure that the Path to Git executable text field is correct for your operating system:
-
- If you are using the Git version from the Git-scm website, then the location will be /usr/local/bin/git.
- If you're using Apple's version, the location will be /usr/bin.
- CHECK POINT: To ensure you are using the right version of Git, click the Test button and you should see a message indicating that Git executed successfully and the current version number. Click the OK button to dismiss this dialog box.
- Open the Command Prompt (Windows) or the Terminal (Mac):
- Type git config --global user.email “yourEmailAddress” and press the Enter or Return key.
NOTE: yourEmailAddress is a valid email address in quotes that should match the email address on your GitHub account.
- Type git config --global user.name “userName” and press the Enter or Return key.
NOTE: userName can be anything you want in quotes. It is used to keep track of commits from your system to the Git repositories. When you press the Enter or Return key, you are saving the configuration for ALL Git projects.
Share Project On GitHub
While you install Git on your computer, you will be using GitHub from the web site. GitHub is used by many developers to share their code with others (public or private). You can create projects for the public for free or create private projects for a nominal monthly fee.
Create a GitHub Account
If you don’t already have a GitHub account you need set one up.
- Go to github.com and fill out your username, email and password.
- Click the Sign up for Github button to create an account.
- Now, you can use those credentials to sign in.
Configure GitHub in Android Studio
Like Git, GitHub has to also be configure to work with Android Studio.
- Close all projects so that you can get to the Android Studio Welcome screen and select Configure… and then Settings from the menu on Windows or Configure... and Preferences on Mac.
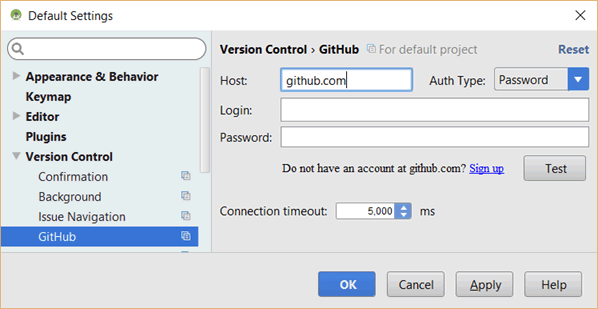
- Expand Version Control and select GitHub (not Git).
- On the right side of the panel, type the Login and Password that you used to create a GitHub account in the previous section.
NOTE: The Host address (github.com) should already be set. - Click the Test button to see if you can connect successfully and then click the OK button to dismiss the dialog box.
- Click OK and you will be ready to upload projects.
Upload to GitHub
- Create a new project or use an existing project that you can upload to GitHub.
- From the main menu, select VCS > Import into Version Control > Share Project on GitHub.
NOTE: VCS stands for Version Control System - If you are prompted for some credentials, enter them.
- In the Share Project On GitHub dialog box that appears, enter a repository name (e.g. myProject).
NOTE: If your original project have spaces in the name, you will be given instruction in red on how to correct it. Notice also that the private checkbox is disabled because we are using the free version of GitHub. - Click the Share button.
- CHECK POINT: In the Add Files For Initial Commit dialog box that appears, you should see a listing of all the app resources that will be checked into GitHub. Click the OK button and you should see a message at the bottom and bottom of the screen that says “Successfully share project on GitHub.”
- CHECK POINT: Click on the project name link (e.g., myProject) at the top of the screen and you will be taken to your project on GitHub. You can review the current folders and files structure and even drill down to see nested folders and files.
Hidden Directory
Once you've uploaded a project to GitHub, a special hidden directory will be created.
- Open Terminal (Mac) or Command Prompt (Windows) and switch to your Android Studio projects directory and type cd AndroidStudioProject/ (or whatever directory your project is in) and then press the Return or Enter key.
- Change to the project name by typing cd myProject (or whatever the name of your project is) and then press the Return or Enter key.
- On the Mac, type ls to see only non-hidden folders and files. On Windows, type dir and you will see more find than on the Mac because some of the files and folders start with a dot character and are hidden on Mac by default.
- CHECK POINT: On Mac, type ls .git and you will see the directory named .git that contains your Git repository on your computer.
- On Mac, type exit to close the Terminal and click the Close button on the Command Prompt window to close it.
Recommit to GitHub
- Make some minor changes to one of your activity classes so that it is eligible for recommitting to the GitHub repository.
- CHECK POINT: Right-click on the app module and then choose Git > Commit Directory… and you should see a listing of the changes you made.
- In the Commit Changes dialog box that appears you should see the changes to the file you made.
- Add a commit message (e.g., minor updates made to file).
- Move the cursor over the Commit button and from the menu that appears, choose Commit and Push…
- Type dir and you will see more find than on the Mac because some of the files and folders start with a dot character. These are hidden on Mac by default.
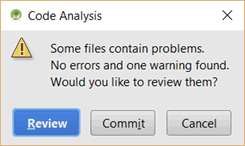
- In the Code Analysis dialog box that appears, you have the opportunity to click the Review button. However. Since we made only some minor changes, click on the Commit button.
- In the Push Commits dialog that appears, click the Push button to upload the commitment to GitHub.
- CHECK POINT: You should see a message at the bottom of the screen that says, “Push successful, Push 1 commit to origin/master and you should see a Version Control tab at the bottom of your screen that has tools to work with GitHub.
Manage Git And GitHub
Once Android Studio is associated with a GitHub repository, you can create, merge, and delete multiple branches. For example, you may want to create a Version 2 of your app by creating a BRANCH from the original project. Later, you may decide to MERGE the new branch back to the original (master branch). In the end you may decide to DELETE the branch.
Create New Branch
- Use the project that was uploaded to the GitHub repository that we created in the previous topic (SimpleToastApp).
- From the main menu, select VCS > Git > Branches… and in the Git Branches dialog box that appears, select New Branch.
- In the Create New Branch dialog box that appears, give the branch a name (Version2) and then click the OK button.
NOTE: From now on, Git will LISTEN for any changes made to this app AND will include the changes in this new branch. Notice that it has been added to the Version Control panel:

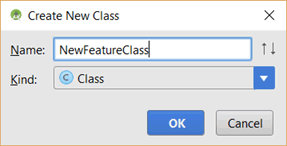
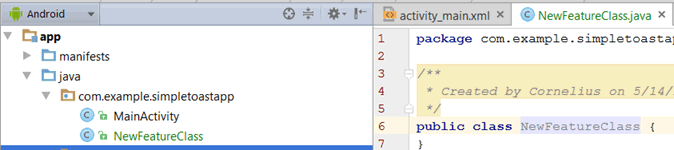
- Add new code to the new branch (e.g., add a new Java class). Right-click on the base package (e.g., com.example.simpletoastapp) and choose New > Java Class and in the Create New Class dialog box that appears, give the class a name (e.g., NewFeatureClass) and then click the OK button.
NOTE: Notice that the Class name is highlighted in green in the tab and in the Android scope panel.
- Delete the comment and then add a no argument constructor using one of the following method:
- Right-click between the NewFeatureClass Class and select Constructor from the menu
- Press ALT+INSERT and then select Constructor from the menu
- Select Code > Generate… from the main menu and then select Constructor from the menu
package com.example.simpletoastapp;
public class NewFeatureClass {
public NewFeatureClass() {
// Code will go here…
}
}
Add Changes To Git
- In the Add File to Git dialog box that appears, you are prompted to add the Java class to the Git. Click the Yes button.
NOTE: If you were to click No, you could add the class later either by right-clicking on the class itself and choosing Git > Add or right-clicking on the app module and choosing Git > Add to include any file(s) since the LAST COMMIT.

NOTE: Notice the line that was added to the Version Control panel.

Push Commit to GitHub
- Click the Commit Changes icon ( ) in either the toolbar OR in the Version Control panel to commit changes to the entire project.
CAUTION: If you right-click on the app module and select Git > Commit Directory, you will only commit changes to the current module directory and sub-directories and not the entire project.
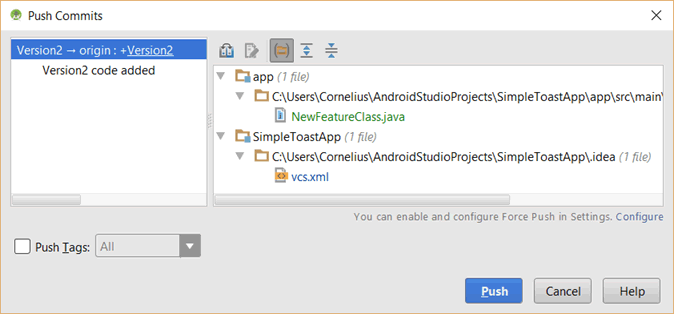
- In the Commit Changes dialog box that appears select all the files that you want to commit and then add a commit message (e.g., Version2 code added).
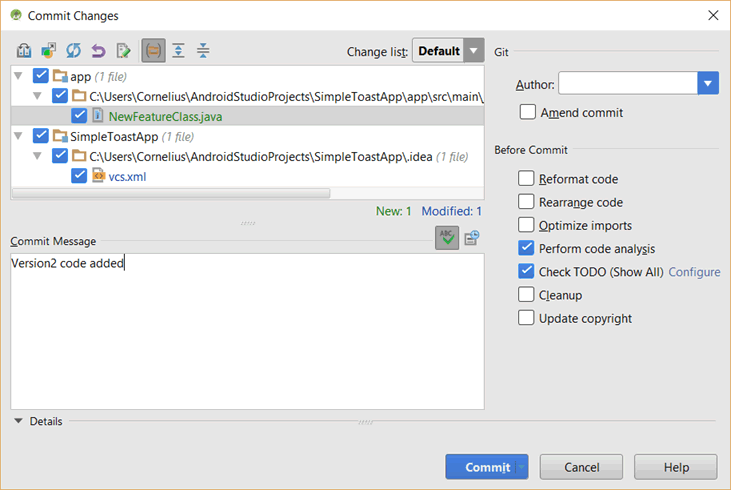
- Move the cursor over the Commit button, and choose Commit and Push from the menu
- In the Code Analysis dialog box that appears, click the Commit button.
- In the Push Commits dialog box that appears, click the Push button to save changes to the GitHub remote repository.
- CHECK POINT: You should see a message at the bottom of the screen that the Push was successful.
Review Commitment on GitHub
- Sign into GitHub.com and click on the project (e.g., SimpleToastApp).
- CHECK POINT: You should see a message indicating that the new branch was added. However, it does not appear in the branch list drop down menu. Refresh the page and click the Branch icon again to see it (e.g., Version2). Also, notice it is listed in the URL (e.g., …SimpleToastApp/Version2). You can drill down to see the Java file that you pushed.
- CHECK POINT: Return to the GitHub root by clicking on the Project name and you will see that you can switch back and forth between the master and the new branch.
Review Local and Remote Branches
- Return back in Android Studio and select VCS > Git > Branches from the main menu and you will see that there are local and remote branches.

- CHECK POINT: Click on the local branch master and then choose Checkout from the menu. You should see that the new Java class disappears from the file structure in the Android scope panel because it was NOT included in the original master branch.
NOTE: If you see that the Version Control tab has disappeared and if you choose VCS > Git menu might have disappeared also, then go to the Preferences or Settings dialog, click on Version Control and look for this directory listed as an unregistered directory, click on it and then click the plus button at the bottom or on the right to re-add it. Then, click the OK button.
Merge Branches
You can MERGE changes from the new branch into the original master branch instead of keeping them separate.
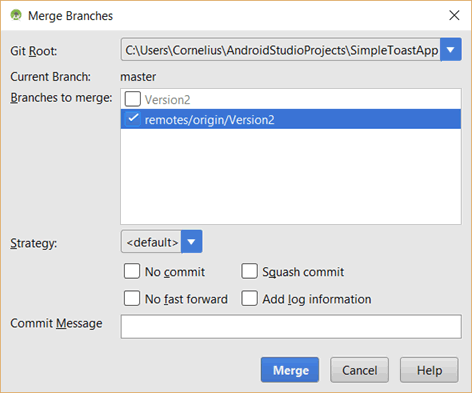
- From the main menu, select VCS > Git Merge Changes and in the Merge Branches dialog box that appears, check the new local branch and then click the Merge button to merge both files.
- CHECK POINT: In the Android scope file structure, you should see that the new class in included in the master branch. If you return to GitHub and drill down to the Java class again, you may not see the file listed there. To ensure that changes are made,
- Open the class and add a blank line to force an update
- Click on the app module and the select VCS > Git > Commit Directory…
- In the Commit Changes dialog box that appears change the commit message to "Update Java class."
- Move the cursor over the Commit button and choose Commit and Push from the menu
- In the Push Commits dialog box that appears click the Push button.
- Go back to GitHub and you should now see the new class MERGE with the master branch.
Delete Branch
Once you are finished with a branch, you can delete it.
- From the main menu, select VCS > Git > Branches.
- In the Git Branches dialog box that appears, click on the local branch and select Delete and then repeat for the remote branch.
- In the Delete Remote Branch dialog box that appears, click the Delete button.
- We
- CHECK POINT: Go to GitHub and at the root URL if you open the branch list you should see that the new branch has been deleted.