Android Tips, Techniques and Theory
PART 2: Creating Content with Java with Android Studio (Programming required)
With Simple Recipes
VITAL FEW TIPS
Using Android Studio Samples
Google Samples are useful in learning some of the Android basic concepts.
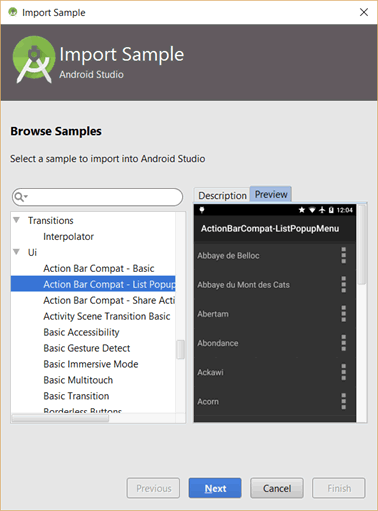
- From the Welcome to Android Studio screen, In the Quick Start section, select Import an Android code sample.
- In the Import Sample dialog box that appears, either scroll and select a sample from the list or type a topic of interest in the search field.
NOTE: The UI section is a great category to start with.
- You can either:
- download and import the app directly from the list by clicking on the Next button
- click on the Browser source in Github link to go to the Github website
Using Existing Activity
Instead of creating a new activity from scratch, you can use an existing activity:
- copy an existing activity (e.g., context_main.xml)
- paste it in the layout folder and give it a different name (mynewlayout.xml)
- modify or add components as needed
- If you want the new activity to launch when the app load:
- Go to the manifest file and change the include statement to read the new activity
(e.g., include layout=“content_main” to include “mynewlayout.xml”)
NOTE: Don’t include the .xml because you are referring to the resource file with is an xml file.
- CHECK POINT: Run the app and you should see the new layout file when the app loads at runtime.
NOTE: Hence, you can have more than one layouts in your app and decide at runtime which one get launch either by changing the setContentView (e.g., setContentView(R.layout.activity_main;) or by including a different child layout (e.g., <include layout/mynewlayout”/> in the xml file (e.g., activity_main.xml). This is akin to copying an HTML page and saving it with a different name.
Android SDK Reference
The online Android SDK Reference contained information about the Android API and is located at http://developer.android.com/reference/packages.html/. It will show all of the packages and their classes, methods and events. One of the most used packages is android.widget which contains all of the components that you will use.
EXAMPLE:
- Click on a package name (e.g. android.widget).
- Scroll down in the bottom panel and review the interfaces and classes that is part of this package.
- Click on one of the classes (e.g., TextView) or interfaces for detail documentation.
You can also use the Chrome SDK Extension to search the online SDK Reference without having to go to the site:
- With the Chrome SDK Extension install, open Chrome and create a new tab and then type ad+Tab.
- Then type a search word (e.g., Button), make a selection from the list and then press the Enter key.
You can also use an offline copy of the Android SDK Reference if you installed it using Android Studio SDK Manager. If you have not downloaded it already, select it from the list and click the Install button. Now, simply navigate to the docs folder where the Android SDK Reference is installed and click on the index.html link to open it. (e.g., dev-tools/adt-bundled/sdk/doc/index.html).
Refactor Code
You can rename variables, methods, class and more by right-clicking on one of these items and then selecting Refactor > Rename or pressing CTRL+ALT+R (PC) or CMD+ALT+R (Mac). Android Studio will determine if an item is a reference to other identically named items and then rename all INSTANCES of them even in comments. How cool is that!!!
CAUTION: If you are renaming a top-level class, the filename will have to be changed as well.
Programming Construct Stub
Add programming code block stub for all programming constructs by typing a key phrase and then pressing the Enter key. For example, if you type fori and press the Enter key, you will get the following code block stub:
for (int i = 0; i < ; i++) {

  }
asdfasfIf you type Toast and then select Toast from the list, you will get:Toast.makeText(myCustomClass.this, "", Toast.LENGTH_SHORT).show();
Format Code
To format a portion of code so that it can be easier to read, select it first and then press CTRL+ALT+L (PC) and CMD+ALT+L (Mac). To format the entire file, don’t select anything. You may need to select more code again (e.g., a complete method) to get the indention and braces to match.
Reorganize Code
You can also reorganize code (class, method, or variable) by first ensuring the outline mode is on and then click and drag that item in the outline view to where you want to move it. For example, if you have a method that is only called from a certain class but available to all, drag it into that class.???????
Extract Local Variable Or Method
See page 419-420 or look for examples on web.
See examples at JetBrians: https://www.jetbrains.com/idea/help/extract-variable.html#d1751486e170/
If you forget to create an instance variable in your class, you can “convert” a local variable into an instance variable (field) by pressing CTRL+ALT+F (PC) or CMD+ALT+F(Mac)
private TextView myTextView;
@Override
protected void onCreate(Bundle saveInstanceState) {
super.onCreate(saveInstanceState) ;
setContentView(R.layout.activity_main);
TextView myTextView = new TextView();
Fix Built Errors
There are several things you can do if you have built errors.
- Check to ensure there is no errors in your code.
- Press F5 to refresh project.
- Select Project > Clean to remove temporary files and rebuild project.
- Delete the R.java file. If the Compile Automatically is enabled, the file will be immediately recreated. Otherwise, you will need to compile the project again.
Vital Few Shortcuts
- CTRL+SHIFT+ENTER (Ctrl + ;)—Complete conditional statement or add a semicolon to the end of the current statement.
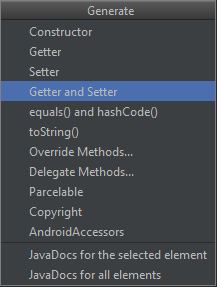
- ALT + INSERT—Generates getters and setters from private fields.
- Ctrl+B—Scroll to the point in the class where that variable was declared if it is called on an instance variable. Open class in an editor if it is called on a class
- CTRL+SHIFT+SPACE—Cast a variable automatically to a particular type (useful when using findViewById(). It can also cast a View to whatever class the variable is.
- ALT+F7—Show all instances of query in project including import statements, variables and even classes that extend the query (if it was a class).
- CTRL+ALT+C—Extract Constant
- CTRL+ALT+F—Extract Field
- CTRL+ALT+M—Extract Method
- CTRL+P —Show parameters for a selected method and if the method is overloaded display a list of the possible parameters.
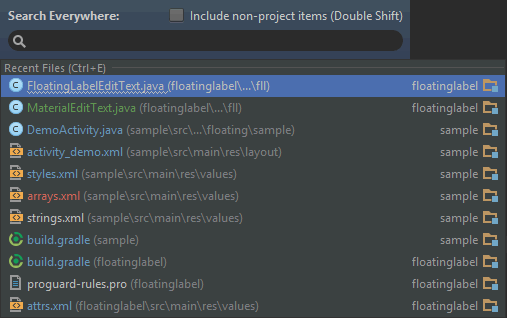
- SHIFT+SHIFT—Search Everywhere in project and show results. Search can include classes, files, methods, etc.
- SHIFT+F6—update all occurrences of what is being renamed in real time. (e.g., classes, files, methods, variables, etc.)

- CTRL+SHIFT+/—Surround highlighted text with block comments (e.g., /* and */).

Content And View
The Context is an abstract class that allows you via activities to access:
- the current app resources
- other app’s components by sending messages
- the app’s environmental info (e.g., private file and assets folder, Android system services)
There are many methods of the Context class. Below are a few of some of the most common methods that are used:
- deleteFile(String name)—delete the given private file associated with this Context’s app package.
- fileList()—return an array of strings naming the private files associated with this Context’s app package.
- getAssets()—return an AssetManager instance for your app’s package. This is used to retrieve an image resource, etc.
- getPackageName()—returns the name of this app’s package
- getResources()—return a Resource instance for your app’s package. This is used to get resources for strings, drawables, xml files, animations, etc.
- getString(int String)—returns a localized string from the app’s package.
- getString(int resid, Object… formatArgs)—return a localized FORMATTED string from the app’s package and substitute format arguments.
- startActivity(intent[ ] intents, Bundle options)—launch a new activity with no options.
- startActivity(intent Intent)—launch a new activity with no options.
The View Class ALWAYS used the Content class as a parameter: The View class has three public constructors:
- View (Content content)—simple constructor to use when creating a view from code.
- View (Content content, AttributeSet attrs)— constructor that is called when inflating a view from XML.
- View (Content content, AttributeSet attrs, int defStyle)—constructor to use when inflating and XML file and applying a class-specific base style.
Instant Run
As of Android Studio 2, a new feature that is turned on by default called Instant Run has been added that works with versions back to Android 4 (Ice Cream Sandwich) that can be a great time-saver. In previous versions, any time any changes were made to an app (e.g., Java, Resources or Configuration file); the app had to be rebuilt and re-launched. With Instant Run, CERTAIN CHANGES could be made on a running app without having to re-launch or restart the app. Go to the Preferences (Mac) or Settings (Windows) window and select Build > Execution > Deployment > Instant Run and you will see the four options that are enabled for Instant Run. The first option allows you to hot-sway code and resource changes on deployment. To see how it worked in previous versions, uncheck Restart activity on code changes, click the OK button and then run your app again.
Regardless of the Android version, Instant Run only works on debug builds and not on release builds because additional components has to be added to the debug version of the app before it is launched to enable Android Studio to communicate with the app at runtime. To check the type of build you are currently using, go to the Build Variants Window.
Java code gets INSERTED into a running app without having to restart the current activity. There are three states that you need to be aware of:
- Hot Swap: If you make a change to the Java code but DO NOT change any method names, modify resources or configuration files, the app can be updated without closing the current activity—This is Instant Run.
- Warm Swap: If you add, remove, or rename any of the app's resources, the current activity will need to be restarted but you shouldn’t have to reinstall the complete app.
- Cold Swap: If you change any Java class names, method names, add fields or do anything that will changes the basic structure of the Java code, the app will need to be re-launched—This is what happened in older versions.
Java For Android
The Android SDK supports a sub-set of Java 6-8 constructs and packages (e.g., java.lang, java.text, java.util). However, it also has its own set of Android Studio packages that begin with the prefix android:
- android.app
- android.widget
- android.database
- android.graphics
- android.net
- android.hardware
NOTE: Review the reference document (https://developer.android.com/reference) to find out what Java features works or don’t work with Android Studio.
Android build process uses
- Java source code (*.java) and Java library code (*.class) that are compiled using javac into Java bytecode (*.class) using the Java SDK on your computer.
- (Optional) In older versions of Android Studio the Java bytecode could be minimized and obfuscated using ProGuard.
- The Java bytecode is then converted to DEX bytecode (*.dex) that can be used by Android Studio using the Dalvik or the new ART (Android RunTime) virtual machine (VM). Dex bytecode is distributed in an app’s package that is then converted to machine code on adevice. The Virtual Machine compiles code differently:
- Dalvik (Android 4.4 and below) uses Just-in-time (JIT) compiling
- ARM (Android 5 and above) uses Ahead-of-time (AOT) compiling
Add Components With Java
While it is easier to add components to a layout using an XML file, you can also add components to a layout using Java. Remember, each component in an XML file represents an instance of an object from a Java class (blueprint).
- Create a new project using a Blank template and save it as AddingComponentsWithJava.
- Change the root element RelativeLayout to a LinearLayout.
NOTE: As you change the name of the opening element, the closing elements gets updated at the same time. How cool is that!
- Add an orientation attribute within the LinearLayout element and set its value to vertical.
NOTE: This will allow us to add components that will stacked vertically.
- Add an id attribute within the LinearLayout element:
android:id=”@+id/custom_layout”
NOTES:
- As with everything you do with OOP, you have to give an object an id name in before you can talk to it. As with any object, you have to get a reference to it to communicate with it; a layout container is no exception.
- The plus sign (+) means that you are ADDING a new ID.
- When you add an id to a layout, Android Studio will AUTOMATICALLY generate a reference in the background to it in the R.java file with a unique numeric value. To see this file and to find its id value:
- press the SHIFT key twice
- type R.java in the Search Everyhwere dialog box and then select the one for your project to open it
- (Optional) Switch to the Project scope window and then click on the Scroll From Source icon to see the path where the file exist.
- In the Search text field enter custom_layout to find the id value in the R.java file (e.g., public static final int custom_layout 0x4f0c00a).
- Go the the MainActivity.java file, before the closing tag of the onCreate() method add the following code:
LinearLayout layout = (LinearLayout) findViewById(R.id.custom_layout);
// Since each object extends from the View class, layout parameters (e.g., height, width) will be added to them
ViewGroup.LayoutParams params = new ViewGroup.LayoutParams();
- Assign the wrap_content constant as arguments for the height and width of the LayoutParams method:
ViewGroup.LayoutParams params = new ViewGroup.LayoutParams(
ViewGroup.LayoutParams.WRAP_CONTENT,
ViewGroup.LayoutParams.WRAP_CONTENT);
- Below the previous code, create an instance of the EditText and Button class:
EditText edittext = new EditText(this);
Button button = new Button(this);
NOTE: The constructor method requires a context. Since you are within the current activity, you can pass it the keyword this that refers to the fact that the button is created in the context of THIS activity.
- Below the EditText declaration code, add the editView to the layout container:
EditText editview = new EditText(this);
layout.addView(editview);
- Below the Button declaration code:
- add a button label
- set its text value
- add the layout parameters to the button
- add button to layout container
button.setText(“Login”);
button.setLayoutParams(params);
layout.addView(button);
- CHECK POINT: Run the app in an emulator. You should see the input text field and the button were “programmatically” added to the layout.
NOTE: Notice that the two components are added AFTER the EXISTING TextView (e.g., “Hello, World”) that was defined in the XML layout. Hence, compontent(s) in the XML layout is executed FIRST and then any component(s) in the onCreate() method in the Java class is executed afterward.
SEE ANDROID APP: AddingComponentsWithJava
Id With Java
The id in the XML file is used to get a HANDLE (or reference) to the component in the *.java file by attaching it to a local variable or a property. Another way to express an id is that it is used to BIND (initialize) a component to a local variable or property in the *.java file as part of the MVC design pattern.
EXAMPLE: How To Use ID with Java
While IDs are written in XML files, they are referenced in Java files programmatically once the XML files are compiled.
EXAMPLE:
TextView myText = (TextView) findViewById(R.id.myTextView)
Will return a generic View of a component that has an id of myTextView that is then CASTED in the correct View type (in this case, a TextView) denoted by (TextView) on the right side of the equal sign.