Employee Directory App
Using jQuery Mobile and PhoneGap Build
OBJECTIVE: Learn how to create an Employee Directory App and then add Local Storage so that the data will persist once the app is closed.
Content At A Glance
Resources:
- Employee Directory w/o Local Storage DEMO
- Employee Directory w/o Local Storage RESOURCE FILES
- Employee Directory with Local Storage
- How to Build a jQuery Mobile Application v1.1
Introduction
NOTE: You don't have to understand all of the concepts to complete this tutorial. You can complete it by:
- Copy the HTML and CSS in red and paste them in the CORRECT place
- Comment or delete code as needed
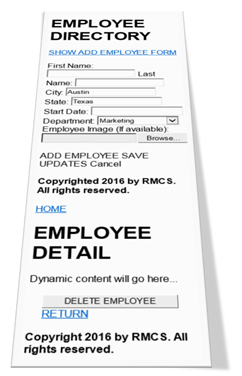
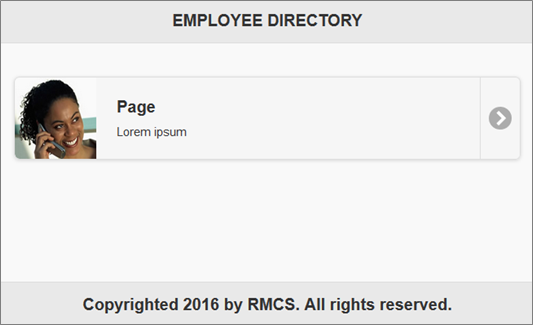
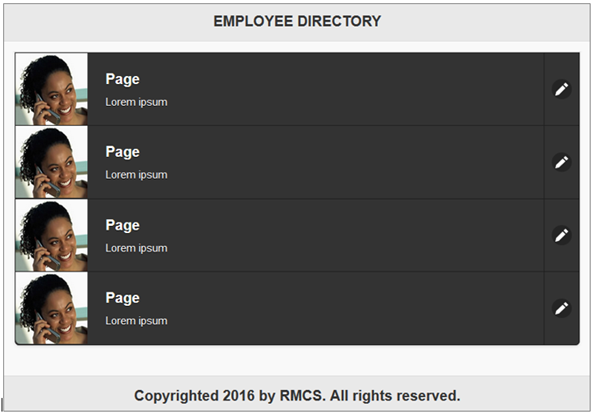
In the tutorial, we will create a mock-up of an Employee Directory using the jQuery Mobile Framework. If you look at the finished app WITHOUT jQuery enabled, you will see something like this:
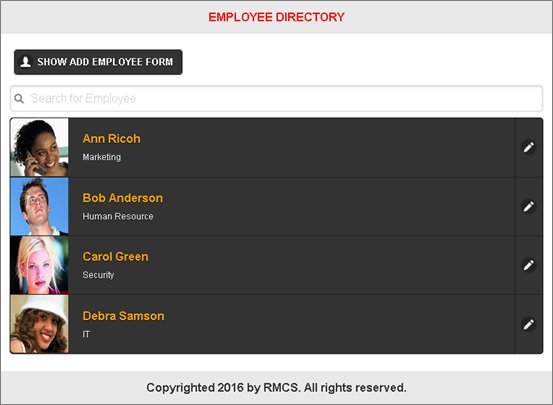
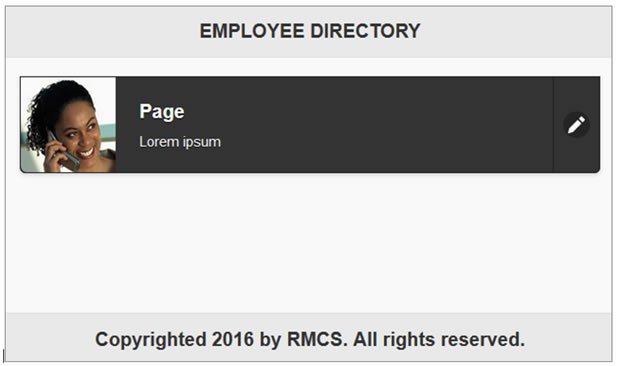
However, once we inject some of the jQuery Mobile Goodness, the SAME app looks like this:
Add jQuery Framework
Before we get started creating the Employee Directory app, we need to implement a jQuery framework. There are two ways to do this:
- Download a LOCAL copy
- Connect to a REMOTE version (CDN)
For simplicity sake, we will use a remote version. However, you could implement a local version if you wish.
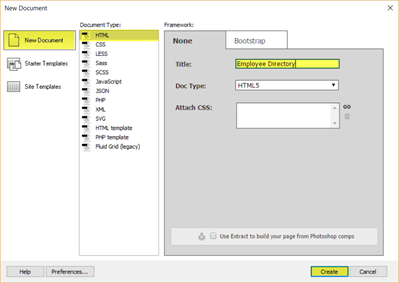
- In Dreamweaver, select File > New… (or CTRL+N) and select New Document and HTML as the Document Type, type Employee Directory as the Title and then click the Create button to create a skeleton HTML page.
- Add the following highlighted code to the HTML markup to add a lang attribute and a meta element that is useful for accessibility and for mobile apps:
<!doctype html>
<html lang="en">
<head>
<meta charset="utf-8">


<meta name="viewport" content="width=device-width, initial-scale=1">
title>Employee Directory</title>
</head>
<body>
</body>
</html>
HTML MARKUP EXPLANATION:
- The lang attribute is used to set the primary language for the app.
- The meta element’s name attribute is used to set a viewport
- The meta elements’ content attribute is used to set the width to the width of the device that the app is installed on. This is particularly used for smart phones and tablets. - Go to jQueryMobile.com and download the latest CDN version the jQuery Mobile framework and add it to the HTML page AFTER the <title> element (See highlighted markup):
<title>Employee Directory</title>


<link rel="stylesheet" href="http://code.jquery.com/mobile/1.4.5/jquery.mobile-1.4.5.min.css"  />

<script src="http://code.jquery.com/jquery-1.11.1.min.js"></script>

<script src="http://code.jquery.com/mobile/1.4.5/jquery.mobile-1.4.5.min.js"></script>
NOTE: Version level (e.g., 1.4.5) may be different from what is shown.
Create jQuery Page Template
Now that we have the jQuery framework implemented, let’s create a jQuery page to use for our app.
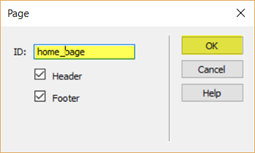
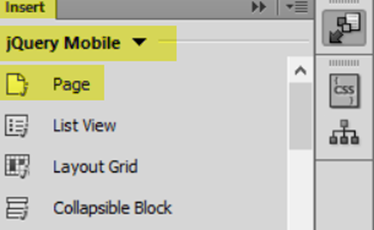
- In the Code View, create a blank line between the opening and closing <body> element. Then, from the Insert panel with the jQuery Mobile option selected, drag-and-drop the Page icon to the blank line.

- In the Page dialog box that appears, modify the ID text field to read home_page, accept the two default options for Header and Footer and then click the OK button.
- Add or modify the following highlighted text and attributes to the HTML markup:
<div data-role="page" id="home_page" data-theme="a">
<div data-role="header" data-position="fixed">
<h1>EMPLOYEE DIRECTORY</h1>
</div>
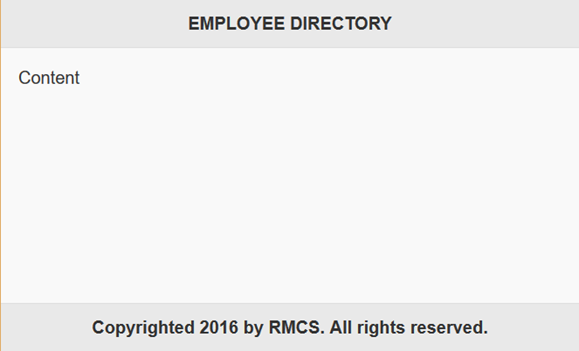
<div data-role="content">Content</div>
<div data-role="footer" data-position="fixed">
<h4>Copyrighted 2016 by RMCS. All rights reserved.</h4>
</div>
</div>
HTML MARKUP EXPLANATION:
- The data-position= “fixed” attributes will LOCK the header and footer to the top and bottom of the screen, respectively.
- The data-theme attribute is used to set a theme for the element it is applied to. - CHECK POINT: Save the file as index.html and then open the app in a browser. You should see the header, content and footer areas of the app displayed.
- Delete the word Content in the <div data-role="content"></div> element below and then create a blank line.
<div data-role="content">

</div>
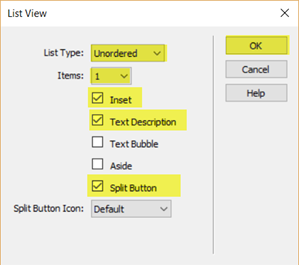
- From the Insert panel with the jQuery Mobile option selected, drag-and-drop the ListView icon to the blank line in the <div> tag, select the following highlighted options and then press the OK button to create a ListView in the <div> tag.
- Format the <ul> tag so that you can see the structure better:
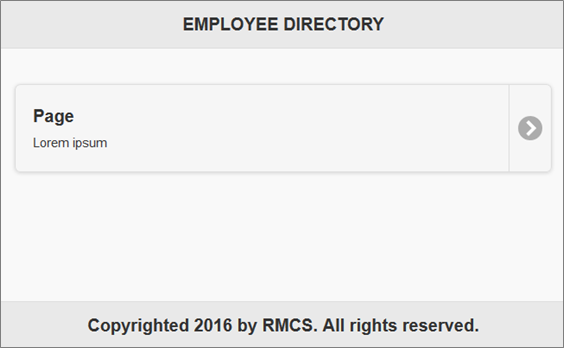
<div data-role="content">
<ul data-role="listview" data-inset="true">
<li>
<a href="#"><h3>Page</h3><p>Lorem ipsum</p></a>
<a href="#">Default</a>
</li>
</ul>
</div>
HTML MARKUP EXPLANATION:
- The data-role=”listview” attribute tells the <ul> element to take a “role” of a ListView.
- The data-inset=”true” attribute causes the ListView to be indented from both sides instead of expanding the complete width of the device. (See screen shot below)
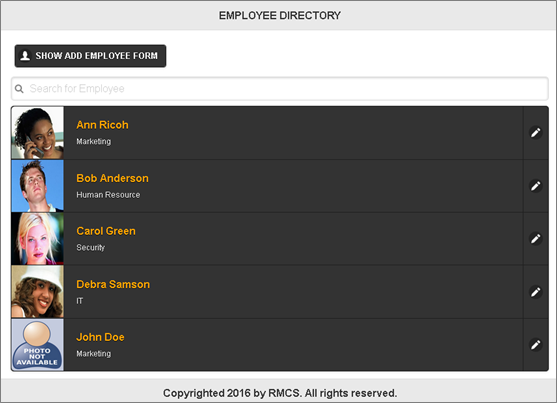
- Notice that within the <li> element there are two <a> elements. Also, note that in the FIRST <a> element there is a <h3> element and a <p> element. The first <a> element will create the long clickable area of the ListView and the second <a> element will create a small split button clickable area. - CHECK POINT: Save the file and open the app in a browser. You should see the DEFAULT ListView displayed. Notice how by simply adding the date-role=”listview” causes the <ul> element to have a unique ListView style complete with a split button and icon on the right.
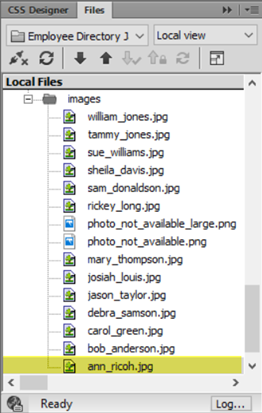
- Insert the cursor BEFORE the opening <h3> element and then in the Files panel’s image folder, drag-and-drop ann_ricoh.jpg to create the following highlighted markup:
ALTERNATIVE: You may have to select Insert > Image from the menu to insert the picture.
<ul data-role="listview" data-inset="true">
<li>
   <a href="#"><img src="images/ann_ricoh.jpg" width="307" height="240" alt=""/><h3>Page</h3><p>Lorem ipsum</p></a>
   <a href="#">Default</a>
</li>
</ul>
NOTE: Notice the image is large; however, when you view it in the browser, jQuery Mobile will SCALE it to work with the ListView. - CHECK POINT: Save the file and open the app in a browser. You should see a smaller version of the same image displayed in the ListView:
- Add or modify the following highlighted markup in the <ul> element:
<ul id="myList" data-split-icon="edit" data-split-theme="b" data-theme="b" data-role="listview" data-inset="true">
<li>
<a href="#"><img src="images/ann_ricoh.jpg" width="307" height="240" alt=""/><h3>Page</h3><p>Lorem ipsum</p></a>
<a href="#">Default</a>
</li>
</ul>
HTML MARKUP EXPLANATION:
- An id attribute is added so that the ListView can be reference programmatically later.
- The data-split-icon attribute is used to set the split button icon to a pencil icon (edit).
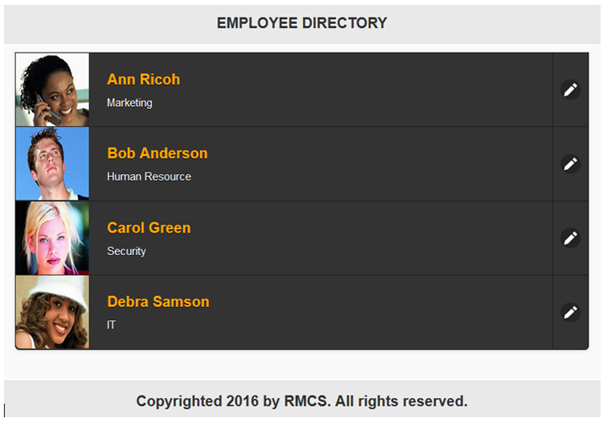
- The two attributes with the word “-theme” are used to style parts of the ListView (e.g., split buttons and ListView items). - CHECK POINT: Save the file and open the app in a browser. You should see a new style for the ListView. Also, note the edit icon has been added. If you hover over it you will see the default tool-tip: Default.
Create Data
Now that we have implemented the jQueryMobile framework AND create a jQuery page, it’s time to implement the data we need for our Employee Directory app. We will do this by creating an array of [employee] objects.
- Write a pair of <script></script> tags BELOW the LAST <script> element:
<script src="http://code.jquery.com/mobile/1.4.5/jquery.mobile-1.4.5.min.js"></script>
<script>

</script>
- Create an array of [employee] objects INSIDE of the pair of <script> tag and then add an alert() method:
<script>
// CREATE AN  ARRAY OF EMPLOYEE OBJECTS -------------------------------------
var Employees = [
{firstName:"Ann", lastName:"Ricoh", department:"Marketing", city:"Austin", state:"Texas", startDate:"1/12/16", image:"ann_ricoh.jpg"},
{firstName:"Bob", lastName:"Anderson", department:"Human Resource", city:"Round Rock", state:"Texas", startDate:"2/13/16", image:"bob_anderson.jpg"},
{firstName:"Carol", lastName:"Green", department:"Security",  city:"Pflugerville", state:"Texas", startDate:"3/14/16", image:"carol_green.jpg"},
{firstName:"Debra", lastName:"Samson", department:"IT", city:"Cedar Park",  state:"Texas", startDate:"4/15/16", image:"debra_samson.jpg"}
];

alert(Employees);
</script>
- CHECK POINT: Save the file and open the app in a browser. You should see an alert dialog box with the following message: [object Object],[object Object],[object Object],[object Object]. The reason you see the [object Object] series being displayed is because we have not DRILLED DOWN further enough into the objects to get to their properties. Press the OK button to dismiss this dialog box and then the browser.
- Modify the alert statement to read:
alert("First name of first employee: " + Employees[0].firstName);
- CHECK POINT: Save the file and then open the app in a browser. You should see the alert dialog box displays a message of "First name of first employee: Ann. from the list of objects returned. Press the OK button to dismiss the dialog box and then close the browser.
- Comment out the alert statement and add the following additional highlighted variable and alert statement:
// alert("First name of first employee: " + Employees[0].firstName);
var numberOfEmployees = Employees.length;
alert("Total Number of Employees is: " + numberOfEmployees);
- CHECK POINT: Save the file and then open the app in a browser. You should see the alert dialog box displays a message of "Total Number of Employees is: 4. Press the OK button to dismiss the dialog box and then close the browser.
Create Master Page
Now that we have created the data for our Employee Directory app and tested it to see if it is formatted and working correctly, let’s create a jQuery wrapper and then LOOP AROUND the array that we created earlier to generate a ListView to display the employees.
- Comment out the alert statement and then write the following highlighted “$(document).ready(function(e){ });” jQuery wrapper for MOST of the CODE that will be used in our app. The comment (e.g., // END OF DOCUMENT.READY() FUNCTIONALITY) is optional but highly recommended as it show where the jQuery wrapper ends.
// alert("Total Number of Employees is: " + numberOfEmployees);
$(document).ready(function(e) {

}); // END OF DOCUMENT.READY() FUNCTIONALITY
</script>
CAUTION: Throughout this tutorial, be careful NOT to place any code OUTSIDE of the closing $(document).ready() method ending symbols and comment (e.g., }); // END OF DOCUMENT.READY() FUNCTIONALITY) except the data code. In essence, all code will go inside of this jQuery wrapper except the data. - Inside the jQuery wrapper, write of the following highlighted code to iterate through the array of objects to get some of their properties and display them in a series of alert dialog boxes:
$(document).ready(function(e) {
// CREATE A  GENERIC FUNCTION THAT WILL CREATE AND  REFRESH THE LISVIEW -----------------
for(i = 0; i < numberOfEmployees; i++)
{
   alert(Employees[i].firstName + "  " + Employees[i].lastName + ": " + Employees[i].department);
}
}); // END OF DOCUMENT.READY() FUNCTIONALITY
</script>
NOTE: The comment states that a generic function is being created. That will be done shortly.
- CHECK POINT: Save the file and open the app in a browser. You should see an alert dialog box with data from the first object: Ann Ricoh: Marketing. Click the OK button four times to see all of the employees each displayed in a separate alert dialog box and then close the browser.
- WRAP the “for” loop in a function so that the code can be used multiple times within other functions and write the new function ABOVE this code to INVOKE this new function immediately:
$(document).ready(function(e) {
// CREATE A  GENERIC FUNCTION THAT WILL CREATE AND  REFRESH THE LISVIEW -----------------
createListView();

function createListView()
{
  for(i=0;i<numberOfEmployees;i++)
  {
    alert(Employees[i].firstName + " " +  Employees[i].lastName + ": " + Employees[i].department);
  }
}
- CHECK POINT: Save the file and open the app in a browser. You should see the EXACT same thing as the previous check point. However, this time the code is “wrapped” in a function and invoke my a function call.
- Inside the “for” loop, comment out the first alert statement and then add the following three highlighted variables and alert statement:
// alert(Employees[i].firstName + " " + Employees[i].lastName + ": " + Employees[i].department);
var fullName =  Employees[i].firstName + " " + Employees[i].lastName;
var imageDirAndName = "images/" + Employees[i].image;
var department = Employees[i].department;

alert (imageDirAndName);
- CHECK POINT: Save the file and open the app in a browser. You should see an alert dialog box that displays the complete path to the first image file (e.g., image/ann_ricoh.jpg) based on the concatenation from the imageDirAndName variable. Click the OK button four times to see the other image paths. These image paths will be used later to retrieve the image for each ListView item.
- Inside of the “for” loop, comment out the second alert statement and then add the following highlighted append() method with the empty double quotes (e.g., ( ““)).
var fullName = Employees[i].firstName + " " + Employees[i].lastName;
var imageDirAndName = "images/" + Employees[i].image;
var department = Employees[i].department;
// alert (imageDirAndName);

$("#myList").append("");
- CUT (NOT COPY) the <li> element from within the body of the page and PASTE it between the double quotes in the append(“”) method and then REPLACE ALL of the DOUBLE quotes EXCEPT for the FIRST and LAST ones with SINGLE quotes and REMOVE ALL CARRIAGE RETURNS so that ALL of the code in on ONE LINE.
IMPORTANT NOTE: It is important that you remove all carriage returns or the page will not render.

TIP: To simplify the process of the replacing the double quotes with single quotes, select the second quote in the <li> element and then press CTRL+F to open the Find and Replace dialog box. Then, click the Replace button until all but the last double quote is replaced. Then, click the OK button to close the Find and Replace dialog box.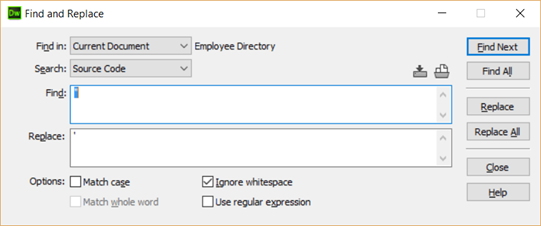
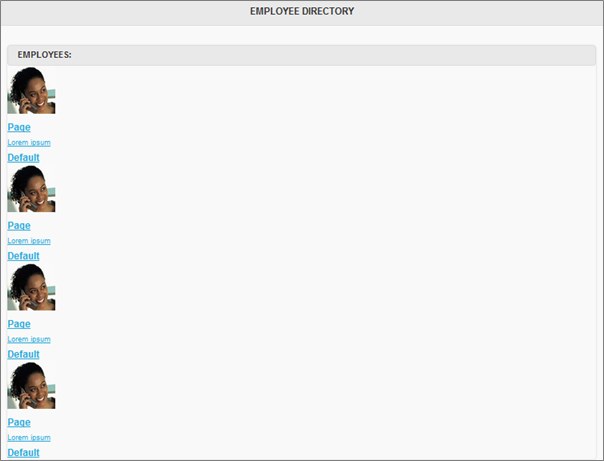
- CHECK POINT: Save the file and open the app in a browser. You should see that the STATIC content is repeated four times because that in the number of employees that are in the array. However, the ListView is not rendering correctly. This will be resolved in the next step.
- Add the following comment and highlighted code BELOW the append() method:
$("#myList").append("<li><a href='#'><img src='images/ann_ricoh.jpg' width='80' height='80' alt=''/><h3>Page</h3><p>Lorem ipsum</p></a><a href='#'>Default</a></li>");
}
// Once a ListView is manipulated, it has to  be REFRESHED to see the updated appearance.
$("#myList").listview("refresh");
- CHECK POINT: Save the file and open the app in a browser. You should see the ListView renders correctly this time; however, the STATIC content is repeated four times AGAIN. This will be resolved in the next step.
- Replace the STATIC content with DYNAMIC content by concatenating the string together within double quotes. Also, add:
- #employee_page as the href attribute’s value that will be used later when we create the EMPLOYEE DETAIL page
- the optional style attribute (e.g., style='color:orange')
NOTE: Notice the pattern for the replacement for each of the dynamic data: “+ variableName +” - CHECK POINT: Save the file and open the app in a browser. You should see the ListView POPULATED with DYNAMIC data from the array including the image, name and title.
ALTERNATIVE: Some developers prefer to use a series of “+=” to write the code similar to this to see the structure better:
var customListView = "<li><a href='#employee_page'>"
customListView += "<img src=" + imageDirAndName + " width='80' height='80' alt=''/>"
customListView += "<h3 style='color:orange'>" + fullName + "</h3>"
customListView += "<p>" + department + "</p></a>"
customListView += "<a id='edit' href='#'>Edit " + fullName + "</a></li>"
$("#myList").append(customListView);
NOTE: Comment out the other code as this is an alternative method.// $("#myList").append("<li><a href='#employee_page'><img src="
+ imageDirAndName + " width='307' height='240' alt=''/><h3 style='color:orange'>"
+ fullName + "</h3><p>" + department + "</p></a><a id='edit' href='#'>Edit " + fullName + "</a></li>");
$("#myList").append("<li><a href='#employee_page'><img src=" +  imageDirAndName
+" width='307' height='240' alt=''/><h3 style='color:orange'>" +  fullName + "</h3><p>"
+  department + "</p></a><a id='edit' href='#'>Edit " + fullName + "</a></li>");
Create Search Functionality
Now that we have a dynamic ListView to display, let’s add some simple code to SEARCH the ListView for the employee we want to view.
- In the body of the page, add the following three highlighted attributes to the <ul> element:
<ul id="myList" data-filter="true" data-filter-placeholder="Search for Employee" data-filter-theme="a"
data-role="listview" data-inset="true" data-split-icon="edit" data-split-theme="b" data-theme="b"  data-divider-theme="a">
</ul>
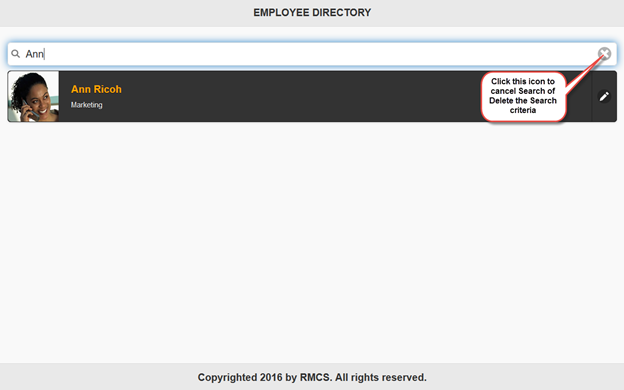
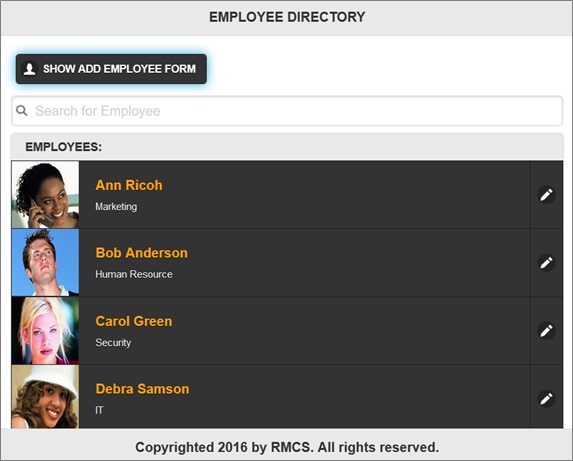
- CHECK POINT: Save the file and open the app in a browser. You should see a Search field above the ListView with a magnifying glass icon. If you type a search criteria (e.g., Ann) the ListView will change if a match is found. If you want to cancel the search, either delete the search word/phrase or click on the small “x” on the right of the Search field:
Create Detail Page
Now that we have created a Master Page with a Search function, it’s time to turn our attention on creating the Detail Page that will provide some additional DETAIL information when a selection is made.
- In the body of the page, create a blank line ABOVE the closing </body> element. Then, from the Insert panel with the jQuery Mobile option selected, drag-and-drop the Page icon to the blank line.
- In the Page dialog box that appears, modify the ID text field to read employee_page, accept the two default options for Header and Footer and then click the OK button.
- Add or modify the following highlighted attributes, etc. inside of the employee_page.
- Page
- Header
- Content
- Buttons
- Footer
NOTE: Blank lines were intentional added so that you can see the following structures better:</div>
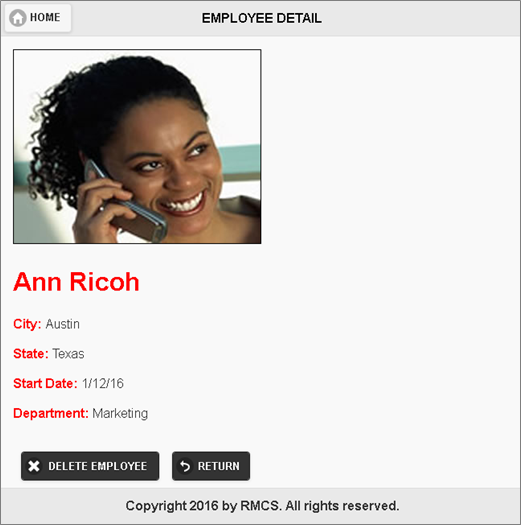
<div data-role="page" id="employee_page">
<div data-role="header">
<a data-icon="home" data-iconpos="left" href="#home_page">HOME</a>
<h1>EMPLOYEE DETAIL</h1>
</div>
<div id="container" data-role="content">
<p>Dynamic content will go here...</p>
</div>
<div style="margin-left:20px;">
<button id="delete_employee_btn" data-icon="delete" data-inline="true" data-mini="true" data-theme="b">DELETE EMPLOYEE</button>
<a id="cancel_delete_employee_btn" href="#home_page" data-role="button" data-icon="back" data-inline="true" data-mini="true" data-theme="b">RETURN</a>
</div>
<div data-role="footer" data-position="fixed">
<h4>Copyright 2016 by RMCS. All rights reserved.</h4>
</div>
</div>
</body>
</html>
- Add the following comment and highlighted code ABOVE the closing document.ready() method:
$("#myList").listview("refresh");
// VIEW SELECTED INDEX FROM LISTVIEW -------------------------------------------
$(document).on("click", "#myList li a", function() {
selectedIndex = $(this).closest("li").index();
alert("The selected index when the view button is clicked: " +  selectedIndex);
});

}); // END OF  DOCUMENT.READY() FUNCTIONALITY
IMPORTANT NOTE: Notice that the selectedIndex variable is not prefixed with the key word var. This is so that the selectedIndex variable can be made GLOBAL so that it can be used ANYWHERE in the app as needed:
- A variable declared using the var keyword INSIDE a function becomes LOCAL in scope and can ONLY be accessed WITHIN that function.
- A variable declared OUTSIDE of a function becomes GLOBAL in scope and ALL scripts and function can access it.
- A variable that has NOT been declared using the keyword var AUTOMATICALLY becomes a GLOBAL variable which is the case above.
- CHECK POINT: Save the file and open the app in a browser. You should see the alert dialog box displays the number 0. Click the OK button. Then, click the Home button and repeat three more times for the other ListView item. You should see all of the index numbers (e.g., 0, 1, 2, 3).
- Comment out the first alert and add the following highlighted variable and alert statement BELOW it but WITHIN the $(document).on() method:
// VIEW SELECTED INDEX FROM LISTVIEW  -------------------------------------------
$(document).on("click", "#myList li a", function() {
selectedIndex = $(this).closest("li").index();
// alert("The selected index when the view button is clicked: " + selectedIndex);
var currentImage  = "images/" + Employees[selectedIndex].image;
alert(currentImage);

}); // END OF DOCUMENT.READY() FUNCTIONALITY - CHECK POINT: Save the file and open the app in a browser. You should see the alert dialog box displays the first image page (e.g., images/ann_ricoh.jpg). Click the OK button. Then, click the Home button and repeat three more times for the other ListView item. You should see all of the image paths.
- Add the remainding variables BELOW the existing one and comment out the alert statement:
var currentImage = "images/" + Employees[selectedIndex].image;
var fullName = Employees[selectedIndex].firstName + " " + Employees[selectedIndex].lastName;
var city = Employees[selectedIndex].city;
var state = Employees[selectedIndex].state;
var startDate = Employees[selectedIndex].startDate;
var department = Employees[selectedIndex].department;

// alert(currentImage);
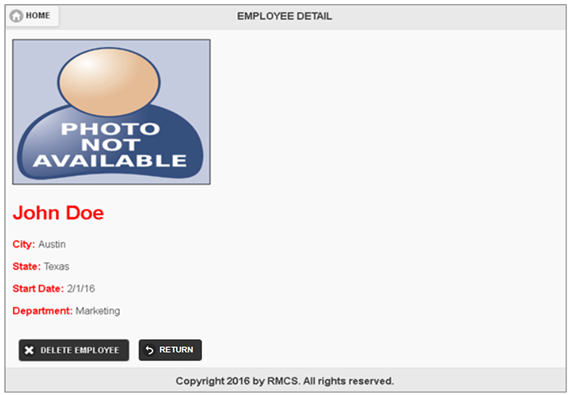
- Add the following highlighted comment and code to EMPTY the employee_page and then APPEND the data to the employee_page.
// alert(currentImage);

// The method replaceWith() did not work so we had to add the empty() and  append() methods
$("#employee_page div#container").empty();

$("#employee_page div#container").append("<img  style='border:1px solid black' src= '" + currentImage + "'  width='307' height='240' alt=''/>");
$("#employee_page div#container").append("<h1 style = 'color:red'>" + fullName + "</h1>");
$("#employee_page div#container").append("<p><strong  style = 'color:red'>City:</strong> " + city + "</p>");
$("#employee_page div#container").append("<p><strong  style = 'color:red'>State:</strong> " + state +  "</p>");
$("#employee_page div#container").append("<p><strong  style = 'color:red'>Start Date:</strong> " + startDate + "</p>");
$("#employee_page div#container").append("<p><strong  style = 'color:red'>Department:</strong> " + department + "</p>");

});

});// END OF VIEW SELECTED INDEX FROM LISTVIEW FUNCTIONALITY
- CHECK POINT: Save the file and open the app in a browser. Click on any one of the ListView item. You should be taken to the EMPLOYEE DETAIL where you should be able to see additional information about the selected ListView item. To Return the Master Page (e.g. home_page), either click on the HOME button or the RETURN button that has already been given the correct href to return to it.
Create Add Page
Now that we have created a Master and Detail page that we can view. Let’s add the functionality to add more employees to the Employee Directory. We will do this by first creating the STATIC content as usual and then writing the code to save the user input into the array and display it in the Master and Detail page.
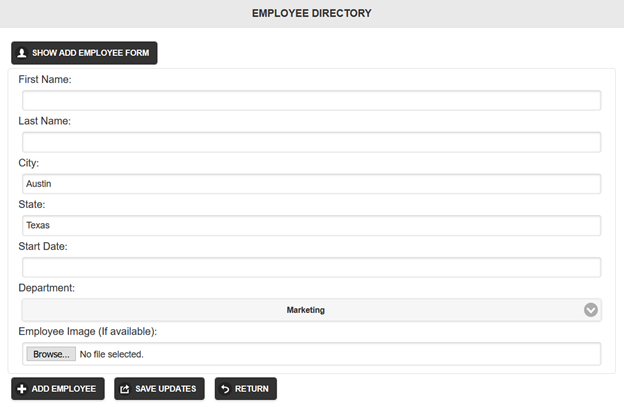
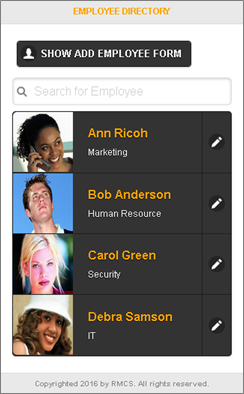
- Add the following STATIC highlighted form, buttons, etc. to the home_page inside of the <div id=”content”> div but BEFORE the opening <ul> element.
NOTE: Blanks lines were intentionally added so that you can see the element groups better.<div data-role=”content”> <a id="show_add_employee_form" href="#" data-role="button" data-icon="user" data-iconpos="left" data-mini="true" data-inline="true" data-theme="b">SHOW ADD EMPLOYEE FORM</a> <form id="add_employee_form" method="post" action="">
<div class="ui-body ui-body-a ui-corner-all"> <label for="firstNameID">First Name:</label>
<input id="firstNameID" value="" type="text" data-mini="true">
<label for="lastNameID">Last Name:</label>
<input id="lastNameID" value="" type="text" data-mini="true">
<label for="cityID">City:</label>
<input id="cityID" value="Austin" type="text" data-mini="true">
<label for="stateID">State:</label>
<input id="stateID" value="Texas" type="text" data-mini="true">
<label for="startDateID">Start Date:</label>
<input id="startDateID" value="" type="date" data-mini="true">
<label for="departmentID">Department:</label>
<select id="departmentID" data-mini="true">
<option value="Marketing">Marketing</option>
<option value="Engineering">Engineering</option>
<option value="IT">IT</option>
<option value="Human Resources">Human Resources</option>
<option value="Sales">Sales</option>
<option value="Customer Services">Customer Services</option> <option value="Admin">Admin</option>
</select>
<label id="imageID_Label" for="imageID">Employee Image (If available):</label>
<input id="imageID" type="file" value="" data-mini="true"/> </div>
</form> <a id="add_employee_btn" data-role="button" data-icon="plus" data-iconpos="left" data-inline="true" data-theme="b" data-mini="true">ADD EMPLOYEE</a>
<a id="edit_employee_btn" data-role="button" data-icon="action" data-iconpos="left" data-inline="true" data-theme="b" data-mini="true">SAVE UPDATES</a>
<a id="cancel_add_employee_btn" data-role="button" data-inline="true" data-theme="b" data-mini="true" data-icon="back" data-iconpos="left">RETURN</a> <ul id="myList" data-filter="true" data-filter-placeholder="Search for Employee" data-filter-theme="a" data-inset="true" data-role="listview" data-split-icon="edit" data-split-theme="b" data-theme="b">
- Also, add a data-theme=”a” to the <div data-role=”content> opening tag:
<div data-role="content" data-theme="a">
- CHECK POINT: Save the file and open the app in a browser. You should see the following elements in the screen shot below. You can still scroll to see the ListView.
- Add the following highlighted comment and code ABOVE the closing document.ready() method to HIDE all of the elements we just inserted except the SHOW ADD EMPLOYEE FORM button.
// alert(Employees[0].firstName);

// HIDE ADD  EMPLOYEE FORM, BUTTONS, ETC.  --------------------------------------
$("#add_employee_form").hide();
$("#add_employee_btn").hide();
$("#cancel_add_employee_btn").hide();
$("#edit_employee_btn").hide();

}); // END OF DOCUMENT.READY() FUNCTIONALITY
- CHECK POINT: Save the file and open the app in a browser. You should see ALL of the elements we created earlier are hidden when the page loads EXCEPT the SHOW ADD EMPLOYEE FORM button. You should also still see the ListView.
- Add the following highlighted comment and code ABOVE the closing document.ready() method
// HIDE ADD EMPLOYEE FORM, BUTTONS, ETC.  --------------------------------------
$("#add_employee_form").hide();
$("#add_employee_btn").hide();
$("#cancel_add_employee_btn").hide();
$("#edit_employee_btn").hide();
// ANIMATE ADD  EMPLOYEE FORM WHEN CLICKED  --------------------------------------
$("#show_add_employee_form").click(function()
{
$(this).hide();
$("#add_employee_form").slideDown(500);
$("#add_employee_btn").show();
$("#cancel_add_employee_btn").show();
});

}); // END OF DOCUMENT.READY() FUNCTIONALITY
- CHECK POINT: Save the file and open the app in a browser. If you click on the SHOW EMPLOYEE FORM button, you should see based on the code that was written that:
- The SHOW EMPLOYEE FORM button immediately disappears (e.g., $(this).hide();)
- The form animates downward (e.g., $("#add_employee_form").slideDown(500);)
- The ADD EMPLOYEE button appears (e.g., $("#add_employee_btn").show();)
- The RETURN button appears (e.g., $("#cancel_add_employee_btn").show();)
- Add the following highlighted comment and code BELOW the previously written code:
// ANIMATE ADD EMPLOYEE FORM WHEN CLICKED  --------------------------------------
$("#show_add_employee_form").click(function()
{
$(this).hide();
$("#add_employee_form").slideDown(500);
$("#add_employee_btn").show();
$("#cancel_add_employee_btn").show();
});
// CANCEL ADD EMPLOYEE BUTTON FUNCTIONALITY  ------------------------------------
$("#cancel_add_employee_btn").click(function(e){
closeForm();
});
function closeForm()
{
$("#add_employee_form").slideUp(500);
$("#show_add_employee_form").show();
$("#firstNameID").val("");
$("#lastNameID").val("");
$("#startDateID").val("");
$("#imageID").val("");
$("#add_employee_btn").hide();
$("#cancel_add_employee_btn").hide();
$("#edit_employee_btn").hide();
}
CODE EXPLANATION: Because we want to use this code again for the EDIT functionality, this code was a great candidate to make into a generic function that was created OUTSIDE of the event handler but INVOKED INSIDE of the event handler (e.g., closeForm). - CHECK POINT: Save the file and open the app in a browser. If you click on the SHOW EMPLOYEE FORM button to expand the form and then click on the RETURN button, you should see that the RETURN button REVERSE the functionality of the ADD EMPLOYEE FORM button. It also CLEARS out any data that may have been entered.
- Add the following highlighted comment and code BELOW the previously written code:
// ADD EMPLOYEE  BUTTON FUNCTIONALITY -----------------------------------------
$("#add_employee_btn").click(function(e){
numberOfEmployees++
var firstNameField = $("#firstNameID").val();
var lastNameField = $("#lastNameID").val();
var cityField = $("#cityID").val();
var stateField = $("#stateID").val();
var startDateField = $("#startDateID").val();
var departmentField = $("#departmentID").val();
var imageField = $("#imageID").val();

Employees.push({firstName:firstNameField, lastName:lastNameField, city:cityField, state:stateField, startDate:startDateField,  department:departmentField, image:imageField});alert("What is first name? " + Employees[0].firstName)
alert("Number of Employees: " + Employees.length);

})
CODE EXPLANATION:
- Notice the numberOfEmployee++ was added to compensate for adding a new element.
- The variables are used to STORE references of the values in the form fields (e.g., text, date, image).
- The push() method is used to ADD the values from the form fields as another element in the Employees array of objects. - CHECK POINT: Save the file and open the app in a browser. Click on the SHOW EMPLOYEE FORM button and then click on the ADD EMPLOYEE button. You should see the alert dialog box displays the message “Ann”. Click the OK button and you will see another alert dialog with the message “5” to indicate that an ADDITIONAL element has been added to the array of objects. This code was written just to check to see if the code block is working correctly and that it will retrieve the correct data.
- Comment out the two comments and then add the following highlighted comment and code BELOW it but INSIDE of the ADD EMPLOYEE code block:
// alert("What is first name? " + Employees[0].firstName);
// alert("Number of Employees: " + Employees.length);
$("#myList").empty(); // Clear ListView
createListView(); // Recreate ListView
closeForm(); // Close Form

});
- CHECK POINT: Save the file and open the app in a browser. Click the SHOW EMPLOYEE FORM button, add some data to the form elements including the image field and then click the ADD EMPLOYEE button. You should see that the employee gets added to the ListView. Now click on the newly created list item to go the EMPLOYEE DETAIL page. Notice that it works as expected except for the image which we will correct next.
- In the CREATE A GENERIC FUNCTION THAT WILL CREATE AND REFRESH LISVIEW code area, add the following highlighted “if” statement INSIDE the “for” loop AFTER the variables but BEFORE the append() method:
for(i=0;i<numberOfEmployees;i++)
{
//  alert(Employees[i].firstName + " " + Employees[i].lastName + ":  " + Employees[i].department);
var fullName =  Employees[i].firstName + " " + Employees[i].lastName;
var imageDirAndName =  "images/" + Employees[i].image;
// alert (imageDirAndName);
var department =  Employees[i].department;

// If NO image is selected than provide default avatar image
if (imageDirAndName == "images/")
{
  imageDirAndName = "images/photo_not_available_large.png";
}
// alert (imageDirAndName);
$("#myList").append("<li><a href='#employee_page'><img src=" + imageDirAndName  + " width='80' height='80'  alt=''/><h3 style='color:orange'>" +  fullName + "</h3><p>" +  department + "</p></a><a id='edit' href='#'>Edit "  + fullName + "</a></li>");
}
NOTE: This code will create the small avatar thumbnail image for the ListView if no image is added to the form.
- In the VIEW SELECTED INDEX FROM LISTVIEW code area, add the following highlighted “if” statement AFTER the variables but BEFORE the empty() method:
var currentImage = "images/" + Employees[selectedIndex-1].image;
var fullName = Employees[selectedIndex-1].firstName + " " + Employees[selectedIndex-1].lastName;
var city = Employees[selectedIndex-1].city;
var state = Employees[selectedIndex-1].state;
var startDate = Employees[selectedIndex-1].startDate;
var department = Employees[selectedIndex-1].department;
// alert(currentImage);

// If NO image  is selected than provide default avatar image
if (currentImage == "images/")
{
  currentImage = "images/photo_not_available_large.png";
}

// The method replaceWith() did not work so I add the empty() and append() methods
$("#employee_page div#container").empty();
NOTE: This code will create the large avatar image on the Detail Page if no image is add to the form. - CHECK POINT: Save the file and open the app in a browser. Click on the SHOW ADD EMPLOYEE FORM button and add some new employee data BUT don’t add an image. Click the ADD EMPLOYEE button to return to the Master page (home_page). You should see the Photo Not Available thumbnail image.
- Click on that particular ListView item (e.g., John Doe) to go to the EMPLOYEE DETAIL page. You should see the Photo Not Available large image.
Create Update Page
Now that we have the ability to ADD employees to the ListView, let’s see how to UPDATE existing information for a given employee. Since the major difference between ADDING and UPDATING an employee using a form is that:
- When ADDING, you have to enter NEW information into the form
- When UPDATING, you have to MODIFY EXISTING information that are PREPOPULATED in the form
- Insert the following code ABOVE the closing jQuery wrapper closing symbol (e.g., }); // END OF DOCUMENT.READY() FUNCTIONALITY
// OPEN AND PREPOPULATE ADD EMPLOYEE FORM FOR EDITING ---------------------------------------

$(document).on("click", "#myList li a#edit", function() {

$("#add_employee_form").slideDown();
$("#show_add_employee_form").hide();
$("#cancel_add_employee_btn").show();
$("#edit_employee_btn").show();

$("#firstNameID").val(Employees[selectedIndex].firstName);
$("#lastNameID").val(Employees[selectedIndex].lastName);
$("#cityID").val(Employees[selectedIndex].city);
$("#stateID").val(Employees[selectedIndex].state);
$("#startDateID").val(Employees[selectedIndex].startDate);

$("#departmentID").val(Employees[selectedIndex].department);
$("#imageID").val(Employees[selectedIndex].image);
});

}); // END OF DOCUMENT.READY() FUNCTIONALITY - CHECK POINT: Save the file and open the app in a browser. Click on ANY one of the ListView item SPLIT BUTTON on the right side of the screen. You should see a tool-tip of the current employee that can be edit (e.g., Edit Ann Ricoh) when you hover over it. Once you click the split button, you should see the ADD EMPLOYEE FORM opens with the values from the Employees array PRE-POPULATING the form for any ADDITIONAL UPDATES. However, the data has not been saved to the Employees array. This will be done in the next step.
- Insert the following code ABOVE the closing jQuery wrapper closing symbol (e.g., }); // END OF DOCUMENT.READY() FUNCTIONALITY:
// SAVE UPDATES  BUTTON FUNCTIONALITY -------------------------

$("#edit_employee_btn").click(function(e){

Employees[selectedIndex].firstName = $("#firstNameID").val();
Employees[selectedIndex].lastName = $("#lastNameID").val();
Employees[selectedIndex].city = $("#cityID").val();
Employees[selectedIndex].state = $("#stateID").val();
Employees[selectedIndex].startDate = $("#startDateID").val();
Employees[selectedIndex].department = $("#departmentID").val();
Employees[selectedIndex].image = $("#imageID").val();

$("#myList").empty();  // Clear ListView
createListView(); // Recreate  ListView
closeForm(); // Close Form
});

});  // END OF DOCUMENT.READY() FUNCTIONALITY
- CHECK POINT: Save the file and open the app in a browser. Click on any one of the Split Button on the right of the ListView. You should see the ADD EMPLOYEE FORM opens. Make a few changes to the input fields and then click the SAVE UPDATES button to save the result and return to the Master Page to see the updated changes in the ListView. Click on that same ListView item to go to the EMPLOYEE DETAIL page to see the changes reflected on that page as well. However, there are two issues that you may not have paid attention to earlier when you click on the Split Button to open the ADD EMPLOYEE FORM and make changes:
- The department drop-down combo box ALWAYS shows the FIRST item (e.g., Marketing) which may not be the correct department.
- The Employee Image field is NOT PRE-POPULATED with the employee's image name like the other text fields.
- Add the following highlighted array ABOVE the current EMPLOYEES array to create an array of per-determined departments:
// CREATE AN ARRAY OF DEPARTMENTS ------------------------------------------
var Departments = ["Marketing", "Engineering", "Human Resource", "Sales", "Customer Services", "Admin", "IT", "Security"];
var totalDepartments = Departments.length;
alert("Total Number of Departments: " + totalDepartments);
// CREATE AN ARRAY OF EMPLOYEE OBJECTS -------------------------------------
- CHECK POINT: Save the file and open the app in a browser. You should see that an alert dialog appears showing 8.
- Comment out the alert statement.
// alert("Total Number of Departments: " + totalDepartments);
- In the body of the page, REPLACE ALL of the <option> elements with its DYNAMIC COUNTERPART by looping through the Departments array created earlier.
FROM THIS:
<select id="departmentID" data-mini="true">
    <option value="Marketing">Marketing</option>
    <option value="Engineering">Engineering</option>
    <option value="IT">IT</option>
    <option value="Human Resources">Human Resources</option>
    <option value="Sales">Sales</option>
    <option value="Customer Services">Customer Services</option>
    <option value="Admin">Admin</option>
</select>
TO THIS:
<select id="departmentID" data-mini="true">
<script>
for(var i=0; i<totalDepartments; i++)
{
 	document.write("<option>" + Departments[i] + "</option>");
}
</script>
</select>
- CHECK POINT: Save the file and open the app in a browser. If you click on the SHOW ADD EMPLOYEE FORM button and then click on the Department drop-down combo-box you should see the it displays the same as before; however, the drop-down combo box is populated from the Departments array instead from STATIC <option> tags. Changing it to a dynamic version will become useful in the upcoming steps.
- In the body of the page, COPY the <label> and <input> elements for the image input file and PASTE a copy below it, then:
- add the number two AFTER ID
- change the type attribute from file to text
- change If Available to If new
<label id="imageID_Label" for="imageID">Employee Image (If available):</label>
<input id="imageID" type="file" value="" data-mini="true"/>
<label id="imageID2_Label" for="imageID2">Employee Image (If new):</label>
<input id="imageID2" type="text" value="" data-mini="true"/>
- In the code, add the following highlighted code in the ANIMATE ADD EMPLOYEE FORM WHEN CLICKED code area:
// ANIMATE ADD EMPLOYEE FORM WHEN CLICKED --------------------------------------
$("#show_add_employee_form").click(function()
{
$(this).hide();
$("#imageID").show();
$("#imageID_Label").show();
$("#imageID2").hide();
$("#imageID2_Label").hide();

$("#add_employee_form").slideDown(500);
$("#add_employee_btn").show();
$("#cancel_add_employee_btn").show();

});
- In the code, add the number two (2) to the lines below so that:
- the code can reference the Text Input field and the not the File Input field
- it can be PRE-POPULATED with the name of an employee (e.g., ann_ricoh.jpg)
- it can be edited
In the SAVE AND UPDATES BUTTON FUNCTIONALITY code area:
var departmentField = $("#departmentID").val();
var imageField = $("#imageID2").val();
In the OPEN AND PREPOPULATE ADD EMPLOYEE FORM FOR EDITING code area:
$("#departmentID").val(Employees[selectedIndex].department);
$("#imageID2").val(Employees[selectedIndex].image);
- In the code, add the following highlighted code in the VIEW SELECTED INDEX FROM LISTVIEW code area:
// VIEW SELECTED INDEX FROM LISTVIEW -------------------------------------------
$(document).on("click", "#myList li a", function() {
selectedIndex = $(this).closest("li").index();
// alert("The selected index when the view button is clicked: " + selectedIndex);

$("#imageID").hide();
$("#imageID_Label").hide();
$("#imageID2").show();
$("#imageID2_Label").show();

var currentImage = "images/" + Employees[selectedIndex].image; - CHECK POINT: Save the file and open the app in a browser. Click on the SHOW ADD EMPLOYEE FORM button. You should only see the FILE INPUT field with the Browser... button DISPLAYED even though a Text Input field was added. That's because code was added earlier to SHOW the FILE INPUT FIELD and HIDE the TEXT FIELD when the SHOW ADD EMPLOYEE FORM button is clicked:

Now, click on the RETURN button to go back to the main page and then click on the SPLIT BUTTON to go to the EDIT EMPLOYEE page. You should only see the TEXT INPUT field when the SPLIT button is CLICKED even though a Text Input field was added along with the File Input field. That's because code was added earlier to SHOW the TEXT FIELD and HIDE the FILE INPUT FIELD when the SPLIT button is clicked:

- In the OPEN AND PREPOPULATE ADD EMPLOYEE FORM FOR EDITING code area, add the following highlighted code and "for" loop:
$("#imageID2").val(Employees[selectedIndex].image);

$("#departmentID").empty(); // Empty combo box first and then refill it with loop
  for(var i=0; i<totalDepartments; i++)
{
var DepartmentArray = Departments[i];
var EmployeeCurrentTitle = Employees[selectedIndex].department;
alert("Current Title: " + EmployeeCurrentTitle + "; " + "Dept Array is: " + DepartmentArray);
}
- CHECK POINT: Save the file and open the app in a browser. Click on one of the SPLIT button on the right to open the ADD EMPLOYEE FORM that is per-populated. You should see an alert dialog box appear with the message for the Current Title and Dept Array (e.g., Current Title: Marketing ; Dept Array is: Marketing) Click the OK button until all of the other options are completed and then close the browser.
- In the "for" loop, add the following two highlighted "if" statements:
for(var i=0; i<totalDepartments; i++)
{
var DepartmentArray = Departments[i];
var EmployeeCurrentTitle = Employees[selectedIndex].department;
alert("Current Title: " + EmployeeCurrentTitle + "; " + "Dept Array is: " + DepartmentArray);

if(EmployeeCurrentTitle == DepartmentArray)
{
  	alert("Match Found")
}

if(EmployeeCurrentTitle != DepartmentArray)
{
  	alert("Match Not Found")
}

}

});
- CHECK POINT: Save the file and open the app in a browser. Click on one of the SPLIT button on the right. You should see a series of alert dialog boxes as before but also a series of alert dialog boxes that states whether a match was found or not found.
- Comment out all three alert statements and add the following highlighted code in the "for" loop:
for(var i=0; i<totalDepartments; i++)
{
var DepartmentArray = Departments[i];
var EmployeeCurrentTitle = Employees[selectedIndex].department;
// alert("Current Title: " + EmployeeCurrentTitle + "; " + "Dept Array is: " + DepartmentArray);

if(EmployeeCurrentTitle == DepartmentArray)
{
// alert("Match Found")
$("#departmentID").append("<option selected='selected'>" + EmployeeCurrentTitle + "</option>");
}

if(EmployeeCurrentTitle != DepartmentArray)
{
// alert("Match Not Found")
$("#departmentID").append("<option>" + DepartmentArray + "</option>");
}

// refresh and force rebuild of the combo box
$("#departmentID").selectmenu("refresh", true);
}

});
- CHECK POINT: Save the file and open the app in a browser. Click one of the SPLIT button on the right of the ListView items. You should now see the department combo box display the correct department name.
Create Delete Functionality
Now that we can view, add, and update employees in our Employee Directory app. The last major thing we would like to do is to have the ability to DELETE an employee from the Employee Directory. The delete page typically does not need a dedicated page to perform this operation. However, it is best practice that when you delete content from an app to prompt the user about the pending deletion and give the user an opportunity to cancel the deletion if perhaps the user clicked the wrong button or had a change of mind.
- Insert the following code ABOVE the closing jQuery wrapper closing symbol (e.g., // END OF DOCUMENT.READY() FUNCTIONALITY:
// DELETE EMPLOYEE BUTTON FUNCTIONALITY --------------------------------------------
$("#delete_employee_btn").click(function(e){

var choose = confirm("Are you sure you want to delete this employee?");

if (choose == true) {
alert("You pressed the OK button!");
}
else
{
alert("You pressed the Cancel button!");
}

}); // END OF DELETE EMPLOYEE BUTTON FUNCTIONALITY

}); // END OF DOCUMENT.READY() FUNCTIONALITY
- CHECK POINT: Save the file and open the app in a browser. Click on any one of the ListView item and then in the EMPLOYEE DETAIL page click on the DELETE EMPLOYEE button. You should be prompted with a confirmation dialog box and then click the Cancel button. You should see an alert dialog box that displays the message, "You pressed the Cancel button!" Click the DELETE EMPLOYEE button AGAIN, this time in the Delete dialog box that appears, click the OK button. You should see an alert dialog box that displays the message, "You presses the OK button!"
- Comment out the two alert statements and modify the previous code to read:
// DELETE EMPLOYEE BUTTON FUNCTIONALITY --------------------------------------------
$("#delete_employee_btn").click(function(e){

var choose = confirm("Are you sure you want to delete this employee?");

if (choose == true) {
//  alert("You pressed the OK button!");
Employees.splice(selectedIndex,1); // Remove selectedItem form Employees array
$("#myList li").eq(selectedIndex).remove(); // Remove selectedItem from ListView
window.location.href = "#home_page"; // Return to Master Page (e.g., home_page)
}
else
{
// alert("You pressed the Cancel button!");
window.location.href = "#home_page";
}

});

}); // END OF DELETE EMPLOYEE BUTTON FUNCTIONALITY
- CHECK POINT: Save the file and open the app in a browser. Click on any one of the ListView item and then in the EMPLOYEE DETAIL page click on the DELETE EMPLOYEE button. You should be prompted with a confirmation dialog box and then click the Cancel button. You should see an alert dialog box disappears and you are immediately be returned to the main page. Click on any ListView item AGAIN and then click the DELETE EMPLOYEE button, this time in the Delete dialog box that appears and you should immediately be returned to the main page where you can confirm that the employee was indeed deleted.
- Select Tools > Externalize JavaScript... , accept the default and then press the OK button to externized the JavaScript code in the head element.
Create Login Page
A login would be nice so that a user would have to log to see the Employee Directory.
Will be added later….
Create Registration Page
A registration page will also an employee to enter his own information into the Employee Directory.
Will be added later….
Add Local Storage
Currently, the data is not actually being saved anywhere. If you make changes (add, update or delete an employee(s)) and then close the app and reopen it, the data will be lost. To maintain the data, we will implement a local storage of the array of objects so that when you come back to the app after it has been closed the data will persist.
If you want to store some simple data for your app instead of using a database, you can use an HTML5 feature called Local Storage (similar to a cookie) that allows you to store key/value pairs on the client computer that can be retrieved from the client computer and that can persist after the app is restarted repeatedly.
Local storage, as the name implies, allows you to store data locally within the user's browser. However, unlike cookies, local storage is:
- more secure
- can hold a larger amount of data (5MB)
- data is never transferred to the server.
- per domain which means that all pages can store and access the same data.
Local storage provides two objects for storing data on the client:
- localStorage - stores data with no expiration date and the data will not be deleted when the browser is closed
- sessionStorage - stores data for one session and the data is lost when the browser tab is closed
There are five methods that can be used with the local storage object:
- key - returns the name of the key at the specified position
- getItem - returns or get the item identified by its key
- setItem - set or save an item at the key provided
- removeItem - removes an item identified by the provided key
- clear - remove ALL the key/value pairs.
However, the current version only support strings. To use an array or JSON object, you need to use two JSON methods:
- JSON.stringify()
- JSON.parse()
EXAMPLE:
var ArrayData = [5, 6, 9];
// store array to localstorage
localStorage.setItem("list_data_key",  JSON.stringify(ArrayData));

// retrieve stored data (JSON stringified) and convert
var storedData = localStorage.getItem("ArrayData ");
if (storedData) {
    ArrayData = JSON.parse(storedData);
}
Other methods that you can use are:
- removeItem
- clear
EXAMPLE:
// To remove a SINGLE key
localStorage.removeItem("item_key");

// To clear ALL Local Storage
localStorage.clear();
- Add the following highlighted code BELOW the Employees array. etc.:
Employees [...];
var numberOfEmployees = Employees.length;
//  alert("NOE " + numberOfEmployees);
//  alert(Employees[0].firstName);

// Retrieve stored data (JSON stringified) and convert
var storedData = localStorage.getItem("list_data_key");

if(storedData)
{
  alert("What is StoredData value? " + storedData);
  Employees = JSON.parse(storedData);
  numberOfEmployees = Employees.length; // Reset number of Employee if data is stored.
}
else
{
 alert("No data stored")
}
CODE EXPLANATION:
- The storeData variable is used to get a reference to the local storage with a name of "list_data_key."
- A conditional statement is used to check if the the storeData returns true. If yes, then set the Employee array to the value of the storedData by parsing it with an JSON object. And alert dialog box is also displayed to show the storedData value.
- It is important to reset the numberOfEmployees variable if the data is stores so it was added in the first part of the "if" statement.
- If storedData returns false, an alert dialog box opens and display the message, "No data stored!" - Add the highlighted lines of codes in the following THREE areas before the closing code block of the first two area and WITHIN the first part of the "if" statement in the last area:
// ADD EMPLOYEE BUTTON FUNCTIONALITY ----------------------
...
...
// store array to localstorage
localStorage.setItem("list_data_key", JSON.stringify(Employees));

}); // END OF ADD EMPLOYEE BUTTON FUNCTIONALITY
// SAVE UPDATES BUTTON FUNCTIONALITY ----------------------
...
...
// store array to localstorage
localStorage.setItem("list_data_key", JSON.stringify(Employees));

}); // ENOD OF SAVE UPDATES BUTTON FUNCTIONALITY
// DELETE EMPLOYEE BUTTON FUNCTIONALITY ----------------------
...
...
if (choose == true) {
...
// store array to localstorage
localStorage.setItem("list_data_key", JSON.stringify(Employees));
}
else
{
// alert("You pressed the Cancel button!");
window.location.href = "#home_page";
}

}); // END OF DELETE EMPLOYEE BUTTON FUNCTIONALITY
CODE EXPLANATION:
- Notice the code was added in the three places where the data can be changed. Namely, add, update and delete operations. - CHECK POINT: Save the file and open the app in a browser. You should see an alert dialog box with the message "No data stored!" and then click the OK button to dismiss the dialog box. Add another employee to the Employee Directory using the SHOW ADD EMPLOYEE FORM and then filli out the fields and then click the ADD EMPLOYEE button. Preview again in a browser and then click the OK button to dismiss the alert dialog box. Close the browser and reopen it again to see that the data persist.
- (OPTIONAL) To clear the local storage, comment out ALL of the previous code that was added for local storage and then add the following highlighted code:
// Retrieve stored data (JSON stringified) and convert
/* var storedData = localStorage.getItem("list_data_key");

if(storedData)
{
  alert("What is StoredData value? " + storedData);
  Employees = JSON.parse(storedData);
  numberOfEmployees = Employees.length; // Reset number of Employee if data is stored.
}
else
{
 alert("No data stored")
} */
localStorage.clear();
NOTE: The localStorage.clear(), as the name implies, will "clear" all of the data from the local storage.
- (ALTERNATIVE) To clear the data from the local storage, open the app in Chrome, press the F12 key to open the Developer tool and then:
- Click the Application tab
- Click the Local Storage option in the left panel and then select file://
- Click the key/value list item to select it
- Click the delete key (X) and the refresh button at the bottom of the screen.
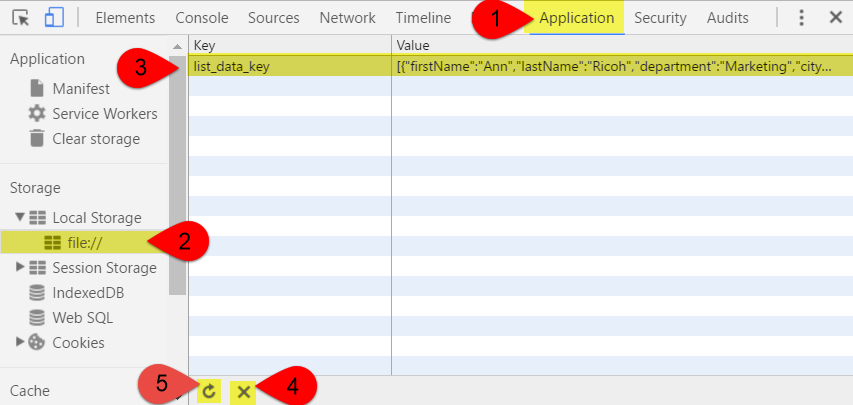
- CHECK POINT: Close Chrome and then reopen it again. You should see that all of the data has been deleted.
Resize Title
If you currently view the app on a small device, you will notice that the title get truncated by ellipses (e.g., EMPLOYEE DIRECT…) and the footer is rather large. To avoid this minor issue, will we create a media query and set a breakpoint for a maximum side of 480px.
- Write the following <style> tag ABOVE the closing </head> element:
<style>
h1.ui-title{color:red;}
@media (max-width:480px){
/* Header */
h1.ui-title{color:orange;
font-size:10px!important;}
/* Footer */
h4.ui-title{color:gray;
font-size:10px!important;}
}
</style>
</head>
- CHECK POINT: Save the file and open the app in a browser. You should see the app updated with a new color header. Scale your browser to the size of a small phone. You should see the header and footer font size changed to accommodate smaller devices as well as the font color.
Large screen:

Small screen:
Change Style
You can always change the style of the page.
- Add the following attribute to the header and footer of the “home_page” container:
<div data-role="page" id="home_page" data-theme="a">
   <div data-role="header" data-position="fixed" data-theme="b">
     <h1>EMPLOYEE DIRECTORY</h1>
   </div>
….
   <div data-role="footer" data-position="fixed" data-theme="b">
     <h4>Copyrighted 2016 by RMCS. All rights reserved.</h4>
  </div>
</div>
- Add the following attribute to the header and footer of the “employee_page” container:
<div data-role="page" id="employee_page" data-theme="a">
  <div data-role="header data-theme="b"">
    <a data-icon="home" data-iconpos="left" href="#home_page">HOME</a>
    <h1>EMPLOYEE DETAIL</h1>
  </div>
….
  <div data-role="footer" data-position="fixed" data-theme="b">
    <h4>Copyright 2016 by RMCS. All rights reserved.</h4>
  </div>
</div>
- CHECK POINT: Save the file and open the app in a browser. You should see the header and footer now displays in black instead of gray.
Make Image Responsive
Currently, the image size does not changed regardless of the size of the device that it is displayed on. In the next step, we will add some CSS to have the image SCALE automatically on smaller devices.
- Write the following highlighted CSS style BELOW the current CSS code:
#employee_page img
{
border: 1px solid black;
max-width: 100%;
height: auto;
display: block;
}
</style>
- CHECK POINT: Save the file and open the app in a browser. Click on one of the Listview item to go to the EMPLOYEE DETAIL page and then scale the browser window to the size of a small device (e.g., phone). You should see that the image size automatically scale as the screen get smaller based on the CSS properties.
Replace Delete Dialog Box
Currently, the Delete Employee dialog box is using a simple JavaScript confirm() method. In the series of upcoming steps, we will replace it with a jQuery Mobile dialog box.
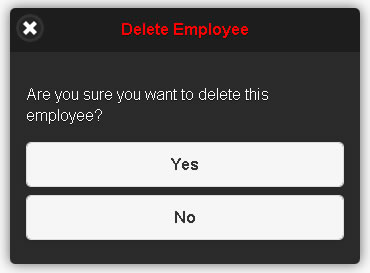
- Add a blank line ABOVE the closing body tag (e.g., </body>) and then from the Insert Panel drag-and-drop the Page icon to the blank line and click the OK button in the dialog box that appears and then make the following highlighted changes. Next, delete the footer div (e.g., <div data-role="footer"> <h4>Footer</h4> </div>):
<!--Delete Dialog Page----------------------------------------------------->
<div data-dialog="true" data-theme="b" data-role="page" id="delete_dialog_page">
		<div data-role="header">
		  <h1>Delete Employee</h1>
		</div>

	  	<div id="container2" data-role="content">
      <!--<p>Dynamic content will go here...</p>-->
		 <p>Are you sure you want to delete this employee?</p>
	   </div>

		<div style="padding:20px;">
       <a href="#" id="confirm_delete" data-role="button" data-theme="a">Yes</a>
       <a href="#" data-rel="back" data-role="button" data-theme="a">No</a>
	    </div>
</div>

</body> - Add href="#delete_dialog_page" and data-role="button" as attributes to the DELETE EMPLOYEE button and change the <button> element to an <a> element.
<a href="#delete_dialog_page" data-role="button" id="delete_employee_btn"
data-icon="delete" data-inline="true" data-mini="true" data-theme="b">DELETE EMPLOYEE</a> - Add the following highlighted CSS class ABOVE the closing style tag (</style>) to style the dialog box:
.ui-dialog-contain { width: 92.5%; max-width: 350px; margin: 10% auto 15px auto; padding: 0; position: relative; top: -15px; } </style> - Comment out the complete DELETE EMPLOYEE BUTTON FUNCTIONALITY code block:
// DELETE EMPLOYEE BUTTON FUNCTIONALITY -------------------------------------------- /* $("#delete_employee_btn").click(function(e){ ... ... }); */ - Add the following highlighted comment and code BEFORE the closing jQuery wrapper closing tag (e.g., }); // END OF DOCUMENT.READY() FUNCTIONALITY):
 // DELETE CONFIRMATION BUTTON FUNCTIONALITY --------------------------------------
    $("#confirm_delete").click(function(e){
    Employees.splice(selectedIndex,1); // Remove selectedItem form Employees array
    $("#myList li").eq(selectedIndex).remove(); // Remove selectedItem from ListView
    window.location.href = "#home_page"; // Return to Master Page (e.g., home_page)
    // store array to localstorage
    localStorage.setItem("list_data_key",  JSON.stringify(Employees));
    }); // end of confirm delete

}); // END OF DOCUMENT.READY() FUNCTIONALITY - Save the file and open the app in a browser, and then:
- Create a new employee
- Click on that employee Listview item.
- Click on the DELETE EMPLOYEE button. You should be prompted with a Delete Employee dialog box with a confirmation message (e.g., Are you sure you want to delete this employee?) and two buttons (a Yes and No button).
- Click on the No button and you should be returned to the same page.
- Click on the Yes button and you will be returned to the main page where you can see that the employee was indeed deleted.
- (OPTIONALLY) To make the delete prompt more personal, you can add the employee name to it.
Add the following highlighted code at the bottom of the VIEW SELECTED INDEX FROM LISTVIEW section but inside the code block.,
$("#employee_page div#container").append("<p><strong style = 'color:red'>Start Date:</strong> " + startDate + "</p>");
$("#employee_page div#container").append("<p><strong style = 'color:red'>Department:</strong> " + department + "</p>");
$("#delete_dialog_page div#container2").empty();
$("#delete_dialog_page div#container2").append("<p>Are you sure you want to delete " + fullName + "?</p>");
}); - CHECK POINT: Save the file and open the app in a browser. Click on one of the Listview item to go to the EMPLOYEE DETAIL page and then click the DELETE EMPLOYEE button. You should see the prompt now include the selected user name as part of the prompt.
Convert To Mobile App
[back to top] Now that we have the majority of the app completed, we would like to turn it into an app that can be installed on a phone or tablet using PhoneGap Build.
- Navigate to folder where the site files are.
- Zip all of the site's content including HTML, CSS and JavaScript including jQueryMobile.
- Log into PhoneGap Build (https://build.phonegap.com/apps)
- Click on the new app button and then upload the zip file to convert the zip file to an apk file.
- Using a QR reader, scan the QR code on the PhoneGap Build website to load app onto a phone or tablet.