HTML BASICS
WHAT IS HTML AND XML?
HTML is the standard markup language for creating Web pages.
HTML and XML use a series of symbols (called tags) that are instructions that tells a browser how to display a page (HTML) or how to structure data (XML).
A set of tags (e.g., <p> ... </p> is called an element which usually consists of a start or opening tag and an end or closing tag with content inserted in between them:
NOTE: HTML elements with no content are called empty elements. Empty elements do not have an end tag. Examples of empty tags include:
- <br> or <br/> to create a line break
- <hr> or <hr/> to create a horizontal rule
- <img> or <img/> to create an image.
NOTE: HTML5 does not require empty elements to be closed. But if you want stricter validation, or if you need to make your document readable by XML parsers, you must close all HTML elements properly.
HTML and XML
HTML stands for HyperText Markup Language.
XML stands for EXtensible Markup Language.
Let's define what each of these words refer to:
- HyperText – the ability to "link" from one page to another using various techniques (See Other Linking Options with the Anchor Tag).
- EXtensible – the ability to create your own USER-DEFINED XML tags—unlike HTML where you must use PRE-DEFINED tags.
- Markup – the ability to use symbols (tags) to "markup" a page usually with a pair of angle brackets (e.g., <p>...</p>). Similar to how you would mark up a page you were correcting for someone. The markup is used to define:
- meaning (semantic)
- structure
- format
- interactivity
- programmability
- Language – the ability to be governed by a set of rules like a "language"
NOTE: There are other MARKUP languages:
- SQL – Structured Query Language that is used to communicate to a database.
- MXML – (No official acronym) Used with Flash Builder to develop Rich Internet Applications (RIAs).
- CFML – ColdFusion Markup Language that is used to develop ColdFusion pages.
- SMIL – Synchronized Multimedia Integration Language that is used to describe audiovisual presentations.
XHTML vs HTML5
XHTML (Extensible Hyper Text Markup Language) was developed in 2000 and is hybrid of HTML 4 with a set of strict XML 1.0 standards allowing a document to be parsed easily by web browsers. All XML syntax requirements are included in a well formed XHTML document. XHTML is a stricter language:
Must have mandatory document structure:
- XHTML DOCTYPE
- XML namespace attribute (e.g., xmlns) in <html> tag
- HTML framework tags (e.g., <html>, <head>, <title>, and <body>)
Attributes must be:
- lower case (e.g., <img src=”myimage.jpg” />)
- In quotes (e.g., <img src=”myimage.jpg” />)
- minimization forbidden
Examples:
Wrong: <input type="checkbox" name="vehicle" value="car" checked/>
Correct: <input type="checkbox" name="vehicle" value="car" checked="checked" />
Elements must be:
- properly nested (e.g., <b><i>This paragraph is bold and italic</i></b>)
In XHTML, you also cannot nest certain elements:- An anchor or form element cannot be nested in another anchor or form element.
- Block element cannot be nested inside of inline elements.
- Text cannot be DIRECTLY nested in the body or a form element.
- List element cannot be DIRECTLY nested in another list element
- always closed (e.g., Elements must include start and end tags -- <p>This is a paragraph</p>)
EXCEPTIONS: The exceptions are self-closing elements (e.g., <br/>, <hr/>, <img />, <link/>, <input/>, and <meta/>) denoted with the forward slash included in the element. (e.g., while <br> is valid HTML, you would be required to write <br /> or <br/> in XHTML.)
- lowercase (e.g., <p> and not <P>)
- one root element (e.g., <html>)
HTML5 has replaced XHTML as a newer standard. It is basically HTML made easy for most developers because it relaxes some of the rules that was imposed by XHTML. Advantages of HMTL5 include:
- Support for all major browsers (e.g., Chrome, Firefox, Internet Explorer, Edge, Safari, Opera, etc.)
- Simpler DOCTYPE (e.g., <!DOCTYPE html>) compared to older HTML versions.
- Easier character code (e.g., <meta charset="UTF-8">)
- Elements are case INSENSITIVE
- More lenient code than previous HTML versions.
New features include:
- New semantic tags (header, footer, section, article, nav, audio, video, etc. See http://www.w3schools.com/html5/html5_reference.asp for details).
- New Multimedia Elements (e.g., native support for audio and video.) In the past, you had to rely on a plug-in like Flash to view video.
- New graphic elements (e.g., Scalable Vector Graphics (SVG) and canvas elements)
- Mobile friendly (e.g., smart phones and tablets).
- Cross-platform application development
- Drag-and-drop effects
- Hybrid of three technologies (HTML, CSS, and JavaScript)
- Geolocation to access geographical user’s location via phone GPD, IP address, if approved.
- Local storage API is a replacement for cookies. Information can be stored even when the browser is closed.
- More accessible form elements (e.g., number, date, time, calendar, and range)
- HTML5 Canvas Element allows you to draw with JavaScript and SVG. It also supports animation.
- Application Cache API allows a user to access a web app without a connection via an off line version which allow less strain on a server and makes the app run faster.
- Support Web workers which are JavaScript that runs in the background as a separate script to allow a user to continue accessing a site without having to wait for scripts to load.
- Sever-Sent Events (SSEs) which preclude the need for a site to request server updates. These automatic updates are sent via a one way messaging to let a site load fresh content (e.g., newsfeed, etc.)
Character Entities or Special Characters
Some characters (e.g., angle brackets:<>) are reserved in HTML because the browser might confuse them with HTML tags. So, character entities are used to display reserved characters in HTML.
HTML uses a set of special characters that are needed in a page that cannot be TYPED themselves. Below are several examples when this is needed:
- So browser don't confuse angle brackets (< >) as a tags. For example, to write a less-than or greater than sign (< >) in between a set of tags, use the entity: < (<); or $gt; (>), © (©).
- Special characters that cannot be typed on the keyboard like copyright - © (©), registered trademark - ® (™), trademark - ™ or degree - ° (°)
- Quotes: double quote - " (") and single quote - ' (')
- Fractions: ¼ (¼), ¾ (¾), ½ (½)
- Non-breaking space ( ).
NOTE: A non-breaking space is a space that will not break into a new line. This is useful when breaking two words might be disruptive
Examples:
- § 20
- 20 km/h
Another use is to prevent browsers from removing spaces in HTML pages. To add real spaces the character entity is used.
TIP: The non-breaking hyphen (‑) lets you use a hyphen character that won't break.
NOTE: All entities start with "&" and ends with a semicolon (;). Because HTML recognize the "&" sign as the start of an entity; if an "&" is intended to be used in the tag, it has to be created as an entity itself (i.e., &). You can also use number as entities (e.g., d). Since all entities do not have names, numbers may be your only option. You can go to this web sites for a list of entities: http://www.unicode.org/charts/
NOTE: Because a browser will not recognize REturns, most Spaces and Tabs (think REST), you need to used non-breaking spaces to add spaces. The reason you may want to add these items (Returns, Spaces or Tabs) in the authoring environment is to make the code easily for YOU to read. Dreamweaver will add these automatically when you press the spacebar. HTML only recognize single space (except for preformatting tag <pre>). In order to add additional spaces, you need to an entity.
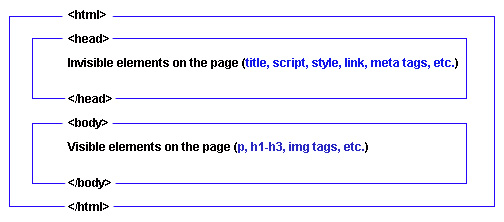
HTML FRAMEWORK
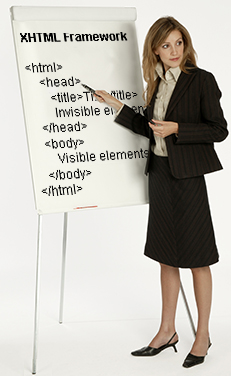
Let's look at the three major tags that make up the HTML framework and what can be included in them.
EXCEPTION: The <html> element contains all content and code except for dynamic code (e.g., ASP, PHP, and CF) that must be loaded before the page content.
The root element contains all the code and content, with the exception of any dynamic code that must load before the page content itself. This dynamic code is usually written in web programming languages such as ASP, Cold Fusion, or PHP.
NOTE: The <head> tag specifies INFORMATION about the page not its CONTENT. The <body> tag specifies CONTENT and not information about the page.
It's helpful to think of the HTML framework and compare it to the human body:
- html tag is like the "skin" – it covers the whole body.
- head tag is like the "head" on the body – it is always on top of the body. The <head> element performs background tasks (e.g.,, styling, loading links).
- body tag is like the "body" – it is always below the head.
- title tag is like a "hat" – while not part of the body, it is visible on the body at the top of the head. In the case of the title, the title shows in the title bar of the browser and not on the page.
NOTE: The head elements are ABOUT the page; whereas, body elements are what you can SEE on the page.
- link tag is like a "link" to a clothing store (via an external CSS) to cloth your site.
- script tag is like "blood" – it can be in the <head> or the <body> tags. It can also be transferred "blood" (that is JavaScript code) to and from the body via an external JavaScript. This is akin to a blood transfusion.
- style tag is like the "cloth" used to "style" the body – you can change your clothing "style" for different occasion
- meta tags (e.g., keyword, descriptions) is like the "heart and soul" of the body – it is used to gather information and pass it to the rest of the body. In the case of keywords and description, this information is passed to search engines.
The <!DOCTYPE> Declaration
The DOCTYPE is not actually a regular HTML tag but a HTML comment that is recognized by a browser. The <!DOCTYPE> declaration represents as the name implies, the document type and helps a browser to display the web page correctly. It only appear once at the top of the page (before any HTML tags). The <!DOCTYPE> declaration for HTML5 is: <!DOCTYPE html>
CONTAINERS, CONTAINERS, CONTAINERS EVERYWHERE
It is important to understand some key concepts before starting to work with HTML tags. HTML tags are represented mostly by a set of angle brackets ("<" and "/>") with pre-defined names between them (e.g., <p>This is a paragraph.</p>). The tag pair AND its content is normally called an ELEMENT.
XHTML uses PRE-DEFINED elements to describe how the content will be FORMATTED or LAYOUT. For example,
- a set of <p></p> tags will DESCRIBE that the content be formatted as a PARAGRAPH.
- a set of <h1></h1> tag will DESCRIBE that the content be formatted as a HEADING 1.
XML uses USER-DEFINED elements that do not describe the format but the DATA CONTENT in them. For example, a tag named <firstname> usually specify that the first name of a person is the DATA content for that element.
MEMORY TIP: Because XML can be created with a simply text editor and the tag are self-describing and can be use as a database. It is helpful to think of XML as a WELL-FORMED POOR-MAN SELF-DESCRIBING VERTICAL UNIVERSAL DATABASE. The term vertical refer to the fact that the elements (or nodes) are arranged vertically from top-to-bottom. In a normal database (flat (e.g., Excel) or relational (e.g., Access, MySQL, etc.)) the data is arranged horizontally in what is referred to as fields in a database with each row as a record as opposed to a node in XML.
HTML ATTRIBUTES
Before we talk about HTML tags, we need to understand another concept: - attributes.
All HTML elements have one or more attributes that is used to provide additional information about a specific HTML element.
- Attributes are always specified in the start or opening tag
- Attributes usually come in name/value pairs like height = "100"
Some attributes are required while others are optional or highly recommended. For example, to create a image you need to use the required "src"attribute as well as the height, width and alt attribute for non-decorative image:
For example.
<img src="myimage.jpg" height="100" width="100" alt="This is a description of my image"/>
COMMON TAGS
Apart from the HTML framework tags (html, head, body, title, etc.) that are created for you automatically in Dreamweaver when you create a page, below is a series of common tags that are used on most pages:
- <p> – use to create paragraphs
- <h1> – <h3> – used to create headings (Notice h4-h6 are not included in this list)
- <a> – used to create various types of links (See Other Linking Options)
- <img> – used to link images
- <ul> and <ol> – used to create bullet and number lists (The definition list is not used as often) (and child tag <li>)
- <table> – used to create tables (and children tags <tr> and <td>)
- <div> – used to create logical divisions within a page and the <span> tag for inline elements.
- <strong> and <em> – used as a replacement for the bold and italic tag, respectively
It is helpful to think of most elements as discrete CONTAINERS on a page. Let's examine some common containers:
Heading Tags: <h1> to <h6>
<h1> to <h6> tags - are used to define various heading levels. They should be nested correctly.
Example in CODE View:
<h2>This is heading level 2</h2>
Result in DESIGN View:
This is a heading level 1
This is heading level 2
Paragraph Tag: <p>
<p> element – is a container that has a paragraph break. This simply means that it will add white space before and after its container element.
Example in CODE View:
<p>This is another paragraph. Notice the space before and after each paragraph.</p>
Result in DESIGN View:
This is a paragraph.
This is another paragraph. Notice the space before and after each paragraph.
NOTE: To prevent adding spaces between paragraphs, you can add a line break <br /> tag.
Example in CODE view:
NOTE: In Code View, the break tag is in between the two paragraph tags. Another way of explaining this is that the line break tag "breaks" the line but NOT the paragraph or the line break tag breaks the paragraph across multiple lines. To add a line break in Design view press the SHIFT+ ENTER keys together. The <br /> tag is usually enclosed inside a set of <p> tags; however, it can be used with other block-level tags.
Result in DESIGN view:
This is a paragraph.
This is another paragraph. Notice there is only a small amount of space between the two paragraphs.
NOTE: This <br /> tag is one of a few self-closing tags. The <hr /> and <img /> are also self-closing or empty tags.
Link Tag: <a>
<a> element – is a container that is used to create a variety of links. The <a> tag must have a required "href" attribute
Example in CODE View:
NOTE: The href attribute specifies the link destination address (https://www.google.com).
Result in DESIGN View:
NOTE: The link above will replace the current page with the link href. To open the link in a new browser, add target = "new" attribute.
Example in CODE View:
Result in DESIGN View:
Image Tag: <img>
<img> element – is a container that is to used to create an embedded image from an outside source. The <img> tag must have a required "src" attribute.
Example in CODE View:
NOTE:The image is located in a folder called images. The alt attribute value can be read by screen readers like JAWS or NVDA to read the alt text to a vision impaired user.
Result in DESIGN View:

Button Tag: <button>
<button> element – is a container that is used to create a button.
Example in CODE View:
Result in DESIGN View:
NOTE: In order to make the button useful, it has to be give some code.
CAUTION: Pay attention to the single and double quotes.
Result in DESIGN View:
NOTE: The onclick attribute is a simple way to assign code to a button. You will learn more on how to do this later with JavaScript.
HTML Formatting Tags
There are several HTML formatting tags that are designed to display special text types: These tags are self-explanatory:
-
<b>/<strong>
- Important text (use the newer <strong> tag instead)
- Example: This is bold text
-
<i>/<em>
- Italic or emphasized text (use the newer <em> tag instead)
- Example: This is italicized text
-
<mark>
- Marked text
- Example: This is marked text
-
<small>
- Small text
- Example: This is small text
-
<del>
- Deleted text
- Example:
This is deleted text
- Example:
-
<ins>
- Inserted text
- Example: This is inserted text
-
<sub>
- Subscript text
- Example: H2O
-
<sup>
- Superscript text
- Example: Note1
HTML Quotation & Citation Tags
There are several quotation and citation tags:
-
<q>
- defines a short quotation.
Example: This is a short quotation.Notice it adds the quotation marks automatically.
-
<blockquote>
- defines a section that is quoted from another source.
- Example:
A blockquote will be indented
on both sides but without quotes
- Example:
-
<abbr>
- defines an abbreviation or an acronym.
- The latest version of HTML is 5. Hover over the word HTML to see the tool-tip. The tool-tip is created from a title attribute in the abbr tag.
- <
address>
- defines contact information of a document or an article.
NOTE: The <address> element is usually displayed in italic. Most browsers will add a line break before and after the element.
- Example:
Cornelius Chopin
1234 Any Street
Austin, Texas 78681
- Example:
Cornelius Chopin
-
<cite>
defines the title of a work.
- Example: The title of his book is "How to use HTML". Notice it is italicized.
-
<bdo>
defines bi-directional override.
NOTE: It is used to override the current text direction:
- Example: This text will appear backward with a <bdo> tag with a dir="rtl" attribute
This text will appear backward with a <bdo> tag.
- Example: This text will appear backward with a <bdo> tag with a dir="rtl" attribute
SPECIALIZED TAGS
There are two specialized tags that are used often along with CSS.
Division Tag: <div>
<div> element (page divisions) – is a generic empty container with NO paragraph breaks (or spaces before or after its container element) and you can place any other XHTML element in them.
Example in CODE View:
<div>This a my first div element</div>
<div>This is my second div element. Notice how they stack on top of one another in Design view without any space between them</div>
| This a my first div element |
| This is my second div element. Notice how they stack on top of one another in Design view without any space between them |
Another way to think of the <div> elements is to consider them as generic empty containers that are used to DIVide the page into discrete areas (i.e., header, sidebar, main content and footer).
NOTE: It is a best practice to NOT use a <div> element if there is an existing element that can be used as a container. For example, if you are using a list for the navbar, there is no need to wrap it with a div element – a ul element can be used instead.
<div id="navBar">
<ul>
<li>Home</li>
<li>Products</li>
<li>Services</li>
</ul>
</div>
instead use:
<ul id="navBar">
<li>Home</li>
<li>Products</li>
<li>Services</li>
</ul>
NOTE: There is no <div> element used in the second example.
Span Tag: <span>
<span> element – is a neutral container that serve no other purpose than to "contain" a "span" of selected text, as the name implies. So if you make a selection without selecting the complete tag sets, Dreamweaver will "wrap" that selection in a <span> tag so you can apply CSS to it.
Example in CODE View:
<p>This is some text that has been selected and a class attribute (class="spanexample") has been added to the span element that was automatically created when the class style was applied to <span class="spanexample">this portion of the paragraph text that was selected. </span> Span elements only work with CSS styles (i.e., class/ID) that will be discussed later.</p>
Result in DESIGN View:
This is some text that has been selected and a class attribute (class="spanexample") has been added to the span element that was automatically created when the class style was applied to this portion of the paragraph text that was selected. Span elements only work with CSS styles (e.g., class/ID) that will be discussed later.
CSS class that was used but will be discussed later:
<style>
.spanexample {color:red;}
</style>
NOTE: The <span> tags are AUTOMATICALLY created when you select a PORTION of text and then apply a format to it.
Comment Tag: <! -- Comments goes here -->
Comment tags are used to:
- insert comments in the HTML source code.
- debug code
- help document your HTML source code.
Example: <! -- Scripts are listed below -- >
Note: Comments are not displayed by the browser.
OBJECTS, OBJECTS, OBJECTS EVERYWHERE
Secondly, it is helpful to think of most elements as discrete OBJECTS on a page. While containers "contain" things. Objects have "properties." Remember, element's attributes can be thought of as properties of a given element. For example, height and width can be thought of as properties of the <img> object.
NOTE: It is important to note also that containers can be objects and objects can be containers.
BLOCK-LEVEL vs INLINE ELEMENTS
Thirdly, it is important to understand how elements are arranged in a page by default.
RULE: In the absence of any positioning techniques using CSS that will be explained later, page elements will be arranged one after another in the NATURAL ORDER in which they appear in the HTML code. However, where they position themselves depend if they are block level or inline elements.
Block-level Elements - STAND ALONE elements
BLOCK ELEMENTS (e.g., <p>, <div>, <blockquote>, <table> elements) will:
- start on a new line
- stack or will be arranged VERTICALLY from top to bottom
- fill 100% of the WIDTH of their parent container unless a WIDTH properties is specified. Useless a HEIGHT property is specified, a block element height will be determine by the the last element in the tag.
- have margins (or space) around them like paragraphs in a word processing program.
MEMORY TIP: It is helpful to think of block elements as paragraph formatting (e.g., line height/leading, paragraph spacing, etc.) in a word processing application.
Below is a list of block level elements:
| <address> | <canvas> | <dt> | <footer> | <hr> | <noscript> | <table> |
| <article> | <dd> | <fieldset> | <form> | <li> | <ol> | <tfoot> |
| <aside> | <div> | <figcaption> | <h1>-<h6> | <main> | <p> <pre> | <ul> |
| <blockquote> | <dl> | <figure> | <header> | <nav> | <section> | <video> |
Example: The following paragraphs have been styled with CSS (See CSS Manual) so that you can "see" these three characteristics more clearly:
This is a paragraph that has been styled with CSS
This is another paragraph that has been styled with CSS
NOTE: Notice the three rules: 100% of its parent container -- the body element, stacked top to bottom and space between them using the following CSS (p { border: solid 1px blue; })
Inline Elements - EXIST WITHIN other elements
INLINE ELEMENTS (e.g., <a> <img>, <q>, <span>, <strong>, <em>) are just the opposite of block-level elements, they will:
- does not start on another line
- stack HORIZONTALLY from the left to right (instead top to bottom),
- require only the amount of SPACE they need until they reach the edge of its container (i.e., <p> or <div> tag) after which they will be move down to the next line like a paragraph in a word processing application
- not have margin (or space) around them.
NOTE: Most formatting (inline and block-level) is done via CSS. The exceptions to the rule is the <strong> and <em> tags.
Below is a list of inline level elements:
| <a> | <bdo> | <cite> | <i> | <label> | <q> | <small> | <textarea> |
| <abbr> | <big> | <code> | <img> | <map> | <samp> | <span> | <time> |
| <acronym> | <br> | <dfn> | <input> | <object> | <script> | <strong> | <tt> |
| <b> | <button> | <em> | <kbd> | <output> | <select> | <sub> <sup> | <var> |
Example: The following paragraphs have been styled with CSS (See CSS Manual) so that you can "see" these three characteristics more clearly:
This is a paragraph that has been styled with CSS
This is another paragraph that has been styled with CSS
NOTE: Notice the three rules: only takes up the space it needs, stacked side-by-side HORIZONTALLY from left to right and NO spaces between other than the space you give them between them: (strong { border: solid 1px blue; } ).
NOTE: Inline elements are usually INSIDE of block-level elements. Notice in the example below the inline strong tags are nested inside of the larger block-level paragraph tag.
This is another paragraph that has been styled with CSS. This is another paragraph that has been styled with CSS. This is another paragraph that has been styled with CSS. This is another paragraph that has been styled with CSS. This is another paragraph that has been styled with CSS.
MEMORY TIP: It is helpful to think of inline elements as character formatting (e.g., bold, italic) in a word processing application.
REVIEW AGAIN: Their horizontal spacing can be adjusted using horizontal paddings, borders or margins. However, vertical paddings, borders, or margins will have no effect on the height of the inline box. To change the inline box height, the LINE HEIGHT property can be used. This is typically used to adjust the height of links that have been converted to block-level elements:
NOTE: An inline element can be converted to a block-level element by using CSS to override the natural display of an element. If set, if an inline element is set to display:block it will behave like a block-level element. This is typically used to convert an anchor element (an <a> tag) to a block box so that the "complete" area of the link is clickable instead of just the area under the text.
NOTE: Inline tags do not implicitly include a line break except for the line break tag (<br />) which is used to break the line but not the paragraph.
It is important to note there are other boxes that can be created:
- Block / Inline box – explained above
- No box – by setting the display property to none for an element, the element will be taken out of the document (i.e., display:none;) This is typically used to "suppress" certain portions of a page (i.e., header, sidebar, footer) when creating a "print" style sheet.
- Invisible box – by setting the display property to invisible for an element, the element will be made invisible but will still maintain its space in the document (i.e., display:invisible;)
NOTE:
- Div elements are used to group block-level containers; whereas, span elements are used to group inline elements.
NOTE: The <br /> is between a block level and inline element - Notice the <q> tag is an inline element typically used for a short quote inside a paragraph. It will add double quotes to its content. The <blockquote> is a block level tag is is used for a LONGER QUOTE. It does not add double quotes. Instead it will indent the paragraph on both sides. Some browsers may not show quote while other show double quotes when using the <q> tag. To get around this problem, you can use CSS to add visual effect like italics to its content as will be discussed later.
TIP: To insert a blockquote easily, click the Text Indent icon in the Properties Panel. This will wrap the <p> tags <blockquote> tags and indent both sides.
NOTE: Inline tags cannot contain block-level tags. Some block-level elements cannot contain other block-level elements. For example, a heading tag cannot contain a paragraph tag.
SEMANTIC OR MEANINGFUL MARKUP
Finally, it is important to use the correct markup tags when defining some elements. Semantic (or sometimes called meaningful) markup elements describe the content's meaning which allows CSS to target them for styling or positioning easier as will be seen. Examples would include:
- Heading elements (h1-h6)
- List elements (ul, ol an dl)
- Form (fieldset, legend, and label)
- Table (caption, thead, tbody and tfoot)
- Others (blockquote, cite, acronym, abbr, code, strong and em)
It is important NOT to "fake" a meaningful markup element with another element. For example, don't style the <p> element by changing its font size and font weight to match one of the heading elements. Otherwise, screen readers and search engines will not be able to recognize them correctly because they are looking for <h1>-<h6> elements instead of <p> elements trying to simulate heading elements.
NOTE: The blockquote tag alerts screen readers that the enclosed text is a quote and not just another paragraph.
NESTED TAGS
Some tags require other tags "nested" inside of them in order for them to be rendered. It is helpful to think of nested tags as parent/children relationship.
While not necessary, it is best practice to have the parent tags at the top and bottom of the code block and the children tags side-by-side:
<ol>
<li>List Item 1</li>
<li>List Item 2</li>
<li>List Item 3</li>
</ol>
Instead of this:
<ol><li>List Item 1</li><li>List Item 2</li><li>List Item 3</li></ol>
or this:
<ol>
<li>
List Item 1
</li>
<li>
List Item 2
</li>
<li>
List Item 3
</li>
</ol>
MEMORY TIP: It is helpful to think of the children tags as being "on the side" of its parents. Hence, side-by-side on the same line instead of top-to-bottom like its parent.
Here are a few examples of nested tags:
Order / Unordered List Tags: <ul> or <ol>
LIST TAGS – with <ol> or <ul> as the parent tag and <li> as the children tags.
Example in CODE View – ORDERED LIST (NUMBER LIST)
<ol>
<li>List Item 1</li>
<li>List Item 2</li>
<li>List Item 3</li>
</ol>
Result in DESIGN View:
1. List Item 1
2. List Item 2
3. List Item 3
Example in CODE View – UNORDERED LIST (BULLET LIST)
NOTE: By simply changing both the <ol> tags above to <ul> tags, you can convert it to an unordered list.
<ul>
<li>List Item 1</li>
<li>List Item 2</li>
<li>List Item 3</li>
</ul>
Result in DESIGN View:
- List Item 1
- List Item 2
- List Item 3
DEFINITION LIST – with definition list <dl> tag as the parent tag and definition term <dt> tag and definition defined <dd> tags as the children tags.
Example in CODE View:
<dl>
<dt>term1</dt>
<dd>definition 1 goes here</dd>
</dl>
<dl>
<dt>term2</dt>
<dd>definition 2 goes here</dd>
</dl>
Result in DESIGN View:
- term1
- definition 1 goes here
- term2
- definition 2 goes here
NOTE: The definition <dd> tag has a built-in indention.
Combo box or List Tag: <select>
Select / List – with <select> tag as the parent tag and the <option> as the children tags.
Example in CODE View:
<select>
<option>Option 1</option>
<option>Option 2</option>
<option>Option 3</option>
</select>
NOTE: The Menu allows a user to only make a SINGLE selection. However, it does save space over a List (discussed next).
Result in DESIGN View (menu):
NOTE: If you simply add a size attribute to the <select> tag, you create a list instead of a menu:
Example in CODE View:
<select size = "3">
<option>Option 1</option>
<option>Option 2</option>
<option>Option 3</option>
</select>
Result in DESIGN View (list):
Please hold down the CTRL or COMMAND key and click to choose multiple options
NOTE: The size attribute determines the number of options the list will display in its container even though there may be more options than the size amount.
NOTE: The advantage of the List over the Menu is that the List allows a user to select MULTIPLE options at one time. To enable this functionality, add the following attribute ( multiple="multiple" ) to the <select> tag. It is best practice to inform users with a brief instruction to let them know they can make multiple selections (i.e., Please hold down the CTRL or COMMAND key and click to choose multiple options.)
Table Tag: <table>
Table – with <table> as the parent tag of the <th> or <td> and the <td> tags as the children of the <th> or <td> tag.
Example in CODE View: Heading on top - <th> tags are only in the FIRST table row <tr> tag
<table border="1">
<tr>
<th>Heading 1 in column 1</th>
<th>Heading 2 in column 2</th>
</tr>
<tr>
<td>Table data goes here</td>
<td>Table data goes here</td>
</tr>
</table>
NOTE: It is helpful to think of the table row <tr> tag as the table row(s) and the table data <td> as the table column(s) since there is no concept of a table column <tc> tag. The <th> tag can serve as a row or column. It differs from the <td> tag in that the text is centered and in bold.
Result in DESIGN View:
| Heading 1 in column 1 | Heading 2 in column 2 |
|---|---|
| Table data goes here | Table data goes here |
Example in CODE View: Header on side – <th> tags are in EACH table row <tr> tag
<table border="1">
<tr>
<th>Header 1</th>
<td>Table data 1</td>
</tr>
<tr>
<th>Header 2</th>
<td>Table data 2</td>
</tr>
</table>
Result in DESIGN View:
| Header 1 | Table data 1 |
|---|---|
| Header 2 | Table data 2 |
<form> Tags
form – with <form> as the parent tag of the <input> or <select> and the <text> tags as the children tag.
Example in CODE View:
<form id="form1" name="form1" method="post" action="">
<p>
<label for="textfield2">Name</label>
<input name="textfield" type="text" id="textfield2" size="40" />
</p>
<p>
<label for="textfield3">Email</label>
<input name="textfield2" type="text" id="textfield3" size="40" />
</p>
<p>
<label for="textarea">Message<br />
</label>
<textarea name="textarea" id="textarea" cols="45" rows="5"></textarea>
</p>
<p>How can we contact you?</p>
<p>
<label>
<input type="checkbox" name="Contact" value="checkbox" id="Contact_0" />
Email</label>
<br />
<label>
<input type="checkbox" name="Contact" value="checkbox" id="Contact_1" />
Phone</label>
</p>
<p>States you have visited:</p>
<p>
<select name="select" id="select">
<option value="La">Louisiana</option>
<option value="Miss">Mississippi</option>
<option value="Tx">Texas</option>
<option value="Ca">California</option>
<option value="Utah">Utah</option>
</select>
</p>
<p>
<input type="submit" name="button" id="button" value="Submit Feedback" />
<br />
</p>
<p> </p>
</form>
Result in DESIGN View:
TAGS AND ATTRIBUTES TO AVOID
Do NOT use:
<font> tag – Use CSS font properties instead
<table> tag for Page Layout – Use CSS div tags instead. Table tags should only be used for TABULAR data
<b> or <i> tags – Use <strong> and <em> tags instead. These tags hopefully will used by screen readers to emphasize words better
align="center" attribute – Use margin: 0 auto CSS property instead. For example, to center a table, you could use table { margin: 0 auto; }
<pre> tag unless you have a compelling reason to do so. The <pre> tag is used to display text EXACTLY as you type without entity in them. It is mainly used to::
- preserve spacing and line breaks and is rendered in mono-space font by default. However, you can style them with CSS. Using the <pre> tag is akin to using a simple notepad editor.
- prevent browser from eliminating multiple space and ignoring embedded breaks.
The <pre> tag can contain most tags except those that create a paragraph break (e.g., <p> element).