Dynamic Form Example
(Progressive Programming)
Resources:
Dynamic Form Example (Complete)
Lay A Good Foundation
Before doing any programming, it is best to lay a good foundation by creating some or all of the objects that you will need, give them names, and then instruct them to do whatever you want.
A. Create Objects
Before making objects interactive or dynamic, it is best to create objects first without any associated CSS or JavaScript code. This is called the presentation layer.
- In Dreamweaver (or your favorite editor), create the framework for a blank HTML page. This is the HTML "framework" objects (html, head, body, etc.)
CODE VIEW:
!doctype html>
<html>
<head>
<meta charset="utf-8">
<title>Dynamic Form</title>
</head>
<body>
</body>
</html>
- Add the following "form" object and form element objects between the body element.
CODE VIEW:
<body>
<!-- Login Info -->
<h1>Dynamic Form</h1>
<form action="" method="post" target="_blank">
<fieldset>
<legend>Login</legend>
<label name="username" for="username">UserName:</label>
<input type="text" name="username" id="username"><br>
<label name="password" for="password">Password:</label>
<input type="password" name="password" id="password"><br/><br/>
<input type="submit" value="Login">
</fieldset>
</form>
<br/><br/>
</body>
DESIGN VIEW:
Dynamic Form
- Add the following "button" object BELOW the closing </form> element and then add a series of line breaks on both sides to add space on both sides of the button:
CODE VIEW:
</form>
<br/><br/>
<button>Show Registration Form</button>
<br/><br/>
DESIGN VIEW:
Dynamic Form
- Add the following form and form elements BELOW the break line elements:
CODE VIEW:
<br/><br/>
<!-- Registration Info -->
<form action="" method="post" target="_blank"><fieldset>
<legend>Personal information</legend><label for ="firstname">First Name:</label>
<input type="text" name="firstname" id="firstname"><br><label for ="lastname">Last Name:</label>
<input type="text" name="lastname" id="lastname"><br><br><p>Gender:</p>
<input id="male" type="radio" name="gender" value="male">
<label for="male"> Male</label><br>
<input id = "female" type="radio" name="gender" value="female">
<label for="female"> Female</label><br/><br/></fieldset>
<p>How do you get around town?</p>
<input type="checkbox" name="walk" value="walk">
<label for="walk">I walk</label><br/>
<input type="checkbox" name="bike" value="bike">
<label for="bike"> I bike</label>
<br/>
<input type="checkbox" name="bus" value="bus">
<label for="bus"> I take a bus</label>
<br/>
<input type="checkbox" name="car" value="car">
<label for="car"> I drive my car</label>
<br/>
<input type="checkbox" name="train" value="train">
<label for="train"> I take a train</label>
<br/><br/><input type="submit" value="Register">
<input type="reset" value="Clear Form"><br><br>
<input type="button" onclick="alert('More Info goes here...!')" value="More Info">
</form>
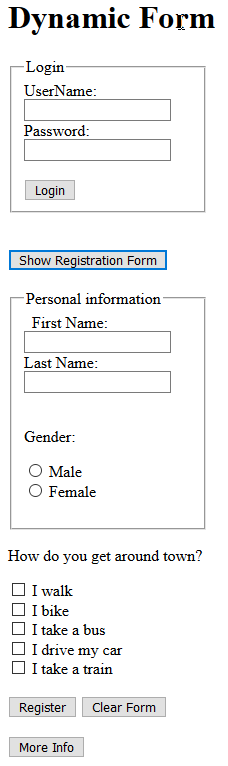
DESIGN VIEW:
Dynamic Form
B. Give Objects Names
While we could have named the objects at the same time we created them, we wanted to do these steps in a systematic manner. This step is used so that these objects can be "talk to" (or reference -- geek term) via CSS and JavaScript later.
- Give name to each of the three major parent objects by adding id attributes to each one of them.
<form id="loginForm" action="" method="post" target="_blank">
<button id="registrationButton">Show Registration Form</button>
<form id="registrationForm" action="" method="post" target="_blank">
- Save the file.
C. Tell Objects What To Do
Once you create objects, then you can tell them what to do or tell them to tell other objects what to do via CSS or JavaScript.
First, we will "talk" to the objects via CSS. An object need a name in order for it to be talked to. It can be its surname (form - similar to a family last name) or its nickname (id value: #registrationForm). Since the form name is common to multiple objects in our example (just as a last name is common to all family members), ALL form elements will be affected. However, the id name is unique (like a fingerprint to each individual of a given family),so only one element can be targeted with it.
- Below the title element, add a style element with the following CSS rule:
CODE VIEW:
<title>Dynamic Form</title>
<style>
form{width: 200px}
</style>
DESIGN VIEW:
Dynamic Form
NOTE: Notice the width property changed for BOTH forms to 200px.
- Add another rule to the style element.
CODE VIEW:
<style>
#registrationForm{display:none;}
fieldset{width: 200px}
</style>
DESIGN VIEW:
Dynamic Form
NOTE: Notice the Registration form has disappeared.
Inspect What You Expect
As a beginner programmer, it is important to inspect portions of your code to ensure that you are getting correct values, data types, etc.
A. Spot Check Code
It is not always obvious as to the type of value that an object returns.
- Add the following onClick attribute to the button element to invoke (or call) the showHideRegitrationForm() function that will be created in the next step:
NOTE: A function as the name implies "tell" an object how to "function" (WOW - Spell it backward - WOW). A function name should reflect what is will "do," In this case, show or hide the registration form.
<button onClick ="showHideRegistrationForm" id="registrationButton">Show Registration Form</button>
- Below the closing script tag (</style>), write the following script element with an alert command.
CODE VIEW:
</style>
<script>
function showHideRegistrationForm()
{
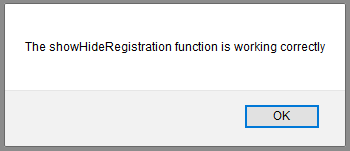
alert("The showHideRegisstration function is working correctly");
}
</script>
- Save the file and preview it in a browser.
- TEST RESULT: If you click on the Show Registration Form button, you will see the alert dialog box display the message that was added the the alert method.. Click the OK button to dismiss the dialog box.
B. Create Stub Code
Stub (noun) - a web page or app code that provides only minimal information (temporary code) that is intended for later development with the actual code.
As a beginner developer and sometimes as an experienced developer, it is good to "stub" out the code to see if the functions are working as expected.
- Comment out alert method as it was used on to see if the function was working correctly and then add the following variable to the function and then trace it with another alert method;
function showHideRegistration()
{
// alert("The showHideRegisstration function is working correctly");
var registration = document.getElementById("registrationForm")
alert (registration);
}
NOTE: The registration variable is only use to store a reference of the form object so that this complete line of code is compact and can be used easier for the rest of the code. It is optional but save you from having to type this reference every time you need to use it.
- Save the file and preview it in a browser.
- TEST RESULT: If you click on the Show Registration Form button this time, you will see the alert dialog box display a weird message. Click the OK button to dismiss the dialog box.

C. Replace With Actual Code
Once you have created stubs for your code and they are working as expected, it time to replace those stubs with actual code.
- Comment out alert second method as it was used only to see see what value it would return and then add the following code to the function:
function showHideRegistrationForm()
{
// alert("The showHideRegistration function is working correctly");
var registration = document.getElementById("registrationForm");
// alert (registration);
registration.style.display ="block";
}
- Save the file and preview it in a browser.
- TEST RESULT: If you click on the Show Registration Form button this time, you will see the SECOND FORM get displayed. However, if you click on the button again nothing happen. This will be resolved in the next section.
Enhance Code
While we could stop at the previous step, we could enhance the code so that the button behave as a toggle.
A. Comment Code
Particularly true for beginner developers, it is important to comment your code so that if you or someone else needs to refer to it several months later to determine what was done or why it was done. You will find out that the more proficient you become at programming, the less you will have a tendency to comment your code because you will know the code better and you will make your code more self-commenting through the use of descriptive names of variables, functions, methods, etc.
- Add the following highlighted comments to the function. Add any other comment as you see fit.
function showHideRegistrationForm()
{
//alert("The showHideRegistration function is working correctly");
var registration = document.getElementById("registrationForm");
//alert (registration);
// Create a toggle function to show or hide second form using an if/then and else statement
// registration.style.display ="block";
}
NOTE: Comments are not executed when the program runs, so you can add as many as you like.
- Save the file and preview it in a browser.
- TEST RESULT: You should see that your code works just the same with or without comments.
B. Make Code Flexible
Instead of a static code, you can make the code more flexible:
- Add the following "if" statement within the function:
// alert (registration);
// Create a toggle function to show or hide second form
// registration.style.display ="block";
if (registration.style.display === "block")
{
registration.style.display = "none";
}
else
{
registration.style.display = "block";
}
- Save the file and preview it in a browser.
- TEST RESULT: If you click on the Show Registration Form button this time, you will see the SECOND FORM get displayed. And if you click again, you will see that it will be hidden. Click on the button several times to see that it acts as a toggle function. However, we have the problem of the button showing Show Registration Form all the time. This will be resolved in the upcoming steps.
- Add the following highlighted code to the function:
function showHideRegistrationForm()
{
// alert("The showHideRegistration function is working correctly");
var registration = document.getElementById("registrationForm");
var regButton = document.getElementById("registrationButton");
// alert (registration);
// Create a toggle function to show or hide second form
// registration.style.display ="block";
if (registration.style.display === "block")
{
registration.style.display = "none";
regButton.innerHTML = "Show Registration Form";
}
else
{
registration.style.display = "block";
regButton.innerHTML = "Hide Registration Form";
}
}
NOTE: The innerHTML property is used to change the inner HTML content with the button element.
- Save the file and preview it in a browser.
- TEST RESULT: If you click on the Show Registration Form button several times, you will see that the button Label toggle based on if the form is displayed or not.
C. Add New Features
Once you have completed the basic needs of your project, you may want to add some additional features or improvement to your project. For example, you may want to add the ability to:
- change onClick method to an event listener.
- change the width of the Show Registration Form button so that it does not flicker when clicked.
- and more...
As a beginner developer you should always strive to make your code more flexible by separating the code from the tag elements, using functions, etc.
It is best practice not to have code "coupled" with the elements on the page. One way to decouple your code is to use event listeners instead of simply event attributes.
IMPORTANT CONCEPT TO REMEMBER: Instead of invoking the showHideRegistrationForm() function from WITHIN the button, an addEventHandler method will be used so that it will add this functionality to the button element from a distance so that the code can be made more flexible. For example, now you can cut and paste the code in the script element and paste it in another document and link it to a different element by using the element id attribute. Let's see how this works.
- Delete the onClick attribute in the button element.
<buttononClick ="showHideRegistrationForm()"id="registrationButton">Show Registration Form</button>
- Move the regButton variable OUTSIDE of the function and then add the event handler.
CODE VIEW:
<script>
var regButton = document.getElementById("registrationButton");
regButton.addEventListener("click", showHideRegistrationForm);
function showHideRegistrationForm()
{
//alert("The showHideRegistration function is working correctly");
var registration = document.getElementById("registrationForm");
// var regButton = document.getElementById("registrationButton");
//alert (registration);
// Create a toggle function to show or hide second form
//registration.style.display ="block";
if (registration.style.display === "block") {
registration.style.display = "none";
regButton.innerHTML = "Show Registration Form";
} else {
registration.style.display = "block";
regButton.innerHTML = "Hide Registration Form";
}
}
</script>
- Wrap the entire script in a window.onload function. This function ensures that all of the object references get loaded in memory BEFORE they are referenced in code. Otherwise, the code will not work.
ALTERNATIVE: Instead of adding the window.onload function code, you could move the entire script element above the closing body tag (</body>). This allow all of the HTML elements to get loaded BEFORE the script code is executed so that objects can be referenced.
CODE VIEW:<script>
window.onload = function() {
var regButton = document.getElementById("registrationButton");
regButton.addEventListener("click", showHideRegistrationForm);
function showHideRegistrationForm()
{
//alert("The showHideRegistration function is working correctly");
var registration = document.getElementById("registrationForm");
// var regButton = document.getElementById("registrationButton");
//alert (registration);
// Create a toggle function to show or hide second form
//registration.style.display ="block";
if (registration.style.display === "block") {
registration.style.display = "none";
regButton.innerHTML = "Show Registration Form";
} else {
registration.style.display = "block";
regButton.innerHTML = "Hide Registration Form";
}
}
} // end of window.load code block
</script>
- Save the file and preview it in a browser.
- TEST RESULT: You should see that it works the same. However, the code is more flexible because now you can copy the code within the script element, paste it into another document, and call a total different object.