JSON (JavaScript Object Notation)
JSON is written with a TEXT based JavaScript Object Notation that is used to STORE or EXCHANGE data. It is important to note that JSON is NOT an OBJECT—it is a JavaScript Object NOTATION which is simply text. However, it may be stored as an object (var myObject = JSON (JavaScript Object Notation).
Because JSON is text, it can be read and used as a data format by any programming language which makes it language independent.
IMPORTANT NOTE: There is no such thing as a JSON object. It is not an object but a STRING.,
When exchanging data between a browser and a server, the data must be text, so JSON is an ideal solution to accomplish this task:
- A JavaScript object can be converted to the JSON format that can then be send to a server OR
- JSON received from a server can be converted to a JavaScript object(s) so that it does not have to be parsed.
JSON Syntax
The JSON syntax is a VERY SIMILAR to a JavaScript Object syntax, hence, its name. Data is created as name/value (or sometimes called key/value) pairs separated by a colon with each name/value pair separated by a comma and all name/value pairs within a set of curly braces:
{"name1" : value1, "name2" : value2,"name3" : value3}
- Because name (key) is a string, it must be in DOUBLE quotes.
- Value is in double quotes only if it is a string. Other value types include: number, object, array, boolean or null.
JavaScript Framework
The window.onload code block method is used for convenient for each example in this tutorial:
<script>
window.onload = function(){

} // end of window.onload function
</script>
However, it is best practice to use either:
- jQuery's $(document).ready()
- $(window).load()
- cross-browser event listeners
- Inside of an HTML page, create the framework for writing JavaScript code to load before the page load with a window.onload = function() code block that is inside a set of script tag.
<script>
window.onload = function(){

} // end of window.onload function
</script> - Write the following JavaScript object between the curly braces:
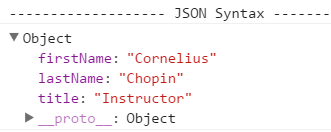
<script>
window.onload = function(){
console.log("---------- JSON Syntax ------------");
{"firstName":"Cornelius", "lastName":"Chopin", "title":"Instructor"}
} // end of window.onload function
</script>
This will allow you to use these more than once. You could also avoid using the window.onload code block by placing the code in a script tag above the closing body tag (</body>) and reference an external JavaScript file (<script src= "externalJavaScript.js"></script>). Like CSS external file (*.css), the JSON syntax is written in an external file with an *.json extension.
Assign JSON to an Object
You can assign JSON to a object (variable):
NOTE: Besides a JavaScript object, an array can also be used to create a JSON format.
- Assign the JSON format to an object (var myPersonalObject) using the assignment operator (=) and close it with a semicolon (;).
var myPersonalObject = {"firstName":"Cornelius", "lastName":"Chopin", "title":"Instructor"}; - Write the following code to trace the result in the Console panel:
var myPersonalObject = {"firstName":"Cornelius", "lastName":"Chopin", "title":"Instructor"};
console.log(myPersonalObject); - CHECK POINT: Save the file and preview it in a browser. Then, press CTRL+SHIFT+I to open the Console panel. You should see the following:
Access Data
You can access data from an object by using the dot syntax (object.property_name):
- Write the following code below the console.log statement:
var myPersonalObject = {"firstName":"Cornelius", "lastName":"Chopin", "title":"Instructor"};
console.log(myPersonalObject); console.log(myPersonalObject.firstName + " " + myPersonalObject.lastName); - CHECK POINT: Save the file and preview it in a browser. Then, press CTRL+SHIFT+I to open the Console panel. You should see Cornelius Chopin in the Console panel.
CAUTION: Be careful NOT to use a DOT (.) which is used only by the dot syntax when attempting to use the array syntax ( myPersonalObject.["firstName"]); otherwise, you will get an error (Uncaught SyntaxError: Unexpected token [ ).
Modify Data
Data in an object can be accessed by assigning the property name a new value:
- Add the following highlighted code to the previous code:
console.log(myPersonalObject);
myPersonalObject.firstName = "Sheila";
console.log(myPersonalObject.firstName + " " + myPersonalObject.lastName); - CHECK POINT: Save the file and preview it in a browser. Then, press CTRL+SHIFT+I to open the Console panel. You should see that it display Shela this time instead of Cornelius.
Send Data To Server
Data is a JavaScript object can be converted to a JSON string using the JSON.stringify() function BEFORE it is sent to a server:
- Write the following code with a script tag within a window.onload code block:
<script>
window.onload = function(){
console.log("------ SEND DATA ------");
var myPersonalObject = {"firstName":"Cornelius", "lastName":"Chopin", "title":"Instructor"};
var myJSON = JSON.stringify(myPersonalObject);
window.location = "my_json_data.php?x=" + myJSON; // [Add php file later]
}	// end of window.onload function
</script> - Write the following PHP file in the htdocs folder of the server:
[NEED TO DO LATER] - CHECK POINT: Save the file and preview it in a browser. Then, press CTRL+SHIFT+I to open the Console panel. You should see...
CODE EXPLANATION:
- The JSON.stringify() function is used to convert the JavaScript object to a JSON string.
- The window.location property is used to send the data to a server.
Receive Data
If data is received in a JSON format, JavaScript can use the built-in JSON.parse() function to convert a JSON formatted string into a native JavaScript object(s).
- Write the following HTML in the body:
<h1 id="myData">This phrase will be replaced with dynamic content later.</h1>
- Write the following highlighted code within a script tag and within a window.onload code block:
IMPORTANT NOTE: Notice that a JavaScript object is wrapped in a set of SINGLE quotes to SIMULATE a JSON string from a server.
<script>
window.onload = function(){
console.log("------ RECEIVE DATA ------");
var myPersonalObject = '{"firstName":"Cornelius", "lastName":"Chopin", "title":"Instructor"}';
console.log("-------------- Receive Data ------------");
console.log(myPersonalObject);
var myObject = JSON.parse(myPersonalObject);
document.getElementById("myData").innerHTML = myObject.firstName + " " + myObject.lastName;
}	// end of window.onload function
</script> - CHECK POINT: Save the file and preview it in a browser. You should see Cornelius Chopin on the page as a h1 tag. Then, press CTRL+SHIFT+I to open the Console panel. You should see the LITERAL STRING ({"firstName":"Cornelius", "lastName":"Chopin", "title":"Instructor"}) because the JavaScript object was enclosed in single quote to make it a string.
Exceptions
- A date object is NOT allowed in JSON. Instead, write it as a string and then convert it back to a date object.
- A function also is not allowed in JSON. However, you can write it as a string and then convert it back to function using the eval() function.
EXAMPLE: Open the receive_data.html file created earlier and save it as receive_data_with_date.html, make the following highlighted changes and then preview result in browser.
EXAMPLE PAGE
<script>
window.onload = function(){
console.log("------ RECEIVE DATA WITH DATE ------");
var myPersonalObject = '{"firstName":"Cornelius", "lastName":"Chopin", "title":"Instructor", "startDate":"12-12-12"}';
console.log(myPersonalObject);
var myObject = JSON.parse(myPersonalObject);
myObject.startDate = new Date(myObject.startDate);
document.getElementById("myData").innerHTML = myObject.firstName + " " + myObject.lastName + "<br>" + myObject.startDate;
} // end of window.onload function
</script>
Alternatively, the optional second parameter of the JSON.parse() called reviver which is a function can be used to check each property before returning a value.
Delete the highlighted strikethrough line and and the other hightlighted lines.
<script>
window.onload = function(){
console.log("------ RECEIVE DATA WITH DATE------");
var myPersonalObject = '{"firstName":"Cornelius", "lastName":"Chopin", "title":"Instructor", "startDate":"12-12-12"}';
console.log(myPersonalObject);
var myObject = JSON.parse(myPersonalObject, function (key, value) {myObject.startDate = new Date(myObject.startDate);
if (key == "startDate") {
return new Date(value);
} else {
return value;
}
}); // End of if statement
document.getElementById("myData").innerHTML = myObject.firstName + " " + myObject.lastName + "<br>" + myObject.startDate;
} // end of window.onload function
</script>
Store And Retrieve Data Locally
When storing and retrieving data locally, the text format is a common format to use.
- Write the following highlighted code within a script tag and within a window.onload code block:
<script>
window.onload = function(){
var myPersonalObject = {"firstName":"Cornelius", "lastName":"Chopin", "title":"Instructor"};
var myJSON = JSON.stringify(myPersonalObject);
// Store data TO Local Storage
localStorage.setItem("storeJSON", myJSON);

// Retrieving data FROM Local Storage
text = localStorage.getItem("storeJSON");
myObject = JSON.parse(text);
document.getElementById("myData").innerHTML = myObject.firstName + " " + myObject.lastName;
}	// end of window.onload function
</script> - CHECK POINT: Save the file and preview it in a browser. You should see Cornelius Chopin displayed on the page because it was STORE LOCALLY FIRST and then RETRIEVED. Then, press CTRL+SHIFT+I to open the Console panel. You should see the LITERALLY text string:
{"firstName":"Cornelius","lastName":"Chopin","title":"Instructor"}
NOTE: In a real world example, the data would be store after someone entered information into a form field and then when the page is closed and the reopened, the data will persist.
EXCEPTIONS:
- A date object ("today":new Date()) is not allowed in JSON. Using the stringify function() will as the name implies convert them to strings. It can be converted back to a date object later.
- A function is not allowed in JSON using the stringify function(). It will be removed if you attempt to add one. To work about this, the function can be converted to a string BEFORE executing the JSON.stringify() function.
You should see: {"firstName":"Cornelius", "lastName":"Chopin", "title":"Instructor", "numClasses":"function () {return 3"}
<script>
var myPersonalObject = {"firstName":"Cornelius", "lastName":"Chopin", "title":"Instructor", "numClasses":function () {return 3;}};
myPersonalObject.numClasses = myPersonalObject.numClasses.toString();
var myJSON = JSON.stringify(myPersonalObject);
document.getElementById("myData").innerHTML = myJSON;
</script>
Looping An Object
The for..in loop is used to get the properties of an object. Since the JavaScript object can be treated as an array, it can be accessed by using the object property.
- Write the following HTML in the body:
<h1 id="myData"></h1>
- Write the following highlighted code within a script tag and within a window.onload code block:
<script>
window.onload = function(){
var myPersonalObject = {"firstName":"Cornelius", "lastName":"Chopin", "title":"Instructor"};
  for (x in myPersonalObject) {
    document.getElementById("myData").innerHTML += x + "<br>";
}
}	// end of window.onload function
</script> - CHECK POINT: Save the file and preview it in a browser. You should see the object's property names: firstName, lastName and title shown on separate lines. Not quite what we wanted. This will be resolved in the next step.
- Write the following code below the previous code:
var myPersonalObject = {"firstName":"Cornelius", "lastName":"Chopin", "title":"Instructor"};
  for (x in myPersonalObject) {
    document.getElementById("myData").innerHTML += x + "<br>";
   }
var myPersonalObject = {"firstName":"Cornelius", "lastName":"Chopin", "title":"Instructor"};
  for (x in myPersonalObject) {
      document.getElementById("myData").innerHTML += myPersonalObject[x] + "<br>";
} - CHECK POINT: Save the file and preview it in a browser. You should see the object's property values: Cornelius, Chopin, and Instructor shown on separate lines.
Nesting Objects
An object or multiple objects can be nested inside of its parent object.
- Write the following HTML in the body:
<h1 id="myData"></h1>
- Write the following highlighted code within a script tag and within a window.onload code block:
<script>
window.onload = function(){
// Nesting Objects
var myWorkObject = {"firstName":"Cornelius",
                    "lastName":"Chopin",
                    "title":"Instructor",
                    "classes": {"class1":"Photoshop",
                                "class2":"Dreamweaver",
                                "class3":"Illustrator"}
};
document.getElementById("myData").innerHTML = myWorkObject.classes.class1;
}	// end of window.onload function
</script> - CHECK POINT: Save the file and preview it in a browser. You should see Photoshop displayed on the pageel.
NOTE: You could have also accessed the property using the array syntax: document.getElementById("myData").innerHTML = myWorkObject.classes["class1"];
You access or modify a nested object just like regular object, but you have to DRILL DOWN farther into the object:
ACCESS: var access_object = myWorkObject.classes.class1;
MODIFY: myWorkObject.classes.class1 = "After Effects"; or myWorkObject.classes["class1"] = "After Effects";
Looping Nested Objects
You can also loop through nested objects. The key is that you have to DRILL DOWN farther into the object.
- Write the following HTML in the body:
<h1 id="myData"></h1>
- Write the following highlighted code within a script tag and within a window.onload code block:
<script>
window.onload = function(){
// Looping Nested Objects
...
}	// end of window.onload function
</script> - CHECK POINT: Save the file and preview it in a browser. You should see Photoshop displayed in the console panel.
NOTE: You could have also accessed the property using the array syntax: document.getElementById("myData").innerHTML = myWorkObject.classes["class1"];
You access or modify a nested object just like regular object, but you have to DRILL DOWN farther into the object:
ACCESS: var access_object = myWorkObject.classes.class1;
MODIFY: myWorkObject.classes.class1 = "After Effects"; or myWorkObject.classes["class1"] = "After Effects";
Delete Object's Property
The delete keyword is used to delete an object's property (duh).
- Write the following highlighted code within a script tag and within a window.onload code block:
NOTE: The "for" loop is only used to show that the object's property was indeed deleted.
// Deleting an object's property
<script>
window.onload = function(){
var myWorkObject = {"firstName":"Cornelius",
                    "lastName":"Chopin",
                    "title":"Instructor",
                    "classes": {"class1":"Photoshop",
                                "class2":"Dreamweaver",
                                "class3":"Illustrator"}
};
document.getElementById("myData").innerHTML += myWorkObject.classes.class1;
delete myWorkObject.class.class2;
for (i in myWorkObject.classes) {
   x += myWorkObject.class[i] + "<br>";
}
document.getElementById("myData").innerHTML = x;
}	// end of window.onload function
</script> - CHECK POINT: Save the file and preview it in a browser. You should see that Dreamweaver is not listed in the result.
JSON From A PHP Server
JSON is commonly used to read data from a web server to display it on a web page. PHP has built-in functions that works with PHP. JavaScript objects can be converted into JSON using the json_encode() function.
- Turn on the server if it is not already on.
TIP: Using XAMPP, in the xampp folder, double-click on the xampp-control icon and then click both the Apache and MySQL Start buttons.
- Create a site and set up a server for it.
TIP: Using Dreamweaver, follow these steps:- Select Site > New Site... from the menu.
- In the Site Setup dialog box that appears with the Site option selected on the left:
- add a Site name (PHP Server Demo) and
- add a Local Site Folder (C:\xampp\htdocs\PHP Demo\).
- Select the Servers option on the left and then click on the plus sign icon (+) to create a new server and then:
- Add the following options:
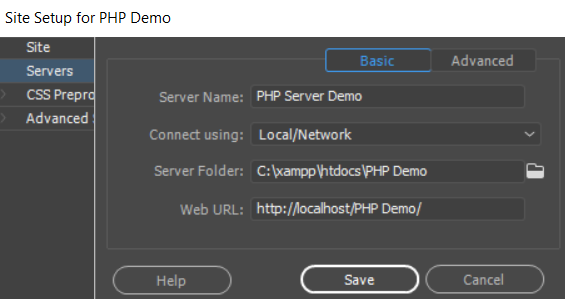
- Add the following options:
- Click the Advanced tab and in the Server Model drop-down list, select PHP MySQL.
- Click the Save button and then then the Done button to complete the setup.
- Write the following PHP code between the body tab in an HTML file in the htdocs folder and name it myData.php.
<?php
	echo phpinfo();
?>
- CHECK POINT: Save the file and preview it in a browser. You should see the PHP info displayed on the page. This was done to verify that the server is working correctly.
- Replace the echo statement with the following PHP code:
<?php
$myObject = new stdClass();
$myObject->firstName = "Cornelius";
$myObject->lastName = "Chopin";
$myObject->title = "Instructor";

$myJSON = json_encode($myObject);

echo $myJSON;
?>
NOTE: The $myObject = new stdClass(); statement is used; otherwise, you would get the following warning:
Warning: Creating default object from empty value in C:\xampp\htdocs\PHP Demo\TMP1vvnnu9.php on line 10
An array in a PHP file can also be converted into JSON. The example below will return: ["Cornelius","Chopin","Instructor"]
<?php
$myArr = array("Cornelius", "Chopin", "Instructor");
$myJSON = json_encode($myArr);
echo $myJSON;
?>
- CHECK POINT: Save the file and preview it in a browser. You should see the following displayed on the page. Notice that the json_encode($myObject) returned a JavaScript object.
{"firstName":"Cornelius","lastName":"Chopin","title":"Instructor"}
- Write the following code in a PHP page and save it as myPHP_Page.php:
<!doctype html>
<html>
<body>
<h2>Retrieve JSON from PHP file on server.</h2>
<p id="myPHPData"></p>

<script>
var xmlhttp = new XMLHttpRequest();
xmlhttp.onreadystatechange = function() {
if (this.readyState == 4 && this.status == 200) {
var myJSON = JSON.parse(this.responseText);
document.getElementById("myPHPData").innerHTML = myJSON.firstName + " " + myJSON.lastName;
}
};
xmlhttp.open("GET", "myData.php", true);
xmlhttp.send();
</script>

</body>
</html>
CODE EXPLANATION:
- JSON from a server is done by making an AJAX request and then the JSON string is parsed into a JavaScript object.
- If an array were used, replace the document.getElementById method with syntax similar to this:
document.getElementById("myData").innerHTML = myJSON[1];
- CHECK POINT: Save the file and preview it in a browser. You should see the following Cornelius Chopin displayed on the page.
JSON HTML
JSON HTML content goes here...
JSONP
JSONP content goes here...
JSON vs XML
There are alot of SIMILARITIES between JSON and XML. They both:
- can be used to receive data from a web server
- can be read by human
- can be parsed
- can be called with an XMLHttpRequest
However, there are some DIFFERENCES betweeen JSON and XML. JSON:
- code is more concise
- easier to read and write
- easier to parse into JavaScript object (JSON.parse(text);)
- doesn't use tags
- can use arrays
See examples below:
// JSON EXAMPLE
{"employees":[
     { "firstName":"Cornelius", "lastName":"Chopin" },
     { "firstName":"John", "lastName":"Doe" },
     { "firstName":"Mary", "lastName":"Jane" }
 ]}
NOTE: As part of a name/value pair, notice that "employees" is the name and the value is an array of objects.
// XML EXAMPLE
<employees>
    <employee>
        <firstName>Cornelius</firstName>
        <lastName>Chopin</lastName>
    </employee>
    <employee>
        <firstName>John</firstName>
        <lastName>Doe</lastName>
    </employee>
    <employee>
        <firstName>Mary</firstName>
        <lastName>Jane</lastName>
    </employee>
</employees>
NOTE: It is common practice to use a PLURAL noun (employees) as the top-level node of an XML file and a SINGLE noun (employee) as the repeating nodes.