Linking Options
This tutorial will show you mainly how versatile the anchor element (e.g., <a href= "">Link Text</a>) is. Beside using it to create a navigational bar (See Horizontal and Vertical Menus) using CSS, the <a> tag has many other uses to help a user navigate the web.
Link (Text)
Creating a regular text link is the hallmark of any web site/web app. There are ten ways to a regular text link which allows you to navigate from one page to another.
Simply select a word or multiple words you want to convert to a link and then:
From the Properties Panel:
- Type a link in the Link field that is part of your site or a link to another site (See relative vs. absolute links).
- Click the Browse for file icon and navigate to a file you want to link and then click the OK button.
NOTE: The folder option is best used when you need to connect to dynamic content (dynamic image) using the Data source checkbox instead of the File System checkbox.
- Click the Point-To-File icon and drag it to a file in the Files panel to link to an existing file.
NOTE: If the folder with the file you are attempting to link is not open, Dreamweaver will automatically open the folder when you hover over it with the Point-To-File icon.
From the Design View: - Right-click and select Make Link from the menu and navigate to a file and then click the OK button.
From the Main Menu: - Select Edit > Link > Make Link and then navigate to file and then click the OK button.
- Select Insert > Hyperlink and then navigate to file and then click the OK button.
- Select Insert > HTML > Hyperlink and navigate to a file and then click the OK button.
NOTE: If you don't have any text selected, you can create text and its link at the same time
From the Code View: - Type the link manually into a code view (e.g., This is a <a href="newpage.html">Link.</a>) will yield: This is a link.)
From the File Panel:
- Drag and drop a file from the File panel to the page to create a link using the file name.
From the Insert Panel: - Select the HTML option, click the Hyperlink option and in the dialog box that appears, type a link or navigate to the file.
EXAMLPLE: Click this link.
NOTES:
- Most of the times, you can simply get by with pointing to a file at the top-level directory (also called parent (e.g., index.html) or a folder DOWN from the parent (e.g., images/mypicture.jpg). However, if you need to go UP a folder, you can use the shorthand for the parent directory (e.g., ../products/product1.html). Notice the "../" in the path. To go UP two levels, use two "../" like this: ../../products/product1.html.
- When using paths to a file, ALWAYS use the forward slash ("/") regardless of the Operating System (Mac, Windows or Linux, etc.).
Link Types
There are three type of links.
- Absolute – a link to an EXTERNAL web site that start with http:// or https:// (e.g., http://anywebsite.com/filename.html/)
TIP: When using an absolute link without specifying a page at the root level or in another folder, use a ending forward slash to tell the server you are requesting the default page; otherwise, there may be a slight delay. (e.g., http://anywebsite.com/filename.html/ )
- Document-Relative (most common) – a link to an INTERNAL page on a web site using a path to the HTML file (e.g., <a href="otherpage.html">Text for link goes here</a>)
- Root-Relative – Like the document-relative, the root-relative shows how to link from one page to another; however, the path is described relative to the web site's ROOT folder. Root relative links always begins with forward slash (" / ") that represent the root or top-level of the site. They are mainly useful if you want to link to an EXISTING site. (e.g., /a_local_file_name.html) There is two major drawbacks:
- They don't work when tested locally unless the Preview Using Temporary File checkbox is selected in the Edit > Preferences.(VERIFY)
- They don't work if the site isn't located at the Web server root.
NOTES:
- By default, a regular link will use blue text with an underline on it. This can be changed using CSS.
- To updates a link, change it in the Property Panel. If you move or rename a file or folder in the File Panel, Dreamweaver will automatically prompt you to update links or graphics on the page to maintain the correct path.
- href stands for hypertext reference.
Link Target
There are several options when targeting a link you create:
- By default, when creating a link, it will replace the current browser's page. This is the same as using the _self Target option in the Properties Panel.
- If you need to open a link in another window which is mainly used to navigate to a web site other than the current site, you can use the _blank or the new Type option in the Properties Panel.
- While framesets are not used as much anymore, you could also use the _parent and _top options can be used.
Link States
There are four major link states color or graphic that can be styled with CSS:
- L ink – The initial link color/graphics before link is clicked. The default is a blue underline for text and a blue border for graphics.
- V isited – Normally, the color/graphics the link changes to when the link is clicked.
- H over – The color/graphics the link changes to when the link is hovered over using the cursor. A hand cursor will also be shown when you hover over a link.
- A ctive –The color/graphics the link turns to when the user is pressing down on the link. The default is red. This option may no longer be supported by some browsers.
Memory TIP: To have you remember the correct order of applying links, remember the acronym: LoVe HAte.
TIP: When using an acronym, it is best practice to use a dotted line instead of a solid line which are usually reserved and understood as links.
An image link is basic the same as a regular text link. The different is that the <a> tags are wrapped around an <img> tag instead of some text. The <img> tag is a self-closing tag like the <br />, <hr />, <link /> and <input /> tags:
<a href="anotherpage.html"><img src="image.jpg" /></a>
EXAMPLE: Click on the image below:
NOTE: It is important to provide an instruction (e.g., click on the image below for more information) to click on an image link; otherwise, a user may not know it is an image that is also a link
An email link is also similar to a text or image link. The different is that the href attribute is set to an email address prefixed by a mailto: protocol instead of a HTML file name (e.g., myfile.html) or http protocol (e.g., http://www.anothersite.com). And, instead of opening an HTML file, when clicked, an email link will open the user's email program (e.g., Microsoft Outlook)
Simply select a word or multiple words you want to convert to an email link and then:
- Type an email link in the Link field with the mailto: protocol (e.g., mailto:yourname@yourcompany.com)
This what is created in Code View:
<a href="mailto:yourname@yourcompany.com">Email Text goes here</a>
- From the main menu, select Insert > HTML > Email Link and provide an email link.
- In the Insert Panel with the HTML category selected, select Email Link and provide an email link
CAUTION: Don't include the mailto: protocol when using the last two options because it is automatically added to the code.
NOTE: If you want to create the email text and its link at the SAME TIME WITHOUT SELECTING ANY TEXT, place the cursor where you want the email link to begin and select Email Link icon from the menu.
TIP: It is best practice to include a statement in front of an email link to let the user know the link is an email link and not a regular link. (e.g., Contact Joe White: joe@rmcs.com) or provide a small icon (usually an envelope) after the email link: (e.g., Contact Us)
When creating a long document page, named anchors (bookmarks) can be used to "jump" or "auto-scroll" from the top of the page to links at the bottom of the page which eliminates the need for scrolling down the page manually. Conversely, a link can be placed at the bottom of the page and an anchor (normally called "top") can be used to "jump" back up to the top of the page. Named anchors can be used to jump WITHIN the SAME PAGE or at a LOCATION INSIDE another page.
CAUTION: You must used a LONG document when using named anchors. Otherwise, you will have to use alot of blank paragraph (e.g., <p> </p> to the bottom of the document to allow the page to scroll above the bottom fold of the user window.
Named anchors require TWO LINKS:
- First, create a regular link or a series of regular links ( A | B | C | D) usually at the top of the page and prefix them with hash signs without any space in the Properties Panel:
.
<a href="#A"> A </a> <a href="#B"> B </a> <a href="#C"> C </a> <a href="#D"> D </a>...
NOTE: Notice that the hrefs are not pointing to HTML files (e.g., myfile.html) but to a named anchors (e.g., #A, #B, #C, etc.) - Create named anchor link(s) where the regular link(s) will jump to the named anchors for each named anchor. Ensure they have the same ID name as the href names in the regular links at the locations where you want the browser to jump to.
Examples:
- <a id="A">A info at bottom of page</a>
- <a id="B">B info at bottom of page</a>
- <a id="C">C info at bottom of page</a>
- <a id="D">D info at bottom of page</a>
NOTES:
- Name anchors are case-sensitive and must be unique on a page.
- To create a named anchor to another page, you need to provide BOTH the filename and the named anchor:
<a href="myfile.html#anchorname">Link text goes here</a>
- Preview in a browser.
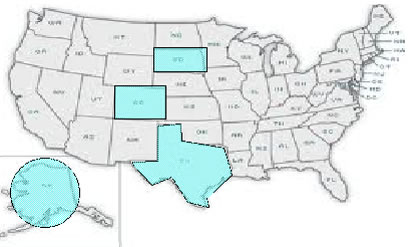
Using an image map is like using an image link but with the ability to have MULTIPLE LINK options to choose from on a SINGLE image. If you have a SINGLE image with SEVERAL LINK AREAS (HOTSPOTS) that you want to use to take the user to different pages (or other interactivity), you can use an image maps.
Avoid Image Maps
The best thing to use image maps for is actually a geographic map where theres a lot of information and complicated shapes. Below is a list of reasons to avoid using them and is a reason why it is not included in the latest version of Dreamweaver.
- Not recognized by search engines
- Not responsive
- Slow load times
- Bad for accessibility & usability
- Difficult to create hotspots
- Typically use a large image for its image map
What to use instead of an image map
It is best to use SVG instead of an image map in today's browser for several reasons. It is:
- recognized by search engines
- responsive because it it vector
- faster than image maps
- better for accessibility and usability
- small file size
TIP: Use the following links to get free SVG maps:
- Create or get a SVG map (See tip above) and edit it in Adobe Illustrator.
NOTE: In this example, the North American SVG Map was used from the Wikipedia website and then everything was deleted but a few states in the U.S in Adobe Illustrator.
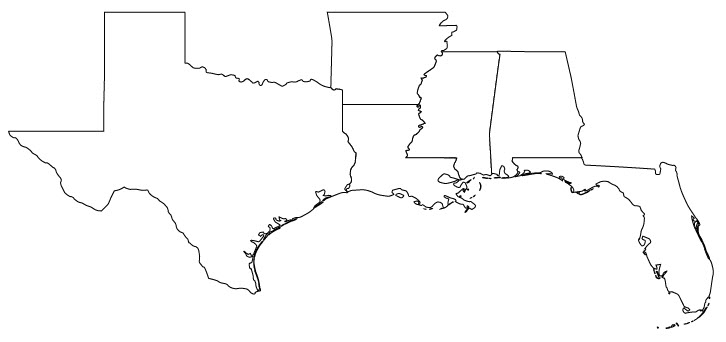
- Refine SVG in a Dreamweaver. Because the path is long, only a portion of it is shown in code:
<svg version="1.1" xmlns="http://www.w3.org/2000/svg" viewBox="0 0 1024 1024" xmlns:xlink="http://www.w3.org/1999/xlink"
id="map" preserveAspectRatio="xMinYMin meet">
   path id="Mississippi_State" class="st0" d="M594.5,168.5c0.6,0.7,1.3,1.5,2.3,1.6c-0.4,3.3-0.9,6.5-1.4,9.8c-0.5,3.3-0.9,6.6-1.4,10... />
</svg>
- Click the small triangles next to EACH <path> tag to collapse the code within them so that you can easily wrap an <a> tag around them in the next step.
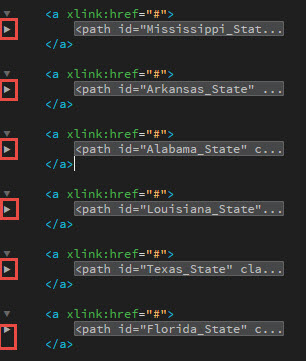
- Wrap EACH <path> tag which represent each shape (e.g., state) within a standard <a> tag with a xlink namespace. A pseudo URL (#) is used; however, you can assign a valid URL if you want to (e.g., Texas.html):
<svg version="1.1" xmlns="http://www.w3.org/2000/svg" viewBox="0 0 1024 1024" xmlns:xlink="http://www.w3.org/1999/xlink"
id="map" preserveAspectRatio="xMinYMin meet"><a xlink:href="#">  <path id="ab" fill="#D3D3D3" d="M351.371,342.397c-55 …" />
<a xlink:href="#">
<path id="Mississippi_State" class="st0" d="M594.5,168.5c0.6,0.7,1.3,1.5,2.3,1.6c-0.4,3.3-0.9,6.5-1.4,9.8c-0.5,3.3-0.9,6.6-1.4,10... />
</a>
</svg>
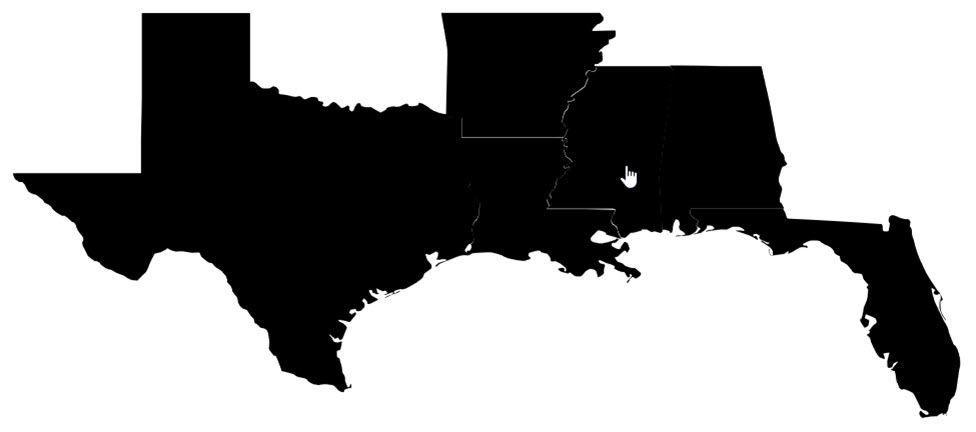
- CHECK POINT: Preview the file in a browser. You should the hand cursor when you hover over any shape.
- Add the following CSS code in a new or existing <style> tag. Vendors prefixes have been removed for clarity:
<style>
path
{
	  transition: .6s fill;
	  fill:darkgreen;
}
path:hover
{
  	fill: lightgreen;
}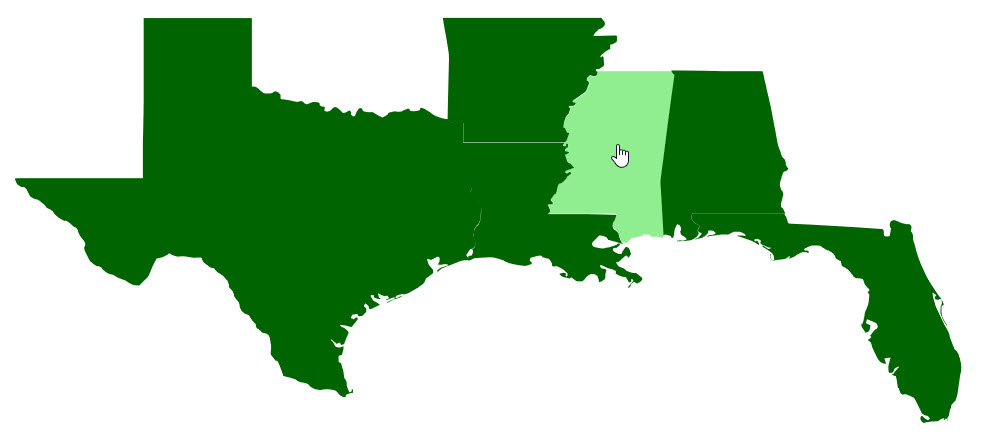
</style> - CHECK POINT: Preview the file in a browser. You should see that not only does the hand cursor appears when you hover over any shape but that they have changed color and also get highlighted when hovered over.
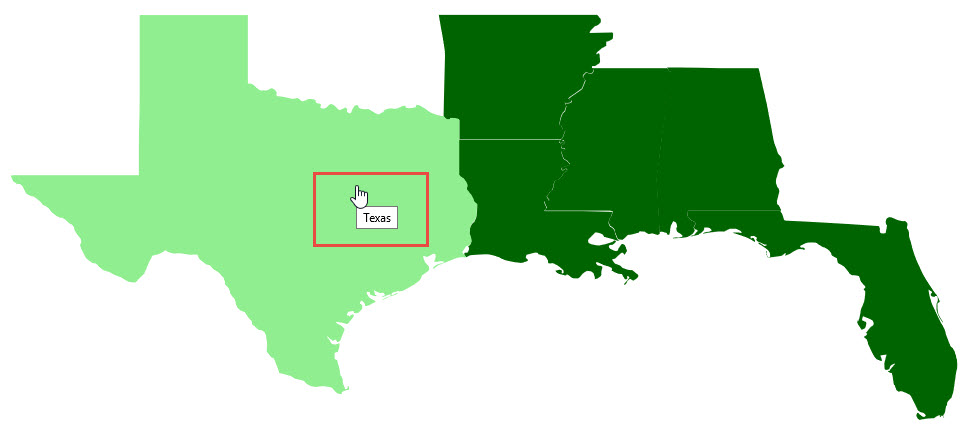
TIP: You can target SVG path element with CSS just like any other HTML element. - Add a <title> tag INSIDE each <a> tag above each <path> tag:
<svg version="1.1" xmlns="http://www.w3.org/2000/svg" viewBox="0 0 1024 1024" xmlns:xlink="http://www.w3.org/1999/xlink"
id="map" preserveAspectRatio="xMinYMin meet"><a xlink:href="#">  <path id="ab" fill="#D3D3D3" d="M351.371,342.397c-55 …" />
<a xlink:href="#">
<title>Mississippi</title>
<path id="Mississippi_State" class="st0" d="M594.5,168.5c0.6,0.7,1.3,1.5,2.3,1.6c-0.4,3.3-0.9,6.5-1.4,9.8c-0.5,3.3-0.9,6.6-1.4,10... />
</a>
</svg>
- CHECK POINT: Preview the file in a browser. You should see that now you also get a tool tip when you hover over a state.
While most of the time we think of linking to a page, you can also link to a JavaScript function. There are three ways to do this.
EXAMPLE: Click To See Dialog
#1: Inline JavaScript.
- Select some text and then in the Properties Panel in the Link text field I, type JavaScript: (with a colon)
- Follow the colon with a simply JavaScript function.
NOTE: This approach should only be used for simply inline function like the one below.
EXAMPLE: <a href="javascript: alert('Hello, World')">Click To See Dialog</a>
NOTE: Notice there are single quotes around Hello, World because double quotes are already being used. - Test in browser by clicking on the link. You should see that a dialog box with the phrase "Hello, World" in it.
#2: Internal JavaScript
- Select some text and then in the Properties Panel in the Link text field, type javascript: (with a colon)
- Follow the colon with a CALL to an internal JavaScript function in the <script> tag in the <head> tag:
<a href="javascript: HelloWorld()">Click To See Dialog</a>)
- Write a function in a <script> tag in the <head> tag:
<script>
function HelloWorld()
{
   alert('Hello, World');
}
</script> - Test in browser by clicking on the link. You should see that a dialog box with the phrase "Hello, World" in it.
#3: External JavaScript
- Repeat steps 1 and 2 from Internal JavaScript.
- Write a <script> tag to an outside JavaScript file:
<script type="text/javascript" src="HelloWorld.js"></script>
- Write an external JavaScript file and name it (e.g., HelloWorld.js):
// JavaScript Document
function HelloWorld()
{
  alert('Hello, World');
} - Test in browser by clicking on the link. You should see that a dialog box with the phrase "Hello, World" in it.