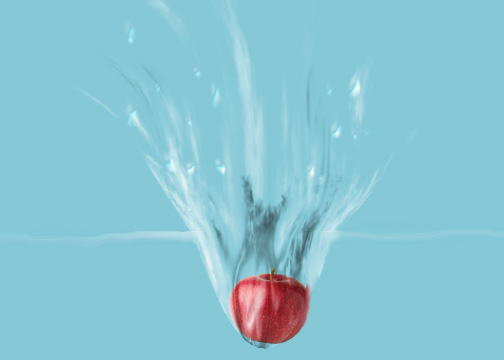
Special Effect: Making A Splash

Create Layers
- Create a new Default Photoshop Size file from the Preset combo box and fill the Background layer with a light blue radial gradient color.
- Create another blank layer above the background layer and name it "Water Effect"
Create Brush
- Select brush tool and then click on the brush option icon and choose Assorted Brushes from the mini-menu and select Append. Select the ‘Spatter 27 pixels’ brush.
- Select the brush option from the Option bar and make the following changes:
- Select the "‘Brush Tip Shape" option and set the Diameter to 100px and the Brush Tip Shape Spacing to 50%
- Select the "Shape Dynamics" option and set the Size Jitter and Angle Jitter both to 100%
- Select the "Scattering" option and select the "Both Axes" checkbot and set its value to 350%
- Close the brush panel
Create Water Droplets
- Set Foreground color to white.
- Using the brush tool, draw water droplets in a circular motion several times in the center of the canvas.
- Press CTRL+T to move the water droplets to the top or the canvas and then scale the water droplets to top third of the canvas and press Enter to commit transformation.
Apply Multiple Filters to Create Water
- In the Layers panel, select the "lock transparency" icon so that only the water droplets are affected.
- Set Foreground color to Black if it is not already Black.
- Select Filter > Render > Clouds and press CTRL+F to reapply the filter several times to create mostly light color from the Clouds filter.
- Select Filter > Artistic > Plastic Wrap... and set the default values (Strength to 20, Detail to 10, Smoothness to 15) and then click OK.
- Select Filter > Sketch > Chrome... and set the Detail to 0, Smoothness to 10 and click OK.
- IMMEDIATELY select Edit > Fade Chrome... and change the (Blend) Mode to "Overlay" and click OK.
- Select water droplets and press CTRL+T and then right-click inside it and chose Warp. In the resulting grid, look at the top row, middle square. Click on the bottom of that square with your cursor and pull it towards the bottom of the canvas. Move the end points as well to adjust the shape of the splash. Press Enter key to commit the changes.
- Switch to Layers panel and change the Blend Mode to "Hard light".
- Select CTRL+T again and rescale and reposition as needed.
Create Water Surface
- To create the water surface, select the lasso tool and freehand select the bottom third of the splash.
- Press SHIFT+CTRL+J and to make a cut of the bottom of the splash onto its own layer.
- Temporarily urn off the top half of the water splash layer.
- Use the smudge tool and set brush size to 13 with a hard edge and set Strength to 90%.
- Draw smudge lines to right and left of bottom splash by clicking and dragging to the right and left from from the center to both sides of the canvas several times.
- Turn back on top water splash layer.
(Optional) Add An Object (e.g., A Red Ball)
- Import an object (i.e., apple). Select CTRL+T to scale the object and tilt it as desired to closely fit the bottom of the splash.
- Switch to Layers panel and move the object between the top and bottom splash layers.
- Ensure the layer with the bottom splash is selected..
- Select Filter > Liquify and select the "Show backdrop" option. Under "Use" select layer the object is on and then use the cursor to mold the splash to conform to the shape of the object. Click OK.
- If necessary, select CTRL+T to further adjust the object to the water.
- (Optional) Select the Smudge tool and set Size and Strength to about 50 and smudge around and object to add more realism to the splash.
(Optional) Adding Water Drops
- Create a new blank layer and call it "drops"
- Select the Brush tool and set the brush diameter to 13 pixels
- Select the Brush Option icon on the Option Bar and select the "Brush Tip Shape" and set the size to 10 pixels.
- Select the "Shape Dynamics" option, under the Size Jitter to 100% and set the Control to Off so that it will not be affected by a tablet.
- Select the "Scattering" and set it to its maximum value (1000%).
- Select the "Brush Tip Shape" option AGAIN and increase the Spacing so that there are 4 to 5 spots on the white field in the brush panel.
- Close the brush panel.
- Ensure foreground is set to white.
- Paint a few drops onto the splash.
- Close the brush panel.
- Switch to the Layers panel and double click on the ‘drops’ layer and open up "Layer Styles."
- Select the "Bevel and Emboss" option and under the "Shading" section in the color field, click inside that color field and select a very light gray color and click OK. Next to the right of ‘Shadow Mode’ change the field to read ‘Color Dodge. Also
- Select the "Blending Options Default, and in the ‘Advanced Blending’ section, set the Fill Opacity to 0. Click OK.
NOTE: Drops should now look more realistic.
- Paint some additional water droplets.
- (Optional) Select the Smudge tool and set its Strength to 25, then using the cursor, blend the drops in the area above the water to give the impression of falling water.
- Select the layer with the top of the splash and press CTRL+T and choose Warp. Use the resulting grid and modify it to look more splashy. Press Enter to commit the changes.
