Resizing vs Resampling an Image
EXECUTIVE SUMMARY
RESIZE FOR PRINT AND RESAMPLE FOR SCREEN.
There are two ways to change an image—Resize or Resample. Many people think these two terms are interchangeably; however, there is a subtle but distinct different between the two terms. These two terms confuse a lot of people so I will make an attempt to explain them and show visuals to help you understand the differences between them. Knowing these differences is important as a designer or even a developer if you are working with mobile apps.
Dimension is expressed as an image area (L x W, H x W)
Resolution is expressed by the number of units in an image (dots/inch (dpi) or pixels per inch (ppi) DPI refers to dots of ink from a printer; whereas, PPI refers to pixels on a screen.
Resizing an Image
Resizing an image (sometimes called Scaling) is useful when you want to SCALE an image so that it can fix nicely on a printed paper when it is sent to a printer. For example, if you wanted to print an image with a height of 2000 pixels at a resolution of 300 dpi, then it would need to be scaled to 6.67 inches (2000/300 = 6.67). If you change the resolution to 200, it would scale to 10 inches (2000/200 = 10).
Because a camera does not know what size the image will print at, the dpi is an arbitrary number so the image will have to be scaled to accommodate the size of paper that it will be printed on.
When you RESIZE an image, you are NOT changing:
- the number of pixels INSIDE of the image or
- the file size on the device
Instead you are RESPACING or REDISTRIBUTING the number of EXISTING PIXELS to fit in a smaller or larger space WITHIN the same image.
Because resizing does not actually change any pixels only their spacing, the process is REVERSIBLE.
- Unzip the sample file and notice the size of the Photoshop file. It is almost 100M whicch is a very BIG FILE. This file size is too large for a single image to be used for both web or mobile. That's because by nature, Photoshop files are usually large because they are not COMPRESSED.
- Create a new file in Dreamweaver and get it a name of Resize.html and a title of Resize Image. Place the cursor in between the body tags and then select Insert > Image from the menu, navigate to the sample file, and click the OK button.
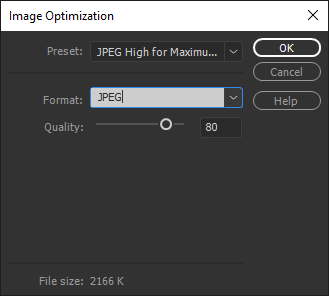
- In the Image Optimization dialog box that appears, ensure that the JPEG Format is select and then click the OK button.
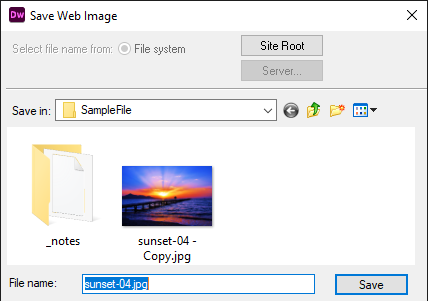
- In the Save Web Image dialog box that appears, click the Save button to insert the image into the Dreamweaver page.
- CHECK POINT: Notice that only a small portion of the image can be seen in Dreamweaver because the image is very large and does not fit within the Dreamweaver View area. Open the Properties panel and notice the small thumbnall of the image and its file size has been reduced from 99.4M to only 2.1M because the image has been compressed with the JPEG format. Also notice the Height ad Width is 4288 and 2848 respectively. This is about 60 inches by 40 inches--a very large file indeed.
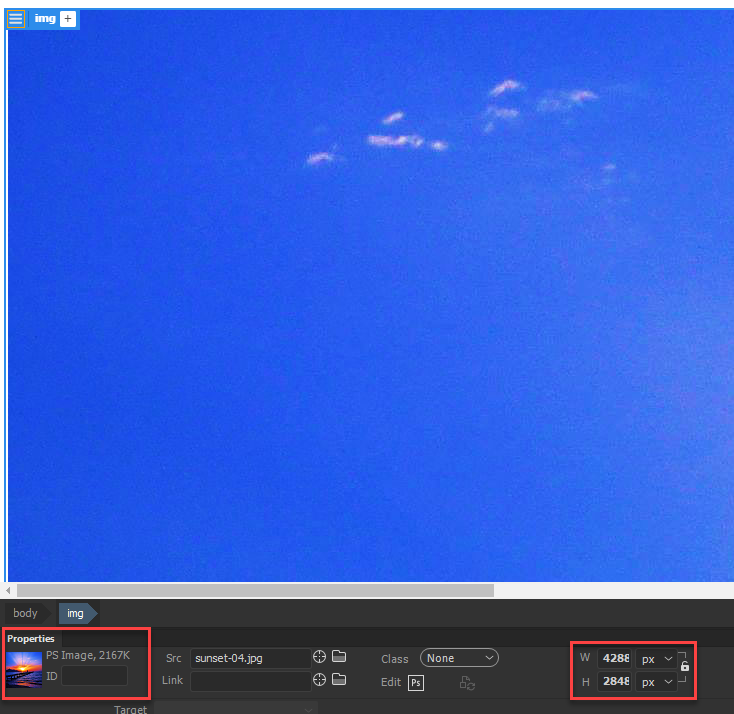
NOTE: Because the file is so large, it is hard to select a handle to resize the image. A shortcut tip will be used in the next section to overcome this limitation. - In the Properperties panel, change the unit of measurement from px to % for both the Height and Width and then change the Height and Width values to 25%. NOTE: If the Constraint icon lock is selected both values will change.
- CHECK POINT: You should now be able to see the whole image within the Dreamweaver View area.
- Keep Dreamweaver open as we will come back to it again in the next section on Resampling. Now, open the sample image In Photoshop. Notice the INITIAL dimensions (width and height) of the image by viewing the ruler (View > Rulers).
Keyboard Shortcut: Press CMD/CTRL+R.
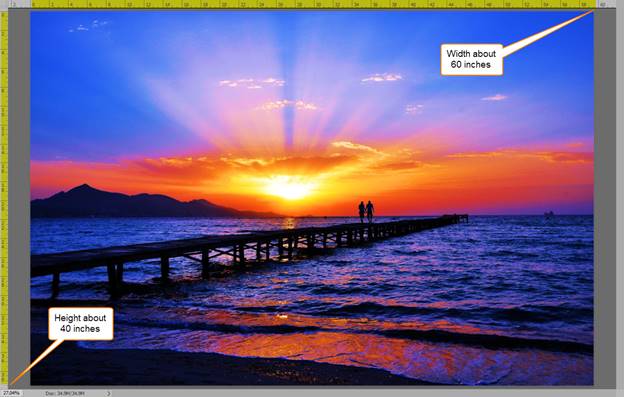
In our example, the dimensions from the ruler is a Width about 60 inches and a Height about 40 inches:

- Now, select Image > Image Size… from the menu.
Keyboard Shortcut: Press CMD/CTRL+ALT/OPTION+I .
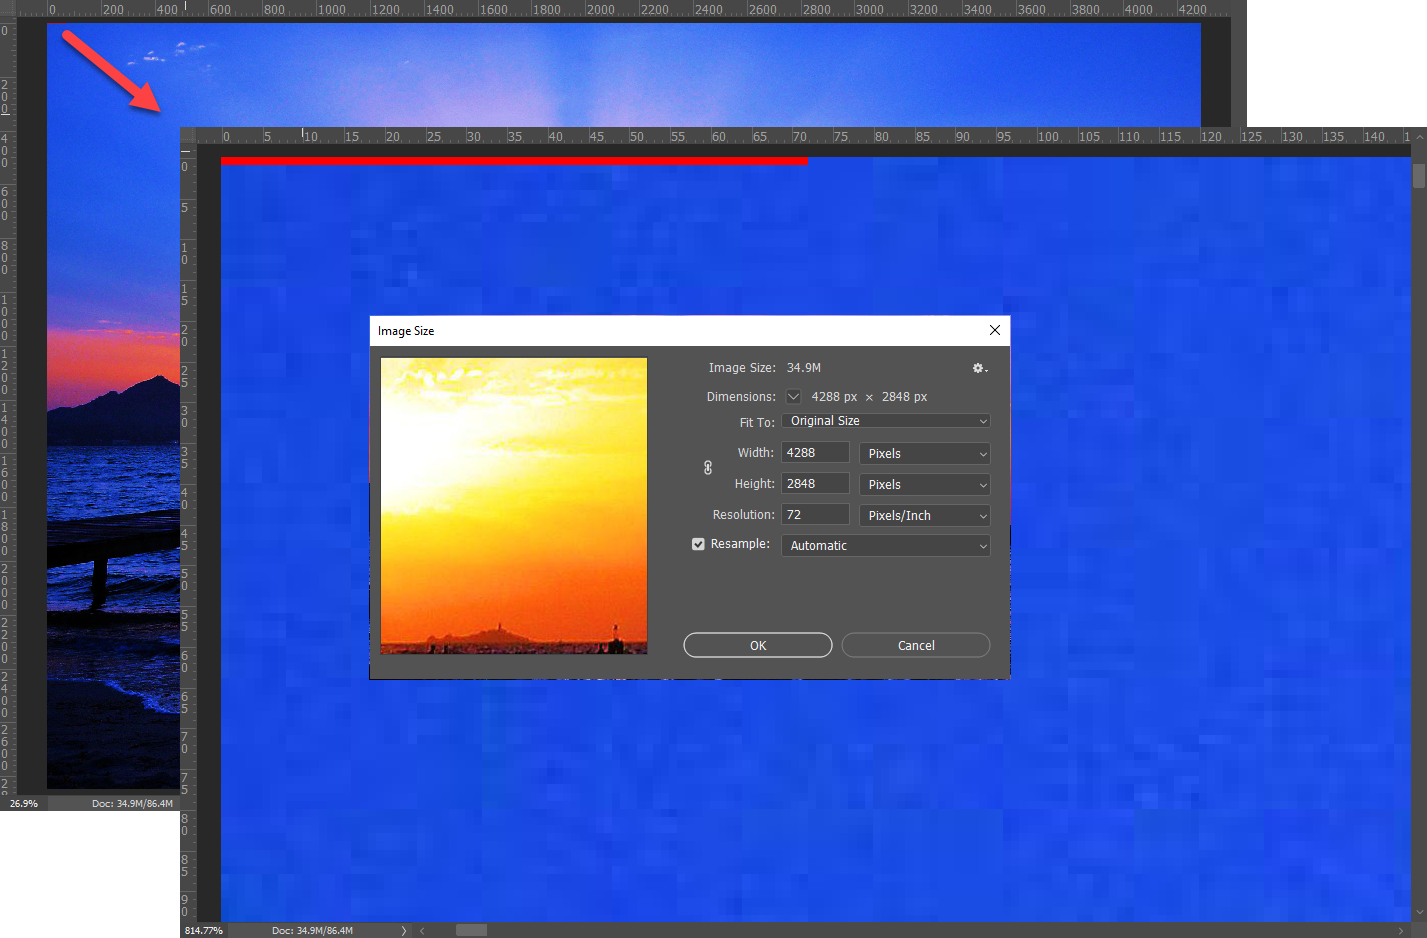
- In the Image Size dialog box that appears, it is important to note that the Resample checkbox is selected by default. Resampling will be explained later.
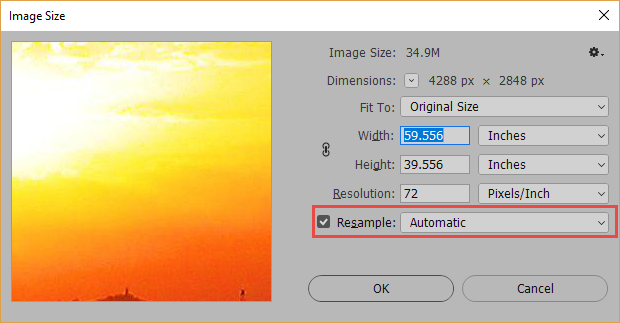
- CHECK POINT: In our example, notice that only a small portion of the image is initially shown in the preview window of the Image Size dialog box. You can hover over the preview and click the minus sign several times to see the entire image displayed. The pixel dimensions is calculated by multiplying the width and height by the resolution (e.g., 59.556 x 72 = 4288px and 39.556 x 72 = 2848px)

- It is also important to note that:
- The (Pixel) Dimensions is:
- the Width and Height, typically, in pixels of the image
NOTE: The Pixel Dimensions is the size the image will display on a SCREEN.
- The Document Size is a combination of three values:
- the Width and Height, typically, in Inches of the image and more importantly
- the Resolution, typically in Pixels/Inch
NOTE: The Document Size is the size the image will PRINT.
- In our example, the Pixel Dimensions is a Width of 4288 px x 2848 px (59.556 x 72 and 390556 x 72) the Document Size is 59.556 Inches x 39.556 Inches, and the Resolution is set to 72 Pixels/Inch which is standard for a screen resolution. This is a very large image that is displayed on an average computer screen.
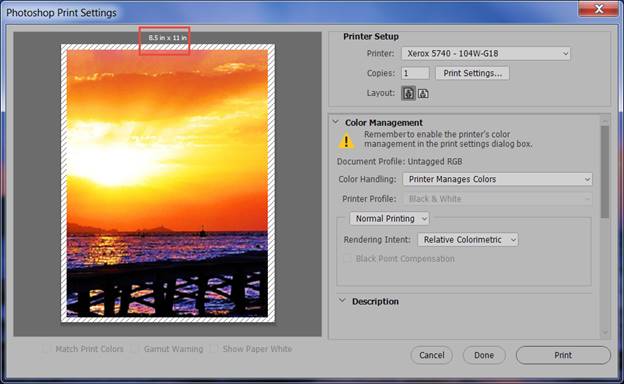
If you were to print it out to a laser print, only a small portion of the image would print because the standard paper size is 8.5” x 11” and the image is close to 60” x 40.”
- To prove this, select File > Print… from the menu.
Keyboard Shortcut: Press CMD/CTRL+P.
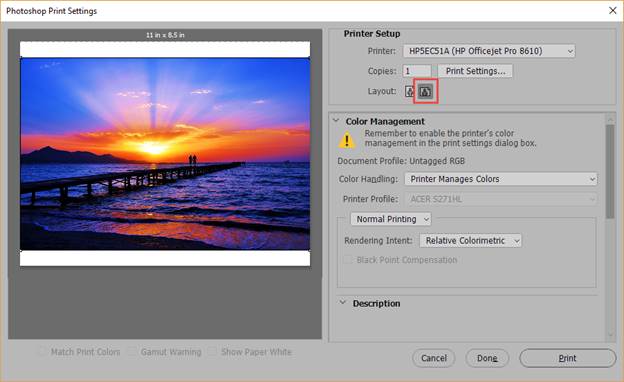
- CHECK POINT: Only the area that is seen in the Photoshop Print Settings dialog box will be printed.
So, how do you print a large image like this onto a small piece of paper? Or “How do you take a ‘two pound of bologna and squeeze it into a one pound bag?’” so to speak. One way is to resize the image.
- If you need to again, select Image > Image Size… from the menu.
Keyboard Shortcut: Press CMD/CTRL+ALT+I.
- Turn off the Resample Image checkbox.
NOTES:
- To RESIZE an image, you MUST turn off the Resample Image checkbox which will cause the Pixel Dimensions Width and Height to no longer be changeable because you are forcing Photoshop to stay WITHIN the confines of its current Pixel Width and Height dimensions.
- The Pixel Dimensions (width and height) is not to be confused with the Document Dimensions (width and height). The Document Dimensions will indeed change when you click the OK button later.
- Also, notice the three connected gray lines with a chain link icon on the left side of the Width, Height, and Resolution denoting that they are bound together to one another (Highlighted with a red border below).
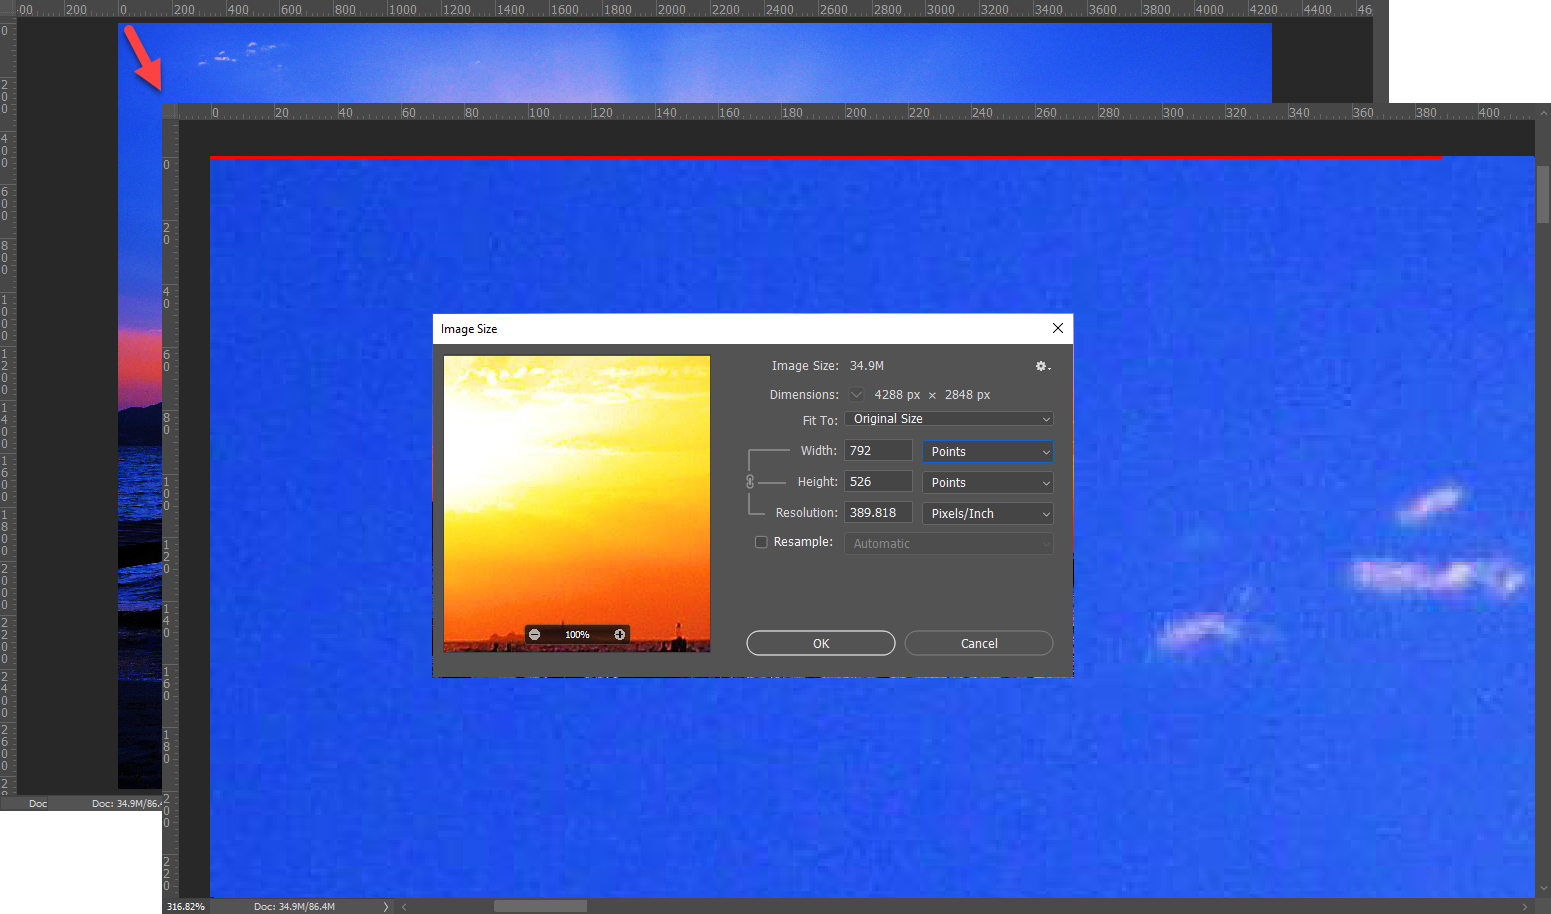
- Change the Width to another value. In our example, it was changed from 59.556 to 11 Inches.
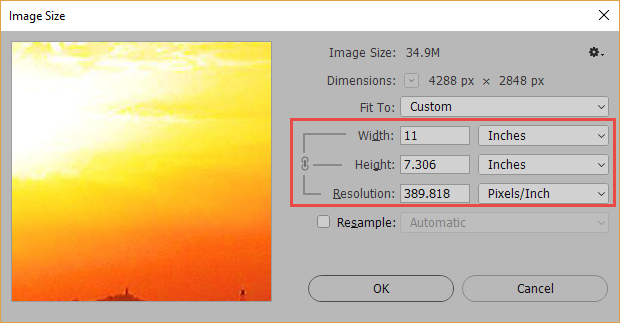
- CHECK POINT: Notice that the Height and Resolution change accordingly. In our example, the Height changed from 39.556 Inches to 7.306 Inches and the Resolution changed from 72 Pixels/Inch to 389.818 Pixels/Inch AUTOMATICALLY. Notice also that if the Document Size gets smaller, the Resolution get larger to accommodate more pixels/inch within the image.
- Click the OK button to commit to the Resizing of the image.
- CHECK POINTS:
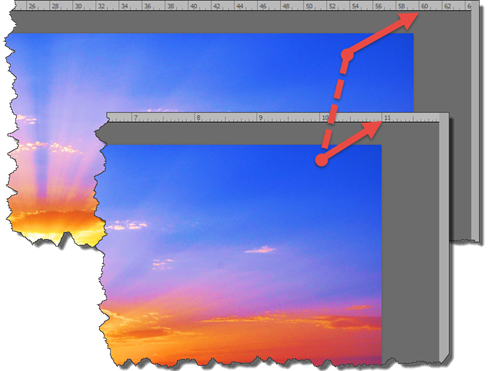
- Notice at first, it appears that nothing in the image changed when the OK button was clicked. However, if you look at the ruler, you will discover that the image size did indeed changed even though the canvas size remained the SAME.
- Notice the Ruler is reading 11 inches as the Width instead of 59.556 inches. The reason for this is that while the pixel dimensions on the canvas did not changed, the document dimensions did to accommodate more pixels in the same amount of space (389.818 pixels per square inch instead of 72 pixels per square inch). However, the Dimensions values (e.g., 4288 x 2848) did NOT CHANGED.
- Notice that the Image Size is still the same. In our example, 34.9M
- If you select File > Print… this time, you will see that the ENTIRE IMAGE can now FIT in the page preview in the Photoshop Print Settings dialog box when it is set to landscape mode.
- CHECK POINT: Conversely, if you change the Resolution, the Width and Height change accordingly. However, it is important to note that the Pixel Dimension NEVER changes regardless of the other changes.
Beside the RESPACING OR REDISTRIBUTION of pixels in the image, there is another change that takes place. The thousand dollar QUESTION is:
How is it that you only have 72 pixels in ONE inch on a large 60 pixels width image, yet, on a small 11 inch width image, you have 389 pixels in that SAME one inch?
The ANSWER is:
The SIZE of the pixels, not number of pixels CHANGES. The pixels in the large image are LARGER (e.g, size of a grain of mustard seed); whereas, the pixels in the small image are SMALLER (e.g., a size of a grain of sand) so that you can fit more pixels in the SAME ONE INCH. For every grain of mustard seed, it is replaced by five grains of sand (389/72 = 5).
In essence, the SIZE of EACH PIXELS is REDUCED to FIT MORE PIXELS into the SAME amount of SPACE (that is, ONE INCH). See screenshot below for examples:
72 dpi:
389 dpi:
Resampling an Image
Just the opposite of resizing, when you RESAMPLE an image, you ARE changing:
- the number of pixels INSIDE of the image and
- the file size
by ADDING or DELETING PIXELS WITHIN the image. This can be done by changing either the image dimensions OR its resolution.
In Photoshop, if you turn ON the Resample image checkbox, then you could:
- change the document image dimensions (Width and Height) to the size you need and Photoshop will add or delete pixels from the image.
Because resampling is actually changing pixels in an image, the process is NOT REVERSIBLE.
- In Photoshop, open the sample image. Notice the INITIAL dimensions (width and height) of the image by viewing the ruler (View > Rulers).
Keyboard Shortcut: Press CMD/CTRL+R.
In our example, we are using the original image, the dimensions from the ruler is a Width about 60 inches and a Height about 40 inches:
- Select Image > Image Size… from the menu.
Keyboard Shortcut: Press CMD/CTRL+ALT/OPTION+I.
- In the Image Size dialog box that appears, ensure that the Resample checkbox is selected by default.
- CHECK POINT: Notice that unlike Resizing, when you Resample, the Document Width and Height are not bound to the Resolution so you can change them independently of each other.
- Change the Width to 11 and the Height to 8.5 so that it can be printed out on a standard paper size in landscape mode.
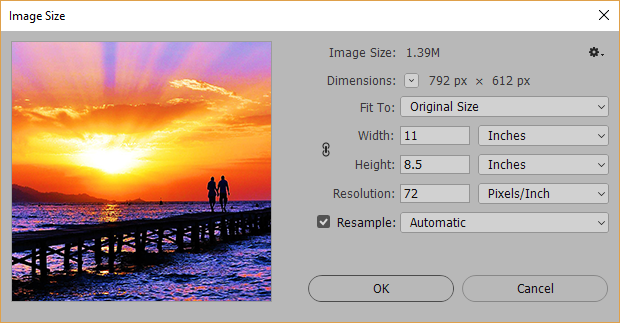
- CHECK POINT: Notice first that the image size changed from 34.9M in our example to 1.39M. That’s because pixels are being “thrown out” to make the image smaller. Also, notice that the pixel dimensions changed to 792 px x 612 px. This is again because pixels were “thrown out.” If you were to print this to a laser printer, it would NOT look as good because the resolution (pixels/inch) is low (72ppi). A standard resolution for print is 300ppi.
NOTE: The pixel dimensions is calculated by multiplying the width and height by the resolution (e.g., 11 x 72 = 792 and 8.5 x 72 = 612 yield 792 px x 612 px)
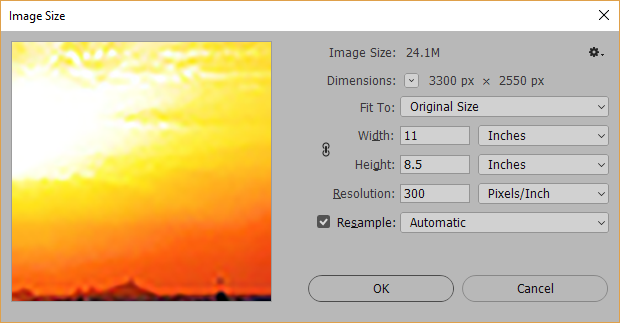
- CHECK POINT: Change the resolution to 300. You should see that the Image Size ballooned to 24.1M. The Pixel Dimensions changed to 3300 px x 2550 px because of the larger Resolution size.
- Reopen Dreamweaver that was used earlier in this tutorial and change the Height and Width set to 25% and then click the Commit Image Size checkbox icon in the Properties panel.
- CHECK POINT: Notice that the image size went from 2.1M to 175K--a vast difference between the two sizes.
Before Resampling:

After Resampling:

- Open the sample file in Photoshop and save the file as Resize_image.jpg, Resize_image.png, Resize_image.gif or something similar.
- CHECK POINT: Review the three files that were saved and then drag them in separate tabs inside of a browser. You should see that the JPG and PNG quality is basically the same with the PNG file being larger. However, the GIF file quality is degraded because the image has a lot of gradients in it which does not bow well when saving as a gif format.
Other Ways To "Throw Out" Pixels
Beside using the resampling technique above, there are oher ways to "thrown out" pixels in an image.
- Convert the Photoshop image (*.psd) to an image format (e.g., jpg, png, or gif).
NOTE: It is helpful to think of an image format as a image compression format. For example, if you save the PSD file as any image format, it will always be smaller than the Photoshop file.
- Select Image > Crop to crop a portion of the image to "throw out" or add pixels.
- Select Image > Trim... to trim around an image to "throw out" pixels
- Select Image > Canvas Size... to "throw out" or add pixel to increase or decrease the size of the canvas
Reduce the Number of Colors
Another way to reduce the file size of an image is to reduce the number of colors in the Color Lookup Table (CLUT). Since GIF and PNG-8 are the only formats that support a CLUT because they are limited to 256 colors.
It is important to note however, that reducing the number of colors does not reduce the number of pixels in an image. For example, a 256 color image that is converted to a 256 grayscale image is about the same size.
The more colors that you have in an image, the bigger the file size will be because each pixels has to be mapped to the CLUT. So if you reduce the numbe of colors, you will also reduce the file size.
Summary
Resampling an image can be seen on the screen. However, resizing does not affect the image on screen at all because a screen will ignore any dpi number and show pixels directly. However, resizing will print a different size on paper if the dpi number changes. Cropping is another way to “throw out” pixels.
If you RESIZE an image (change the document size), the pixels dimensions remains the SAME but the resolution CHANGES. For example, an 8” x 10” image at a resolution of 300 ppi will INITIALLY have a pixel size of 2400 x 3000 (e.g., 8x300 = 2400 and 10x300 = 3000). However, if you RESIZE the small image to 4” x5”, the pixel sizes will still be the SAME (2400 x 3000) BUT the PRINTED copy will be 4” x 5” (e.g., 2400/600=4 and 3000/600=5) and the resolution will CHANGE to 600 ppi. When you resize an image, you keep all of the pixel information so the process is reversible.
If you RESAMPLE an image, Photoshop will determine (guess) which pixels to ADD (upsample through a process called interpolation) to make the image LARGER or which pixels to DELETE (downsample) to make the image SMALLER. When you resample an image, you add or delete information so the process is NOT reversible.
One of the easiest of many interpolation methods to understand is the nearest-neighbor interpolation which replaces every pixel with multiple pixels of the same color. While this method will result in a larger image and preserves all of the original details, it may introduce jagged stair-stepped lines on diagonal lines in the image.
When to use Resizing vs Resampling?
The bottom line question is “What is your final output?”
- If you want to view it on a SCREEN, you don’t need a higher resolution. 72 ppi is the standard for a screen so use the RESAMPLE technique.
- If you are going to PRINT the image, 240 - 300 ppi is the range you want to use with 300 being the standard so use the RESIZE technique.