Working with Layers
Like selections, before we can start working with layers, we need to define what they are, how they can be created and what you can do with them.
It is helpful to think of layers as a form of mask as well, in that is shows, hides or protects the layer below it.
There are eleven different layer types. Most of them have an icon in the bottom-right corner denoting what type it is. Others have special thumbnails or mask/image.
- Bitmap - a pixel-based layer (e.g., photo)
- Vector/Shape - a vector-based layer (e.g., AI or custom drawing using vector-based toots like the Pen or Custom Shape Tootls)
- Text - a text-based layer using the Type Tools
- Grouped - two or more layers that are grouped together for better organization and maintenance
- Linked - two or more layers that are linked together so that the can be manipulate together
- Adjustment - a layer with an adjustment effect that affects all layers below it.
- Fill - a layer will a fill applied to it (e.g, Solid, Gradient, or Pattern)
- Smart Object - a layer that have been converted to a Smart Object
- Frame - a layer that contains a frame to insert a photo in it similar to adobe InDesign.
- Cloud - is a type of Smart Object that is cloud-based.
- Background - a special layer which is always located at the bottom of all other layers that is locked.
What are layers?
LAYERS are similar to acetate sheet (clear plastic film) stacked on top of one another so that:
- The underlying pixel of each non-overlapping pixel shows though
- The underlying pixel are blended together using a blending mode
How to Duplicate or Delete A Layer
There are five ways to DUPLICATE a layer with a layer selected in the Layer panel:
- Right-click a layer in the Layers panel or
- Click the menu at the top of the Layers panel or
- Click the main menu at the top of the page
- then select Duplicate Layer..., give it a name in the dialog box that appears, and then click the OK button.
- Press CMD/CTRL+J
- Drag a layer to the Create a new layer icon at the bottom of the Layers panel
NOTE: Learning to use CMD/CTRL+J or dragging a layer to the Create a new layer icon are the BEST two options to avoid having to move the mouse or opening the Duplicate Dialog box (unless you want to give the layer a name).
There are six SIMILAR ways to DELETE a layer with a layer selected in the Layers panel:
- Right-click a layer in the Layer panel or
- Click the menu at the top of the Layers panel or
- Click the Delete icon at the bottom of the Layers panel or
- Click the main menu at the top of the page and select Layer > Delete > Layer
- then click YES in the Delete dialog box that appears
NOTE: If you hold down the ALT/OPTION key while selecting the Delete command, you will suppress the Delete dialog box
- then click YES in the Delete dialog box that appears
- Press the DELETE key
- Drag a layer to the Delete layer icon at the bottom of the Layers panel
NOTE: Learning to drag a layer to the Delete layer icon or pressing the Delete key are the BEST two options to avoid opening the Delete Dialog box.
How to Create A Blank Layer
There are five ways to create a BLANK LAYER:
- Click the menu at the top of the Layers panel or
- Click the main menu at the top of the page or
- Press SHIFT+CMD/CTRL+N or
- then select New Layer... or Layer > New > Layer..., give it a name in the dialog box that appears, and then click the OK button.
- Click the create new layer icon at the bottom of the Layers panel
NOTE: Clicking the create new layer icon is the BEST option to avoid having the New Layer dialog box (unless you want to give the layer a name).
How to Create A Layer Automatically
Many layers are created AUTOMATICALLY when the following items are used or created:
- Text Tools
- Custom Shape Tools with the Shape option selected
- Image is Inserted into an existing Photoshop file
- Image is pasted into a selection (e.g., Copy and Edit > Paste Special > Paste Into)
- An Adjustment Layer (e.g., black and white, hue saturation)
- Frame Tool
What Can You Do With Regular Layers
There are so many things that you can do with layers. Below is a list of some of the most common things that you can do:
At the TOP of the Layers panel, you can:
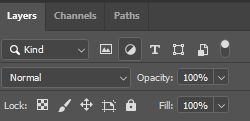
Search Options
- Search - search layer(s) by:
- KInd - filter layer by pixel, adjustment layer, type, shape, or smart object by clicking on one of the search icons:

- Name - type name of layer into the search field
- Effect - select an effect from the drop down menu (e.g., Bevel & Emboss, Stroke, etc.)
- Mode - select a blend mode from the drop down menu (e.g., Normal, Dissolve, etc.)
- Attribute - select attribute from the drop down menu (e.g., Visible, Locked, etc.)
- Color - select layer color (e.g., Red, Orange, etc.)
- Smart Object - select Smart Object by clicking on one of the smart object icons:

- Up to date library linked smart objects
- Up to date local linked smart objects
- Out to date library linked smart objects
- Missing linked smart objects
- Embeded samrt objects
- Selected - only layer(s) that are selected
- Artboard -
- KInd - filter layer by pixel, adjustment layer, type, shape, or smart object by clicking on one of the search icons:
Blend, Opacity, Lock, and Fill Options
- Blend Mode - change blend mode from the default Normal from the drop down list (e.g., Normal, Dissolve, etc.)
- Opacity - change the opacity from the default 100%.
- Lock - change the lock mode by clicking one the lock icons:

- Lock transparent pixels - allow you not paint in transparent areas.
- Lock image pixels - prevent the layer from being edited.
- Lock position - prevent the layer from being moved.
- Prevent auto-nesting in and out of Artboards and Frames - Shapes created outside of artboards won't be nested when they are moved on to artboards
- Lock all - lock all of the above attributes
- Fill - change the fill from the default 100% that affect the Layer style (e.g., stroke) and not the whole layer.
SHOW EXAMPLE HERE
In the MIDDLE of the Layers panel, you can:
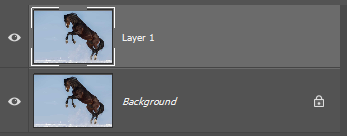
- The "eye" icon allow you to show or hide a layer.
- To rename a layer, click on the layer name and type in a new name.
- To select a layer, click on it
- To move a layer, drag it up or down the layer stack
At the BOTTOM of the Layers panel, you can:
![]()
- Link Layers - link two or more layers together to perform an operation on linked layers at the same time.
- Add a Layer Style - add a layer style to a layer(e.g., Bevel & Emboss, Drop Shadow)
TIP: You can double-click on any layer to add a layer style. - Add Layer Mask -
- Create New Fill (Solid, Gradient, and Pattern) or Adjustment Layer (e.g., Hue/Saturation, Black & White)
- Create a New Group - Create a new folder group to store two or more layers
TIP: You can also press CMD/CTRL+G to group layers - Create New Layer - create a new transparent layer
- Delete Layer - delete selected layer(s)
Using the Layers Panel Menus:
There are four menus that can be access in the Layer panels depending where you click:
NOTE: There are some overlapping menu options across these three menus.
Mini-menu at the top of the Layers panel. Right-click on a selected layer

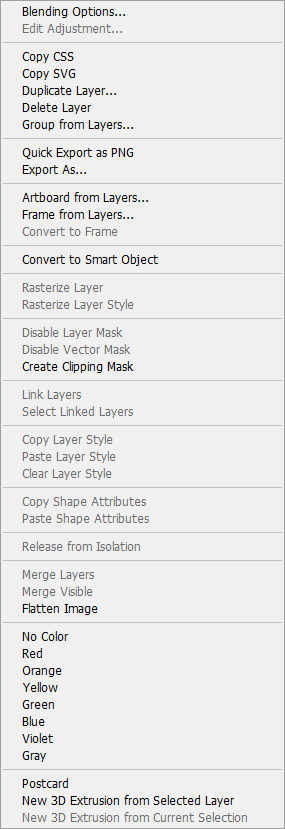
Right-click on the layer image thumbnail
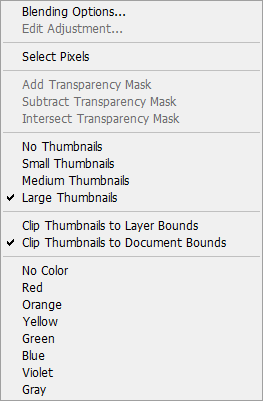
Right-click on the layer mask thumbnail
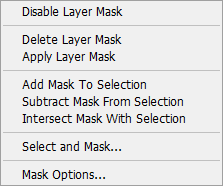
In the MAIN MENU, you can:

- Blend IT -- choose from a list of blend options in the layer panel to blend one layer pixels with that of another underlying layer. Blending layers create a "simulated lighting" effect. Unlike filters where you can apply multiply filters to a single layer, you can only apply a single blend to two adjacent layers.
- Select IT -- right-click on the image while the Move tool is select to move to a desired layer without having to use the Layer panel.
- Link/Unlink IT -- click on the link icon at the bottom on the Layer panel to link or unlink selected layers.
- Group IT -- click on the Create New Group icon at the bottom of the Layer panel to create a group (or folder) so that you can organize related image together or to apply layer styles or blend modes to a group of layers. You can also select the layers and the select the New Group from Layers option to group the layers without having to move the layers into the group. You can also link groups,
- View IT -- click ALT + a selected layer eye icon to view just that layer.
- Order IT -- drag selected layer(s) up/down the layer panel to change its stacking order. You can also CTRL + click the right/left square brackets. CTRL+SHIFT with brackets to move to Top or Bottom (but not below Background layer) or choose Layer>Arrange and one of the arrange option from the sub-menu.
- Style IT -- click on the Add layer style icon (fx) at the bottom on the Layer panel to add a layer style (i.e., shadow, glow, etc.) to the layer (except Background layer) TIP: To make the object invisible but the shadow visible, set the opacity to 0%.
- Duplicate IT -- drag layer to Create New Layer icon at the bottom of Layer panel.
By dragging -- Hold down the ALT key and drag to create a duplicate layer while at the same time positioning it anywhere within the layer stack.
From menu or Right-clicking -- select Layer>Duplicate Layer...
From keyboard -- Control J to duplicate above current selected layer - Delete IT -- drag layer to trash can icon in Layer panel or select Layer>Delete Layer)
- Invert IT-- Choose Image>Adjustment>Invert with the layer mask thumbnail selected or select CTRL+I
- Rename IT -- double click on the layer name to rename it.
- Flip IT -- click on the layer to flip and select Edit > Transform > Flip Horizontal/Vertical from the menu.
- Move IT -- To move multiple layers and to create a temporary linking of them, select the layers and move them using the Move tool. To create a more permanent linking, select the layer and click on the lock icon at the bottom of the Layer panel, then move them.
What Can You Do With The Background Layer
The Background layer is a unique layer from the other layers in Photoshop. It behaves differently and you cannot do certain things to it.
- Move it
- Use blend or opacity
- Add color to layer
You can; however, convert a Background into a layer by double-clicking on the Background name and renaming it or
You can also convert a layer to a Background by choosing Layer>New>Background From Layer at top of layer menu.