jQuery Effects And Animations
Animation
The animate() method allows you to animate CSS attributes from its current values to specific values that are set as the parameters.
SYNTAX: $(“CSS selector”).animate({Parameters}, speed, callback)
IMPORTANT NOTES:
- The curly braces represent an object literal that typically contain a list of CSS name:value pairs. (e.g., {height:"100px", width:"100px"}). Unlike effects, jQuery animate method uses this REQUIRED parameter which is an object to define the CSS properties that you want to animate. Like the jQuery effects previously mentioned, jQuery animate method uses two OPTIONAL parameters (speed and callback function) the same way.
- All CSS properties can be animated that have numeric values:
- If the value have a unit of measurement (e.g., px, em, percentage), it has to be placed in single or double quotes.
- If the value does NOT use a unit of measurement (e.g., opacity, fontSize, borderWidth), the quotes are optional but highly recommended for consistent code.
- It is important to remember that multiple words CSS properties with dashes must be converted to camelCase (e.g., margin-left to marginLeft or font-size to fontSize). The reason for this is that CSS would treat the dashes as minus signs. Alternatively, jQuery will let you use dashes in a property name if you place it in quotes (e.g., "margin-left":"10px").
- Unlike CSS, if you want to animate color, you need to download the Color Animations plugin from jQuery.com.
- All HTML elements have a STATIC position by default and cannot be moved. To animate an object position, it is important to remember to set the CSS position property of the element typically to relative or absolute.
- Because the border-width property is a shorthand that set the width of all four sides to be the same, in order to animate all of them differently, you have to animate all four borders separately (e.g., $(“myObject”).animate( {borderTopWidth: “15px”, borderRightWidth: “5px”, borderBottomWidth: “25px”, borderLeftWidth: “12px”)}).
Animate Method:
Create an object and give it a name:
- Copy the Slide Toggle Box button code and paste it on the next line and modify the code to read and remove the <br> tag since this is the last button in the list.
<button id="slideToggleBoxButton">Slide Toggle Box</button>
<button id="moveBoxButton">Move Box</button>
Tell the object to do something: - Copy the slideToggleBoxButton code and paste it below the current code and modify the code to read:
$("#slideToggleBoxButton").click(function()
{
$("#myBox").slideToggle();
}); // end of slideToggleBoxButton event handler$("#moveBoxButton").click(function()
{
$("#myBox").animate({left:"350px"});
}); // end of moveBoxButton click event handler
- Add position:absolute rule to the #myBox selector so that the object can be "poped" off the page and animated.
- CHECK POINT: Save the file and test the page in a browser by clicking on the Move Box button. You should see the red box move 350 pixels from the left edge of the page.
Manipulating Multiple CSS Properties
You can animate multiple CSS properties at the SAME TIME by separating the name/value pairs with commas.
- Add the following three CSS properties to the existing animate method.
CAUTION: Don't forget to include a comma after the "400px" to separat the name/value pairs correctly. Don't add a comma to the last name/value pairs.
$("#moveBoxButton").click(function(){
$("#myBox").animate({left:"350px",
opacity:"0.2",
height:"150px",
width:"150px"
}); // end of animate method
}); // end of moveBoxButton event handler
NOTE: While not necessary, it is common practice when many CSS properties are needed to place each on separate lines so that you can see CSS name/value pairs better along with their corresponding commas.
- CHECK POINT: Save the file and test the page in a browser by clicking on the Move Box button. You should see the red box move not only 400 px from the left edge of the page but also grow and become transparent.
Using Relative Values
You could have the animation move relative to its CURRENT position each time the Move button is pressed using the “+=” or “-=” prefix in front of the value to increment or decrement the value on each button click.
- Modify the code to include the “+=” to the left property:
$("#moveBoxButton").click(function(){
$("#myBox").animate({left:"+=350px",
opacity:"0.2",
height:"150px",
width:"150px"
}); // end of animate method
}); // end of moveBoxButton event handler
- CHECK POINT: Save the file and test the page in a browser by clicking on the Move Box button repeatedly. You should see that the height and opacity and position animate on the first click. However, if you click again only the left position property animate because it is the only one with the "+=" assigned to it.
Using Predefined Values
While not intuitive, you can also associate CSS property values with jQuery effect names like show, hide and toggle. How cool is that!
- Change the following code to read:
$("#moveBoxButton").click(function(){
$("#myBox").animate({left:"+=350px",
opacity:"toggle",
height:"150px",
width:"150px"
}); // end of animate method
}); // end of moveBoxButton event handler
- CHECK POINT: Save the file and test page in a browser by clicking on the Move Box button repeatedly. You should see only the opacity property with the “toggle” value change to zero with each button click.
- For the next example, REMOVE the opacity, height and width property to simply example.
Using Queue Functionality
To create multiple animations one after another, you can create a separate line (keyframe) for each animation and jQuery with “queue” them one after another.
- Add the following additional animate methods below the first large animate code block:
$("#myBox").animate({left:"400px"});
$("#myBox").animate({top:"200px"});
$("#myBox").animate({left:"200px"});
$("#myBox").animate({top:"0px"});
}); // end of moveBoxButton click event handler
NOTE: It is important to note that the top and left properties when using the animate method refer to the top edge of the browser or the left edge of the browser. This sometimes confuses new developers. For example, the first left animate line ($("#myBox").animate({left:"400px"});) move the box to the RIGHT, yet the second left animate line ($("#myBox").animate({left:"200px"}); ) move the box to the LEFT. The reference is NOT the movement but the position of the object.
- CHECK POINT: Save teh file and test the page in a browser by clicking on the Move Box button. You should see each line of animation play one after another. It is important to note that EACH line represents a key frame (or leg) of the animation. This is akin to a relay race where each team member passes the baton to the next team member in the race.
Animation In An Animation
You can create an animation inside of an animation. This is akin to a TV that shows a picture in a picture (PIP).
- Add the following highlighted text to the red box <div> tag.
<div id ="myBox">My Red Box</div>
- Add the following highlighted CSS in the <style> tag so that the text can be seen better in the next example.
<style>
#myBox{width:100px; height:100px; background:red; position:absolute; left:200px; color: white; font-weight:bold;}
button{width:125px; border: 1px solid blue;}
</style>
- Add another animation line:
$("#myBox").animate({left:"350px"});
$("#myBox").animate({top:"200px"});
$("#myBox").animate({left:"200px"});
$("#myBox").animate({top:"0px"});
$("#myBox").animate({fontSize:"20px"});
}); // end of moveBoxButton click event handler
- CHECK POINT: Save the file and test the page in a browser by clicking on the Move Box button. You should see the red box animates and then the text animate at the end. If you click the Move Box button again, you will notice that the animation happens again but the text REMAINS the same size. That's because its font size property has ALREADY occured.
Delaying an Animation
There are times when you need to introduce a delay or pause in your animation. The delay() method is used for just this purpose. Its specifies a delay in milliseconds before beginning the animation. Place it BEFORE or BETWEEN animate methods to add delay where you want them.
- Add two delay methods ABOVE the first animate method and AFTER the third animate method:
$("#myBox").delay(2000);
$("#myBox").animate({left:"350px"});
$("#myBox").animate({top:"200px"});
$("#myBox").animate({left:"200px"});
$("#myBox").delay(2000);
$("#myBox").animate({top:"0px"});
$("#myBox").animate({fontSize:"20px"});
}); // end of moveBoxButton click event handler;
- CHECK POINT: Save the file and test the page in a browser by clicking on the Move Box button. You should see the animation pauses for 2 seconds before animating and then starts to animate and then pauses for another two seconds after the fourth leg of the animation. Its the fourth leg because the delay method is a keyframe as well.
Stopping an Animation
Now, that you know how to START and DELAY an animation, sometimes you may want to STOP an animation from completing once it starts. The jQuery stop() method is used to accomplish this task. It can also be used to stop an effect.
SYNTAX: $("CSS selector").stop();
You can pass several boolean values based on what you want to do:
- object.stop()–stops the current active animation and allows the queued animations to continue
- object.stop(true)–stops all animations
- object.stop(true, true)–complete the current active animation then jump to the end.
- Perform the following tasks:
- Add a comma and a speed parameter to the first four animate methods so that you have ample time to click the Stop Animation button.
- Comment out the delay method so that the animation start immediately.
$("#moveBoxButton").click(function(){
/* $("#myBox").delay(5000); */
$("#myBox").animate({left:"350px"},8000);
$("#myBox").animate({top:"200px"},8000);
$("#myBox").animate({left:"200px"},8000);
$("#myBox").delay(2000);
$("#myBox").animate({top:"0px"},8000);
$("#myBox").css("color","blue").slideUp(2000).slideDown(2000);
$("#myBox").animate({fontSize:"20px"}, displayMessage);
}); // end of moveBoxButton click event handler
- Copy the Move Box button code and paste it on the next line and modify the code to read:
<button id="moveBoxButton">Move Box</button><br>
<button id="stopBoxAnimationButton">Stop Animation</button><br> - Write the following code to stop the animation below the last animation code block:
$("#stopBoxAnimationButton").click(function(){
$("#myBox").stop();
}); // end of stopBoxAnimationButton event handler
- CHECK POINT: Save the file and test the page in a browser by first clicking on the Move Box button to start the animation and then click on the Stop Animation button to stop the animation. Notice the only the current animation keyframe stops while the other continued.
- Add a boolean of true as a parameter to the stop method:
$("#myBox").stop(true);
- CHECK POINT: Save the file and test the page in a browser by first clicking on the Move Box button to start the animation and then click on the Stop Animation button to stop the animation in its track.
- Add TWO booleans of true as a parameters to the stop method:
$("#myBox").stop(true, true);
- CHECK POINT: Save the file and test the page in a browser by first clicking on the Move Box button to start the animation and then click on the Stop Animation button to stop the animation in its track and then jump to the end of the current animation sequence.
Adding an Callback
Like the jQuery effects mentioned earlier, you can also add an optional callback function parameter to the animate function to do something when the animation is FINISHED. The callback function is the third parameter ({css properties name/value pairs}, speed, callback).
- Add a comma and a callback name to the Move Box on the last animate method:
/*$("#myBox").delay(5000);*/
$("#myBox").animate({left:"350px",
opacity:"0.2",
height:"150px",
width:"150px"}, 4000);
/*$("#myBox").animate({top:"300px"});
$("#myBox").animate({left:"0px"});
$("#myBox").animate({top:"150px"});
$("#myBox").animate({fontSize:"20px"}, displayMessage);*/
}); // end of moveBoxButton click event handler - Add the callback function below the moveBoxButton click event handler:
}); // end of moveBoxButton click event handler
function displayMessage(){
alert("The Move Box button was pressed.");
}
ADVANCED TIP:
If you are an experience developer, you can DELETE the NAMED callback function word displayMessage and CUT AND PASTE the function INSIDE the code as below. This is called an anonymous (no name) function.
$("#myBox").animate({left:"350px"}, function (){alert("The Move Box button was pressed."); });
- CHECK POINT: Save the file and test the page in a browser by clicking on the Move Box button. You should see that once the animation ends the message is displayed. Click the OK button to dismiss the dialog box. The callback function could be added to any of the animate method line; however, the animation will pause automatically when the alert dialog appears and you will have to click the OK button to continue the animation if it is not the last animate method.
Adding Easing
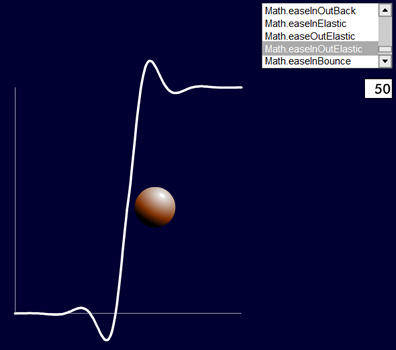
Another optional argument to jQuery effects is easing that CONTROLS the speed of an animation at different points in time. JQuery only has two built-in easing: swing and linear. Linear specifies a constant or linear speed. Swing specifies an animation that starts quickly and then slows down. If you don’t specify an easing, the animation will use the default swing easing.
However, you are not limited to these two easing by using a jQuery easing plug-in available at http://www.gsgd.co.uk/sandbox/jquery/easing/. To visualize how these effect works go to http://www.robertpenner.com/easing/easing_demo.html. See example below:
As with any class library, you must download the plug-in and attach it to your page. Then, you can use any of the available easing options from the library. For example, to animate the width property of the red box with a bounce-like effect, you could write the following two code block:
- Download the jQueryEasing.js file from http://www.gsgd.co.uk/sandbox/jquery/easing/.
- Create another folder called js in the same directory as the other files and add this js file to it.
- Add the following <script> tag BELOW the jquery script to connect it to the jQueryEasing.js file in the js folder.
<script src="http://ajax.googleapis.com/ajax/libs/jquery/1.11.0/jquery.min.js"></script>
<script type="text/javascript" src="js/jQueryEasing.js"></script>
Create an object and give it a name:
- Copy the Stop Box Animation button code and paste it on the next line and modify the code to read:
<button id="stopBoxAnimationButton">Stop Box Animation</button><br>
<button id = "animateBoxEasingButton">Animate Box with Ease</button>
Tell object to do something:
- Add the following code below the stopBoxAnimationButton code block:
$("#stopBoxAnimationButton").click(function(){
$("#myBox").stop();
}); // end of stopAnimationBoxButton event handler$("#animateBoxEasingButton").click(function()
{
$("#myBox").animate({left:"500px"}, 1000, "easeInOutBounce");
}); // end of animateBoxEasingButton click event handler}); // end document ready function
- CHECK POINT: Save the file and test the page in a browser by clicking on the Animate Box with Ease button. You should see the red box bounce at the beginning and end of the animation.
Using jQuery Chaining Method
Until now, the jQuery animation statements have been written one line at a time. There is an easier approach called chaining that allows you to execute multiple jQuery statements using the same element. To chain an animation together, you can simply append each function together separated by dots.
- Remove the semicolons on the animate methods and then "chain" the code into a SINGLE line as shown below:
$("#myBox").animate({left:"350px"}).animate({top:"200px"}).animate({left:"200px"}).animate({top:"0px"}).animate({fontSize:"20px"}, displayMessage);
}); // end of moveBoxButton click event handler
- CHECK POINT: Save the file and test the page in a browser by clicking on the Move Box Button. It should work the same but with less code.
NOTE: To make it easier to read you could place each animation on a separate line with indentions. Also, notice there is only one reference to the red box object (e.g., #myBox) instead of five. jQuery will ignore any whitespace.
$("#myBox").animate({left:"350px"})
.animate({top:"400px"})
.animate({left:"0px"})
.animate({top:"200px"})
.animate({fontSize:"20px"}, 2000, displayMessage);
}); // end of moveBoxButton click event handlerYou can chain together not only animate() methods, but CSS methods (e.g., css()) and jQuery effect methods (e.g., slideUp() and slideDown()).
- Add the following code below the last animate method:
$("#myBox").animate({left:"350px"})
.animate({top:"400px"})
.animate({left:"0px"})
.animate({top:"200px"})
.animate({fontSize:"20px"}, 2000, displayMessage);
$("#myBox").css("color","blue").slideUp(2000).slideDown(2000);
NOTE: CSS properties will render first regardless of where it is in the chain. In this case, the text will change color even though its properties is listed at the end of the properties chain.
- CHECK POINT: Save the file and test the page in a browser by clicking on the Move Box button. You should see that it animates as before with some additional options (text color turns blue IMMEDIATEDLYand red box slide up and down at the end of the animation.)
NOTE: When working with animation, it is helpful to think of each animate() method as a separate keyframe that are used in other programs like Flash, After Effects, Photoshop and even CSS animation @keyframe rules.
(OPTIONAL) Using an Event Object
You can use an event object as an argument to a function to ascertain properties of the event and the object that made the invocation.
- Update the hideBoxButton code with the following highlighted code:
$("#hideBoxButton").click(function(eventObject){
$("#myBox").hide(2000);
var buttonID = eventObject;
alert("What is the button ID name? " + buttonID);
}); // end of hideBoxButton click event handler
- CHECK POINT: Save the file and test the page in a browser by clicking on the Hide Box button. You should see the alert dialog box display [object Object]. This is because we have not drilled down far enough to get to the button's ID name.
- Add .target to the end of the eventObject:
var buttonID = eventObject.target;
- CHECK POINT: Save the file and test the page in a browser by clicking on the Hide Box button. You should see the alert dialog box display [object HTMLButtonElement]. This is because we have not drilled down far enough to get to the button's ID name. The target property returns the type of HTML element.
- Add .id to the end of the target:
var buttonID = eventObject.target.id;
- CHECK POINT: Save the file and test the page in a browser by clicking on the Hide Box button. You should see the alert dialog box display hideBoxButton. This is because we have drilled down enough to get to the button's ID name.
- Replace id with nodeName or tagName
- CHECK POINT: Save the file and test the page in a browser by clicking on the Hide Box button. You should see the alert dialog box display BUTTON. This is because we have drilled down enough to get to the button's ELEMENT name.
- Replace nodeName with textContent.
- CHECK POINT: Save the file and test the page in a browser by clicking on the Hide Box button. You should see the alert dialog box display Hide Box. This is because we have drilled down enough to get to the button's BUTTON name.