Android Product Directory
PART 2: Create Custom ListView
While a standard ListView is acceptable for simple projects, typically, you will want to customize it to meet your particular need by adding additional icons and text to it to make it more appealing.
Prep for Part 2
- Copy the ProductDirectoryAppPart1 and paste it in the same directory as ProductDirectoryAppPart2.
- Open ProductDirectoryAppPart2 in Android Studio.
- Right-click on the package and Refactor > Rename… and change the 1 to 2 on the package name: com.example.productdirectoryapppart2 and then click the OK button.
- In the strings.xml file change the 1 to 2 for the app name attribute:
<string name="app_name">ProductDirectoryApp Part 2</string>
Create Assets Folder
An Assets folder has to be created manually to hold the images for the project. However, unlike other resources, these images do not have resource IDs so they have to be addressed directly by their file names.
- Right click on the app module and select New > Folder > Assets Folder and then click the Finish button to create the Assets folder.
- Copy the images that you want to use in your project and then right-click on the assets folder and select Paste. In the Copy dialog box that appears, click the OK button to add the images to the assets folder.
Create Java Classes
We will need to create two classes for this project—Product and DataProvider.
Product Class
- Right-click on the java folder and select New > Java Class and in the Choose Destination Directory dialog box that appears, ensure that apps/src/main/java is selected and then click the OK button.
- In the Create New Class dialog box that appears add a name of Product, a package name of com.example.productdirectoryapppart2 and then click the OK button.
- In the Product.java file, add four private fields, four getter methods and one constructor method to the class:
package com.example.productdirectoryapppart2;
public class Product {
private String productId;
private String name;
private String description;
private double price;
public String getProductId() {
return productId;
}
public String getName() {
return name;
}
public String getDescription() {
return description + "\n";
}
public double getPrice() {
return price;
}
public Product(String productId, String name, String description, double price) {
this.productId = productId;
this.name = name;
this.description = description;
this.price = price;
}
}
CODE EXPLANATION: The constructor method is used to create instances of the class based on the four fields. Notice that the Product class is a public class so it will be used within another class. In our case, the DataProvider Class that will be explained next.
DataProvider Class
- Right-click on the java folder and select New > Java Class and in the Choose Destination Directory dialog box that appears, ensure that apps/src/main/java is selected and then click the OK button.
- In the Create New Class dialog box that appears add a name of DataProvider and a package name of com.example.productdirectoryapppart2 and then click the OK button.
- Add the word final to the class:
public final class DataProvider {
NOTE: The word final makes the class ….
- In the DataProvider.java file, add the following highlighted code INSIDE of the DataProvider class curly braces.
package com.example.productdirectoryapppart2;
public final class DataProvider {
public static List<Product> productList = new ArrayList<>();
public static Map<String, Product> productMap = new HashMap<>();
static {
addProduct("shirt101",
"Cross-back training tank",
"Our cross-back training tank is made from organic cotton with 10% Lycra for form and support, and a flattering feminine cut.",
35);
addProduct("jacket101",
"Bamboo thermal ski coat",
"You’ll be the most environmentally conscious skier on the slopes - and the most stylish - wearing our fitted bamboo thermal ski coat, made from organic bamboo with recycled plastic down filling.",
128);
addProduct("pants101",
"Stretchy dance pants",
"Whether dancing the samba, mastering a yoga pose, or scaling the climbing wall, our stretchy dance pants, made from 80% organic cotton and 20% Lycra, are the most versatile and comfortable workout pants you’ll ever have the pleasure of wearing.",
85);
addProduct("shirt102",
"Ultra-soft tank top",
"This versatile tank can be worn in the gym, under a blazer, or for a day out in the sun. Made from our patented organic bamboo and cotton mix, our ultra-soft tank never stops feeling soft, even when you forget the fabric softener.",
23);
addProduct("shirt103",
"V-neck t-shirt",
"Our pre-shrunk organic cotton t-shirt, with its slightly fitted waist and elegant V-neck is designed to flatter. You’ll want one in every color!",
26);
addProduct("sweater101",
"V-neck sweater",
"This medium-weight sweater, made from organic knitted cotton and bamboo, is the perfect solution to a chilly night at the campground or a misty walk on the beach.",
65);
addProduct("shirt104",
"Polo shirt",
"Our pre-shrunk organic cotton polo shirt is perfect for weekend activities, lounging around the house, and casual days at the office. With its triple-stitched sleeves and waistband, our polo has maximum durability.",
38);
addProduct("shirt105",
"Skater graphic T-shirt\n",
"Hip at the skate park or around down, our pre-shrunk organic cotton graphic T-shirt has you covered.",
45);
addProduct("jacket102",
"Thermal fleece jacket",
"Our thermal organic fleece jacket, is brushed on both sides for ultra softness and warmth. This medium-weight jacket is versatile all year around, and can be worn with layers for the winter season.",
85);
addProduct("shirt106",
"V-neck pullover",
"This organic hemp jersey pullover is perfect in a pinch. Wear for casual days at the office, a game of hoops after work, or running your weekend errands.",
35);
addProduct("shirt107",
"V-neck T-shirt",
"Our pre-shrunk organic cotton V-neck T-shirt is the ultimate in comfort and durability, with triple stitching at the collar, sleeves, and waist. So versatile you’ll want one in every color!",
28);
addProduct("pants102",
"Grunge skater jeans",
"Our boy-cut jeans are for men and women who appreciate that skate park fashions aren’t just for skaters. Made from the softest and most flexible organic cotton denim.",
75);
addProduct("vest101",
"Thermal vest",
"Our thermal vest, made from organic bamboo with recycled plastic down filling, is a favorite of both men and women. You’ll help the environment, and have a wear-easy piece for many occasions.",
95);
}
private static void addProduct(String itemId, String name,
String description, double price) {
Product item = new Product(itemId, name, description, price);
productList.add(item);
productMap.put(itemId, item);
}
public static List<String> getProductNames() {
List<String> list = new ArrayList<>();
for (Product product : productList) {
list.add(product.getName());
}
return list;
}
public static List<Product> getFilteredList(String searchString) {
List<Product> filteredList = new ArrayList<>();
for (Product product : productList) {
if (product.getProductId().contains(searchString)) {
filteredList.add(product);
}
}
return filteredList;
}
}
CODE EXPLANATION:
- This class creates a list of complex objects that are instances of the Product class. It exposes data in two static fields:
- public static List<Product> productList = new ArrayList<>(); — is an ordered list of data
- public static Map<String, Product> productMap = new HashMap<>(); — is a map of a set of key/value pairs, where the key is a string and the value is an instance of that product class.
- Notice that the following imports were automatically added to the top of the class:
import java.util.ArrayList;
import java.util.HashMap;
import java.util.List;
import java.util.Map;
Create Layout File
A new layout file is needed (list_item.xml) that will be used to represent each row in the ListView that include:
- an ImageView component on the left
- a LinearLayout on the right with two TextViews (cloth’s name and price) with has some dummy text to see what the app design will look like. The cloth’s description will be shown later on a DetailActivity.
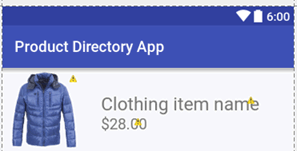
- Right-click on the layout folder and select New > Layout resource file and in the New Resource File dialog box that appears, enter a file name of list_item and a Root Element of RelativeLayout and then click the OK button.
- In the list_item.xml file that opens in Text view:
- change the layout_height to wrap_content in the RelativeLayout element
- add a paddingBottom attribute to the END of the opening RelativeLayout element
- add the following highlighted code
<?xml version="1.0" encoding="utf-8"?>
<RelativeLayout xmlns:android="http://schemas.android.com/apk/res/android"
android:layout_width="match_parent"
android:layout_height="wrap_content"
android:paddingBottom="10dp">
<ImageView
android:id="@+id/imageView"
android:layout_width="100dp"
android:layout_height="100dp"
android:scaleType="fitStart"
android:src="@drawable/jacket101"
android:layout_margin="5dp"/>
<LinearLayout
android:layout_width="wrap_content"
android:layout_height="wrap_content"
android:layout_centerVertical="true"
android:layout_toEndOf="@+id/imageView"
android:layout_toRightOf="@id/imageView"
android:orientation="vertical"
android:padding="10dp"
android:layout_marginLeft="10dp"
android:layout_marginStart="10dp">
<TextView
android:id="@+id/nameText"
android:layout_width="wrap_content"
android:layout_height="wrap_content"
android:text="Clothing item name"
android:textSize="24sp" />
<TextView
android:id="@+id/priceText"
android:layout_width="wrap_content"
android:layout_height="wrap_content"
android:text="$28.00"
android:textSize="20sp" />
</LinearLayout>
</RelativeLayout>
- Copy and paste the first image (jacket101.png) from the drawable folder to the assets folder.
NOTE: This step is not required but was only used so that a preview of the layout could be seen. You can delete this image now or later. Images will later be referenced from the assets folder later.
- CHECK POINT: You should the following in Design view:
[REPLACE WITH OWN GRAPHICS AND TEXT]
Create Custom ArrayAdapter
Currently, when the app starts, it creates an instance of the ArrayAdapter class that contains instances of the String class. Then, an Android SDK layout with a simple list of strings is used:
ArrayAdapter<String> adapter = new ArrayAdapter<>(this, android.R.layout.simple_list_item_1, android.R.id.text1, items);
This ArrayAdapter will be REPLACED with a custom ArrayAdapter that will know how to handle the Product class and the custom layout file (list_items.xml).
- Right-click on the java folder and select New > Java Class and in the Choose Destination Directory dialog box that appears, ensure that apps/src/main/java is selected and then click the OK button.
- In the Create New Class dialog box that appears add a name of ProductListAdapter and a package name of com.example.productdirectoryapppart2 and then click the OK button.
- In the ProductListAdapter.java file that opens:
- delete the comments
- extend the ArrayAdapter class (extends ArrayAdapter)
- sets the ArrayAdapter superclass type to the custom Product class (<Product>). The custom Adapter class is a subclass of the ArrayAdapter class.
package com.example.productdirectoryapppart2;
import android.widget.ArrayAdapter;
public class ProductListAdapter extends ArrayAdapter<Product> {
}
NOTE: Notice the import statement was automaticallya add to the top fo the class.
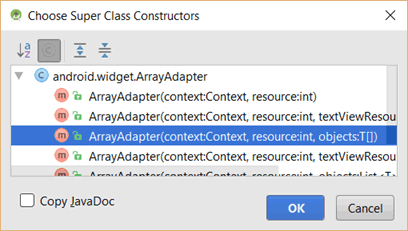
- Click in the red wavy line (error indicator) and Press ALT+ENTER and select Create constructor matching super from the list and then in the Choose Super Class Constructors dialog box that appears, select the constructor with the three arguments shown below and then press the OK button:
public class ProductListAdapter extends ArrayAdapter<Product> {
public ProductListAdapter(Context context, int resource, Product[] objects) {
super(context, resource, objects);
}
}
NOTE: Notice it automatically add the ProductListAdapter method.
- Change the Array of Product to a List of Product because this is how we will be getting the data from the DataProvider and then add:
- a list of products as a private field of this class, and name it products (private List<Product> products;)
- a reference to the data (products = objects) as the constructor is called.
import java.utils.List;
public class ProductListAdapter extends ArrayAdapter<Product> {
private List<Product> products;
public ProductListAdapter(Context context, int resource, List<Product> objects) {
super(context, resource, objects);
products = objects;
}
CODE EXPLANATION:
- Now, you have a persistent reference to all of the data.
- Notice the import java.util.List; was imported.
- Below the ProductListAdapter code block, type getView and then press the ENTER key and select the first option from the list to create an override:
public ProductListAdapter(Context context, int resource, List<Product> objects) {
super(context, resource, objects);
products = objects;
}
@Override
public View getView(int position, View convertView, ViewGroup parent) {
return super.getView(position, convertView, parent);
}
CODE EXPLANATION: This method is automatically called each time the user scrolls the ListView up or down to take the data from the current product and display it in the visual controls in the ListView layout.
- In the getView method, add an “if” statement to check whether the convertView is null. In the inflate() method, add the following three arguments:
- the custom layout (R.layout.list_item)
- the parent—the parameter that is passed in for the current ViewGroup
- the false Boolean value attached to root
if(convertView == null)
{
convertView = LayoutInflater.from(getContext()).inflate(R.layout.list_item, parent, false);
}
CODE EXPLANATION:
- The “if” statement checks to see if the convertView is null. If so, than instantiate it.
- When the getView() method is called, it receives a convertView argument that is either null or represents a layout that is already created. Because the ListView will be recycling the views, you don’t always want to create new instances of the view for every row that the user in currently seeing.
- Below the “if” statement code block, add the following highlighted code:
if(convertView == null)
{
convertView = LayoutInflater.from(getContext()).inflate(R.layout.list_item, parent, false);
}
Product product = products.get(position);
CODE EXPLANATION: Notice that when the getView() method is called it receives a position argument as integer that represents the current position of the required data item for the current row in the ListView. It is used to get the value with the product.get and pass in the position.
- Below the Product statement, create a TextView object and name it textTitle which will represent the name of the current title of the item. Then, get a reference to it by calling convertView.findViewById and pass in R.id.nameText and then cast the return value as a TextView object. Then, type nameText.setText and pass in product.getName (a getter method from the product item).
TextView textTitle = (TextView) convertView.findViewById(R.id.nameText);
textTitle.setText(product.getName());
- Replace the current return statement (return super.getView(position, convertView, parent);) with return convertView.
return convertView;
- Open the MainActivity class and comment out the code for the standard ArrayAdapter that binds data to the ListView.
// ArrayAdapter<String> adapter = new ArrayAdapter<String>(this, android.R.layout.simple_list_item_1, android.R.id.text1, items);
- Create a private field that is an instance of the List interface that contains products and once again name it products and assign it a value by calling DataProvider.productList:
private List<Product> products = DataProvider.productList;
- Press ALT+ENTER and then select the first option from the list and then press the ENTER key.
- In the onCreate() method below the commented out Adapter, create an instance of the custom ProductListAdapter class named adapter as before and instantiate it with new ProductListAdapter and pass it three arguments:
- Context = this
- ResourceID = R.layout.list_item (custom layout)
- Object = products (custom objects)
// ArrayAdapter<String> adapter = new ArrayAdapter<String>(this, android.R.layout.simple_list_item_1, android.R.id.text1, items);
ProductListAdapter adapter = new ProductListAdapter(this, R.layout.list_item, products);
CODE EXPLANATION: Now you have a PERSISTENT reference to the data that we will be working with.
- CHECK POINT: Run the app in an emulator. You should see that the app is displaying the custom name for each product but the SAME image and price for each product. This will be resolved in the upcoming steps.
Customize Image And Price
Once you have one of the component working, it easy to implement the other components using similar code:
- Open the ProductListAdapter class, below the TextView code, add the following highlighted code:
TextView textTitle = (TextView) convertView.findViewById(R.id.nameText);
textTitle.setText(product.getName());
NumberFormat formatter = NumberFormat.getCurrencyInstance();
String price = formatter.format(product.getPrice());
TextView priceText = (TextView) convertView.findViewById(R.id.priceText);
priceText.setText(price);
CODE EXPLANATION: The price was stored as a double value in the Product class. So it was formatted as a currency value by using the NumberFormat class and then it called the getCurrencyInstance method. If you want to internationalize your app, you can set the currency instance to a particular locale. Then, a String named price again is created and get its value by formatting the numeric value with the formatter name format.
- CHECK POINT: Run the app in an emulator. You should see that the app is displaying the custom name AND the custom price for each product but the SAME image for each product. This will be resolved in the upcoming steps.
- In the ProductListAdapter file, below the end of the getView method code block, add the following highlighted code:
- A private method that returns an instance of the Bitmap class and name it getBitmapFromAsset and pass it a String from the Product class that is set up in the DataProvider class where each product ID matches the name of one of the *.png in the assets folder. For example, shirt101 matches shirt101.png in the assets folder.
- A reference to the assetManager is made by calling the getContext() method and the getAssets() methods.
- An InputStream set initially to null.
- A stream = assetManager.open that is passed the productId and concatenated to the “.png” extension.
private Bitmap getBitmapFromAsset(String productId) {
AssetManager assetManager = getContext().getAssets();
InputStream stream = null;
stream = assetManager.open(productId + ".png");
}
CODE EXPLANATION: Since the code for creating the bitmap is more informed, it was given its own method.
- Click on the error indicator and the press ALT+ENTER and select Surround with try/catch from the list:
private Bitmap getBitmapFromAsset(String productId) {
AssetManager assetManager = getContext().getAssets();
InputStream stream = null;
try {
stream = assetManager.open(productId + ".png");
} catch (IOException e) {
e.printStackTrace();
}
}
- In the try code block and the catch code block, add the following highlighted return statements:
try {
stream = assetManager.open(productId + ".png");
return BitmapFactory.decodeStream(stream);
} catch (IOException e) {
e.printStackTrace();
return null;
}
CODE EXPLANATION: The first return statement create a BitmapFactory and make a call to the decodeStream which is passed to the stream. If the catch block is used, the return statement is null.
- In the ProductListAdapter file, below the price code block, add the following highlighted code for the image to:
- Declare an instance of the Bitmap class and get its value by calling the custom getBitmapFromAsset() method and pass it product.getProductId.
- Display that image with iv.setImageBitmap() method and pass it the bitmap.
priceText.setText(price);
ImageView iv = (ImageView) convertView.findViewById(R.id.imageView);
Bitmap bitmap = getBitmapFromAsset(product.getProductId());
iv.setImageBitmap(bitmap);
- CHECK POINT: Run the app in an emulator. You should see that the app is displaying the custom names, price and image for each product. Now, the default displays is being overridden for all components.
Create Detail Activity
Most apps consist of a concept called Master/Detail. In Android Studio, the Master activity is typically a ListView that shows a limited amount of information but for many items. Once a user clicks on any item, he or she is taken to a Detail Activity that gives the complete picture of the item that was clicked.
- Create a new activity by selecting File > New > Activity > Basic Activity template and give it a name of DetailActivity.
- Click on the browser button on the right side of the Hierarchical Parent and choose MainActivity and in the Select Activity dialog box that appears click the OK button.
- Add a package name of com.example.productdirectoryapppart2.
- Click the Finish button to create the new activity.
- CHECK POINT: This will create several files:
- DetailActivity class—it extends AppCompatActivity and load a new layout file (SetContentView(R.layout.activity_detail) and because this is a SECONDARY activity, it has the code to display the Back icon in the Action Bar (getSupportActionBar().setDisplayHomeAsUpEnabled(true)).
- If you CLICK on activity_detail link, you see will load an activity_detail.xml layout file and if you click on the link in the include element (<include layout = “@layout/content_detail” />) it will load the content_detail.xml file layout file where we will add components.
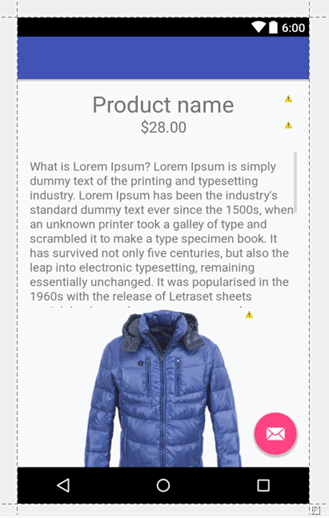
- In the content_detail.xml file, REPLACE the EXISTING code with the following highlighted code:
<?xml version="1.0" encoding="utf-8"?>
<RelativeLayout xmlns:android="http://schemas.android.com/apk/res/android"
xmlns:app="http://schemas.android.com/apk/res-auto"
xmlns:tools="http://schemas.android.com/tools"
android:layout_width="match_parent"
android:layout_height="match_parent"
android:paddingBottom="@dimen/activity_vertical_margin"
android:paddingLeft="@dimen/activity_horizontal_margin"
android:paddingRight="@dimen/activity_horizontal_margin"
android:paddingTop="@dimen/activity_vertical_margin"
app:layout_behavior="@string/appbar_scrolling_view_behavior"
tools:context="com.example.productdirectoryapppart2.DetailActivity"
tools:showIn="@layout/activity_detail">
<TextView
android:id="@+id/nameText"
android:layout_width="fill_parent"
android:layout_height="wrap_content"
android:gravity="center_horizontal"
android:text="Product name"
android:textSize="30sp" />
<TextView
android:id="@+id/priceText"
android:layout_width="fill_parent"
android:layout_height="wrap_content"
android:layout_below="@+id/nameText"
android:gravity="center"
android:text="$28.00"
android:textSize="20sp" />
<ScrollView
android:layout_width="wrap_content"
android:layout_height="match_parent"
android:layout_above="@+id/imageView"
android:layout_below="@+id/priceText"
android:layout_marginTop="20dp">
<TextView
android:id="@+id/descriptionText"
android:layout_width="fill_parent"
android:layout_height="wrap_content"
android:layout_marginTop="10dp"
android:text="@string/about_text"
android:textSize="16sp" />
</ScrollView>
<ImageView
android:id="@+id/imageView"
android:layout_width="250dp"
android:layout_height="250dp"
android:layout_alignParentBottom="true"
android:layout_centerHorizontal="true"
android:src="@drawable/jacket101" />
</RelativeLayout>
- Open the strings.xml file and add the following highlighted string constant resource:
<resources>
<string name="app_name">Product Directory App</string>
<string name="action_settings">Settings</string>
<string name="title_activity_detail">DetailActivity</string>
<string name="about_text">
What is Lorem Ipsum?
Lorem Ipsum is simply dummy text of the printing and typesetting industry. Lorem Ipsum has been the industry's standard dummy text ever since the 1500s, when an unknown printer took a galley of type and scrambled it to make a type specimen book. It has survived not only five centuries, but also the leap into electronic typesetting, remaining essentially unchanged. It was popularized in the 1960s with the release of Letraset sheets containing Lorem Ipsum passages, and more recently with desktop publishing software like Aldus PageMaker including versions of Lorem Ipsum.
Why do we use it?
It is a long established fact that a reader will be distracted by the readable content of a page when looking at its layout. The point of using Lorem Ipsum is that it has a more-or-less normal distribution of letters, as opposed to using Content here, content here, making it look like readable English. Many desktop publishing packages and web page editors now use Lorem Ipsum as their default model text, and a search for lorem ipsum will uncover many web sites still in their infancy. Various versions have evolved over the years, sometimes by accident, sometimes on purpose (injected humour and the like).
</string>
</resources>
- Right-click in the left margin and select Use Soft Wraps to see all of the text.
- CHECK POINT: Open the content_detail.xml file. Change to Design View and you should see a preview of the layout with dummy text and a default image.
[REPLACE WITH MY OWN IMAGE]
- Open the MainActivity class, INSIDE of the onCreate() method below the line listview.setAdapter(adapter); and type the beginning of the interface listview.setOnItemClickListener(new OnItem) and then press the ENTER key to automatically insert the rest of the code:
listview.setOnItemClickListener(new AdapterView.OnItemClickListener() {
@Override
public void onItemClick(AdapterView<?> parent, View view, int position, long id) {
}
});
CAUTION: Be careful to type onItemClickListener and NOT onClickListener.
CODE EXPLANATION: The setOnItemClickListener is passed an anonymous implementation of an interface named onItemClickListener. onClickListener is used typically for buttons. However, when working with an AdapterView, you use the onItemClickListener so that the event listener responds to each item in an AdapterView component like a ListView.
- Inside of the onItemClick() method code block, add the following intent and startActivity statements:
public void onItemClick(AdapterView<?> parent, View view, int position, long id) {
Intent intent = new Intent(MainActivity.this, DetailActivity.class);
startActivity(intent);
}
CODE EXPLANATION:
- You CANNOT use “this” because it is INSIDE of the onItemClickListener method and NOT the onCreate() method which represents the MainActivity. So you have to change it to MainActivity.this.
- The DetailActivity.class refers to creating an instance of this class.
- The startActivity() method is then passed the intent to start the activity.
- CHECK POINT: Run the app in an emulator. You should see that if you click on ANY item in the ListView it will take you to the DetailActivity screen and if you press the Back button or the Up icon in the Action Bar you will be taken BACK to the ListView.