Learning Selections From The Joes
ABCs OF SELECTIONS
EXECUTIVE SUMMARY: If you are not getting what you have EXPECTED, double-check what you have SELECTED.
What is a selection?
Unlike most applications where you click, double-click, or drag a lazzo around an object (e.g., text, image, vector) to SELECT and HIGHLIGHT it. This is not the case with a Photoshop SELECTION where it uses a differenct kind of selection method.
A SELECTION in Photoshop is a window to the underlying pixels of the active layer if it is NOT LOCKED OR HIDDEN if it is NOT LOCKED or HIDDEN. It is helpful to think of a selection as areas where there are "holes" in a transparent mask where the canvas can be drawn on or modified.
We will see later that only pixels within these "window" areas can be modified by other actions (e.g., filling with a color/pattern, adding a stroke, or transformation). Everything else will be considered protected from modification.
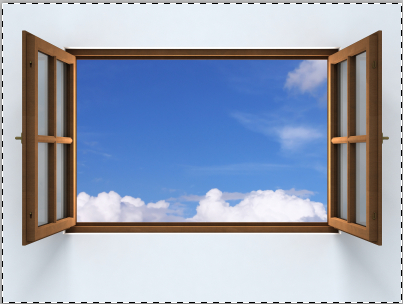
EXAMPLE: The illustration below shows an actual "window" depicting a selection to the outside world and the sky depicting the "underlying pixels" of the active layer (e.g., the world).

MEMORY TIP: It is helpful to think of a selection as a stencil or a masking tape that protects or exposes paint on the surface of another object (e.g., poster, wall).
How do you know you have a selection?
You typically "know" you have a SELECTION with one major EXCEPTION by viewing the marquee which is commonly known as the "marching ants" on the canvas. This is an EXPLICIT (clearly seen) selection.
EXAMPLE: With the same illustration above being used, the Rectangular Marquee tool was used to draw a selection around the window which shows the "marching ants." In Photoshop, these dashes will animate around the selection.

EXCEPTION TO RULE: However, if you don’t make a selection explicitly, you will have an IMPLIED (suggested without being directly seen) selection of the WHOLE canvas without any marching ants.
RULE: If you don't have anything selected, the whole canvas is a SELECTION so the whole canvas gets affected.
EXAMPLE: From the previous screenshot, the illustration below shows the selection covering the whole canvas instead of an object in the image like the window when the CMD/CTRL+A keys were pressed.
![]() If you want to “see” the selection of the whole canvas, select Select > All or press CMD/CTRL+A to select all of the pixels on the canvas. This is NOT necessary unless you want to copy or cut the whole image to another file.
If you want to “see” the selection of the whole canvas, select Select > All or press CMD/CTRL+A to select all of the pixels on the canvas. This is NOT necessary unless you want to copy or cut the whole image to another file.
![]() If you make it a habit of using CMD/CTRL+A to select ALL of the pixels on a layer, then when you want to cut or copy an image to another open Photoshop file, you don't have to worry about the CUT or COPY menu items being dimmed out because you did not make a selection.
If you make it a habit of using CMD/CTRL+A to select ALL of the pixels on a layer, then when you want to cut or copy an image to another open Photoshop file, you don't have to worry about the CUT or COPY menu items being dimmed out because you did not make a selection.
![]() It is important to learn upfront that a selection is INDEPENDENT of the layer in the Layers panel in which it was created on. Another way of stating this it that a selection "cuts" across ALL layers. As a result, it is typical that you may CREATE a selection on one layer to be USED on a completely different layer.
It is important to learn upfront that a selection is INDEPENDENT of the layer in the Layers panel in which it was created on. Another way of stating this it that a selection "cuts" across ALL layers. As a result, it is typical that you may CREATE a selection on one layer to be USED on a completely different layer.
How do you see a selection as a mask?
RULE: Look behind the curtain to see what is certain. Once you have made a selection, not that it is necessary, and if you want to "see" what is actually selected or not selected as a mask, turn on the Edit In Quick Mask Mode (Q key). Typically, you will see a red translucent Quick Mask that have "holes" (clear areas) cut out of it. These holes or clear areas represent the actual selection once you exit the Quick Mask mode by clicking on the Q key again.
EXAMPLE: Using the previous image again that has a selection, this illustration shows a layer with the Quick Mask depicted as a red translucent mask on top of it with a clear area or hole (window) to the underlying layer's pixels when the Q key is pressed.

- It is important to note that you cannot view the selection AND the Quick Mask at the same time. To bring back the selection, you have to exit the Quick Mask mode (e.g., pressing Q key again).
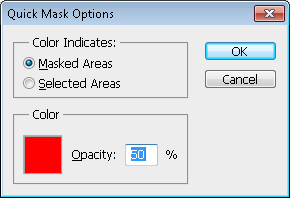
- The Quick Mask is red by default, however, if the image contains a lot of red colors in it, you may want to change the Quick Mask overlay color to a different color by double-clicking on the Edit In Quick Mask Mode icon at the bottom of the toolbar and then clicking a color chip to change its color.
The screenshot below shows the Quick Mask Options dialog box where you can change certain properties of the Quick Mask (e.g., masked or selected areas, mask color, and mask opacity).
![]() As mentioned earlier, if you don't have anything selected and you click on the Edit In Quick Mask mode icon, you won't see anything. You must have an INITIAL selection of some sort in order to see the Quick Mask; however, the Quick Mask is still active. To prove this with no selection made, enter into the Quick Mask mode (Q key) and with the brush tool paint with black and white and you will see the Quick Mask created or erased as you paint.
As mentioned earlier, if you don't have anything selected and you click on the Edit In Quick Mask mode icon, you won't see anything. You must have an INITIAL selection of some sort in order to see the Quick Mask; however, the Quick Mask is still active. To prove this with no selection made, enter into the Quick Mask mode (Q key) and with the brush tool paint with black and white and you will see the Quick Mask created or erased as you paint.
However, even though you cannot see a selection when nothing is selected, there are a few ways to tell that a Quick Mask is on:
- The Quick Mask icon will be highlighted in the Toolbar.
- The word "Quick Mask" will be displayed at the top of the page in the title area.
- The Layers panel will be highlighted with the color of the Quick Mask (default is red)
- There will be a QuickMask Alpha Channel in the Channels panel with the word QuickMask italicized.
What get affected by a selection?
CAUTION: As mentioned earlier, it is important to note that you cannot do anything if the active layer of the current selection is either LOCKED or HIDDEN.
In Photoshop, a selection is important whether it is implied or not. All other functionalities (cut/paste, filters, effects, etc.) as you will see are based on a given selection.
MEMORY TIP: To help you remember this rule, remember "If it is SELECTED, then it can be AFFECTED."
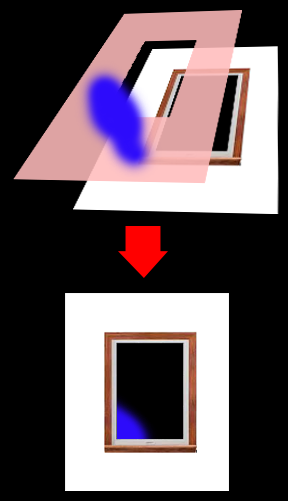
Because a selection behaves like a transparent mask with holes in it, only what's selected gets affected by what you do next (e.g., cut, copy, transform). Conversely, the unselected areas (the red overlay) will provide protection from what you do next. For example, If you make a selection and then decided to cut or delete the selected area, only the area where the selection was made will be affected.
EXAMPLE: The illustration below depicts a selection as a red translucent mask (e.g., a Quick Mask) with a "hole" in it positioned over a layer below it with the mask painted with a blue brush. Even though the paint was applied "over" the red translucent area of the mask and its clear opening, only the area "within" the mask's opening on the actual layer (e.g., image below) got affected by the blue paint (e.g., the small blue area in the bottom left corner of the image).
Hence, only the area that is selected get affected by what you do next (e.g., paint).
EXCEPTION TO RULE: If you don't have anything selected, the whole canvas is affected by what you do next. As a result, in the previous example, without a selection, you can "paint" ANYWHERE on the ENTIRE canvas of the image.
![]() It is important to note that while only what is selected get affected, it is just as important to note that the layer that is selected in the Layers panel is the ONLY layer that get affected. Hence, ensure you are on the right layer in the Layers panel before you do something after creating a selection.
It is important to note that while only what is selected get affected, it is just as important to note that the layer that is selected in the Layers panel is the ONLY layer that get affected. Hence, ensure you are on the right layer in the Layers panel before you do something after creating a selection.
How do you CONSTRAINT a selection?
One task that is done quite often is constraining a selection while drawing using the rectangular or elliptical tool along with one or two modifier keys:
| KEY(S) USED: | WHILE drawing a SINGLE selection with the rectangular or elliptical tool: |
|---|---|
| SHIFT | It will CONSTRAINT a selection to a square or a circle, respectively. |
| ALT/OPTION | It will CONSTRAINT a selection's drawing from its CENTER rather than from a corner. |
| SHIFT+ALT/OPTION | It will CONSTRAINT a selection to a square or a circle AND draw the selection from its center. |
NOTES:
- Because there are no SQUARE and CIRCLE marquee tools, you have to use the SHIFT key to create a square or circle selection if you want to do it easily.
- Releasing the SHIFT or the ALT/OPTION key WHILE still drawing a selection with the mouse will revert back to an UNCONSTRAINT shape or NOT DRAW FROM THE CENTER.
How do you ADD TO or SUBTRACT FROM a selection?
Another task that is done often is adding or subtracting from an existing selection. In the normal default mode (New Selection) with the exception of the Quick Selection tool, a new selection is created each time you click and drag AND any previous selection is removed. However, you can use one or two modifier keys to add or subtract from an existing selection.
Using the SAME set of key modifiers (SHIFT, ALT/OPTION), you can add to or subtract from a selection.
| KEY(S) USED: | AFTER drawing a selection with ANY tool: | Smart Cursor to give hint |
|---|---|---|
| SHIFT | It will ADD to an existing selection (increasing its size or shape) OR it will allow a new selection to be made somewhere else on the canvas. |
Notice the plus sign (+) next to the cursor when the SHIFT key is pressed. |
| ALT/OPTION | It will SUBTRACT from an existing selection (decreasing its size or shape). |
Notice the minus (-) sign next to the cursor when the ALT/OPTION key is pressed. |
| SHIFT+ALT/OPTION | It will give an INTERSECTION of two or more OVERLAPPING selections (yielding a new selection where the selections overlap.). |
Notice the x symbol next to the cursor when the SHIFT & ALT/OPTION keys are pressed. |
NOTE: The term intersection is not used in the title because it is a form of subtracting two overlapping selections. So the term subtract is used to represent both terms (intersection and subtract).
ALTERNATIVE: As an alternative to using modifier keys, in the Options bar, you can select a default method ( ![]() ) of adding or subtracting selections AUTOMATICALLY without using any modifier keys. However, while this approach is easier to use, it will cause a new user confusion if he or she forgets to turn off this option when creating a new selection later. Hence, it is best to learn how to use modifier keys since they are often used for so many techniques.
) of adding or subtracting selections AUTOMATICALLY without using any modifier keys. However, while this approach is easier to use, it will cause a new user confusion if he or she forgets to turn off this option when creating a new selection later. Hence, it is best to learn how to use modifier keys since they are often used for so many techniques.
How do you MOVE a selection?
With a SELECTION TOOL active, you can also MOVE the selection.
| KEY USED: | WHILE drawing a SINGLE selection with the rectangular or elliptical tool: | Smart Cursor to give hint |
|---|---|---|
| SPACEBAR | You can MOVE the selection at the same time you are drawing a selection by holding down the SPACEBAR key and dragging it. |
None |
| KEY USED: | AFTER drawing a SINGLE selection with the rectangular or elliptical tool: | Smart Cursor to give hint |
|---|---|---|
| NONE | You can click inside of the selection and drag it to MOVE it or use the ARROW KEYS to nudge the selection one pixel at a time or ten pixels at a time if you press the SHIFT key along with an arrow key. |
Notice the small selection icon next to the cursor when the SHIFT key is pressed. |
TIP: You can constraint a selection to a square or circle while drawing it from its center and moving it while doing all three actions at the SAME TIME by pressing the SHIFT+ALT/OPTION keys together and afterward pressing the SPACEBAR key and dragging the selection to move it. The reason for this is because of what was mentioned earlier:
- The SHIFT key will constraint a shape to a square.
- The ALT/OPTION key will draw a shape from its center
- The SPACEBAR key will allow a shape to be moved
How do you CUT or DUPLICATE PIXEL UNDER a selection?
With a selection made and with the MOVE TOOL active instead of the SELECTION TOOL, you can:
| KEY USED: | AFTER drawing a selection: | Smart Cursor to give hint |
|---|---|---|
| NONE |
You can CUT AND MOVE pixel under a selection on the SAME LAYER by dragging it. Notice the plus sign (+) next to the cursor when the SHIFT key is pressed. |
Notice the small scissor icon next to the cursor when the cursor is inside the selection |
| ALT/OPTION | You can DUPLICATE AND MOVE pixels under a selection on the SAME LAYER by holding down the ALT/OPTION key and dragging it. |
Notice the small black & white arrows icon next to the cursor when the cursor is inside the selection |
ALTERNATIVELY: With the Selection Tool active (not the Move Tool), you can CUT AND MOVE a selection on the SAME LAYER by holding down the CMD/CTRL key and dragging it.
TIP: Knowing that the SHIFT key is used to constraint the movement to ONE AXIS (e.g., X or Y) when CUTTING or DUPLICATING PIXEL UNDER A SELECTION, you can press the SHIFT key AFTER pressing the ALT/OPTION key or the CMD/CTRL key to MOVE the pixels in the initial direction (up/down or right/left) and the movement will be constraint only to that direction. Again, remember that:
- The ALT key is typically used to make a duplicate.
- The SHIFT key is typically used to constraint
- a shape (Rectangle to square, Elliptical to a circle)
- a line (while drawing to a horizontal, vertical or 45 degree angle)
- a direction (while drawing to x or y axis) (in this case, in a certain direction instead of a particular shape–square or circle).
- The CTRL key is typically used to cut.
If you keep these three concepts in mind, they will help you to remember what combination of keys to press to perform a desired task.
SUMMARY: With close to a dozen functions (e.g., constraint, add, subtract, duplicate, etc.) that can be done:
- only three keys are used (ALT/OPTION, CMD/CONTROL, and SHIFT) and
- only two tools used (Selection and Move)
What can you do with a selection?
The previous sections talked about what a selection is and how to CREATE, ADD/SUBTRACT from selections. In this section, we will discuss what do you DO AFTER a selection is made. With a Selection tool active AND a selection made, you can perform many different tasks by right-clicking and choosing an option from the menu:
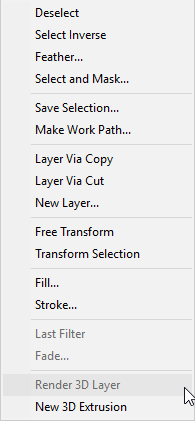
- Deselect IT – deselect a selection (You can also press CMD/CTRL+D or click on the canvas.).
- Invert IT – inverse a selection (You can also press CMD/CTRL+SHIFT+I—but not CMD/CTRL+ I which will invert image).
TIP: This is best useful when:
a. you want to select the object in the image first and then invert it to have the background selected instead.
b. the background is easier to select because it is solid color so that it can be inverted to select the object in the image that is not easy to select.
- Feather IT – soften the edges (feather) of a selection. (You can also press SHIFT+F6.).
TIP: The higher the feathering value the softer the edge. It is best used to create what is called a vignette effect or to create a soft edge when compositing images. It is best to use this method to feature a selection AFTER it has been made instead of BEFORE using the feature option in the Options bar.
- Select and Mask IT (Used to be called Refine Edges) – refine (enhance) the edges of a selection (You can also press SHIFT+CMF/CTRL+R.).
- Save IT – save a selection as an alpha channel in the Channels panel to be used later.
NOTE: It is helpful to think of a selection as a "temporary" invisible mask and an alpha channel as a "permanent" visible mask. If a selection is not saved, it may be lost if it is deselected. However, if it is saved, you can retrieve it just like you would retrieve a file that you saved on your computer in a folder. In fact, it is helpful to think of the Channels panel as a folder for your saved selections.
- Make Work Path of IT – store a selection as a work (temporary) path.
NOTE: To convert the temporary work path to a permanent saved path, double-click on the thumbnail in the Paths panel and give it a meaning name and click the OK button to commit it. Like the Channels panel, it is helpful to think of the Paths panel as a folder where paths are saved.
- Create Layer Via Copy from IT – copy a selection to a new layer (You can also press CMD/CTRL+J or choose Layer > New > Layer via Copy from the menu.).
NOTE: If you copy to a new layer, you create an object with a transparent background if the entire layer was not selected.
- Create Layer Via Cut from IT – cut a selection to a new layer (You can also press CMD/CTRL+SHIFT+J or choose Layer > New > Layer via Cut from the menu.).
NOTE: If you cut to a new layer, you create an object with a transparent background if the entire layer was not selected.
- Create New Layer for IT – create a new layer from a selection and make that layer active.
- Free Transform IT – perform transformations (e.g., scale, rotate, skew, distort) on the PIXELS under the selection (You can also press CMD/CTRL+T.).
TIP: To commit the transformation, double-click inside selection, press the ENTER key or select the checkmark in the Options bar.
- Transform Selection of IT – perform transformations (e.g., scale, rotate, skew, distort) on a selection itself.
- Fill IT – fill a selection with a color, gradient, pattern, etc.
TIP: To fill a selection with the foreground color select ALT+Backspace or ALT/OPTION+Delete. To fill a selection with the background color select CTRL+Backspace or CMD/CTRL+Delete. To get the Fill dialog box, select SHIFT+Backspace.
- Stroke IT – add a stroke to a selection of a given thickness and color.
- Add a FILTER to IT – add a filter (e.g., Gaussian Blur) to a selection.
- Fade IT –
- Render IT – Render only the selected portion of a 3D object.
TIP: By creating a selection on a portion of a 3D object, you can save time by rendering only the selected portion to check the object's shadow or reflection in that area without having to render the whole 3D object.
- Create 3D Extrusion from IT – make a 3D object from a selection.
From the main menu, you can perform some additional tasks.

- Select All of IT – select all of the pixels in an image (You can also press CTRL+A).
TIP: Not necessary unless you need to copy a selection to a new file.
- Deselect IT – see above for details.
- Reselect IT – reselect a previous existed selection (You can also press SHIFT+CTRL+D. This menu option will be grayed out if there is already a selection.
NOTE: If there is currently a selection on the canvas, this menu item will be dimmed out (See screenshot). - Invert IT – see above for details.
- All Layers –
- Deselect Layer –
- Find Layers –
- Isolate Layer –
- Color Range –
- Focus Area –
- Subject –
- Select and Mask – see above for details
- Modify IT – see below for details.
- Grow IT – grow a selection based on adjacent pixels.
- Similar – grow a selection based on similar pixels throughout the entire image.
- Transform Selection of IT – see above for details.
- Edit IT in Quick Mask Mode – turn on the Quick Mask so that a selection can be edited (You can also press the Q key.).
- Load IT – load a selection from an alpha channel from the Channels panel.
- Save IT – see above for details.
- Create 3D Extrusion from IT – see above for details.
Under the Modify sub-menu items, you can also:
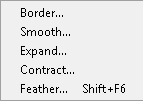
- Give IT a Border – create a border around a selection.
TIP: It is best used to create a border around a selection so that a blur (e.g., Gaussian Blur) can be applied to soften the selection edges to make it anti-alias.
- Smooth IT – smooth out "stray" pixels in a color selection.
- Expand IT – make a selection larger.
- Contract IT – make a selection smaller.
TIP: It is best used to minimize color fringe in a selection.
- Feather IT – see above for details.
TIP: This method is better than using the Options bar featuring technique because it does not change the feathering default value as does the Options bar which can cause confusion if a user forget that feathering was applied earlier. Also, to see what a featuring effect will look like, click the Refine Edges... button in the Options bar and experiment with the options.
OLD SCHOOL/NEW SCHOOL: Several of the Modify menu options can now be easily done by selecting the Refine Edges... button in the Options bar when a selection is created using any of the selection tools.
Even more, you can:
- Crop IT – use the Crop tool (
 ) or press Image > Crop while a selection is active to crop just the selection and not the whole image.
 - Show or Hide IT – select View > Extras to show or hide a selection (You can also press CMD/CTRL+H to show or hide).
TIP: To see what options beside the selection that you can show or hide, press View > Show > Show Extras Options. CAUTION: Hide a selection with caution because you cannot see selection even though it is still active. To know that a selection is there, with a Selection tool active, if you hover over the "invisible" selection, the cursor will change to a selection cursor ( ).
).
As you can see, there are over two dozen different tasks that you can do with a selection once it is made.