Masking Made Easy
MASKS
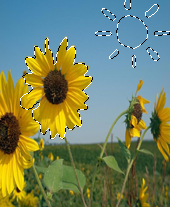
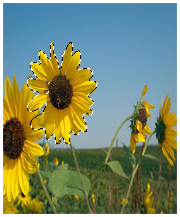
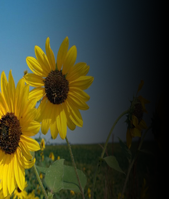
Exercise file: Sunflower image
Quiz: Photoshop_Quiz Student
Vital Few: All Masks
There are various types of masks; however, they all do the SAME things (show or hide, and protect object(s) under them) but in DIFFERENT ways:
- Quick Mask
- Alpha Channel Mask
- Vector Mask
- Layer Mask
- Gradient Mask
- Clipping Mask
- Filter Mask
- Adjustment Layer Mask
When creating a mask, you TYPICALLY start with a SELECTION (explicit or implied) then, you can:
- Create IT [can be created from other objects (e.g., selection, bitmap, vector (path))]
- See IT [can be seen by one or more means (e.g., On the canvas, as a Quick Mask, as a thumbnail, as a clipping icon)]
- Edit IT [can be changed by one or more means (e.g., brush/eraser, vector tool like the pen)]
- See the Effect of IT [can see the end result of the mask]
- Remove the Effect of IT [can be removed simply by deleting the mask]
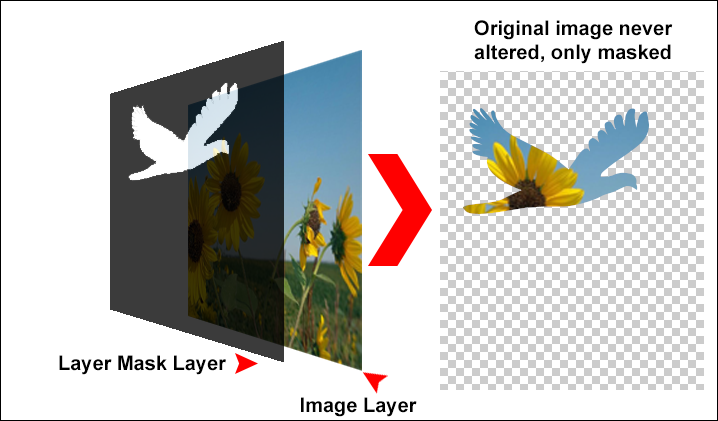
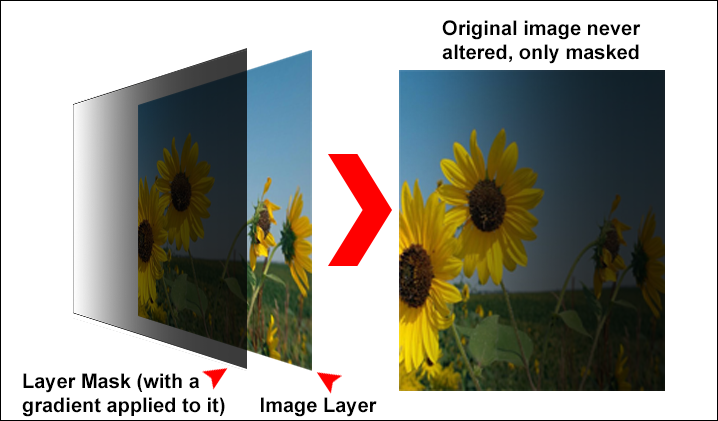
To remove the mask's effect (clipping, filter, adjustment layer) of the last three masks, you have to delete the mask AND the effect that was applied to the mask. With ALL mask, the underlying IMAGE is NEVER ALTER—a technical term that is referred to as NON-DESTRUCTIVE EDITING.
EXECUTIVE SUMMARY: Once you create it, you can see it to modify it and then you can see the effect of modifying it and delete it if you need to without every altering the original image.
Moreover, ALL masks:
- can show some degree of transparency (e.g., gray will be shown as a translucent color)
- are store somewhere (e.g., Layers/Channels, Paths panels)
- can create a selection (e.g., CTRL+ Click on a mask's thumbnail, a layer with transparency, or turn off Quick Mask)
- can create non-destructive edits
- can show or hide (selection, image, or effect) but always protects the entire layers below it.
- always modified on the canvas (not thumbnail).
- CTRL + click a mask's thumbnail will show a SELECTION, ALT + click a mask's thumbnail will show a MASK.
Once you realize the above concepts, it will help to "take" the mystery out of creating, editing and seeing the effect of any mask or even deleting it.
You don't need to use a mask:
Even though a mask is a good thing, you don’t have to use one. However, you may permanently alter the layer. This is akin to not using a face mask and attempting to fight a fire. You may be “scared” for life if you are not careful.
EXAMPLE: You could make a selection, invert it, and then delete the selection to get the effect you are looking for.

However, the pixels in the transparent area are deleted permanently. However, if you had used a mask, you would never “touch” the face of the image so that it would be “scared” for life, as it were. You can create the exact same effect with a mask but with the added advantage of not altering the image (e.g., non-destructive editing).
Below is a list of eight mask types:
Quick Mask
Quick Mask – a bitmap mask used to SHOW or CREATE a TEMPORARY SELECTION.
It shows or hides areas of a SELECTION (not image) AND protects PIXELS of an image from being modified once the Quick Mask is converted back to a selection.
How do you:
Create It
It is typically CREATED by:
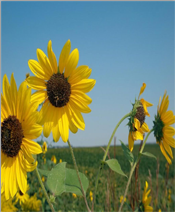
- Making a selection by whatever means.
Shown as a marquee (e.g., black and white dashed).
To learn more about the various ways to create selections, see the "Learning Selections From The Joes" app.
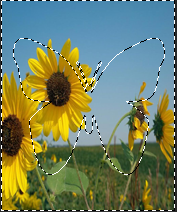
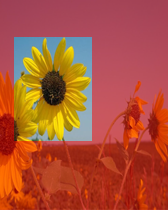
NOTE: A selection is a type of TRANSPARENT MASK that "sits" on top of the image. It is not "clearly" seen because it is transparent. In the screenshot below it is shown as semi-transparent so that you can "see" it.
- Turning the Quick Mask on by pressing the Q key or pressing the Edit In Quick Mask Mode (Q) icon (
 ) at the bottom of the toolbar.
 - CHECK POINT: You will immediately see the result of the QuickMask once you exit it:
See It
The actual mask is typically SEEN as:
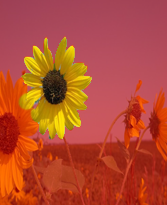
A red translucent overlay on top of the image with "hole(s)" in it showing the underlying image (e.g., sunflower) clearly.
3D VIEW: Any bitmap changes to the QUICK MASK LAYER will determine how much of the SELECTION is SHOWN or HIDDEN on the IMAGE LAYER when the Quick Mask is turned off.
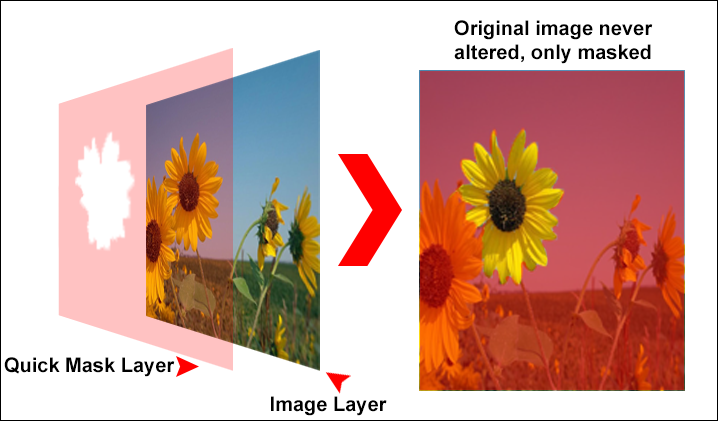
- QUICK MASK LAYER is depicted as a red translucent overlay with a "hole" in it. Where:
- the red area partially conceals the image to partially hide the underlying image on the image layer
- the clear area (hole) clearly reveals the image to clearly show the underlying image on the image layer
- IMAGE LAYER is depicted as the original image.
- APPLICATION: If you turn off the Quick Mask, by clicking the Quick Mask icon (or pressing the Q key), you will see the SELECTION based on the red and clear areas of the Quick Mask. Where:
- the red area conceals the selection and protect this area from being edited on the image layer
- the clear area (hole) reveals the selection and expose this area for editing on the image layer
A thumbnail version of the mask can also be SEEN as:
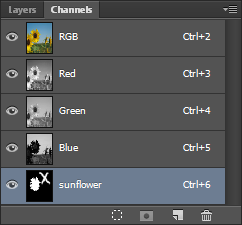
A small black, white or gray thumbnail mask with the word "Quick Mask" italicized next to it denoting it is a temporary Alpha Channel that is not yet saved:
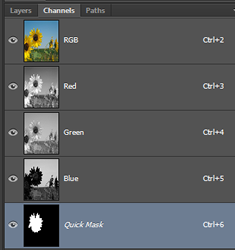
![]()
- It is a temporary mask because once you exit the Quick Mask mode the thumbnail mask goes away in the Channels panel. For details, see Alpha Channel Mask which is similar to a Quick Mask that will be discussed in the next section.
- A Quick Mask is used to VIEW a selection as a translucent mask to "see" where the selected and unselected areas of the selection are located.
- In the Quick Mask mode, the clear area represents the actual selection where the selection will be revealed. The red overlay area represents the "unselected" portion of the image where the selection will be concealed (or masked) which allows the image to be protected from editing once you exit the Quick Mask mode by pressing the Q key again to return to the selection. RULE: In the Quick Mask mode, RED conceals the selection (not the pixels) and CLEAR reveals the selection (not the pixels) of the underlying image.
- The default color of the Quick Mask overlay is red. However, if there is a lot of red colors in an image, it is helpful to change the overlay color to something different by double-clicking on the Edit In Quick Mask Mode (Q) icon and changing its default color to something that will work for you.
![]() You can "toggle" between the selection, the Quick Mask, and their inverse by ALT + clicking the Edit In Quick Mask Mode (Q) icon (
You can "toggle" between the selection, the Quick Mask, and their inverse by ALT + clicking the Edit In Quick Mask Mode (Q) icon ( ![]() ) at the bottom of the toolbar repeatedly.
) at the bottom of the toolbar repeatedly.
EXAMPLE: Click to see an example of the effect of not having a selection when using a Quick Mask
EXAMPLE: In this first screenshot:
- The image has no selection with the Quick Mask turned on. Notice that there is no noticeable change made to the image.
- In this second screenshot, a large zero was painted on the Quick Mask which reveals portion of the Quick Mask:
- In this third screenshot, when the Quick Mask mode is exited, you can see the selection:
However, you can always tell that you are in the Quick Mask mode, even if it is not obvious by the following indicators:
- The word QuickMask is in the tab of the selected image.
- The Edit In Quick Mask Mode (Q) icon ( ) is selected at the bottom of the toolbar.
- The active layer in the Layers panel is highlighted in gray or the color of the Quick Mask instead of blue (unless the mask is blue).
- The Quick Mask is listed in the Channels panel with the word Quick Mask italicized.
Modify It
It is typically MODIFIED by:
- Turning the Edit In Quick Mask Mode (Q) ON (or pressing the Q key).
- Painting or erasing the Quick Mask's overlay on the canvas with any bitmap tools (e.g., Brush, Eraser) with black, white or gray to show or hide more or less of the Quick Mask.
NOTE: When you enter the Quick Mask mode, the foreground and background colors will AUTOMATICALLY change to black and white in the toolbar so that you can paint or erase with these colors. Once you EXIT the Quick Mask mode, the foreground and background color will be restored.
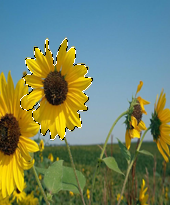
Shown in the screenshot by a sketch of a sun using the brush tool with the foreground color set to white.
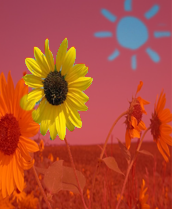
NOTE: The Quick Mask is SIMPLY a bitmap image so painting with black will conceal (grow the mask's overlay) and white will reveal (erase the mask to create holes in it so you can "see" the underlying image clearly).
- Keep your finger on the X key so that you can easily "toggle" between black and white as you paint on the Quick Mask.
- Adjust the size of the brush or eraser stroke as needed by clicking on the the right and left square brackets (e.g., [ ] ).
- To paint with gray, select black as the foreground color and turn down the Opacity in the Options bar at the top of the screen. It is important to note that when you paint with gray that the selection will NOT be obvious (in fact, it may be misleading) unless you do something to the selection like fill it with a color.
- When modifying a Quick Mask, take in consideration the following guidelines:
| When painting or erasing with: | Quick Mask (denoted typically by a red overlay) | Selection (denoted typically by a marquee) |
|---|---|---|
| Black | will ADD (ENLARGE) areas of the QM | will be DECREASED when QM mode is turned off |
| White | will SUBTRACT (ERASE) areas of the QM | will be INCREASED when QM mode is turned off |
| Gray | will ADD (ENLARGE) translucent areas of the QM | will be TRANSLUCENT when QM mode is turned off |
NOTE: It is important NOT to get the concepts of a Quick Mask and a selection confused. The Quick Mask is typically a red overlay with clear "holes" that is on top of the image that represents but is not a selection but a mask. However, when you paint on the Quick Mask's overlay with black, white or gray, you will modify this mask which will ultimately result in a modification of the selection once you turn off (EXIT) the Quick Mask mode.
EXAMPLE: Click to see an example of the effect of painting with gray
EXAMPLE: In the previous screenshot:
- A rectangular selection was made around one of the sunflower and then the Quick Mask mode was turned on.
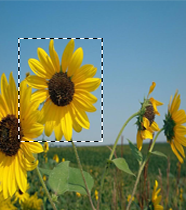
- In the Quick Mask mode, half of the clear area was selected with the rectangular selection tool so that when the brush tool is used only that area will be affected because of the selection. Then, with the brush tool set with the foreground color to black and the Opacity set to 50%, that area is painted on.
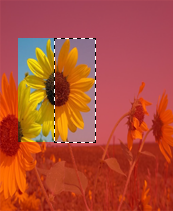
NOTE: Notice the red overlay that was painted is a lighter red than the rest of the Quick Mask. - Next, the Quick Mask was turned off.
NOTE: Notice that even when the Quick Mask is turned off, only half of the selection that was not painted on with gray is shown. However, there is more to the selection than you can see. To proved this in the next step the selected area will be filled with a solid blue color. - Lastly, with the foreground color set to blue, CTRL+DELETE was used to fill the selection with blue and the selection was turned off (CTRL+D).
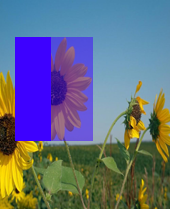
NOTE: Notice that you now see the "translucent" part of the selection once it was filled. The shade of gray will determine how translucent the mask area is. The range is white (0) to black (255).
See Effect Of It
Its effect can typically be SEEN after modifications has been made by:
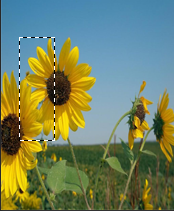
- Turning the Edit In Quick Mask Mode (Q) OFF (pressing the Q key again) to "see" the selection instead of the Quick Mask.
Shown as a selection (e.g., the sun) being ADDED to the previous selection once the Quick Mask mode is turned off.
Remove It
It can typically be REMOVED by:
- Turning off the Quick Mask mode and deselecting the selection (CTRL+D), or
- Dragging the Quick Mask thumbnail in the Channels panel (not the Layers panel) to the trash can icon or left-clicking on it and selecting Delete Channel.
Alpha Channel Mask
Alpha Channel Mask – a bitmap mask used to SHOW or CREATE a SAVED SELECTION.
It shows or hides the selected and unselected areas of a SAVED SELECTION AND protects PIXELS of an image if the Alpha Channel is made into a selection.
NOTE: An Alpha Channel is an extra 8-bit or 256 level of grayscale bitmap image layer that is added to the Channels panel for a saved selection.
Create It
It is typically CREATED by:
- Making a selection by whatever means.
To learn more about the various ways to create selections, see the "Learning Selections From The Joes" app
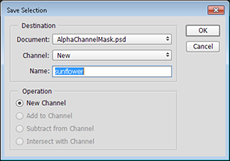
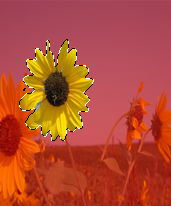
- Saving the selection as an Alpha Channel by right-clicking inside of the selection and choosing Save Selection... from the menu and then in the Save Selection dialog box giving the selection a name (e.g., sunflower) and clicking the OK button. Alternatively, you could choose Select > Save Selection... from the main menu.
- Deselecting the selection (e.g., CTLR + D or clicking outside of the selection) so that you can load the selection from the Channels panel later when needed. Alternatively, you could right-click inside of the selection and choose Deselect from the menu.
- CHECK POINT: You will immediately see the result of the Alpha channel once you load it:
![]()
- The Alpha Channel Mask is a permanent mask because if you save the file, it will be available the next time you open Photoshop.
- An Alpha Channel Mask is similar to a Quick Mask but it creates a permanent saved selection instead of a temporary selection like the Quick Mask.
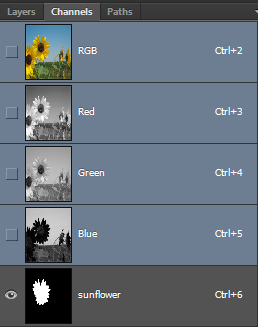
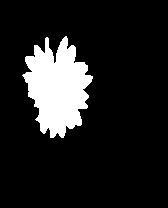
- An Alpha Channel is used to VIEW a selection as a black, white or gray mask. In the Alpha Channel thumbnail, black conceals areas of the saved selection, white reveals areas of the saved selection.
- To load (open) the selection, choose Select > Load Selection... or press CTRL + click the Alpha Channel thumbnail in the Channels panel.
- If a selection is simple (e.g., rectangle), there is little need to save it as an Alpha Channel. It is best practice to use Alpha Channel for more complex selections that are harder to recreate.
See It
The actual mask is typically SEEN as a black, white and gray bitmap image on the canvas by:
Pressing ALT + clicking the Alpha Channel thumbnail in the Channels panel.
3D VIEW: Any bitmap changes to the ALPHA CHANNEL will determine how much of the SELECTION is SHOWN or HIDDEN on the IMAGE LAYER if the Alpha Channel mask (a saved selection) is loaded.
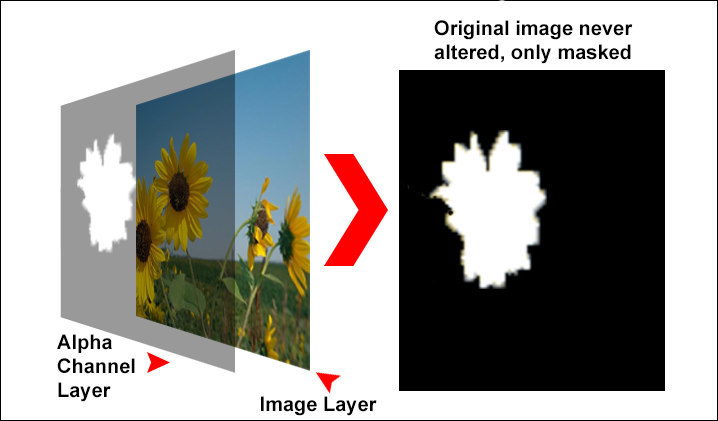
- ALPHA CHANNEL LAYER is depicted as a black and white overlay.
- IMAGE LAYER is depicted as the original image.
- APPLICATION: If you load the Alpha Channel (a saved selection) using Select > Load Selection... (or CTRL+Click on the Alpha Channel in the Channels panel), you will see the SELECTION based on the black, white or gray information of the Alpha Channel Mask:
A thumbnail version can also be SEEN as:
A small black, white or gray thumbnail mask (See screenshot above).
It can also be seen as a Quick Mask by:
- Turning on ALL of the Color Channels.
- Turning on the Alpha Channel layer itself.
NOTE: It will appear as a Quick Mask (even though you did not click the Edit In Quick Mask Mode button) because it is similar to a Quick Mask. The different as noted earlier is that a Quick Mask is a temporary mask; whereas, an Alpha Channel Mask is a permanent mask.
Modify It
It is typically MODIFIED by:
- Pressing ALT + clicking on the Alpha Channel Mask thumbnail in the Layers Panel to load the Alpha Channel Mask on the canvas.
- Modifying the mask by whatever means (e.g., paint with black, white or gray).
It can also be MODIFIED as a Quick Mask:
- Turning ON the Color Channels in the Channels panel by clicking the Indicate channel visibility icon (
 )
) - Selecting the Alpha Channel to be edited and ensure visibility is turned on.
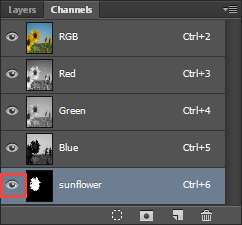
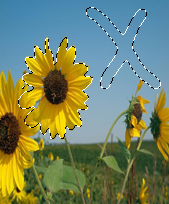
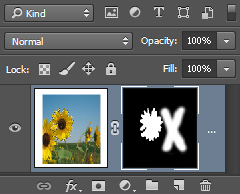
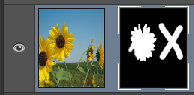
- Painting directly on the Quick Mask overlay on the canvas with any bitmap tools (e.g., Brush, Eraser) with black, white or gray to show or hide more or less of the Alpha Channel Mask in the Channels panel.
Shown as a large X painted on the canvas in the screenshot below:
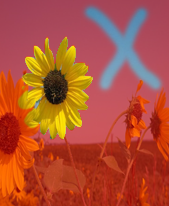
- Turning off the Alpha Channel Mask by unselecting the Indicate channel visibility icon ( ) to turn the red overlay off on the canvas to see the Alpha Channel get updated in the Channels panel.
From the previous screenshot, shown as a large X in the Alpha Channel mask's thumbnail in the screenshot below:
An alpha channel can be used:
- REUSE a saved selection.
- MODIFY a saved selection.
- ADD/SUBSTRACT/INTERSECT a saved selection.
See Effect Of It
Its effect can typically be SEEN after modifications has been made:
- As a selection by pressing CTRL + clicking on the Alpha Channel thumbnail's mask to "see" the Alpha Channel as a selection or selecting Select > Load Selections from the menu and selecting it from the drop down menu.
Shown as an added selection (e.g. a large X) on the canvas in the screenshot below.
Remove It
Its can typically be REMOVED by:
- Dragging the Alpha Channel to the trash icon at the bottom of the Channels panel or right-clicking on the Alpha Channel and selecting Delete Channel from the menu.
Vector Mask
Vector Mask – a non-bitmap mask (vector) typically used to SHOW or CREATE an EXISTING PATH.
It shows or hides PIXELS of an image.
NOTE: Because a Vector Mask is based on vectors, it is resolution independent meaning that it can be scaled without losing any crispness unlike a Layer Mask. However, it does not support transparency so its edges cannot be feathered. However, you can make the whole mask transparent by adjusting the Opacity in the Layers panel.
REFERENCE: To learn more about the different between a vector and a bitmap, see the "Bitmap vs. Vector" app.
Create It
It is typically CREATED by:
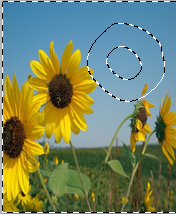
- Making a path (not a selection) with a vector-creation tool (e.g., Pen, Text, Custom Shape).
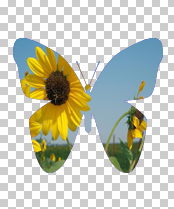
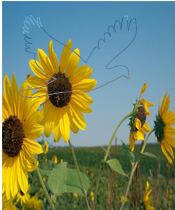
Shown as a vector path (e.g., of a bird) on the canvas:
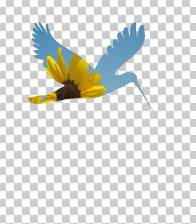
- Right-clicking inside the path and selecting Make Vector Mask from the menu.
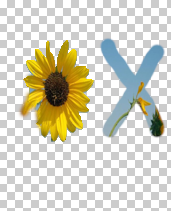
Shown as an image being "clipped inside" of the outline (vector shape) (e.g., of the bird) against a transparent background:

NOTE: If you are using the Custom Shape Tool, you must first select the Direct Selection Tool before right-clicking inside of the path.
![]()
- A Vector Mask is typically based on an EXISTING PATH. However, it can be created with no path made but this is not the usually approach. It can be created with a Vector Mask that will reveal all (Layer > Vector Mask > Reveal All) or hide all (Layer > Vector Mask > Hide All) pixels of the underlying image on the canvas.
- A Vector Mask is similar to a Layer Mask (discussed next) but its mask is a vector shape instead of a bitmap image.
- It is important to note that the vector shape is "drawn" on TOP of the bitmap image.
- You could have started with a selection and then converted that selection to a vector path by right-clicking inside of the selection and choosing Make Work Path... from the menu with the Pen tool selected. However, it may be difficult to create a selection with complex curves using Selection tools.
- Like the Alpha Channel Mask which is saved in the Channels panel, any vector that is created:
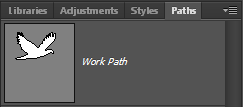
- with the Pen Tool it is saved into the Paths panel as a Work Path instead of the Layers panel
- with the Custom Shape Tools:
- If the Shape method is used, it is saved in two places: the Paths panel as a Shape Path AND the Layers panel as a Shape Layer. If you delete either one, they both will be deleted.
- If the Path method is used, it is saved in the Paths panel as a Work Path.
- If the Pixel method is used, it is saved as pixels as part of that layer or on a new layer if one were created in the Layers panel. It is NOT saved in the Paths panel at all.
See It
The actual mask is typically SEEN as:
As a path on the canvas. If you don't see the path, hold down ALT + click the Vector Mask thumbnail in the Layers panel.
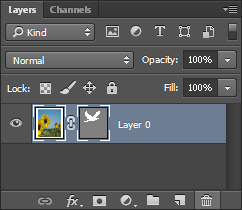
A thumbnail version can also be SEEN as:
A small gray and white thumbnail mask next to the actual image thumbnail in the Layers panel. Where the gray areas of the thumbnail mask will conceal pixels (make areas of the image transparent on the canvas) and the white areas of the thumbnail will reveal pixels (make areas of the image visible on the canvas).
IMPORTANT NOTE: Unlike the previous mask that could be seen clearly on the canvas, the Vector Mask can only be seen as a path on the canvas which may easily be overlooked.
3D VIEW: Any vector (path) changes on the VECTOR MASK LAYER will be shown on the IMAGE LAYER if the VECTOR MASK is applied.
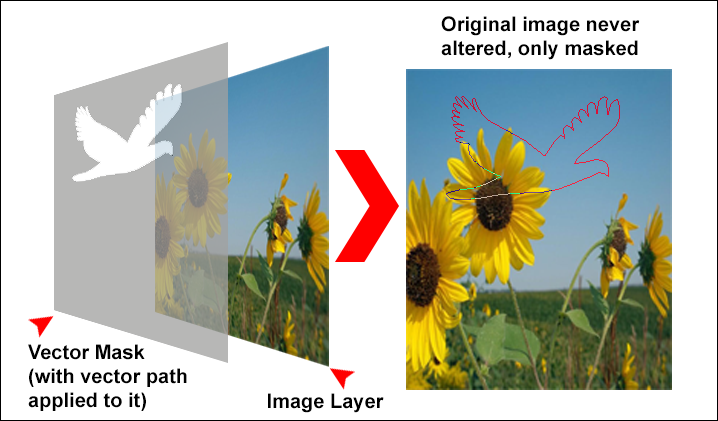
- .VECTOR MASK LAYER is depicted as a gray and white overlay with a vector path applied to it.
- IMAGE LAYER is depicted as the original image.
- APPLICATION: If the vector mask is APPLIED, you will see only the portion of the image that is part of the vector mask. Where:
- gray conceals the image pixels to hide the underlying image pixels on the image layer making them transparent
- white reveals the image pixels to show the underlying image pixels on the image layer making them opaque
Modify It
It is typically MODIFIED by:
- Modifying any point(s) on the Vector Mask with the Direct Selection Tool to alter the vector shape to show or hide more or less of the vector mask or the image it is masking.
Shown by modifying one point on the birds' beak in the screenshot below.
NOTE: You can also modify the mask by "cutting" holes into it using other vector tools.
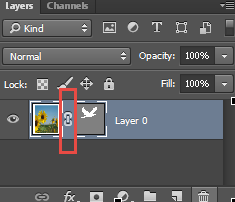
By default, they are linked together. However, you can "unlink" them by clicking on this link icon. In which case, you can move the mask or move the image INDEPENDENT of one another by selecting either one of the thumbnails and then using the Move Tool to move the image or the Direct Selection Tool to move the mask. If the link is locked, the Move Tool will move BOTH the image and mask together.
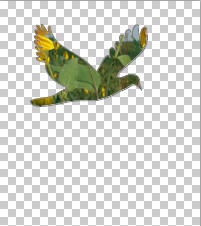
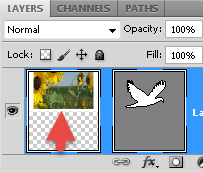
EXAMPLE: Click to see an example of moving the mask or image thumbnail independently
EXAMPLE: In this first example, the image (of the flower) is move up showing a different portion of the image through the mask (of the bird) which is not moved (static). Notice also how the image thumbnail is moved up in the Layers panel is the second screenshot. (Highlighted with red arrow)
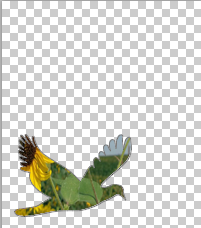
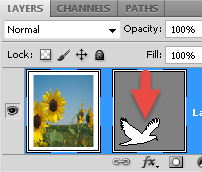
EXAMPLE: In this second example, the mask (of the bird) is moved down showing a different portion of the image that is not moved (static). Notice how the mask thumbnail is moved down in the Layers panel is the second screenshot. (Highlighted with red arrow)
NOTE: Unlike a Layer Mask that will be discussed next where you have to unlock the image and mask in the Layers panel and then use the Move tool to move the bitmap mask, , to MOVE a vector mask, you have to use the Path Selection tool instead of the Move tool to move the mask.
See Effect Of It
Its effect can typically be SEEN after modifications has been:
On the canvas to show and hide pixels of the underlying layer:
Remove It
Its can typically be REMOVED by:
- Selecting the Vector Mask thumbnail and pressing the Delete key or dragging it to the Delete Layer icon (
 ) at the bottom of the Layers panel.
NOTE: To temporary toggle the Vector Mask on or off, press SHIFT + click on the Vector Mask thumbnail.
Layer Mask
Layer Mask – a bitmap mask typically based on an EXISTING SELECTION.
It shows or hides PIXELS of an image.
NOTE: Because a Layer Mask is based on pixels, it is resolution dependent meaning that it when it is scaled it will lose its crispness unlike a vector mask. However, it does support transparency so its edges can be feathered.
REFERENCE: To learn more about the different between a vector and a bitmap, see the "Bitmap vs. Vector" app.
Create It
It is typically CREATED by:
- Making a selection by whatever means.
To learn more about the various ways to create selections, see the "Learning Selections From The Joes" app.
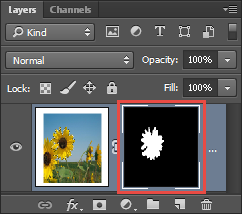
- Clicking the Add Layer Mask (
 ) icon at the bottom of the Layers panel. (Highlighted with a red border.)
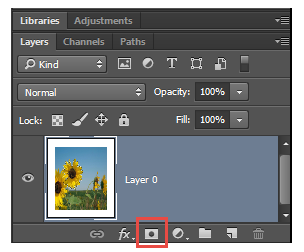
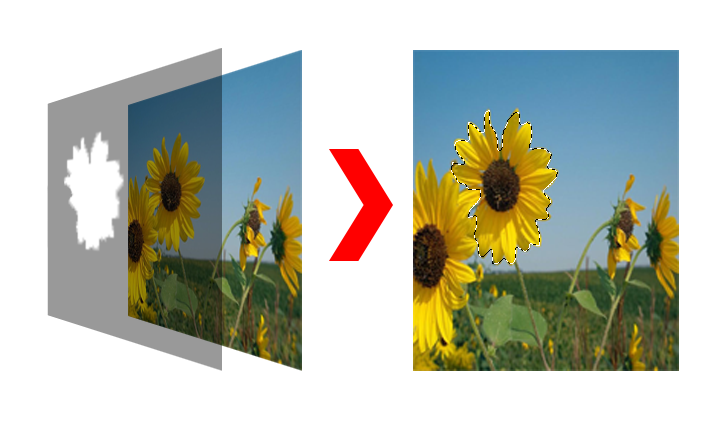
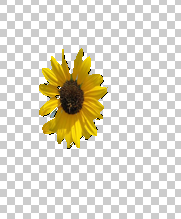
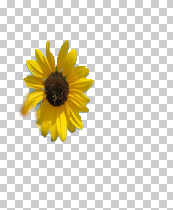
- CHECK POINT: You will immediately see the result on the canvas with only the sunflower showing against a transparent background.
NOTE: If you press the ALT key and then click on the Add Layer Mask ( ) icon at the bottom of the Layers panel, you will get an INVERTED Layer Mask.
![]()
- A Layer Mask is typically based on an EXISTING SELECTION. However, it can be created with no selection made but this is not the usually approach. It can be created with a Layer Mask that will reveal all (Layer > Layer Mask > Reveal All) or hide all (Layer > Layer Mask > Hide All) pixels of the underlying image on the canvas.
- A Layer Mask is similar to a Quick Mask or Alpha Channel Mask but it works with an actual image not a selection.
- To move a Layer Mask to another layer drag its thumbnail to the other layer. To copy a Layer Mask to another layer press the ALT key as you drag it to another layer.
- You can add a Layer mask to multiple layers by first adding the desire layers to a Layer Group. (VERIFY)
- You can change the brush's hardness to less then 100% to soften the edges of the Layer Mask by pressing the SHIFT +[ or SHIFT+] to change the increment or decrement size by 25%.
- You can change the brush's opacity by pressing 1 for 10%, 5 for 50%, 0 for 100%, etc.
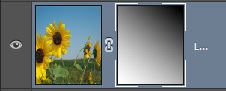
See It
The actual mask is typically SEEN as:
A black, white and gray bitmap image on the canvas by ALT+clicking on the Layer Mask thumbnail in the Layers panel.
It can also be SEEN as:
A thumbnail version can be SEEN as a small black, white or gray thumbnail mask next to the actual image thumbnail in the Layers panel (See previous screenshot). Where:
- the black areas of the thumbnail mask will conceal pixels (make areas of the image transparent on the canvas)
- the white areas of the thumbnail will reveal pixels (make areas of the image visible on the canvas)
- the gray areas of the thumbnail mask will make pixels translucent (make areas of the image show various degrees of transparency). In essence, you get the best of both worlds where gray partially conceal and partially reveal depending on the grayscale level.
Shown in the Layers panel as a Layer Mask's thumbnail with a large X painted in white from a previous screenshot.
3D VIEW: Any bitmap changes to the LAYER MASK LAYER will determine how much of the IMAGE is SHOWN or HIDDEN on the IMAGE LAYER if the LAYER MASK is applied.
- LAYER MASK LAYER is depicted as a black and white overlay.
- IMAGE LAYER is depicted as the original image.
- APPLICATION: If the Layer Mask is APPLIED, you will see only the portion of the image that is part of the Layer Mask. Where:
- black conceals the image pixels to hide the underlying image pixels on the image layer making them transparent
- white reveals the image pixels to show the underlying image pixels on the image layer making them opaque
Modify It
It is typically MODIFIED by:
- Pressing ALT + clicking the Layer Mask thumbnail in the Layers Panel to load the Layer Mask on the canvas.
- Painting directly on the canvas to paint directly on the Layer Mask's thumbnail with any bitmap tools (e.g., Brush, Eraser) with black, white or gray to show or hide more or less of the Layer Mask.
[ADD SCREEN SHOT HERE]
It can also be MODIFIED by:
- Selecting the Layer Mask thumbnail (not the image thumbnail) in the Layers panel by clicking on it. (Highlighted with a red border)
- Painting directly on the canvas to paint directly on the Layer Mask's thumbnail with any bitmap tools (e.g., Brush, Eraser) with black, white or gray to show or hide more or less of the Layer Mask.
Shown on the canvas with an area of the image showing through the large X from a previous screenshot.
NOTE: You could also have painted with gray to reveal different level of transparency depending on the level of opacity that is set.
See Effect Of It
Its effect can typically be SEEN after modifications has been made:
On the canvas to show and hide pixels of the underlying pixels.
Remove It
Its can typically be REMOVED by:
- Select the Layer Mask thumbnail and press the Delete key or drag it to the Delete Layer icon ( ) at the bottom of the Layers panel.
NOTE: To temporary toggle the Layer Mask on or off, press SHIFT + click on the Layer Mask thumbnail.
Gradient Mask
Gradient Mask – a bitmap mask based on a GRADIENT applied to a Layer Mask.
It shows or hides PIXELS of an image based on the gradient grayscale colors of the mask.
Create It
It is typically CREATED by:
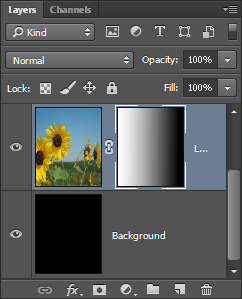
- Creating a Layer Mask but WITHOUT a selection. (See Layer Mask section on how to create a Layer Mask)
- Selecting the Layer Mask thumbnail (not the image thumbnail ) in the Layers panel by clicking on it.
NOTE: A layer filled with black was added BELOW so that the gradient effect can be seen better.
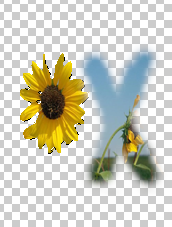
- Using the Gradient Tool to add a black, white or gray gradient to the mask from the canvas.
- CHECK POINT: You will IMMEDIATELY see the effect in the Layer Mask thumbnail as a gradient and on the canvas where black conceals, white reveals and gray shows various degrees of transparency.
NOTE: Notice because of the Gradient Mask how the black background layer is gradually showing through to the top layer. It is best to use the Foreground To Transparent gradient type because it will allow you do add multiple passes while created a gradient. The other gradient type will be replace each time you use them.
![]()
- Normally, you do not make a selection before applying the gradient; however, you can but only the selected area will be affected by the gradient.
- To make a selection first before applying the gradient, press CTRL and then click the mask thumbnail in the Layers panel.
- If you attempt to use a color gradient instead of black, white or gray, it will still show as a black, white and gray gradient in the Layers Panel.
See It
The actual mask is typically SEEN as:
A black, white and gray bitmap image on the canvas by ALT+clicking on the Gradient Mask thumbnail in the Layers panel.
It can also be SEEN as:
A thumbnail vesion as a small black, white or gray thumbnail mask next to the actual image thumbnail in the Layers panel (See previous screenshot). Where the black areas of the thumbnail mask will conceal pixels (make areas of the image transparent on the canvas) and the white areas of the thumbnail will reveal pixels (make areas of the image visible on the canvas) and gray areas of the thumbnail mask will make pixels translucent (make areas of the image show various degrees of transparency). In essence, you get the best of both worlds where gray partially conceal and partially reveal depending on the level of grayscale.
3D VIEW: Any bitmap changes to the GRADIENT MASK LAYER will determine how much of the IMAGE is SHOWN or HIDDEN on the IMAGE LAYER if the GRADIENT LAYER MASK is applied.
- GRADIENT MASK LAYER is depicted as a black and white overlay with a gradient applied to it.
- IMAGE LAYER is depicted as the original image with the GRADIENT MASK LAYER overlayed on top of it.
- APPLICATION: If the Gradient Layer Mask is APPLIED, you will see only the portion of the image that is part of the Gradient Layer Mask. Where:
- black conceals the image pixels to hide the underlying image pixels on the image layer making them transparent
- white reveals the image pixels to show the underlying image pixels on the image layer making them opaque
- gray partially conceals or partially reveals the image pixels to show or hide the underlying image pixels on the image layer making them various degrees of transparent depending on the level of the gradient value.
Modify It
It is typically MODIFIED by:
- Pressing ALT + clicking on the Gradient Mask thumbnail in the Layers Panel to load the Gradient Mask on the canvas.
- Manipulating the gradient mask with any bitmap tools but especially the gradient tool.
[ADD SCREEN SHOT HERE]
NOTE: You may need to make a selection as well to CONFINE the gradient effect to a specific area of the image.
It can also be MODIFIED by:
- Clicking on the Gradient Mask thumbnail in the Layers panel.
- Manipulating the gradient mask with any bitmap tools but especially the gradient tool.
Shown by the angular instead of a linear gradient applied to the mask.
NOTE: You may need to make a selection as well to CONFINE the gradient effect to a specific area of the image.
See Effect Of It
Its effect can typically be SEEN after modifications has been made:
On the canvas to show and hide pixels (partially or in full)
Remove It
It can typically be REMOVED by:
- Select the Layer Mask thumbnail and press the Delete key or drag it to the Delete Layer icon ( ) at the bottom of the Layers panel.
NOTE: To temporary toggle the layer mask on or off, press SHIFT + click on the Vector Mask thumbnail.
Clipping Mask
Clipping Mask – a bitmap or vector mask based on a BITMAP IMAGE or a VECTOR SHAPE.
It shows or hides PIXELS of an image(s) that is clipped into the mask.
Create It
It is typically CREATED by:
- Placing one or more images ABOVE the bitmap image or vector shape you want to be "clipped."
Shown with an image of a sunflower and custom shape below it in two separate layers.
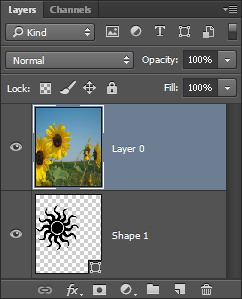
NOTE: This may not be all layers above it, only the ones that you want "clipped." - While holding the ALT key down and clicking BETWEEN the image or the vector shape layer when you see the clipping icon (Highlighted with a red border.)
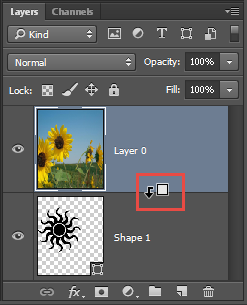
- CHECK POINT: You will immediately see the clipping effect on the canvas.
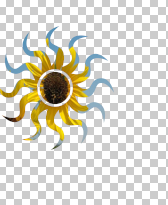
![]()
- If only one image is used, a Clipping Mask behaves similar to a Layer Mask. However, a Clipping Mask has the added advantage of using MULTIPLE IMAGES. It can be used to “CLIP” one or more images into a SINGLE BITMAP image OR VECTOR shape beneath it.
- You cannot clip into a selection or a path because there is no bitmap information to work with.
- The bitmap image or vector shape cannot be the same size or shape as the image or images above or the clipping effect will not be obvious.
- If multiple images are used, they should not overlap each other within the boundaries of the image size so that they can be seen.
- Unlike the Vector/Layer Mask, you don't delete a clipping mask, you remove it "clipping" ability by pressing the ALT key + clicking between two layers that are clipped.
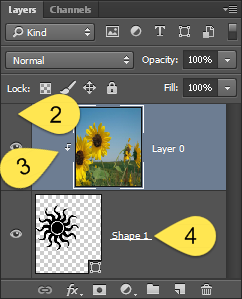
- Unlike the Vector Mask and Layer Mask that is represented by a thumbnail next to the image's thumbnail in the Layers panel, a Clipping Mask has NO thumbnail, the image(s) is simply "clipped" into the shape or image below it. However, there are four different ways to tell that you have a Clipping Mask:
- There is no mask thumbnail next to the image thumbnail in the Layers panel.
- The image thumbnail is INDENTED in the Layers panel.
- There is small icon next to the image denoting the image or images will be clipped into the image or shape below.
- The layer that the image is clipped into is UNDERLINED denoted it as the clipping layer.
See It
Only a thumbnail version of the mask is SEEN as:
A bitmap image or vector shape layer in the Layers panel that acts as a mask for one or more images ABOVE it.
NOTE: Unlike most other mask that can be seen on the canvas, you cannot see a clipping mask on the canvas.
3D VIEW: The ORIGNAL IMAGE is CLIPPED INTO any vector (path) OR bitmap changes and will be shown if the CLIPPING MASK is applied.
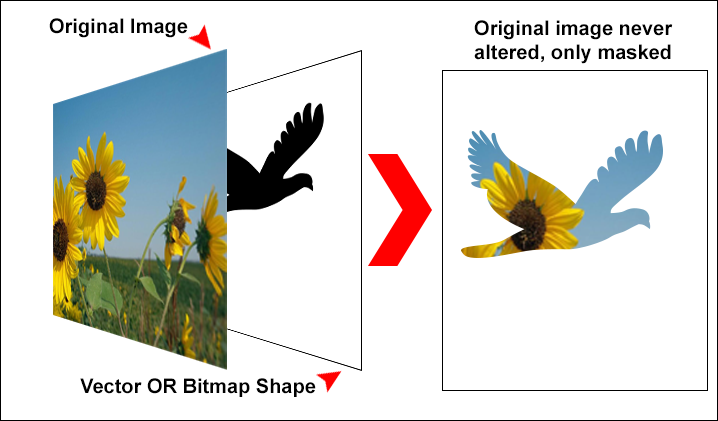
- ORIGINAL IMAGE is depicted as the actual image.
- VECTOR OR BITMAP SHAPE is depicted as a shape UNDER the image.
- APPLICATION: If the clipping mask is APPLIED, you will see only the portion of the image that is CLIPPED. Note there are three distinct differences with a clipping mask:
- The image in on TOP of the shape
- The image is CLIPPED into the shape so that it behaves as a mask
- You cannot see a large version of the mask on the canvas as black and white image.
Modify It
It is typically MODIFIED by:
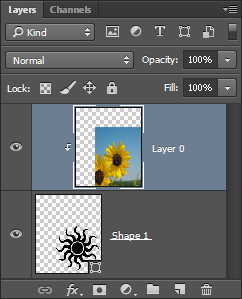
- Moving or manipulating the image or images above the clipping layer or moving OR manipulating the clipping layer itself.
Shown by both the image and the clipping layer being moved to the bottom right corner of the canvas.
CHECK POINT: You will IMMEDIATELY see the effect on the canvas and in the Layers panel layer(s).

See Effect Of It
Its effect can typically be SEEN after modifications has been made:
On the canvas as the bitmap image or vector shape it is "clipped" into.
TIP: You can adjust opacity to see image better.
Remove It
It can typically be REMOVED by:
- ALT + clicking BETWEEN the two layers (the indented layer and the layer with shape).
NOTE: You will have to do this multiple times if there are more than one layer that has been clipped. Notice that the original image has not been modified.
Filter Mask
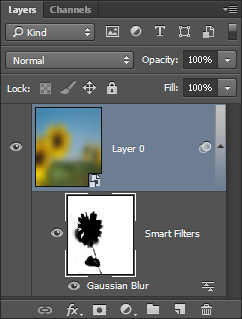
Filter Mask – a bitmap mask based on a FILTER EFFECT applied to a Smart Object.
It shows or hides PIXELS of an image based on a SPECIAL EFFECT (F/X) that has been applied to the mask (not the image).
Create It
It is typically CREATED by:
- Converting a layer to a Smart Object (e.g., Filter > Convert For Smart Filter).
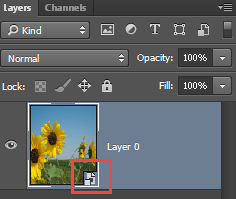
NOTE: You will see a small icon in the bottom right corner of the thumbnail indicating this is a Smart Object.(Highlighted with a red border.)
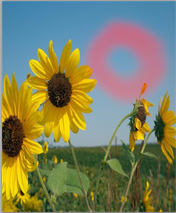
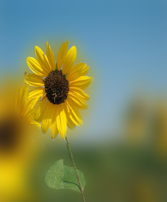
- Applying a filter (e.g., Gaussian Blur) to that layer will create a Filter Mask BELOW that layer.
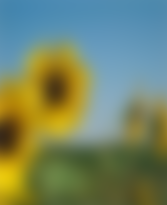
- CHECK POINT: You will IMMEDIATELY see the "effect" immediately in both the Layers panel thumbnail and on the canvas (See screenshot above).
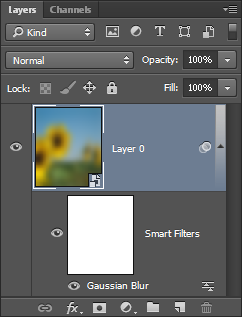
![]()
- A Filter Mask is similar to a Layer or Vector Mask; however, it works with the "effect" that is applied to the mask not the selection or actual image.
- Unlike a Layer Mask in which the mask is on the same layer as the image, a Filter Mask is BELOW the image on a separate layer. (See screenshot above).
- Like a Gradient Mask, normally, you do not make a selection before applying the filter; however, you can but only the selected area will be affected by the filter.
- Like the Clipping Mask that has NO thumbnail, there are four different ways to tell that you have a Filter Mask:
- There is no mask thumbnail next to the image thumbnail in the Layers panel
- The image thumbnail is INDENTED in the Layers panel
- There is small icon in the image's layer (
 )
) - The layer that is masked has the mask name (e.g., Smart Filters) and there is a small icon (
 )
)
See It
It can typically be SEEN:
- Pressing ALT + clicking on the Filter Mask thumbnail in the Layers Panel to load the Filter Mask on the canvas.
- Manipulating the Filter Mask with any bitmap tools.
[ADD SCREEN SHOT HERE]
NOTE: You may need to make a selection as well to CONFINE the filter effect to a specific area of the image.
It can also by seen:
- In the Layers panel as a small black, white or gray thumbnail mask BELOW a filter effect that is applied directly to the actual image thumbnail. Where black areas of the thumbnail mask will conceal pixels (make areas of the image transparent on the canvas), white areas of the thumbnail will reveal pixels (make areas of the image visible on the canvas) and gray areas of the thumbnail mask will make pixels translucent (make areas of the image show various degrees of transparency).
3D VIEW: Any bitmap changes to the FILTER MASK LAYER OR the FILTER EFFECT LAYER will determine how much of the IMAGE is SHOWN or HIDDEN if the FILTER MASK is applied.
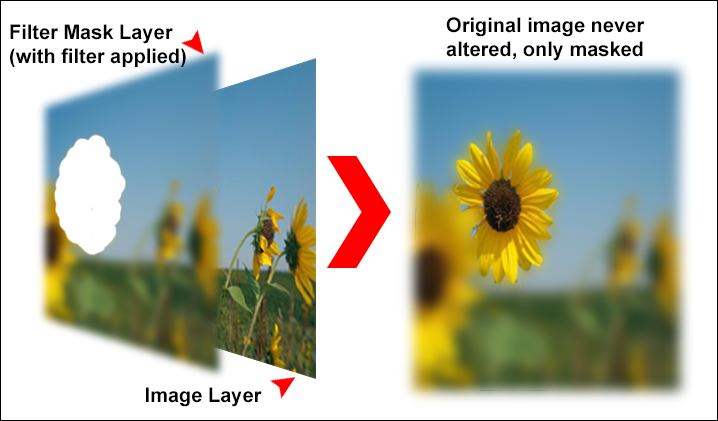
- FILTER MASK LAYER is depicted as a bitmap image (with a hole based on the selection) with a filter (e.g., blur) applied to it.
- IMAGE LAYER is depicted as the original image.
- APPLICATION: If the filter mask is APPLIED, you will see the effect of the mask.
Modify It
It is typically MODIFIED by:
- Pressing ALT + clicking on the Filter Mask thumbnail in the Layers Panel to load the Filter Mask on the canvas.
- Manipulating the Filter Mask with any bitmap tools.
[ADD SCREEN SHOT HERE]
NOTE: You may need to make a selection as well to CONFINE the filter effect to a specific area of the image.
It can also be MODIFIED by:
- Clicking on the Adjustment Layer Mask in the Layers Panel.
- Painting with black, white or gray to show or hide more or less of the "effect” (not the image) that is applied to the layer.
Shown as a black and white thumbnail in Layers panel as an "effect" similar to what you get if you created a Layer Style.
- CHECK POINT: Notice that you can "see" the whole image at all times in both the Layers panel and on the canvas. However, only the "effect" is shown or hidden as a result of modifying the Filter Mask.
See Effect Of It
Its effect can typically be SEEN after modifications has been made:
On the canvas to show and hide the effect that is applied to the Filter Mask.
[ADD SCREEN SHOT HERE]
Remove It
It can typically be REMOVED by:
- Selecting the Filter Mask thumbnail and pressing the Delete key or dragging it AND the filter effect (e.g., Gaussian Blur) to the Delete Layer icon ( ) at the bottom of the Layers panel.
NOTE: To toggle the Filter Mask on or off, press SHIFT + click on the Filter Mask thumbnail. To toggle the mask's EFFECT on or off, press the Toggle all smart filter visibility icon (
) below the Filter Mask in the Layers panel.
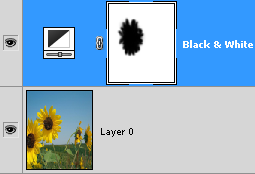
Adjustment Layer Mask
Adjustment Layer Mask – a bitmap mask based on an ADJUSTMENT LAYER PROPERTY.
It shows or hides PIXELS of an image based on CERTAIN PROPERTIES (e.g., hue/saturation) that has been applied to the mask (not the image).
TIPS:
- It is best to use an adjustment layer rather than a regular layer because an adjustment layer is non-destructive whereas a regular layer is permanent. Hence, you can make changes to the adjustment layer without making changes to the underlying layer. It also add a layer mask so that you can define the area of the layer below it that you want to be affected by the adjustment layer.
- You can have the adjustment layer affect only one layer by create a clipping path to the layer below it (See Clipping Mask). Also to have the adjustment layer affect only a PORTION of a layer, modify the include layer mask by painting with black or white.
Create It
It is typically CREATED by:
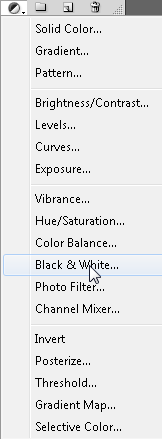
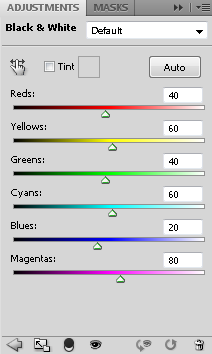
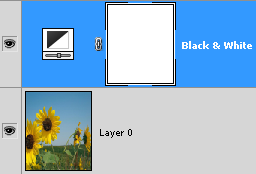
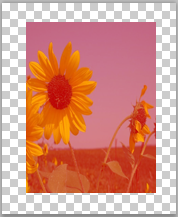
- Adding an adjustment layer above the layer(s) you want to apply a property by clicking on the Create new fill or adjustment layer icon (
 ) at the bottom of the Layers panel and choosing an adjustment layer filter (e.g., Gaussian Blur, Black & White...) which will create a Adjustment Layer and its mask ABOVE the active layer which will affect all layers below it.
- Optionally, you can "adjust" the adjustment layer settings.
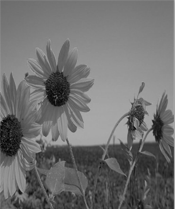
- CHECK POINT: You will immediately see the "adjustment" in both the Layers panel and on the canvas.
NOTE: Each adjustment property has a different type of icon.
![]()
- Like a Gradient and Filter Mask, normally, you typically do not make a selection before applying the Adjustment Layer; however, you can but only the selected area will be affected by the adjustment.
See It
The actual mask is typically SEEN:
As a black, white and gray bitmap image on the canvas if you click ALT + click the Filter Mask thumbnail.
A thumbnail version can also be SEEN:
- In the Layers panel as a small black, white or gray thumbnail mask on a special adjustment layer ABOVE the layer(s) that it is "adjusting." Where the black areas of the thumbnail mask will conceal pixels (make areas of the image transparent on the canvas), the white areas of the thumbnail will reveal pixels (make areas of the image visible on the canvas) and the gray areas of the thumbnail mask will make pixels translucent (make areas of the image show various degrees of transparency).
3D VIEW: Any bitmap changes to the LAYER MASK OR the ADJUSTMENT EFFECT LAYER will determine how much of the IMAGE is SHOWN or HIDDEN if the ADJUSTMENT LAYER MASK is applied.
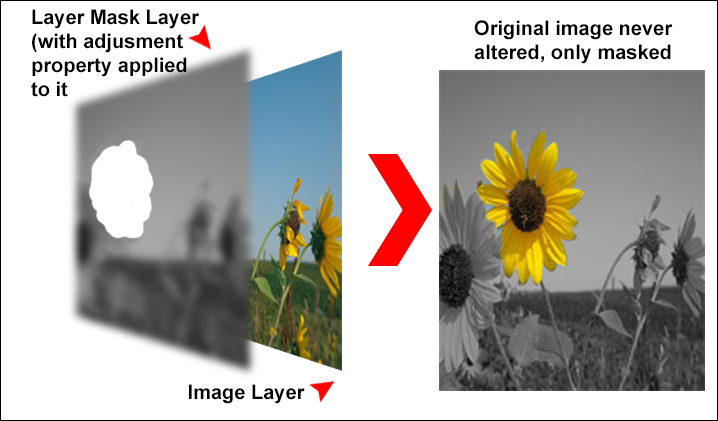
- ADJUSTMENT LAYER MASK is depicted as a bitmap image (with a hole in it based on the selection) with an adjustment property (e.g., Black and White) applied to it.
- IMAGE LAYER is depicted as the original image.
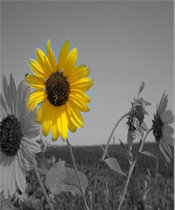
- APPLICATION: If the adjustment Layer Mask is APPLIED, you will see the effect of the mask.
Modify It
It is typically MODIFIED by:
- Pressing ALT + clicking on the Adjustment Layer Mask thumbnail in the Layers Panel to load the Gradient Layer Mask on the canvas.
- Manipulating the Adjustment Layer Mask with any bitmap tools
[ADD SCREEN SHOT HERE]
NOTE: You may need to make a selection as well to CONFINE the adjustment effect to a specific area of the image.
It can also be MODIFIED by:
- Clicking the Adjustment Layer mask thumbnail and painting with black, white or gray on the canvas to show or hide the "adjustment property."
Shown as a black and white thumbnail in the Layers panel.
CHECK POINT: You will immediately see the changes in the Layers panel (screenshot above) and on the canvas.
See Effect Of It
Its effect can typically be SEEN after modifications has been made by:
On the canvas to show or hide the adjustment property "effect" which shows or hides the actual image.
Remove It
It can typically be REMOVED by:
- Select the Adjustment Layer Mask thumbnail and press the Delete key or drag it to the Delete Layer icon ( ) at the bottom of the Layers panel.
NOTE: To toggle the Adjustment Layer Mask on or off, press SHIFT + click on the Layer Mask thumbnail.
EXECUTIVE SUMMARY
Of all the ways of creating masks above, it is important to note that you have to do 2-4 steps all the times for any one of them:
- Create a path, if necessary
- Create a selection
- Save selection as an alpha channel, if necessary
- Apply an effect, etc.
It is all important to note how to use the modifier keys effectively with a thumbnail mask:
- CTRL + click on a thumbnail to make a SELECTION in the Layers, Channels, and Path panels for a Layer or Vectorl mask or Alpha Channel thumbnail.
- ALT + click on a Layer or Vector Mask thumbnail to SHOW/HIDE the ACTUAL mask on the canvas for a Vector or Layer mask thumbnail.
NOTE: The Layer mask will be shown typically as a black and white image on the stage. It is harder to see the vector mask because it ia a path around the object on the stage. - ALT + drag a Layer or Vector Mask thumbnail to another layer to DUPLICATE the mask on that layer.
- SHIFT + click on Layer or Vector Mask thumbnail to TOGGLE (ENABLE/DISABLE) the EFFECT of the mask on the canvas (denoted by red X when disabled)
SUMMARY OF MASKS
| Mask | Type | Typically created by | Typically modified by | Temporary/Permanent |
|---|---|---|---|---|
| Quick | Bitmap | Creating a selection and turning Quick Mask mode on | Painting on the Quick Mask with black, white or gray | Temporary |
| Alpha Channel | Bitmap | Saving a selection as an Alpha Channel Mask | Painting on the Alpha Channel with black, white or gray | Permanent |
| Vector | Vector | Saving a selection as a Vector Mask | Modifying point(s) on the Vector Mask | Permanent |
| Layer | Bitmap | Saving a selection as a Layer Mask | Painting on the Layer Mask with black, white or gray | Permanent |
| Gradient | Bitmap | Creating a Layer Mask and applying a gradient to it | Painting on the Layer Mask with black, white or gray gradient | Permanent |
| Clipping | Both | Clipping an image(s) into an image or shape below it | Manipulating image(s) above the layer being clipped | Permanent |
| Filter | Bitmap | Converting a layer to a Smart Object and applying a filter | Painting on the Filter Mask with black, white or gray | Permanent |
| Adjustment Layer | Bitmap | Creating an adjustment layer above the layer(s) you want to effect. | Painting on the Adjustment Layer Mask with black, white or gray | Permanent |
Major differences above are highlighted in bold.
BOTTTOM LINE EXECUTIVE SUMMARY: Most masks are permanent bitmap created from a selection and modified by painting on them with black, white or gray.
WHEN TO USE WHAT MASK TYPE:
| Mask Type | Best used when you need to: | Quick | - view the selected and unselected areas of a selection easier |
|---|---|
| Alpha Channel | - save a complex selection to be used later |
| Vector | - create a vector mask that has crisp edges that does not distort if scaled |
| Layer | - create a bitmap mask that can have its edges feathered and can have transparency |
| Gradient | - make mask translucent to show and hide portion of the image |
| Clipping | - clip more than one images into a bitmap image or vector shape |
| Filter | - add a special effect to a mask (e.g., Gaussian blur) |
| Adjustment Layer | - add a layer property to a mask (e.g., Black and White) |
WHERE ARE THEY STORED:
| FORMAT | WHERE IT IS STORED | HOW IS IT STORED |
|---|---|---|
| Bitmap | Layers Panel | As an image |
| Vector | Paths Panel | As a path |
| Selection (that is saved) |
Channels Panel | As an alpha channel |
MASK vs IMAGE THUMBNAIL
When working with a layer with a mask in the Layers panel, be careful to select the CORRECT thumbnail (e.g., image or mask) when you want to modify either. Depending on what you have selected will determine what is affected (e.g., the image or the mask). For example, it is easy to inadvertently "paint on pixels" (POP) on the image thumbnail when you really intended to "paint on pixel" on the mask thumbnail to edit it.
EXAMPLE: Typically, when you create a Layer Mask, you will want to paint on the mask thumbnail instead of the image thumbnail in the Layers panel. It is easy to forget to click on the mask thumbnail so that image thumbnail will be affected. Below is the results of both:
In the first example, a Layer Mask was created with the image thumbnail selected in the Layers panel. Then, a large red X was painted next to the sunflower on the canvas. However, the large red X does NOT show on the canvas but it does show on the image's thumbnail in the Layers panel:
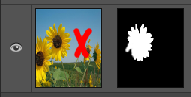
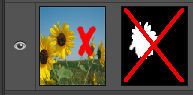
Actually, the large X did get painted on the canvas; however, it is not seen because it is hidden by the Layer Mask. To see the actual image again, press SHIFT + click the mask's thumbnail to temporarily disable it (shown with large red strike through mark on the mask's thumbnail) and you will indeed see that the actual image was painted on. This is a common mistake that beginner designers make. SHIFT + click the mask's thumbnail again to enable the mask again.
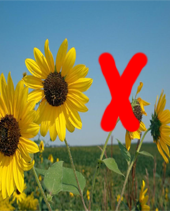
In the second example, a Layer Mask was created with the mask thumbnail selected in the Layers panel. Then, a large red X was painted next to the sunflower on the canvas. In this case, the large X DID show on the canvas revealing a portion of the image and the large X is shown on the mask thumbnail in the Layers panel which is typically what is intended.
NOTE: Besides being highlighted with a border of all sides (See example of layer mask in the screenshot above), you can allow determine if you have a layer mask or layer image thumbnail selected by looking at the name in the title bar at the top of the file (e.g., layerName, Layer Mask/8 or layerName, RGG/8#).
DON'T MAKE A MASK A MYSTERY (M3)
Unmask the mystery of the mask. A mask is typically a black, white and gray bitmap image. The exception is a Quick Mask which appears as a red translucent overlay that has clear "holes" in it. However, all masks except the Vector Mask can be modified with regular bitmap tools (e.g., Brush, Eraser) or transformed like any other image (e.g., filter added). You can even add a selection to the mask and perform any task afterward (e.g., delete, fill with color/gradient).
EXAMPLE: Click to see steps on how to make a Frame Edge Effect from a Quick Mask:

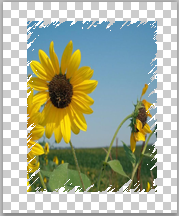
STEP 1: Make a selection of image (Rectangular Marquee Tool)
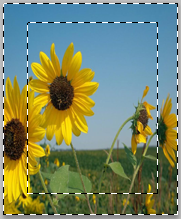
STEP 2: Invert the selection (SHIFT+CTRL+I)
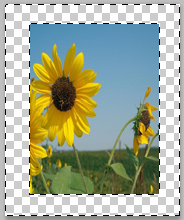
STEP 3: Delete the inverted selection (Delete key)
STEP 4: Convert selection to a Quick Mask (Q key)
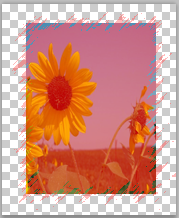
STEP 5: Apply a Filter (Filter > Filter Gallery) (e.g., Sprayed Strokes)
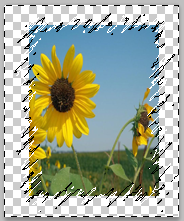
STEP 6: Exit the Quick Mask (Q key) and delete the selection (Delete key)
STEP 7: Deselect (CTRL+D) the selection to see the effect