Masking Made Easy
LAYERS
ABOUT A LAYER AS A MASK
What is a Layer?
A layer is similar to acetate sheet (clear plastic film) stacked on top of one another so that the underlying pixels of:
- each non-overlapping pixels show though to the top most layer
- several layers may be blended together creating a unique "blend" of all associated pixels
As a result, how does the following properties make a layer behave like a mask?
Layer's Transparent Areas
As mentioned in the topic on "ABCs of Masks", a layer can be thought of as a mask because it can show, hide or protect pixels underneath it.
EXAMPLE: In the illustration below, four layers are shown that has a separate object (e.g., rectangle, star, heart, and polygon) on each of them with transparency (denoted by the checkerboard pattern) that is then composited or merged into the single image on the bottom showing all four objects. Each layer can be "seen" because of their transparency.
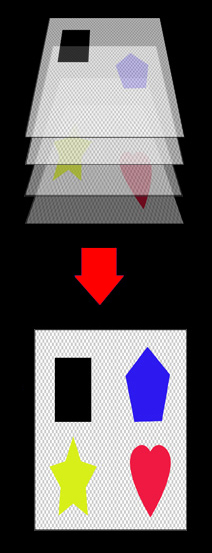
![]() It is important to note that the transparent areas of a layer will still protect layers below it. It is helpful to think of the transparent areas as a "clear glass." Even though you can "paint" on the clear glass, it will still protect the underlying layers from getting painted on. Only the layer that was painted on will get affected by the paint.
It is important to note that the transparent areas of a layer will still protect layers below it. It is helpful to think of the transparent areas as a "clear glass." Even though you can "paint" on the clear glass, it will still protect the underlying layers from getting painted on. Only the layer that was painted on will get affected by the paint.
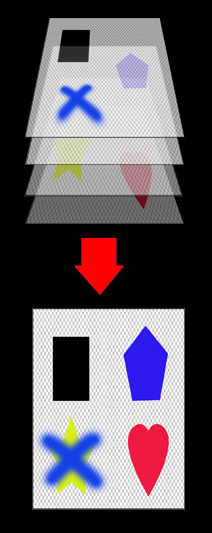
EXAMPLE: From the illustration above, the top layer with the black box was painted on with a blue X yet the other layers were unaffected by it. Ultimately, all of the layers are merged into one layer as is the case of the image on the bottom showing the blue X painted on top of the yellow star.
Layer's Opacity
Similar to layer's transparent areas, a layer's opacity can make a layer behave like a mask (e.g., shows, hides, or protects pixels). The difference between the two is that a layer's opacity affects the whole layer not just the transparent areas of the layer.
As a result, when a layer opacity is set to 100 and there is no transparent area, the pixels of the underlying layers cannot be seen. However, when the opacity is set lower than 100, then some of the underlying pixels may show through.
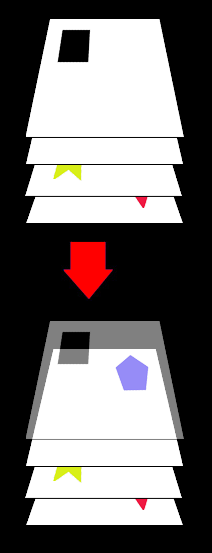
EXAMPLE: The illustration below shows how changing the layer's opacity affect how the underlying pixels are shown. The example on the first image shows the top layer with the opacity set to 100 (default) and as such the underlying pixels cannot show through. The second image shows the same layer with its opacity set to 50% in which case you can see the underlying pixels of the layer below:
Layer's Stacking Order
A layer's stacking order can also play a role in making a layer behave like a mask because it can help to show or hide the underlying pixels on a layer below it. If the top layer has neither transparency or opacity, then it will be the only visible layer. To see another layer, it would have to be moved ABOVE the top layer.
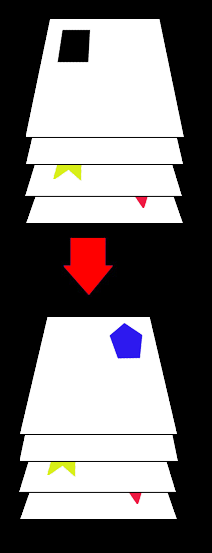
EXAMPLE: The illustration below shows how changing the layer's stacking order affect how the underlying pixels are shown. The example on the first image shows the top layer with with no transparent area and no opacity and as such no underlying pixels can be seen. The example on the bottom shows the the second layer moved to the top of the stack in which case only its pixels can be seen:
Layer's Blend Mode
Lastly, a layer's Blend Mode setting in the Layers panel can also make a layer behave like a mask. The blend mode setting will determine how a layer's pixel will "blend" or interact with other pixels below it. There are a host of blend modes (e.g., Normal, Dissolve, Hard Light) available that you can experiment with to "see" the affect of the blending.
![]() The Normal blend mode causes layers to behave as the name implies "normally" without any "blending" of pixels. Hence, the normal mode is NO blend setting at all.
The Normal blend mode causes layers to behave as the name implies "normally" without any "blending" of pixels. Hence, the normal mode is NO blend setting at all.
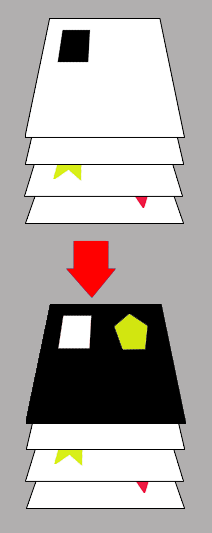
EXAMPLE: The illustration below shows how changing the layer's blending mode affect how the underlying pixels are shown. The example on the first image shows the top layer with the blend mode set to Normal and as such there is no "blending" with the underlying pixels. The example on the bottom image shows the same layer with its blend mode set to Difference in which case the entire layer was affected by the blend option (e.g., the difference blend mode, as the name implies, "subtracts the difference" of the darker colors from the lighter colors when layers' pixels interact.) Black pixels turned white, white pixels turned black and and the blue pixels of the polygon shape on the second layer interact with the white pixel on the top layer to give a completely new color.
BONUS: Background Layer vs Regular Layer
Lastly, when you first open Photoshop it creates a SPECIALIZED layer called a BACKGROUND LAYER at the bottom of the Layers panel. It has several characteristics that are OPPOSITES of a REGULAR LAYER.
| REGULAR LAYER | BACKGROUND LAYER |
|---|---|
| Layer not lock by default | Layer locked by default |
| Layer can be moved | Layer cannot be moved |
| Hole can be cut into layer to reveal transparency |
Hole cannot be cut into layer to reveal transparency (No transparent pixel) |
| Layer can be moved up or down except for the Background layer | Layer cannot be moved above and no other layer can be moved below |
| When a layer is cropped larger, transparency canvas will be created. | When a layer is cropped larger, the Background color is shown for canvas |
| Layer can be deleted | Layer cannot be deleted |
| Layer Blend Mode, Opacity, and Fill can be changed | Layer Blend Mode, Opacity, and Fill cannot be changed |
NOTES:
- ANALOGY: It is helpful to think of the Background layer as being a clipboard with the papers above it being other layers the can be moved and modify. Whereas the clipboard is fixed.
- To convert a Background layer to a Regular layer:
- click the lock icon on the right of the layer
- double-click the Backgroud Layer's thumbnail, It will be named Layer 0. If you hold down the ALT/OPTION key while doing this you will be prompted to give the layer a name.
- select Layer > New > Layer from Background... NOTE: This also works to convert a Regular layer to a Background layer and it will automatically be sent to the bottom of the layer stack and renamed Background.
To learn more about the various ways to create layers, see the app called "Learning Layers From The Joes." In the app, you will learn how to create the following types of layers: Regular,Custom Shape, Adjustment, Smart Object, 3D and Text.