Masking Made Easy
SELECTIONS
ABOUT A SELECTION AS A MASK
What is a selection?
As a review, a selection is a window to the underlying pixels of the active layer. It is helpful to think of the selection as areas where there are "holes" in a transparent mask where the canvas can be drawn on or modified.
We will see later that only pixels within this "window" area can be modified by other actions (e.g., filling with a color or pattern, adding a stroke, or transformation). Everything else in the image will be considered protected from modification.
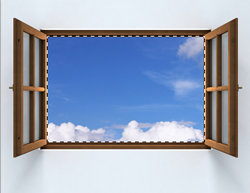
EXAMPLE: The illustration below shows an actual "window" depicting a selection to the outside world and the sky depicting the "underlying pixels" of the active layer (e.g., the world).

MEMORY TIP: It is helpful to think of a selection as a stencil or a masking tape that protects or exposes paint on the surface of another object (e.g., poster, wall).
How do you know you have a selection?
You typically "know" you have a SELECTION with one major EXCEPTION by viewing the marquee (e.g., black and white dashes) which is commonly known as the "marching ants" on the canvas. This is an EXPLICIT (clearly seen) selection.
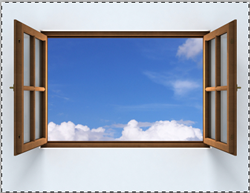
EXAMPLE: With the same illustration above being used, the Rectangular Marquee tool was used to draw a selection around the window which shows the "marching ants." In Photoshop, these dashes will animate around the selection.
EXCEPTION TO RULE: However, if you don’t make a selection explicitly, you will have an IMPLIED (suggested without being clearly seen) selection of the WHOLE canvas without any marching ants.
RULE: If you don't have anything selected, the whole canvas is a SELECTION. This is the one major exception, a minor exception will be discussed later.
EXAMPLE: From the previous screenshot, the illustration below shows the selection covering the whole canvas instead of an object in the image like the window when the CTRL+A keys were pressed.
![]() If you want to “see” the selection of the whole canvas, choose Select > All or press CTRL + A to select all of the pixels on the canvas. This is NOT necessary unless you want to copy or cut the whole image to another file.
If you want to “see” the selection of the whole canvas, choose Select > All or press CTRL + A to select all of the pixels on the canvas. This is NOT necessary unless you want to copy or cut the whole image to another file.
![]() If you make it a habit of using CTRL + A to select ALL of the pixels on a layer, then when you want to cut or copy an image to another open Photoshop file, you don't have to worry about the CUT or COPY menu items being dimmed out because you did not make a selection.
If you make it a habit of using CTRL + A to select ALL of the pixels on a layer, then when you want to cut or copy an image to another open Photoshop file, you don't have to worry about the CUT or COPY menu items being dimmed out because you did not make a selection.
![]() It is important to learn upfront that a selection is INDEPENDENT of the layer in the Layers panel in which it was created on. Another way of stating this it that a selection "cuts" across ALL layers. As a result, it is typical that you may CREATE a selection on one layer to be USED on a completely different layer.
It is important to learn upfront that a selection is INDEPENDENT of the layer in the Layers panel in which it was created on. Another way of stating this it that a selection "cuts" across ALL layers. As a result, it is typical that you may CREATE a selection on one layer to be USED on a completely different layer.
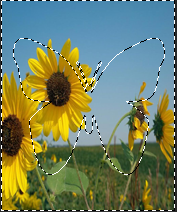
EXAMPLE: CTRL + clicking the Butterfly layer's thumbnail was used to CREATE a SELECTION on that layer as shown on the canvas:
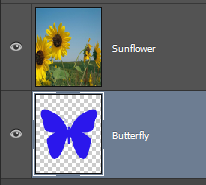
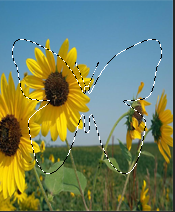
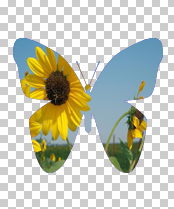
However, the Sunflower layer is then click on to make it active so that the selection was USED on that layer instead. Then the selection is inverted (CTRL+SHIFT+I), deleted (Delete key) and deselected (CTRL+D) yielding the sunflower image showing through the butterfly against a transparent background:

You will see later how to use different types of masks to create NON-DESTRUCTIVE versions of the same effect.
How do you see a selection as a mask?
RULE: Look behind the curtain to see what is certain. Once you have made a selection, not that it is necessary, but if you want to "see" what is actually selected or not selected as a mask, turn on the Edit In Quick Mask Mode (Q) ( ![]() ) at the bottom of the toolbar. Typically, you will see a red translucent Quick Mask that have "holes" (clear areas) cut out of it. These holes or clear areas represent the actual selection once you exit the Quick Mask mode by clicking on the Q key again.
) at the bottom of the toolbar. Typically, you will see a red translucent Quick Mask that have "holes" (clear areas) cut out of it. These holes or clear areas represent the actual selection once you exit the Quick Mask mode by clicking on the Q key again.
EXAMPLE: Using a previous image again that has a selection, this illustration shows a layer with the Quick Mask depicted as a red translucent mask on top of it with a clear area or hole (window) to the underlying layer's pixels when the Q key is pressed.

- It is important to note that you cannot view the selection AND the Quick Mask at the same time. To bring back the selection, you have to exit the Quick Mask mode (e.g., pressing the Q key again).
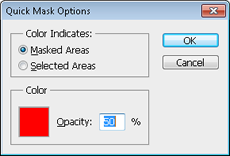
- The Quick Mask is red by default, however, if the image contains a lot of red colors in it, you may want to change the Quick Mask overlay color to a different color by double-clicking on the Edit In Quick Mask Mode (Q key) icon at the bottom of the toolbar and then clicking on the color chip to change its color.
The screenshot below shows the Quick Mask Options dialog box where you can change certain properties of a Quick Mask (e.g., color by masked or selected areas, mask color, and mask opacity).
![]() As mentioned earlier, if you don't have anything selected and you click on the Edit In Quick Mask mode icon, you won't see anything. You must have an INITIAL selection of some sort in order to see the Quick Mask; however, the Quick Mask is still active. To prove this with no selection made, enter into the Quick Mask mode (Q key) and with the brush tool paint with black and white and you will see the Quick Mask created or erased as you paint.
As mentioned earlier, if you don't have anything selected and you click on the Edit In Quick Mask mode icon, you won't see anything. You must have an INITIAL selection of some sort in order to see the Quick Mask; however, the Quick Mask is still active. To prove this with no selection made, enter into the Quick Mask mode (Q key) and with the brush tool paint with black and white and you will see the Quick Mask created or erased as you paint.
What get affected by a selection?
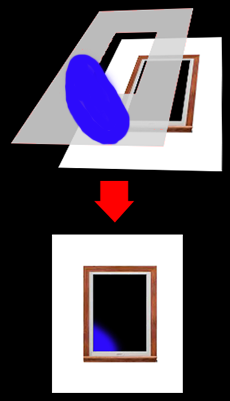
Because a selection behaves like a transparent mask with holes in it, only what's selected gets affected by what you do next (e.g., cut, copy, transform). Conversely, the unselected areas (the red overlay) will provide protection from what you do next. For example, if you make a selection and then decided to cut or delete the selected area, only the area where the selection was made will be affected.
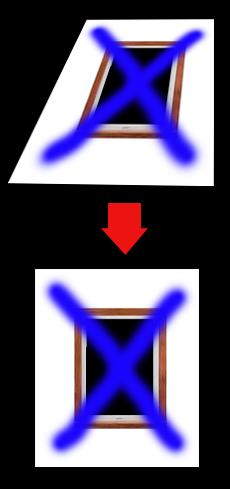
EXAMPLE: The illustration below depicts a selection as a transparent mask with a "hole" in it positioned over a layer below it with the selection painted on with a blue brush. Even though the paint was applied "over" the transparent area of the mask and its clear opening, only the area "within" the selection's opening on the actual layer (e.g., bottom image) got affected by the blue paint (e.g., the small blue area in the bottom left corner of the image).
Hence, only the area that is selected get affected by what you do next (e.g., paint).
NOTE: The problem for most people is that because they cannot see, it is hard to believe it is a mask.
EXCEPTION TO RULE: If you don't have anything selected, the whole canvas is affected by what you do next. As a result, in the previous example, without a selection, you can "paint" ANYWHERE on the ENTIRE canvas of the image.
![]() It is important to note that while only what is selected get affected, it is just as important to note that the layer that is selected in the Layers panel is the layer that get affected. Hence, ensure you are on the right layer in the Layers panel before you do something after creating a selection.
It is important to note that while only what is selected get affected, it is just as important to note that the layer that is selected in the Layers panel is the layer that get affected. Hence, ensure you are on the right layer in the Layers panel before you do something after creating a selection.
So, there are actually THREE LEVELS that get affected:
- CANVAS: Only the selected SELECTION on the canvas will get affected.
- LAYER: Only the selected LAYER in the Layers panel will get affected.
- THUMBNAIL: Only the selected THUMBNAIL in the Layers panel will get affected.
NOTE: This last one relates to masks that will be discussed later in which there is an image and a mask thumbnail on the same layer.
To learn more about the various ways to create selections, see the app called "Learning Selections From The Joes."
In the app, you will learn how:
- "Joe the Architect" uses vector drawing tools (e.g., Pen, Text, Custom Shape) to create a selection.
- "Joe the Builder" uses geometric shape and other selection tools (e.g., Rectangular Marquee, Elliptical Marquee) to create a selection.
- "Joe the Painter" uses bitmap painting tools (e.g., Brush, Eraser) to create a selection.
- "Joe the Contractor" uses blueprints (e.g., CTRL + Thumbnail, CTRL + Layer) to create a selection.
- "Joe the Inspector" uses specialized tools (e.g., Alpha Channel, Color Range) to create a selection.