There is a host of DW shortcuts that can save you time editing and reviewing code. Below is a brief list of some important shortcuts that you should learn:
Quick Comment - Press CTRL+/ to comment and uncomment code in both HTML and CSS after select the code
Quick Edit - Place cursor within class or ID and then press CTRL+E to introspect or edit code. For more information, see Quick Edit.
Quick Duplicate - Press CTRL+D to duplicate HTML or CSS code in Code View and a node in the DOM panel
Quick Doc - Press CTRL+K to access in-content CSS properties documentation from within Code View.
Quick Insert Line Above - Press CTRL+SHIFT+ENTER to add a blank line above the current line.
Quick Increment/Decrement - Click inside a numeric value (e.g., 10px) and then press CTRL+ALT+UP/DOWN ARROW KEY to increase or decrease value by 10.
Quick Parent Select - Press CTRL+[ key repeatably to select and highlight parent elements.
For a complete listing of Dreamweaver shortcuts, go to keyboard shortcuts on Adobe web site.
The Quick Tag Editor (CTRL+T) can be using to insert, wrap, and edit content in the Design View without having to use the Code View:
Insert - when nothing is seleced, the Insert panel will be displayed.
Wrap - when content is selected, the Wrap panel will be displayed.
Edit - when content AND an element is selected via the Tag Chooser, the Edit panel will be displayed. NOTE: These mini editors can be moved by dragging them wherever you want.
Code hints help users learn HTML, CSS, and other web standards, and visual aids like auto-indentation, code coloring, and resizable fonts help reduce errors and make your code easier to read.
Code Hints - When you type code, Dreamweaver will provide you with HTML, CSS and other web standard information.
For more information, see Code hinting and code completion.
Code Formatting - When you type code, Dreamweaver will auto-indents the code for better readability.
Collapse/Expand code - you can click the triangle to expand or collapse large amount of code so that you can see the structure better.
Select Start and End Tags - If you click the opening tag, Dreamweaver will highlight the closing tag for you automatically so that you can see the complete element opening and closing tags.
Code Complete - provide code hinting as you type and if you press the ENTER key once an option is selected or highlighted, Dreamweaver will complete the code with an equal sign, double quotes, and an insertion point (e.g., class="I")
Code Coloring - Dreamweaver provides you with color code to ensure you are writing the correct code for a host of file types and data types:
(e.g., HTML, JS, CSS, PHP, XML, LESS, Sass, SCSS, SVG, Bash, C, C#, C++, clojure, CoffeeScript, Dart, Diff, EJS, Embedded Ruby, Groovy, Handlebars, Haskell, Haxe, Java, JSON, Lua, Markdown, Markdown (GitHub), Perl, Properties, Python, RDF Turtle, Ruby, Scala, SQL, Stylus, Text, VB, VBScript, XML, and YAML.)
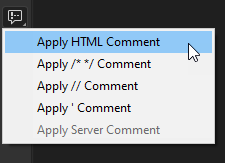
Code Commenting - To add comments, type the text, select it and then click comment icon on the left side of the Code View pane and select one of the comment type.
NOTE: You can change syntax highlighting for different file types directly from the status bar in code view.
Image and color preview - hover over an image or a color value to see a thumbnail view of it.
Instead of manually searching and replacing, use the Find and Replace command to do the work for you.
The Find and Replace dialog box (Find > Find and Replace in Files) can be used to search for attributes and element even if no files are open in Dreamweaver (e.g., searching within a folder).
NOTE: The Find and Replace Quick Find bar is at the bottom of the Dreamweaver workspace.
Dreamweaver supports linting (analyzing code for potential errors) for HTML, CSS, and JavaScript.
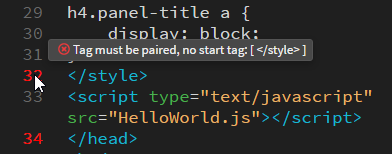
The Lint Checker provides live code error monitoring and inform you by displaying a red circle with an x in it at the bottom of the screen:
Tips on using the Lint checker:
Keep an eye on the status panel for errors, click the red x icon to open the Output with the errors in it. It will report the line, column, and errors/warnings.
Double-click an error to take you to the line in the Code View where the error occurs.
Dreamweaver also shows a quick error preview in the line number column in Code View. If you see a red line number in Code view, hover your mouse over it to see the error message:
Once you correct an error, you need to save the file to refresh the Lint checker status.
If there is no error, a green circle with a check mark will be displayed ().
The DOM panel suport multiple selections, editing of elements, classes, and IDs, and insertion of new elements. You can layout and design most part of your web page by using just the DOM panel.
NOTE:
To make contiguous selection of multiple elements, hold down the SHIFT key and click.
To make non-contiguous selection of multiple elements, hold down the CTRL key and click.
When multiple selections are made:
Properties panel and CSS Designer panel are disabled.
Tag hierarchy is cleared at the bottom of the page.
The Insertion point in Code View becomes inactive
Insert or Wrap elements, press the SPACEBAR or click the insert icon (Large plus sign) next to the element and then type the name of the element.
Edit elements, classes, and IDs by double-clicking them in the DOM panel.
Add additional classes or IDs by separating them with a space. NOTE: For elements that are not associated with a class or ID, type the class or ID name after double-clicking the element TIP: Start with a dot for class and a hash sign for an ID to filter them using code hints.
Insert before, after or within an element, or wrap a new element around another element by clicking on the large plus sign next to the element and selecting from the drop down list.
Duplicate, Delete, or Remove element (e.g., strong element) by right-clicking on it and selecting options from drop-down list.
Move element(s) up and down the DOM tree.
Drag element from Insert panel to DOM panel. NOTE: Guides will appear to indicate where the element can be drop to be inserted. NOTE: When an element is inserted using the DOM panel, default placeholder text, required element attributes and other elements
are also inserted:
for div, header/footer, nav, aside, section, h1-h6, and hgroup, default text will appear
for tables, a 3 rows and 3 columns table is created
for img or embed, the Select File dialog box will appear
for meta element, the code: <meta name="" content=""> will be created
for a figure, a figure element with a nested figcaption is created:
This is the content for Layout Figure Tag
This is the caption for Layout Figure Tag
for a bullet list (ul or ol), an ol or ul element with a nest li element is created.
When a node is selected in the DOM panel, its child's node is highlighted in a light blue. If the child node is explicitly selected, the light blue highlight is not displayed
Emmet is a tool that is used as an HTML and CSS abbreviation expander. Emmet Commands can be used to create shorthand code that can be expanding into actual code. It use CSS operators.
It works by typing an Emmet command and then pressing the TAB key. Moreover, the cursor is also correctly positioned between opening and closing tag or attribute quotes.
Emmet uses CSS selector operators for its abbreviation engine to create structured code. (e.g., child selector (>) and sibling operator (+). It also uses the dot (.) for classes, hash sign (#) for IDs and the asterisk (*) for multiplication.
HTML EXAMPLES:
Type a Emmet command and then press the TAB key.(e.g., table)
Type c to create a blank comment with the cursor ready for your to type your comment (e.g. c)
<!-- -->
Type any element name to write both the opening and closing tags and in some cases the attributes. (e.g., input)
<input type="text">
Some Emmet commands require you to add attribute preceded by a colon (e.g. style:src)
<script src=""></script>
Create paragraph with Lorem Ipsum placeholder text with a fixed number of words (e.g., p>Lorem or p>Lorem30)
<p>Lorem ipsum dolor sit amet, consectetur adipisicing elit.
Voluptate ipsam, illum, ab, sed eveniet iusto quibusdam nemo
illo autem nisi tempora dicta temporibus fugit possimus
dolores nobis laboriosam blanditiis dolor.</p>
NOTE: p>Lorem by itself will yield a 30 words Lorem Ipsum placeholder text.
Create a fixed number of paragraphs with Lorem Ipsum placeholders with a fixed number of words (e.g., p*4>Lorem10)
<p>Lorem ipsum dolor sit amet, consectetur adipisicing elit. Harum, sint.</p>
<p>Velit accusantium, id facere? Numquam harum, fugiat nemo tempora aliquam.</p>
<p>Vero quas tenetur cupiditate sequi adipisci, ea maiores eligendi, fugiat!</p>
<p>Delectus dicta consequuntur itaque libero quam odit placeat veritatis, quidem.</p>
NOTE: Note that the multiplier is applied to the p element containing the Lorem Ipsum text not the Lorem keyword.
Create a bullet list with a class and with a fixed number of list items (e.g., ul.nav>li*4)
Create a bullet list with a fixed number of list items and some default link text using the placeholder brackets ({text goes here}) (e.g., ul.nav>li*4>a{item$})
NOTE: The multiplier (*4) is assigned to the first element that needs to have multiple repeated elements (four
li
elements). Once established, any element within that element will be automatically repeated as well (four
a
elements).
Create a bullet list with classes and UNIQUE NUMBERED ids using the sequence operator ($) and with a fixed number of list items (e.g., ul.nav>li>#myID$.myClass*4)
TIP:
It is helpful to place parenthesis arournd the element that will be repeated so that you can see what is muliplied:
Create a fix number div elements with classes using the multiple operator (*) (e.g., .myclass*4): NOTE: If not element is specified, a div element will be used.
NOTE: The three climb-up operators (^^^) basically said "climb-up" three levels and add an element at the same level. Same for the second climb-up operator. Climb-up two level and addan element at the same level.
CSS EXAMPLES:
Instead of standard element names, Emmet CSS uses abbreviations.
Type a Emmet command and then press the TAB key.(e.g., table)
To add a padding or margin, type p or m
padding: ;
NOTE: It has to be in a style element; otherwise you will get a paragraph.
margin: ;
NOTE: To add individual padding or margin, type pt for padding-top: ; , pr for padding-right: ; , pb for padding-bottom: ; , and pl for padding-left: ;. The same holds true for margins.
To add a padding with a value (e.g., p10)
padding: 10px;
To add a padding with multiple values (e.g., p20-0-20-20)
<div>
<ul>
  <li>Line Item 1</li>
  <li>Line Item 2</li>
  <li>Line Item 3</li>
  <li>Line Item 4</li>
</ul>
<p>Lorem ipsum dolor sit amet, consectetur adipisicing elit. Tempore itaque officia atque, delectus
architecto magni tenetur, perspiciatis velit, necessitatibus dolore quo aspernatur earum expedita.
Veniam, quibusdam, fuga. Maxime, eaque, voluptas!</p>
<p>Exercitationem quasi soluta quidem voluptatibus, tempore necessitatibus velit laborum, reiciendis
maiores illo animi accusantium vitae laboriosam est in hic cumque iste quas. Ipsum saepe, pariatur cupiditate
deleniti! Neque earum, culpa.</p>
<p>Accusamus laboriosam dolorem animi? Eum commodi repellendus odio quod facere. Omnis possimus
impedit error alias odit. Laborum repellat, esse fuga animi facere quaerat praesentium libero eveniet.
Corrupti necessitatibus, velit odit.</p>
<p>Provident laborum est non explicabo maiores itaque voluptate voluptas unde. Ducimus fuga aliquam
saepe vel cum laboriosam dolore ab, accusamus doloribus error, distinctio laudantium quia! Culpa id iure
vero natus.</p>
</div>
BONUS EXAMPLE:
Press exclamation mark (!) and then the TAB key to create the HTML framework elements. How cool is that!!!
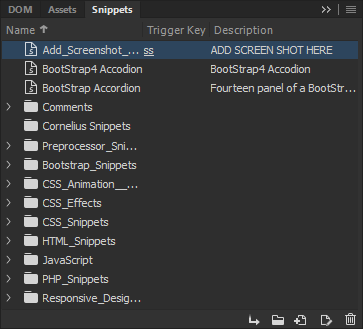
The Snippets Panel (Window > Snippets or CTRL+F9) can be used to create your own reusable code within any file or you can use the host of snippets that comes with Dreamweaver.
BIG TIP: You can rename a Trigger Key in the Snippets panel and then use it like an Emmet command in the Code View. (e.g., bsa for Bootstrap Accordion)
Instead of using a third-party FTP Client program, you can do FTP from within Dreamweaver to save you time not have to move back and forth between two applications.
Behaviors are pre-defined JavaScript code that performs varies actions (e.g., swap image) when they are triggered by an event (e.g., mouse over). Below are the steps to apply an image to a page:
Select a page element that you want to trigger the behavior.
Open the Behavior panel and choose the behavior you want to apply.
Specify the settings for the behavior.
Dreamweaver offers more than a dozen built-in behaviors that can be accessed from the Behaviors panel by selecting Window > Behaviors or SHIFT+F4. You can also download behaviors for free or for a small fee. Below are some functionalities that a behavior can do:
Open a browser window
Swap an image with another image (rollover effect)
Fade image or page area in and out
Grow or shrink an image
Display pop-up message
Chagne text or HTML within a given area
Show or hide a page section
Call a custom Javascript function
The triggering elements often involves a hyperlink applied to a range of text or to an image which may need a dummy link (#) in order for it to work correctly.
Multiple behaviors can be applied to the same trigger. For example, you can swap one image with another and change the image caption at the same time.
EXAMPLE: SWAP IMAGE BEHAVIOR:
Insert an image that you want to use as the initial image.
Click the image and then add a dummy link (#) in the Propertiy Panel Link text field.
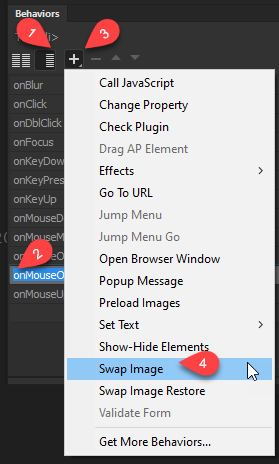
Open up the Behaviors panel (Windows > Behaviors),
click the Show all events icon
select onMouseOver
click the large plus sign (+) icon (Add behavior)
select the Swap Image behavior
In the Swap Image dialog box that appears:
click the Browser... button and navigate the the image you want to swap with the initial image.
Click the OK button.
Close the Behavior panel.
CHECK POINT: Save the file and preview it in a browser. Hover over the image and you should see it gets "swap" with the second image. Hover off the image and you will see that it reverts back to the original image.
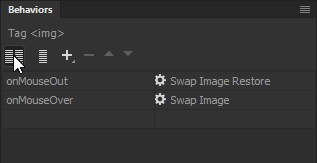
(Optional) Reselect the image, re-open the Behaviors panel again, and click the Show set events icons.
You should see the two behaviors that got added to the image. If you want to move a behavior up or down click one of the arrows. If you want to delete a behavior, click the minus sign (Remove behavior).
Creating personalized content is very important to make an immediate connection with the reader, and hopefully increase your success rates with email marketing.
You can now use the Campaign extension for Dreamweaver to create personalized email campaigns. To get started:
Download the Campaign extension by clicking Window > Extensions > Browse Extensions.
Create a new email newsletter, or edit an existing one.
After you finish designing, personalize content using Campaign's personalization fields and content blocks, and you are ready to go.
If you use Dreamweaver to create email campaigns, you can now go a step further and add personalized content (such as the reader's name, or a personalized call to action) using data from Adobe Campaign.
Dreamweaver automatically syncs up with Campaign so that your content changes in Dreamweaver are available for you in Campaign. All you then have to do is enter an email address, and send a personalized campaign to your email recipient.
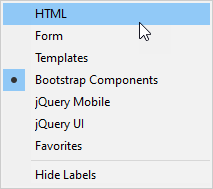
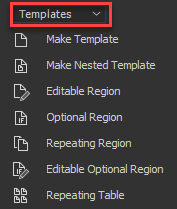
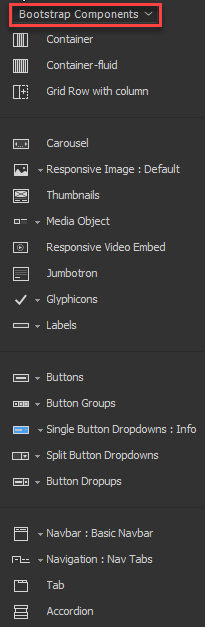
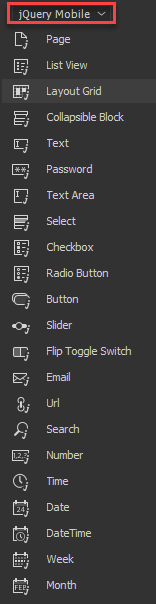
The Insert Panel (Window > Insert or CTRL+F2) can be used to insert a host of different types of elements and Frameworks:
Frameworks can be used to simplify the process of creating complex pages.
BootStrap*
jQuery Mobile
jQuery UI
* To select a different version of BootStrap, select Site > New Site and then click on the Bootstrap tab on the left and then select the BootStrap version (3.4.1 and 4.3.1)from the drop-down menu.
You can use Git to manage version control and collaboration. See Using Git in Dreamweaver for more details.
Git is an open source version control system that can be used to manage your files, including source code from within Dreamweaver without using a third party application.
You can also use Git:
as a collaboration tool by creating and merging branches and remote repositories.
view the differences between two versions of a file,
view file and repository histories.
The Files panel supports a new Git view that allows you to manage the untracked, modified, staged, and committed files associated with your site.


 ).
).