Home
Learning Selections From The Joes
Joe The Builder
Scenario: Joe The Builder started off by using bitmap tools to create selections. However, because he has a lot of "tools" in his toolbox, he has to decide which one is the right tool for the right job.
Joe The Builder uses SELECTION TOOLS to DIRECTLY create selections.
Major tools of the trade: SELECTION TOOLS
Geometric Selection (Marquee) Tools – best used to a make selection based on simple "geometric" shapes.
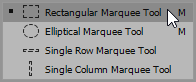
- Rectangular – used to select a rectangular or square object in an image.
- Elliptical – used to select an elliptical (oval) or circular object in an image.
- TIP: To toggle between the Rectangular and Elliptical tools press SHIFT+M.
- Single Row/Column – used to create a single row or column, respectively, across the width or height of the image. They are typically used to create multiple horizontal or vertical lines faster than using the Pencil or Line tool. See section on how to fill a selection for details.
 TIP: While not used as often, beside the default mode of Normal, in the Options bar, you can set two additional selection styles when using the rectangular or elliptical marquee tools to draw a selection:
FIXED Ratio:
FIXED Size:
Freehand Drawing (Lasso) Tools – best used to draw a selection based on an object in an image with an "irregular" shape that has EDGES (freehand, straight):
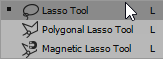
- Lasso – used to draw a freehand selection with rough-edges (e.g., a freehand sketch).
- TIP: The Lasso is also good for adding or deleting small imperfections from an existing selection.
- Polygonal – used to draw around an object in an image with straight-edges (e.g., polygon).
- TIP: While using the Polygonal Lasso tool, you can hold down the ALT key to switch to the Lazzo tool to draw freehand.
- Magnetic – used to draw a selection with defined-edges by clicking once to start and then dragging around the "object" in the image that has a defined edge and then clicking again at the original point to close selection. You can also add additional point at any time by clicking or you can double click to create a straight path to the original point.
TIP: If you turn on the caps lock, you will be able to see and adjust the brush size so you can better move around the object to straggle between the background and the object.
NOTE: The Frequency value can be set to determine the number of points that will be created automatically.
TIP: To change between the three types of Lasso tools "on the fly" click the ALT key???
Color Sampling (Brush/Wand) Tools — best used to a sample a selection based on an object's "color" instead of its shape.
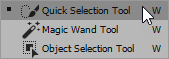
- Quick Selection – used to sample a selection based on colors and defined edges in an image by selecting them.
- Magic Wand – used to sample a selection based on similarity of a range of colors (or shades of gray in a grayscale or in an alpha channel.). To add the same or a different color to a selection hold down the SHIFT key.
There are several options in the Option panel that influence how much color get selected with the Magic Wand:- Contiguous as the name implies select contiguous (adjacent colors without gaps) pixels of the same color. If this option is turned off then all pixels of that color will be selected in the whole image.
- Tolerance determine the range of colors that will be included in the selection.
- Sample All Layers will allow all visible layers above and below active layer colors to be sampled. If this option is turned off then only colors from the active layer will be sampled.
- Sample Size specify the Eyedropper sample size (e.g., 3x3, 5x5). It average the pixels based on the pixel that was clicked.
- Point Sample Size – set the pixel numbers that will be sampled.
- Point Sample – get the exact value of selected pixel.
- Point Average – get the average value of selected pixels.
- Contiguous as the name implies select contiguous (adjacent colors without gaps) pixels of the same color. If this option is turned off then all pixels of that color will be selected in the whole image.
- Object Selection - Create selection by drawing a simple rectangle or lasso around an object.
- Sometimes it is best to make a rectangular selection around an object that has a solid color background and then hold down the ALT key to subtract the background from the selection which in turn selects the object in the image
Color Range Menu
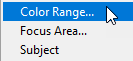
- You can also use the Select > Color Range menu (not a tool) to select a range of color interactive unlike the Magic Wand or the Quick Selection tools (See Joe The Inspector for details)