List Fragment App
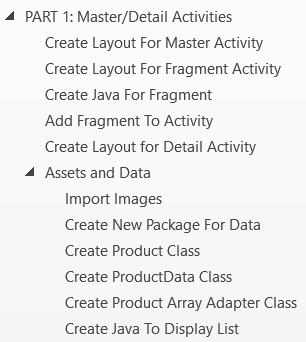
PART 1: Master/Detail Activities
Many apps work with the Master/Detail Pages (Activities) methodology. Where the Master page shows a small amount of information about a topic (e.g., product) typically using a ListView or Table and the Detail page shows more “detail” information about the item that is selected from the ListView or Table.
Android apps that employ lists typically use the ListActivity class that handles interaction better than the normal Activity. However, apps that use fragments typically use the ListFragment class for the same reasons.
Create Layout For Master Activity
First, we need to create a fragment layout using XML for the Master Activity
- Create a new project using the Empty Activity Template and save it as List Fragment App PART 1.
- Open the activity_main.xml file and in the Design view or Text view, delete the default TextView component (“Hello, World!). Optional, in Text view, you can delete the package prefix from the tools:context attribute (e.g., com.example.listfragmentapppart1) but leave the dot AND the package name (e.g., .MainActivity). Also, optional, you change the ConstraintLayout to a FrameLayout since a FrameLayout component is designed for a SINGLE object.
<?xml version="1.0" encoding="utf-8"?>
<FrameLayout xmlns:android="http://schemas.android.com/apk/res/android"
xmlns:tools="http://schemas.android.com/tools"
android:id="@+id/activity_main"
android:layout_width="match_parent"
android:layout_height="match_parent"
tools:context=".MainActivity">
</FrameLayout>
XML EXPLANATION:
- Now that the activity_main.xml file is EMPTY, it can act as a CONTAINER for the fragment file that will be created next. The MainActivity that was automatically created when the project was created completed the XML and Java file needed for the Master page.
- CHECK POINT: With the activity_main.xml selected and with the Design tab selected, you should see an EMPTY container to hold the fragment activity that will be created next.
Create Layout For Fragment Activity
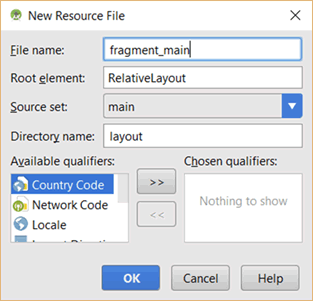
- Right-click on the layout folder and select New > Layout Resource File and enter the following values and then click the OK button:
NOTE: Even though a LAYOUT file appears similar to an ACTIVITY, the different is that an activity has to be registered in the AndroidManifest.xml file. So instead of doing New > Activity > [Activity Type], you do New > Layout Resource File. However, ALL three are XML based files.
- In the fragment_main.xml layout file that opens, add a TextView in the RelativeLayout element by type <TextView and pressing the ENTER key and then tab to add match_parent and wrap_content for the layout_width and layout_height, respectively. Then, add the following attribute and values:
- text = “Product Listing”
- textStyle = “normal | bold”
- textAlignment = “center”
- textSize = “18sp”
<TextView
android:layout_width="match_parent"
android:layout_height="wrap_content"
android:text="Product Listing"
android:textStyle="normal|bold"
android:textAlignment="center"
android:textSize="18sp" />
- Still in the fragment_main.xml layout file, add a ListView component in the RelativeLayout element by typing <List and pressing the ENTER key and then tab to add match_parent and wrap_content for the layout_width and layout_height, respectively. Then, add an id of list from the Android framework.
<?xml version="1.0" encoding="utf-8"?>
<RelativeLayout xmlns:android="http://schemas.android.com/apk/res/android"
android:layout_width="match_parent" android:layout_height="match_parent">
<TextView
android:layout_width="match_parent"
android:layout_height="wrap_content"
android:text="Product Listing"
android:textStyle="normal|bold"
android:textAlignment="center"
android:textSize="18sp" />
<ListView
android:id="@android:id/list"
android:layout_width="match_parent"
android:layout_height="wrap_content">
</ListView>
</RelativeLayout>
NOTE: The id MUST be named list from the Android framework (e.g., "@android:id/list").
- CHECK POINT: You can see a preview of the TextView and ListView components with some default text (Item, Sub Item 1) either in the Design view or Text View with the Preview panel open. However, if you were to run this app in an emulator, you would NOT see the anything YET because:
- The activity gets load but the fragment has not yet been added to the activity. That will be resolved later.
- There is no data provided to the ListView yet. That will be resolved later as well.
NOTE: The activity_main.xml and the fragment_main.xml files will BOTH represent the MASTER “PAGE.” The fragment_main.xml layout file will programmatically be added to the activity_main.xml layout file later.
Create Java For Fragment
Now that an XML layout file was created, a Java class is needed to “pull in” a view for the XML Layout file (e.g., fragment_main.xml).
IMPORTANT CONCEPT TO NOTE: It is helpful to think of the relationship between the Java class and the XML layout file as an akin to JavaScript to an HTML page that gives it interactivity. However, unlike HTML that is linked to a JavaScript file. With Java, the XML file is linked to the Java file. Notice that for every XML layout file, there is a corresponding Java class:
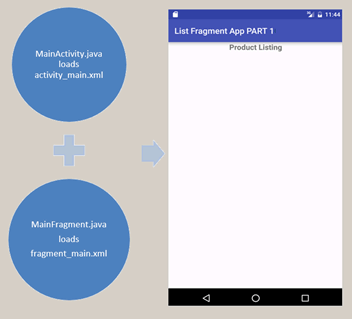
- activity_main.xml AND MainActivity.java (Automatically generated by Android Studio when the project was created.).
- fragment_main.xml AND MainFragment.java (Manually created by you next to create the fragment layout file and its associated Java class).
MEMORY TIP: Notice that the main part of the Java file names (e.g., MainActivity or MainFragment) are the REVERSE of the XML file names (e.g., activity_main or fragment_main) but the XML files has an underscore in them.
- Right-click on the package com.example.listfragmentapppart1 and in the Create New Class dialog box that appears, give it a name of MainFragment and then click the OK button.
TIME-SAVING TIP: If you had right-click on the java folder instead of the package, you would had to choose a directory (e.g., …\app\main\java\) from the Choose Destination Directory dialog box that appears before the Create New Class dialog box would appear. Hence, the previous step will save you from having to do this step.
- In the MainFragment.java file that opens, delete the comments and set the super class by extending the main class by typing extends ListFragment.
import android.app.ListFragment;
public class MainFragment extends ListFragment {
}
CODE EXPLANATION: Notice that the class is extended using the ListFragment and NOT the Fragment or Activity class. Also, notice the import android.app.ListFragment statement is imported at the top of the class.
- Right-click inside of the curly braces and select Generate… (or ALT+INSERT) and in the list that appears, select Constructor to automatically create a no argument constructor.
public class MainFragment extends ListFragment {
public MainFragment() {
}
}
CODE EXPLANATION: The no argument constructor consist of:
- The constructor name which is the same as the class name (MainFragment).
- A set parenthesis and a set of curly braces.
- The empty constructor is not always necessary but it is a best practice. This constructor is empty because this class does not “construct” anything, it simply performs a task (e.g.,
“create a view” for the fragment_main.xml file).
- Insert cursor BELOW the constructor code block, type onCreateView and press the ENTER key to automatically override the onCreateView() method of the ListFragment class:
public class MainFragment extends ListFragment {
public MainFragment() {
}
@Override
public View onCreateView(LayoutInflater inflater, ViewGroup container, Bundle savedInstanceState) {
return super.onCreateView(inflater, container, savedInstanceState);
}
}
CODE EXPLANATION:
- When the fragment java file is initialized, the onCreateView() method is invoked to:
- Select a layout
- Inflate the layout
- Return a view
- The onCreateView() method has three arguments:
- An inflator object—used to inflate the XML layout file
- A container ViewGroup—used to contain the fragment (Typically, the root element of the containing activity)
- A bundle (saveInstanceState)—used to restore the fragment.
- Notice all of the import statements that are automatically added at the top of the class:
import android.app.Fragment;
import android.os.Bundle;
import android.view.LayoutInflater;
import android.view.View;
import android.view.ViewGroup;
- Delete the following line to implement your custom onCreateView() method code instead of the onCreateView method of the Fragment class:
return super.onCreateView(inflater, container, savedInstanceState);
- Replace the deleted code with the following highlighted code:
public View onCreateView(LayoutInflater inflater, ViewGroup container, Bundle savedInstanceState) {
View fragmentView = inflater.inflate(R.layout.fragment_main, container, false);
return fragmentView;
}
CODE EXPLANATION:
- A variable name fragmentView is declared and assigned to an inflator object.
- The inflator method takes three arguments:
- A resource ID—used to reference the XML layout file for the fragment (e.g., R.layout.fragment_main).
- A container ViewGroup—used as the container that was passed in as an argument.
- A Boolean—used to attach to root argument. Its value is set to false because it does not need to be reattach.
- The return fragmentView; statement is used as the name implies to return the fragmentView.
- Whenever an instance of this fragment class is added to an activity, the onCreateView() method will be called and the view is created, returned and displayed on the screen.
Add Fragment To Activity
Now that we have two Java classes AND two XML layout files that represent BOTH the Activity and the Fragment, we need to ADD the Fragment to the Activity. There are two ways of doing this—either with XML or with Java code. We will be using Java code. The activity will represent the Master (“page”) Activity. Later, will we create the Detail Activity to complete the Master/Detail set of activities.
- Open the MainActivity.java file and add the following highlighted code in the onCreate() method:
protected void onCreate(Bundle savedInstanceState) {
super.onCreate(savedInstanceState);
setContentView(R.layout.activity_main);
MainFragment fragment = new MainFragment();
getFragmentManager()
.beginTransaction()
.add(R.id.activity_main, fragment)
.commit();
}
CODE EXPLANATION:
- When the onCreate() method is invoked, it will programmatically add the fragment with Java code instead of XML markup.
- An instance of the MainFragment class named fragment is created. The fragment object already has a reference to its layout from the Java class that was created earlier (See above for detail).
- The fragment is added to the container using the add() method that uses the resource ID (an integer) and the fragment object.
- Notice the methods this is attached to the getFragmentManager() method is “daisy chained” together on separate lines by means of the dot syntax for each method (e.g., . begin, .add, and .commit).
- CHECK POINT: If you look at the activity_main.xml file you will not see the fragment displays because the preview only support XML markup. However, if you run the app in an emulator, you should see the fragment displayed at runtime with the title Product Listing.
Create Layout For Detail Activity
While this file will not be used until later, since we are creating layout files, it is nice to create all of them at one time. We will create a file (product_detail.xml) that has a TextView and ImageView to display and name and image we need for the master activity (“page”).
- Right-click on the layout folder and select New > Layout Resource file from the menu.
- In the New Resource File dialog box that appears, enter a File name of product_detail.xml and a Root element name of RelativeLayout and then click the OK button.
- Copy or write the following highlighted code or use the Design view to create the code yourself to generate the Detail layout. Spaces between components are optional and are used for to see each component better.
<?xml version="1.0" encoding="utf-8"?>
<RelativeLayout xmlns:android="http://schemas.android.com/apk/res/android"
android:layout_width="match_parent"
android:layout_height="wrap_content"
android:background="?android:attr/activatedBackgroundIndicator"
android:paddingBottom="10dp">
<ImageView
android:id="@+id/ivProductImage"
android:layout_width="80dp"
android:layout_height="80dp"
android:layout_alignParentLeft="true"
android:layout_alignParentTop="true"
android:layout_margin="10dp"
android:contentDescription="@string/placeholder" />
<TextView
android:id="@+id/tvProductName"
android:layout_width="wrap_content"
android:layout_height="wrap_content"
android:layout_centerVertical="true"
android:layout_marginLeft="10dp"
android:layout_toRightOf="@+id/ivProductImage"
android:text="@string/placeholder"
android:textAppearance="?android:attr/textAppearanceLarge" />
</RelativeLayout>
XML EXPLANATION:
- The background attribute enables the activation appearance on tablets.
- Click inside either of the two placeholder resource strings in red (e.g., @string/placeholder) and then:
- press ALT+ENTER keys
- select Create string value resource ‘placeholder’ from the menu
- press the Enter key
- type placeholder in the Resource value field in the New String Value Resource dialog box that appears
- press the OK button
- CHECK POINT: In the Design view or in the Text view with the Preview panel opened, you should see a “preview” of the Detail layout. The ImageView is not obvious unless you click on it to see its outline.

Assets And Data
While not required, it is helpful to create or provide the assets and data needed for your app upfront before writing the bulk of Java code so that you can see the result of your code as you progress through your app. The assets are simple the images that we need. The data will be created with Java code as a series of Java classes.
Import Images
We will import the images needed from the exercise file.
- Copy the images from the exercise file.
- Right-click on the Drawable folder and select Paste from the menu and in the Copy dialog box that appears click the OK button to insert the images in the Drawable folder.
Create New Package For Data
While not required, it is sometimes helpful to create a sub-package to organize classes better. Hence, we will be creating a new package and then add two classes (Product and ProductData) to it.
- Right-click on the package com.example.listfragmentapppart1 and select New > Package.
- In the New Package dialog box that appears, enter data in the text field and then click the OK button.
- CHECK POINT: You should see the new data package under the main package.
Create Product Class
A Product class will be used as the name implies to create a Product object.
- Right-click on the data package that was created earlier and select New > Java Class from the menu.
- In the Create New Class dialog box that appears, enter Product in the text field and then press the OK button.
- Delete the comment and add the following private fields:
public class Product {
private String productName;
private int imageResource;
private String instructions;
private double price;
}
- Click BELOW the private fields and right-click and select Generate… from the menu.
- In the list that appears, select Getters and Setters to generate getters and setters from the private fields.
- In the Select Fields to Generate Getters and Setters dialog box that appears, select ALL of the private fields and then click the OK button.
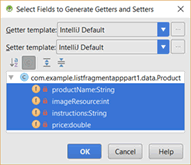
- CHECK POINT: You should see the getters and setters for each private fields automatically created.
- Add the following constants ABOVE the private fields:
// constants for field references
public static final String PRODUCT_NAME = "productName";
public static final String IMAGE_RESOURCE = "imageResource";
public static final String INSTRUCTIONS = "instructions";
public static final String PRICE = "price";
private String productName;
private int imageResource;
private String instructions;
private double price;
- Click BELOW the last setter method and add the following four highlighted method but before the closing Product class curly brace:
public void setPrice(double price) {
this.price = price;
}
// Used when creating the data object
public Product (String id, int imageResource, double price, String instructions) {
this.productName = id;
this.imageResource = imageResource;
this.instructions = instructions;
this.price = price;
}
// Create from a bundle
public Product(Bundle b) {
if (b != null) {
this.productName = b.getString(PRODUCT_NAME);
this.imageResource = b.getInt(IMAGE_RESOURCE);
this.instructions = b.getString(INSTRUCTIONS);
this.price = b.getDouble(PRICE);
}
}
// Package data for transfer between activities
public Bundle toBundle() {
Bundle bundle = new Bundle();
bundle.putString(PRODUCT_NAME, this.productName);
bundle.putInt(IMAGE_RESOURCE, this.imageResource);
bundle.putString(INSTRUCTIONS, this.instructions);
bundle.putDouble(PRICE, this.price);
return bundle;
}
// Output product data
@Override
public String toString() {
return productName;
}
}
CODE EXPLANATION: This class has:
- private fields
- getters and setters to represent a single instance of a data object named Product
- a constructor method
- methods to transform the product object to and from a bundle (will be used later)
- Note that the Bundle package was imported (e.g., import android.os.Bundle;).
Create ProductData Class
The ProductData.java class will be used to add items to an array list.
- Right-click on the data package that was created earlier and select New > Java Class from the menu.
- In the Create New Class dialog box that appears, enter ProductData into the text field and then press the OK button.
- Delete the comment and add the following private fields:
public class ProductData {
private List<Product> products = new ArrayList<Product>();
}
- Place the cursor AFTER the private field and right-click and select Generate… and then select Getter from the menu and then click the OK button to automatically create a getter based on the private field:
public class ProductData {
private List<Product> products = new ArrayList<Product>();
public List<Product> getProducts() {
return products;
}
}
- Place the cursor BELOW the newly created getter method and write the following highlighted code:
public class ProductData {
private List<Product> products = new ArrayList<Product>();
public List<Product> getProducts() {
return products;
}
public ProductData() {
products.add(new Product("Dreamweaver CC", R.drawable.icon_dw, 99.95,
"Web and Mobile Design"));
products.add(new Product("Photoshop CC", R.drawable.icon_ps, 74.95,
"Image editing and composite"));
products.add(new Product("Illustrator CC", R.drawable.icon_ai, 28.95,
"Vector Graphics and Illustration"));
products.add(new Product("InDesign CC", R.drawable.icon_id, 58.95,
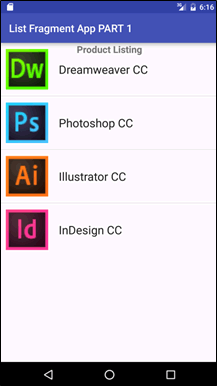
"Print Design and Layout For Print and Digital Publishing"));
}
}
Create Product Array Adapter Class
This class is an extension of the ArrayAdapter class that uses a class named Product. It takes an array list of product objects and then displays each product using a layout.
- Right-click on the com.example.listfragmentapppart1 package and select New > Java Class.
- In the Create New Class dialog box that appears, enter ProductArrayAdapter in the Name text field and the click the OK button.
- In the ProductArrayAdapter.java file that opens, delete the comment and extend the ArrayAdapter super class by typing extends ArrayAdapter<Product> and then add the two private classes listed below:
public class ProductArrayAdapter extends ArrayAdapter<Product> {
private Context context;
private List<Product> objects;
}
- After the private fields, right-click and select Generate… (or press ALT+INSERT) and choose Constructor from the menu and in the Choose Super Class Constructor dialog box that appears select the fifth option highlighted below and then click the OK button.
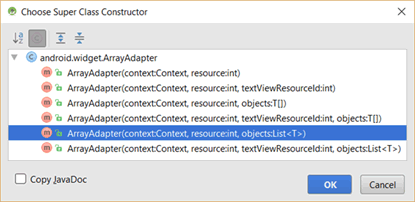
NOTE: Notice the Choose Super Class Constructor dialog box appears instead of the Choose Fields to Initialize by Constructor dialog box because the ProductArrayAdapter class is being extended by the ArrayAdapter super class.
- In the Choose Fields to Initialize by Constructor dialog box that appears this time click on the Select None button to deselect all fields and to write the code.
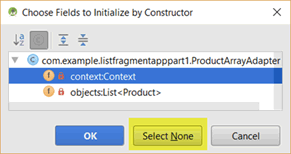
public ProductArrayAdapter(Context context, int resource, List<Product> objects) {
super(context, resource, objects);
}
- Add the following highlighted code in the ProductArrayAdapter constructor:
public ProductArrayAdapter(Context context, int resource, List<Product> objects) {
super(context, resource, objects);
this.context = context;
this.objects = objects;
}
- BELOW the constructor, type getView and press the ENTER key to write the following code to override the ArrayAdapter getView() method:
public View getView(int position, View convertView, ViewGroup parent) {
return super.getView(position, convertView, parent);
}
- In the Override method ABOVE the return statement, add the following highlighted code:
@Override
public View getView(int position, View convertView, ViewGroup parent) {
Product product = objects.get(position);
LayoutInflater inflater =
(LayoutInflater) context.getSystemService(Activity.LAYOUT_INFLATER_SERVICE);
View view = inflater.inflate(R.layout.product_detail, null);
ImageView image = (ImageView) view.findViewById(R.id.ivProductImage);
image.setImageResource(product.getImageResource());
TextView textview = (TextView) view.findViewById(R.id.tvProductName);
textview.setText(product.getProductName());
return super.getView(position, convertView, parent);
}
}
- Replace the current return statement (e.g., return super.getView(position, convertView, parent);) with return view:
TextView textview = (TextView) view.findViewById(R.id.tvProductName);
textview.setText(product.getProductName());
return view;
}
}
Create Java To Display List
Some adding Java code is needed to display the product items in the ListView on the Master Page.
- In the MainProduct.java file, write the following highlighted code ABOVE the constructor class:
List<Product> products = new ProductData().getProducts();
public MainFragment() extends ListFragment {
}
CODE EXPLANATION:
A list of product objects is created by declaring a List (List<Product> products) and then the data is assigned by instantiating the ProductData class and the getProducts() method is called. In a production app, you could replace this code with a local database or web service.
- Click on Product and ProductData and press ALT+ENTER and select import class for both.
- Click BELOW the constructor class and type onCreate and press the ENTER key to automatically create an override for the onCreate() method:
public MainFragment() {
}
@Override
public void onCreate(Bundle savedInstanceState) {
super.onCreate(savedInstanceState);
}
- BELOW the super.onCreate() method, add the following highlighted code:
@Override
public void onCreate(Bundle savedInstanceState) {
super.onCreate(savedInstanceState);
ProductArrayAdapter adapter = new ProductArrayAdapter(getActivity(),
R.layout.product_detail,
products);
setListAdapter(adapter);
}
CODE EXPLANATION:
- An instance of the ProductArrayAdapter class named adapter was instantiated which takes three agruments:
- context—a reference to the current activity is called by the getActivity() method
- resource—the XML layout ID used to display each item in the ListView (e.g, R.layout.product_detail)
- data—products
- The setListAdapter is used to set the custom adapter object. As the fragment get loaded in the activity_main.xml file, the data is retrieved and displayed in the ListView.