List Fragment App
PART 3: Communicate Between Activities and Fragments
Now, we are ready to create the detail fragment that displays detail information for each selected list item.
Prep for Part 3
- Copy the ListFragmentAppPart2 and paste it in the same directory as ListFragmentAppPart3.
- Open ListFragmentAppPart3 in Android Studio.
- Right-click on the package and select Refactor > Rename… and change the 2 to 3 on the package name: com.example.productdirectoryapppart3 and then click the OK button.
- In the strings.xml file change the 2 to 3 for the app name attribute:
<string name="app_name">ListFragmentApp Part 3</string>
Modify activity_main.xml
Modify the activity_main.xml file with the following highlighted code:
<FrameLayout xmlns:android="http://schemas.android.com/apk/res/android"
xmlns:tools="http://schemas.android.com/tools"
android:id="@+id/activity_main”
android:layout_width="match_parent"
android:layout_height="match_parent"
tools:context=".MainActivity">
<fragment
android:id="@+id/listFragment"
android:name="com.example.listfragmentapppart3tr.ProductListFragment"
android:layout_width="fill_parent"
android:layout_height="fill_parent"
tools:layout="@layout/product_list_fragment"/>
</FrameLayout>
MARKUP EXPLANATION:
- A fragment element and its attributes has been added to include the product_list_fragment into the main_activity.
Add Detail Fragment
We need to add two new layout files and their corresponding java classes for the detail fragment.
ADD DRAWING HERE TO DEPICT WHAT WE WILL BE DOING
Create activity_product_detail.xml
- Click on the layout folder to create another layout file
- In the New Resource File dialog box that appears, give it a File Name of activity_product_detail and a Root Element of FrameLayout and then click the OK button.
- In the Text View, add the following highlighted code:
<?xml version="1.0" encoding="utf-8"?>
<FrameLayout xmlns:android="http://schemas.android.com/apk/res/android"
android:layout_width="match_parent"
android:layout_height="match_parent"
android:id="@+id/detailContainer"
tools:context=".MainActivity">
</FrameLayout>
- Press ALT+CLICK inside of the word tools to insert the following attribute to the opening FrameLayout element:
xmlns:tools="http://schemas.android.com/tools"
NOTE: This is a container for a product_detail_fragment.xml file that will be created next.
Create product_detail_fragment.xml
- Click on the layout folder and create another layout file
- In the New Resource File dialog box that appears, give it a File name of product_detail_fragment and a Root Element of LinearLayout and then click the OK button:
- In the Text View, add or modify the following highlighted markup:
<?xml version="1.0" encoding="utf-8"?>
<LinearLayout xmlns:android="http://schemas.android.com/apk/res/android"
android:id="@+id/detailContainer"
android:layout_width="fill_parent"
android:layout_height="fill_parent"
android:layout_margin="@dimen/activity_horizontal_margin"
android:gravity="center_horizontal"
android:orientation="vertical"
android:paddingTop="10dp">
<TextView
android:id="@+id/tvFlowerName"
android:layout_width="wrap_content"
android:layout_height="wrap_content"
android:layout_marginBottom="20dp"
android:text="@string/placeholder"
android:textAppearance="?android:attr/textAppearanceLarge"
android:textStyle="bold" />
<ImageView
android:id="@+id/ivFlowerImage"
android:layout_width="wrap_content"
android:layout_height="wrap_content"
android:layout_marginBottom="20dp"
android:contentDescription="@string/placeholder"
android:src="@drawable/california_snow" />
<TextView
android:id="@+id/tvInstructions"
android:layout_width="wrap_content"
android:layout_height="wrap_content"
android:layout_marginBottom="20dp"
android:layout_marginLeft="30dp"
android:layout_marginRight="30dp"
android:text="@string/placeholder" />
<TextView
android:id="@+id/tvPrice"
android:layout_width="wrap_content"
android:layout_height="wrap_content"
android:text="@string/placeholder"
android:textAppearance="?android:attr/textAppearanceLarge"
android:textStyle="bold" />
</LinearLayout>
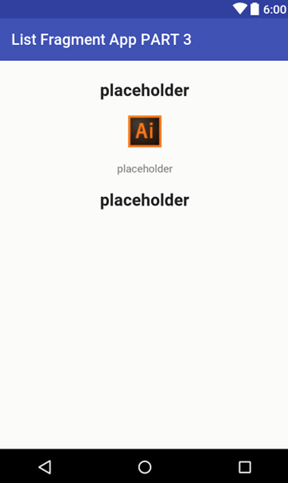
NOTE: This layout has three TextViews and one ImageView that will display details of the selected product object. Next, we will create the Java files for each of these two layouts. Notice that BOTH the activity_product_detail.xml and the product_detail_fragment.xml has the same id (e.g., android:id="@+id/detailContainer").
- CHECK POINT: Change to Design View. You will see the “placeholders” text and images shown:
Create ProductDetailActivity.java
This file has code to display the fragment using the Fragment manager and its associated methods. It also has code to return to the previous activity, if this activity has been opened using an intent and will return to the ORIGINAL activity using a finish() method.
- Right-click on the package (e.g., com.example.listfragmentapppart2) and select New > Class from the menu.
- In the Create New Class dialog box that appears, give it a name of ProductDetailActivity and then click the OK button.
- Delete the comment and then add the following highlighted code:
[ ADD DETAIL STEPS ON HOW TO CREATE THE CLASS LATER]
package com.example.listfragmentapppart2;
import android.app.Activity;
import android.os.Bundle;
import android.view.MenuItem;
// This activity is only used in single pane mode
public class ProductDetailActivity extends Activity {
@Override
protected void onCreate(Bundle savedInstanceState) {
super.onCreate(savedInstanceState);
setContentView(R.layout.activity_product_detail);
getActionBar().setDisplayHomeAsUpEnabled(true);
if (savedInstanceState == null) {
// Create the fragment, set its args, add it to the detail container
ProductDetailFragment fragment = new ProductDetailFragment();
getFragmentManager().beginTransaction()
.add(R.id.detailContainer, fragment)
.commit();
}
}
// Returns to the list activity
@Override
public boolean onOptionsItemSelected(MenuItem item) {
if (item.getItemId() == android.R.id.home) {
finish();
}
return true;
}
}
- From the main menu, select Build > Rebuilt Project so that the red “R” errors disappears.
NOTE: Like the Master Page that used two layouts and two Java files; likewise, the Detail Page need the same structure:

Create ProductDetailFragment.java
This file has all of the code to take a product object and display its information in the three TextViews and one ImageView component.
- Right-click on the package (e.g., com.example.listfragmentapppart2) and select New > Class from the menu.
- In the Create New Class dialog box that appears, give it a name of ProductDetailFragment and then click the OK button.
- Delete the comment and then add the following highlighted code:
[ ADD DETAIL STEPS ON HOW TO CREATE THE CLASS LATER]
package com.example.listfragmentapppart2;
import android.app.Fragment;
import android.os.Bundle;
import android.view.LayoutInflater;
import android.view.View;
import android.view.ViewGroup;
import android.widget.ImageView;
import android.widget.TextView;
import com.example.listfragmentapppart2tr.data.Product;
import java.text.NumberFormat;
public class ProductDetailFragment extends Fragment {
Product product;
public ProductDetailFragment() {}
@Override
public View onCreateView(LayoutInflater inflater, ViewGroup container, Bundle savedInstanceState) {
// Load layout
View view = inflater.inflate(R.layout.product_detail_fragment, container, false);
if (product != null) {
// Display ImageView, TextViews and format number.
TextView tvName = (TextView) view.findViewById(R.id.tvProductName);
tvName.setText(product.getProductName());
TextView tvInstructions = (TextView) view.findViewById(R.id.tvInstructions);
tvInstructions.setText(product.getInstructions());
NumberFormat fmt = NumberFormat.getCurrencyInstance();
TextView tvPrice = (TextView) view.findViewById(R.id.tvPrice);
tvPrice.setText(fmt.format(product.getPrice()));
ImageView ivPicture = (ImageView) view.findViewById(R.id.ivProductImage);
ivPicture.setImageResource(product.getImageResource());
}
return view;
}
}
- From the main menu, select Build > Rebuilt Project so that the red “R” errors disappears.
SCREENSHOT GOES HERE....
Use Callback Methods (Theory only)
The code to handle a touch event using fragments is different than when using just activities because the top-level activity is no longer a ListView activity. The communication BETWEEN the fragment and activity has to be HANDLED first in the fragment which tells the main activity what event just happened. This process is called callback and it is akin to a concept in other programming languages called bubbling where the event bubbles up the chain of objects.
To pass data to a fragment, you use arguments. This is similar to passing arguments to functions or methods. The code would look something like this:
Bundle bundle = myProduct.toBundle();
ProductDetailFragment fragment = new ProductDetailsFragment():
fragment.setArguments(bundle);
// Add fragment here…
CODE EXPLANATION:
- A bundle is a set of name/value pairs that can be create manually or programmatically by calling the toBundle() method of a data object which takes all of its private field values and “bundles” them together and returns a bundled object.
- An instance of the fragment class is created and then the bundled object is passed to the fragment with the setArguments() method which is a method of the Fragment class.
When working with an activity, data is passed back through an intent. However, when working with a fragment that is INSIDE of an activity, the fragment cannot be loaded by an intent but by another activity. Hence, a callback has to be use to NOTIFY the activity of an event and to pass back data if needed.
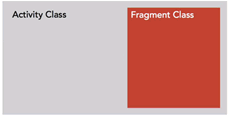
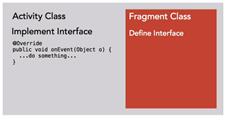
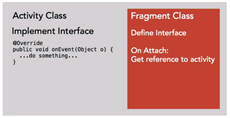
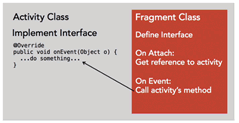
It best to demonstrate how a callback works with a fragment and an activity with some visuals:
[REPLACE WITH MY OWN SCREENSHOTS FOR EACH]
- Code needs to be added to Activity class AND the Fragment class that is INSIDE of the Activity class to create a CONTRACT between the two.
- First, an interface is DEFINED in the Fragment Class with abstract method(s) that are used to NOTIFY the activity that an event happened and optionally pass data back to that activity if needed.
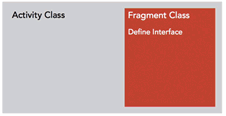
- Next, the interface is IMPLEMENTED in the Activity Class using the implements key word. Then, the @Override annotation and a SIGNATURE of the callback method is used that MATCH the abstract DEFINITION from the Fragment Class. So, in essence, a CONTRACT is created between the Fragment and the Activity class—the fragment’s abstract method will NOTIFY the activity when an event occurs and the implementation of that method in the activity will LISTEN for that event. For example, when a user click on a ListView item that is part of the fragment, the fragment will notify the activity that the click occurred.
- However, to call the activity implementation, a reference to the activity object needs to be created using the onAttach() method which also is a method of the Fragment class that is automatically called by the framework that can be saved locally so that it persists for the lifetime of the fragment.
- Next, when an event (e.g., click/touch) happens, the Fragment Class calls the Activity’s onEvent() method and execute code in its code block and passes data back if necessary.
Create ProductListFragment.java
Create ProductListFragment.java. [ADD MORE DETAIL HERE]
- Right-click on the package (e.g., com.example.listfragmentapppart3) and select New > Class from the menu.
- In the Create New Class dialog box that appears, give it a name of ProductListFragment and then click the OK button.
- Delete the comment and then add the following highlighted code:
[ADD DETAIL STEPS LATER ON HOW TO CREATE THE CLASS]
package com.example.listfragmentapppart3;
import android.app.ListFragment;
import android.os.Bundle;
import android.view.LayoutInflater;
import android.view.View;
import android.view.ViewGroup;
import com.example.listfragmentapppart3tr.data.Product;
import com.example.listfragmentapppart3tr.data.ProductData;
import java.util.List;
public class ProductListFragment extends ListFragment {
List<Product> products = new ProductData().getProducts();
public ProductListFragment() {
}
@Override
public void onCreate(Bundle savedInstanceState) {
super.onCreate(savedInstanceState);
ProductArrayAdapter adapter = new ProductArrayAdapter(getActivity(),
R.layout.product_list_item, products);
setListAdapter(adapter);
}
@Override
public View onCreateView(LayoutInflater inflater, ViewGroup container, Bundle savedInstanceState) {
View rootView = inflater.inflate(R.layout.product_list_fragment, container, false);
return rootView;
}
}
CODE EXPLANATION:
- ADD EXPLANATION OF CODE LATER.
Implement A Callback Interface
Currently, the ListView is inside of the fragment which is inside of the activity. We want to write a callback method that will implement code so that when a user select a ListView item, it will:
- open a new activity with a fragment or
- load another fragment in the same activity
Create product_list_item.xml
Create product_list_image layout. [ADD MORE DETAIL HERE]
- Right-click on the layout folder and in the New Resource File dialog box that appears, enter product_list_image for the File Name and RelativeLayout for the Root Element and then click the OK button.
- In the product_list_item file that appears, add the following highlighted markup:
<?xml version="1.0" encoding="utf-8"?>
<RelativeLayout xmlns:android="http://schemas.android.com/apk/res/android"
android:layout_width="match_parent"
android:layout_height="wrap_content"
android:background="?android:attr/activatedBackgroundIndicator"
android:paddingBottom="10dp" >
<ImageView
android:id="@+id/ivProductImage"
android:layout_width="80dp"
android:layout_height="80dp"
android:layout_alignParentLeft="true"
android:layout_alignParentTop="true"
android:layout_margin="10dp"
android:contentDescription="@string/placeholder" />
<TextView
android:id="@+id/tvProductName"
android:layout_width="wrap_content"
android:layout_height="wrap_content"
android:layout_centerVertical="true"
android:layout_marginLeft="10dp"
android:layout_toRightOf="@+id/ivProductImage"
android:text="@string/placeholder"
android:textAppearance="?android:attr/textAppearanceLarge" />
</RelativeLayout>
Create product_list_fragment.xml
Create product_list_fragment layout. [ADD MORE DETAIL HERE]
- Right-click on the layout folder and in the New Resource File dialog box that appears, enter product_list_fragment for the File Name and RelativeLayout for the Root Element and then click the OK button.
- In the product_list_fragment file that appears, add the following highlighted markup:
<?xml version="1.0" encoding="utf-8"?>
<RelativeLayout xmlns:android="http://schemas.android.com/apk/res/android"
xmlns:tools="http://schemas.android.com/tools"
android:layout_width="match_parent"
android:layout_height="match_parent"
android:paddingLeft="@dimen/activity_horizontal_margin"
android:paddingRight="@dimen/activity_horizontal_margin"
android:paddingTop="@dimen/activity_vertical_margin"
android:paddingBottom="@dimen/activity_vertical_margin"
tools:context=".MainActivity">
<ListView
android:id="@android:id/list"
android:layout_width="match_parent"
android:layout_height="wrap_content">
</ListView>
</RelativeLayout>
Set Up A Callback
A contract will be set up between the fragment and the activity to declare an interface in the fragment.
- In the ProductListFragment.java file add the following highlighted interface and abstract methods BELOW the onCreateView method() code block to create the first size of the contract:
@Override
public View onCreateView(LayoutInflater inflater,
ViewGroup container,
Bundle savedInstanceState) {
View rootView = inflater.inflate(R.layout.product_list_fragment, container, false);
return rootView;
}
public interface Callbacks {
public void onItemSelected(Product product);
}
CODE EXPLANATION:
- The interface describes the abstract method that will be called.
- The abstract method onItemSelected is designed to be implemented by the containing activity is used to notify the activity when a user selects an item from the ListView in this fragment. Then, a reference is passed (e.g., Product product) to the data object that was selected, which is an instance of the Product class.
- In the MainActivity.java class that contains the list fragment, add the following highlighted code to establish the second part of the contract:
public class MainActivity extends AppCompatActivity
implements ProductListFragment.Callbacks {
public static final String PRODUCT_BUNDLE = "PRODUCT_BUNDLE";
public static final int REQUEST_CODE = 1001;
CODE EXPLANATION:
- The implements key word followed by the name of the class (e.g., ProductListFragment), a dot and then the callback interface name (e.g., Callbacks) was added to the class declaration which is a member of the Fragment class.
- The two constants will be used later.
- Click INSIDE of the word implements and then press ALT+ENTER keys and choose Implement Methods from the menu. In the Select Methods to Implements dialog box that appears, select the onItemSelected abstract method that was defined earlier and then click the OK button to create the method at the bottom of the class.
@Override
public void onItemSelected(Product product) {
}
- Add the following highlighted code to the onItemSelected() method to take the prduct object and pass it to the detail fragment:
public void onItemSelected(Product product) {
Bundle bundle = product.toBundle();
Intent intent = new Intent(this, ProductDetailActivity.class);
intent.putExtra(PRODUCT_BUNDLE, bundle);
startActivityForResult(intent, REQUEST_CODE);
}
TIP: CTRL+click on the toBundle() phrase to go to the Product.java file to see where the Bundle is implemented.
CODE EXPLANATION:
- To get to the detail fragment a reference we have to go THROUGH the detail activity. To do this, a reference to the bundle object is made that represents all of the product objects data by creating a Bundle name bundle and get its reference product.toBundle. To toBundle method is a custom method of the product class that wraps all of the private field data in a bundle and returns it.
- A new Intent object named intent is created with the class constructor method and is passed two arguments—the context (e.g., this) and the class property (e.g., ProductDetailActivity.class).
- The data is passed using intent.putExtra and is passed two arguments—a bundle constant declared at the top of the class (e.g., PRODUCT_BUNDLE) and the bundle object (e.g., bundle) that we just got a reference to.
- The startActivityResult method is used to get a result when the activity is started and is passed two arguments—the intent object (e.g., intent) and the request code constant (e.g., REQUEST_CODE) that was created at the top of the class.
- Both set of this code NOW fulfill the contrast. However, there is still no communicate between the fragment and the activity. T\hat will be done next.
- Go back to the ProductListFragment.java file and enter the cursor BELOW the Callbacks method code block, type onListItemClick and then press the Enter key to create the following highlighted code:
public interface Callbacks {
public void onItemSelected(Product product);
}
@Override
public void onListItemClick(ListView l, View v, int position, long id) {
super.onListItemClick(l, v, position, id);
}
CODE EXPLANATION:
- This code will implement the method onItemClick that is a member of the ListFragment class that will automatically be triggered when the user select a List item.
- Delete the super class method and add the following highlighted code:
@Override
public void onListItemClick(ListView l, View v, int position, long id) {
Product product = products.get(position);
}
CODE EXPLANATION:
- This code get a reference to the product object that was selected using products.get() and pass it a position argument of the item that is clicked.
- Add the following private field at the top of the class to create a reference to that activity class that will be an implementation of the callbacks interface.
public class ProductListFragment extends ListFragment {
List<Product> products = new ProductData().getProducts();
private Callbacks activity;
- At the bottom of the code, BELOW the onListItemClick() method code block, type onAttach and press the Enter key and add the following highlighted code.
public void onListItemClick(ListView l, View v, int position, long id) {
Product product = products.get(position);
}
@Override
public void onAttach(Context context) {
super.onAttach(context);
this.activity = activity;
}
CODE EXPLANATION:
- This method will be an override of the onAttach() method which is passed a reference to the current activity (Context context).
- Move the cursor over the activity argument and press ALT+ENTER to explicitly cast the type to CallBacks.
@Override
public void onAttach(Activity activity) {
super.onAttach(activity);
this.activity = (CallBacks) activity;
}
- In the onListItemClick() method, add the following highlighted code:
public void onListItemClick(ListView l, View v, int position, long id) {
Product product = products.get(position);
activity.onItemSelected(product);
}
CODE EXPLANATION:
- The onItemSelected method is passed the product object.
- Open the AndroidManifest.xml file and add the following markup below the current activity:
</activity>
<activity android:name=".ProductDetailActivity" />
</application>
NOTE: All activity needs to be declared in the manifest file so that it can be registered with the app.
- CHECK POINT: Run the app in an emulator. If you click on one of the item, you should be taken to the “detail” page. However, it is currently only showing placeholders. In the next section we will see how to pass arguments to the detail activity. The detail activity contains the detail fragment.
Pass Arguments To Fragment
Now that we know the theory of using a callback, let’s see how to:
- send data to a fragment using arguments
- send data back to the activity using a callback method
- Open the ProductDetailActivity.java file and add the following highlighted code:
if (savedInstanceState == null) {
// Create the fragment, set its args, add it to the detail container
ProductDetailFragment fragment = new ProductDetailFragment();
Bundle bundle = getIntent().getBundleExtra(MainActivity.PRODUCT_BUNDLE);
fragment.setArguments(bundle);
getFragmentManager().beginTransaction()
.add(R.id.detailContainer, fragment)
.commit();
}
CODE EXPLANATION:
- In the ProductDetailFragment file, there is a private field (e.g., Product product) which is an instance of the Product class and there is code that changes the text views and the image view if the product object is not null. However, the product object has to be instantiated.
- A bundle is create (e.g., Bundle bundle) to receive the bundle of data that is sent FROM the MainActivity.java file as a BundleExtra with a constant of ProductBundle as a key and then passed TO the fragment in this file. Hence, if a bundle is PUT as an Extra, it can be RETRIEVE as an Extra.
- The bundle is declared (e.g., Bundle bundle) and a reference to it is made (e.g, getIntent.getBundleExtra) and pass the bundle as an argument.
- The name of the Extra is MainActivity.PRODUCT_BUNDLE which is a constant from the MainActivity.java class so that it can be passes directly to the fragment.
- The fragment (e.g., named fragment) use the setArgument() method to pass in the bundle.
- Open the ProductDetailFragment.java file and type onCreate and press the ENTER key to add the following highlighted code:
public ProductDetailFragment() {}
@Override
public void onCreate(Bundle savedInstanceState) {
super.onCreate(savedInstanceState);
}
CODE EXPLANATION:
- The arguments need to be received and the best place to do that is in the onCreate() method, so this code creates and override to the onCreateI() method.
- Add the following highlighted code to the onCreate() method:
@Override
public void onCreate(Bundle savedInstanceState) {
super.onCreate(savedInstanceState);
Bundle bundle = getArguments();
if (bundle != null && bundle.containsKey(Product.PRODUCT_NAME)) {
product = new Product(bundle);
)
}
CODE EXPLANATION:
- This code is placed after the call to the super class to AGAIN declare a bundle (e.g., ) and get its reference by calling the getArguments() method which is a method of the Fragment class.
- A conditional statement is used to check if the bundle is not null AND ensure that the bundle has a key value by using the containsKey() method and passing it a constant from the Product class (Product.PRODUCT_NAME) of one of the name that it must have. If the key exist that means a single instance of the Product class is available and a new product object can be created using the new constructor method and passing it the bundle.
- CHECK POINT: Run the app in an emulator. If you click on any one of the item you should be taken to the “detail” page. However, this time, you should see the actual data instead of the placeholders. Repeat the step several times to see some of the other items. So far, two ways of communicating between the activities and fragments were discussed:
- Using a callback method to communicate from the list activity back up to the MainActivity to tell it that the user had selected an item from the list.
- Passing data to the detail fragment using arguments when it is opened.
Detect Dual-pane Layout
Currently, there are TWO layout files for the “main” activity—activity_main.xml for small screen (e.g., smart phones) and activity_main.xml (sw600) for large screens (e.g., tablets) which has a fragment element AND a FrameLayout element with an id of detailFragment.
It is important to note that for a small layout that ONE fragment REPLACES the main activity; whereas, on a large layout TWO fragments get LOADED into the main activity layout.
- Right-click on the values folder and then click New > Values resource file, give it a name of layout and then add the following highlighted code:
<?xml version="1.0" encoding="utf-8"?>
<resources>
<item name="activity_main" type="layout">@layout/activity_main_large</item>
</resources>
CODE EXPLANATION:
- The layout selection is automatic based on the resource aliases that is added. In the values large folder, it is referencing the activity_main_large.
- At runtime, the Android framework looks at these resources. If it is a larger screen, it chooses activity_main_large. If it is a small screen, it chooses activity_main. Next, we need to programmatically select a layout by finding out which layout exist by checking for the id of detail_container. If the returned value is no that means a small screen is being used. But if this id return true, a large tablet is being used.
- Right-click on the layout folder and then click New > Resource layout file from the menu, give it a name of active_main_large.xml and then add the following highlighted code:
[MAY BE ABLE TO USE THE OTHER FILE (activity_main.xml (sw600)) INSTEAD. CHECK BEFORE DOING THE FOLLOWING CODE!!!!!]
<?xml version="1.0" encoding="utf-8"?>
<LinearLayout xmlns:android="http://schemas.android.com/apk/res/android"
xmlns:tools="http://schemas.android.com/tools"
android:id="@+id/myContainer"
android:layout_width="match_parent"
android:layout_height="match_parent"
tools:context=".MainActivity"
android:orientation="horizontal">
<fragment
android:id="@+id/listFragment"
android:name="com.example.listfragmentapppart3tr.ProductListFragment"
android:layout_width="0dp"
android:layout_weight="1"
android:layout_height="fill_parent"
tools:layout="@layout/product_list_fragment"/>
<FrameLayout
android:id="@+id/detailContainer"
android:layout_width="0dp"
android:layout_weight="1"
android:layout_height="fill_parent">
</FrameLayout>
</LinearLayout>
- In the MainActivity.java file, add the following highlighted code:
public class MainActivity extends AppCompatActivity implements ProductListFragment.Callbacks
{
public static final String PRODUCT_BUNDLE = "PRODUCT_BUNDLE";
public static final int REQUEST_CODE = 1001;
private boolean isTwoPane = false;
@Override
protected void onCreate(Bundle savedInstanceState) {
super.onCreate(savedInstanceState);
setContentView(R.layout.activity_main);
if(findViewById(R.id.detailContainer) != null)
{
isTwoPane = true;
}
CODE EXPLANATION:
- A private Boolean variable was added with a value of isTwoPane and set to false which is the default but added to make it more readable.
- In the onCreate() method an “if” statement was added to check after the activity starts and the layout is loaded to find out which layout was selected. If the return value is not null that means the large layout was loaded and the value isTwoPane will be set to true. Next, now that we can set the state programmatically to determine which layout has been loaded, we can change the layout accordingly.
- In the MainActivity.java file, modify the code to read the following highlighted code:
@Override
public void onItemSelected(Product product) {
Bundle bundle = product.toBundle();
if (isTwoPane) {
ProductDetailFragment fragment = new ProductDetailFragment();
fragment.setArguments(bundle);
getFragmentManager().beginTransaction()
.replace(R.id.detailContainer, fragment)
.commit();
} else {
Intent intent = new Intent(this, ProductDetailActivity.class);
intent.putExtra(PRODUCT_BUNDLE, bundle);
startActivityForResult(intent, REQUEST_CODE);
}
}
CODE EXPLANATION:
- In the onItemSelected() callback method, an if statement was added to check if isTwoPane is true and if so do the selected code block.
- When a user selects an item form the List fragment, it calls back to the activity and passes the selected product and the behavior will change depending on which layout is used. - In the “if” statement, if the condition is true (e.g., large layout), we don’t want to create another intent but instead create an instance of the product_detail fragment called fragment and instantiate it with it no arguments constructor.
- The bundle that was created earlier from the product object is passed to the fragment.setArguments.
- The getFragmentManager is called beginTransaction is set to it.
- The existing container is REPLACED with the fragment using the replace() method and the fragment is passed into it.
- The commit() method is invoked.
- The current code that is using intent to open a separate activity is moved into the “else” clause of the “if” statement.
- CHECK POINT: Run the app in an emulator using a large device (e.g., tablet). You should see that if you click on one of the list item, detail information about that item is displayed on the SAME screen and the list view. In essence, the fragment is instantiating and pass data to it as arguments and then the existing container is replaced with the fragment and opens on the right side of the screen. If you view the same app on a small device, the intent system is used to open a SEPARATE activity.