List Fragment App
PART 2: Layouts For Multiple Screen
When an app is created for multiple screens, you can write Java code to determine how the app displays at runtime based on the device dimensions and change its layout accordingly.
Prep for Part 2
- Copy the ListFragmentAppPart1 and paste it in the same directory as ListFragmentAppPart2.
- Open ListFragmentAppPart2 in Android Studio.
- Right-click on the package and select Refactor > Rename… and change the 1 to 2 on the package name: com.example.productdirectoryapppart2 and then click the OK button.
- In the strings.xml file, change the 1 to 2 for the app name attribute:
<string name="app_name">ListFragmentApp Part 2</string>
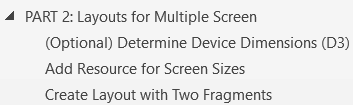
(Optional) Determine Device Dimensions (D3)
The steps below are used to create a utility class that will calculate the current device’s device independent dimensions (physical width and height in pixel) and display it.
- Right-click on the com.example.listfragmentapppart2 package and select New > Package and in the New Package dialog box that appears, enter utilities and then click the OK button.
NOTE: It is common practice to create a separate folder for helper or utilities class in a project.
- Right-click on the newly created package (utilities) and select New > Java Class and in the New Java Class dialog box that appears, enter DimensionUtility and then click the OK button:
public class DimensionUtility {
}
- Remove the comment and then add the following three highlighted private fields:
import android.app.Activity;
public class DimensionUtility {
private Activity activity;
private float dpWidth;
private float dpHeight;
}
NOTE: Notice the import android.app.Activity that was added.
- Click BELOW the private fields and then right-click and select Generate… (or ALT+INSERT) and then select Constructor and in the Choose Fields to Initialize by Constructor dialog box that appears, select ONLY the activity field and then press the OK button to create a constructor method:
public DimensionUtility(Activity activity) {
this.activity = activity;
}
- Click BELOW the constructor and then right-click and select Generate… (or ALT+INSERT) and then select getter from the menu.
- In the Select Fields to Generate Getters dialog box that appear, select the width and height fields and then press the OK button to automatically generate two getter methods.
public float getDpWidth() {
return dpWidth;
}
public float getDpHeight() {
return dpHeight;
}
- BELOW this.activity = activity, write the following highlighted Java code:
public DimensionUtility(Activity activity) {
this.activity = activity;
Display display = activity.getWindowManager().getDefaultDisplay();
DisplayMetrics outMetrics = new DisplayMetrics();
display.getMetrics(outMetrics);
float density = activity.getResources().getDisplayMetrics().density;
dpHeight = outMetrics.heightPixels / density;
dpWidth = outMetrics.widthPixels / density;
}
CODE EXPLANATION:
- The first part of the code retrieves the width and height in pixels that matches the device physical pixel.
- The displayMetrics() method get the screen density by dividing the physical pixels by the density to yield the device independent pixels.
- The class is designed to calculate the DP width and height on instantiation. Then, you can use the two public methods getDpWidth and getDpHeight to return their values.
- In the MainActivity.java class, add the following highlighted code in the onCreate() method to use the utility class:
protected void onCreate(Bundle savedInstanceState) {
super.onCreate(savedInstanceState);
setContentView(R.layout.activity_main);
MainFragment fragment = new MainFragment();
getFragmentManager()
.beginTransaction()
.add(R.id.activity_main, fragment)
.commit();
DimensionUtility utility = new DimensionUtility(this);
String deviceDimension = "Your device dimension is: " + utility.getDpWidth() + "W x " + utility.getDpHeight() + "H";
Toast.makeText(this, deviceDimension, Toast.LENGTH_LONG).show();
}
CODE EXPLANATION:
- The DimensionUtiltiy class will be instantiated when the app is created. It is named utility and is passed the current activity (this).
- A String class output is create to concatenate a message to be displayed in a Toast message using a series of literal string and variables formed from the utility.getDpWidth() and utility.getDpHeight() methods.
- CHECK POINT: Run the app in an emulator using a small device (phone) AND large device (tablet). You should see the Toast message displayed when the app loads. If you rotate the app, you see the Toast message again; however, the width and height will be swapped.
Add Resource For Screen Sizes
When working with multiple screen sizes, Android can choose which layout to use based on alternative XML layout resource files in specific folders for given screen sizes. You can provide a different UI layout for:
- language and region (e.g., en, fr)
- layout direction (e.g., ldrtl, ldltr) where ldrtl is layout direction right-to-left and ldltr is layout direction left-to-right
- smallest width (e.g., sw320dp, sw600dp, sw720dp)
- and more…
For more information, go to: http://developer.android.com/guide/topics/resources/providing-resources.html
- In the Project view (not Android view), right-click on the res folder and select New > Directory and in the New Directory dialog box that appear, enter layout-sw600dp and then press the OK button to create a new folder.
NOTE: The layout-sw600dp means that this layout folder is for screens where the shortest size is at least 600 device pixels.
- In the default layout folder, right-click on the activity_main.xml file and select Copy from the menu.
- Right-click on the newly created alternative folder (e.g., layout-sw600dp) and select Paste and in the Copy dialog box that appears, leave the name the SAME and then click the OK button.
NOTE: The default XML layout folder is for your smaller devices (e.g., phone). The alternative XML layout file will be for your larger devices (e.g., tablet).
- On the TAB at the top of the screen with the name of sw600dp\activity_main that should be opened, change the top-level element from a FrameLayout to a RelativeLayout and assign it a vertical orientation attribute to make the components stack on top of one another. Then, add a TextView with following highlighted attributes:
<?xml version="1.0" encoding="utf-8"?>
<LinearLayout xmlns:android="http://schemas.android.com/apk/res/android"
xmlns:app="http://schemas.android.com/apk/res-auto"
xmlns:tools="http://schemas.android.com/tools"
android:id="@+id/activity_main"
android:layout_width="match_parent"
android:layout_height="match_parent"
tools:context=".MainActivity"
android:orientation="vertical">
<TextView
android:text="LARGE SCREEN DISPLAY"
android:layout_width="match_parent"
android:layout_height="wrap_content"
android:id="@+id/textView"
android:textAlignment="center"
android:textSize="48sp"
android:textStyle="normal|bold" />
</LinearLayout>
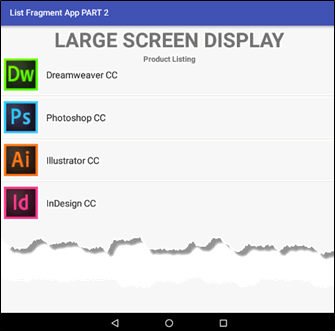
- CHECK POINT: Run the app in an emulator on a small device (phone) and a large device (tablet). You should see that on the small device is displays the same as before; however, when you run the app on a large device, you should see the text “LARGE SCREEN DISPLAY” showing at the top of the device. Hence, Android “served up” the correct layout file based on the screen size. You can add as many layout files as you need based on your project complexity.
Create Layout With Two Fragments
Now that we know how to create multiple resource files for various screen sizes, we will take this concept a step further by create two activities in a single screen for larger devices to complete our concept of Master/Detail with the Master on the right with a ListView and the Detail on the left with “detail” information about the item clicked in the ListView.
- In the default layout/activity_main.xml file inside the FrameLayout element, type <frag, press the ENTER key and type “m” twice to add match_parent to both the layout_width and layout_height attributes and then type “/” to complete the element with a closing tag (/>). Then, add the following additional highlighted attributes:
<FrameLayout xmlns:android="http://schemas.android.com/apk/res/android"
xmlns:tools="http://schemas.android.com/tools"
android:id="@+id/activity_main"
android:layout_width="match_parent"
android:layout_height="match_parent"
tools:context=".MainActivity">
<fragment
android:id="@+id/listFragment"
android:name="com.example.listfragmentapppart2.MainFragment"
android:layout_width="match_parent"
android:layout_height="match_parent"
tools:layout="@layout/fragment_main"/>
</FrameLayout>
XML EXPLANATION:
- This markup will add the fragment using XML which allows us to add some additional attributes easily. However, because the same fragment was added programmatically earlier, it code has to be deleted or commented out.
- The tools:layout="@layout/fragment_main statement is optional but was written so that you can see the layout in Design view. If you delete it, you see that the design view will display rendering problems.
- In the MainActivity.java file, comment out or delete the following highlighted code to remove the programmatic approach in adding the fragment.
protected void onCreate(Bundle savedInstanceState) {
super.onCreate(savedInstanceState);
setContentView(R.layout.activity_main);
/* MainFragment fragment = new MainFragment();
getFragmentManager()
.beginTransaction()
.add(R.id.activity_main, fragment)
.commit(); */
DimensionUtility utility = new DimensionUtility(this);
String deviceDimension = "Your device dimension is: " + utility.getDpWidth() + "W x " + utility.getDpHeight() + "H";
Toast.makeText(this, deviceDimension, Toast.LENGTH_LONG).show();
}
- CHECK POINT: Preview the app in Design view or Text view with the Preview panel opened, you should see the fragment displayed in the activity. However, the data is not showing because it has to be seen in the emulator. Run the app in an emulator and you would see the actual data in the ListView the SAME as before; however, it is being loaded via XML instead of Java code.
- In Text view, COPY all of the highlighted lines for the <fragment> element and then PASTE it in the alternative layout-sw600dp/activity_main.xml file for larger screens and then make the following changes:
- Change the orientation attribute to horizontal because we want to “layout” the fragment side-by-side.
- Change the layout_width from match_parent to 0dp
- Add a layout_weight attribute of 1.
- Delete the TextView component.
<LinearLayout xmlns:android="http://schemas.android.com/apk/res/android"
xmlns:app="http://schemas.android.com/apk/res-auto"
xmlns:tools="http://schemas.android.com/tools"
android:id="@+id/activity_main"
android:layout_width="match_parent"
android:layout_height="match_parent"
tools:context=".MainActivity"
app:orientation="horizontal">
<fragment
android:id="@+id/listFragment"
android:name="com.example.listfragmentapppart2.MainFragment"
android:layout_width="0dp"
android:layout_weight="1"
android:layout_height="match_parent"
tools:layout="@layout/fragment_main"/>
</LinearLayout>
XML EXPLANATION:
- Notice that we did not change the ID attribute because we want to use the same fragment regardless of which layout (or screen size) is loaded—the default (layout/activity_main.xml) or the alternative (layout-sw600dp/activity_main.xml).
- Notice also that the SAME class name is being used too (MainFragment).
- BELOW the <fragment> element, type <Frame and press the ENTER key and then type 0dp for the layout_width and match_parent for the layout_height. Then, add the following attributes:
- layout_weight of 1
- id of detailFragment
- background of #cccccc
<fragment
android:id="@+id/listFragment"
android:name="com.example.listfragmentapppart2.MainFragment"
android:layout_width="0dp"
android:layout_weight="1"
android:layout_height="match_parent"
tools:layout="@layout/fragment_main"/>
<FrameLayout
android:id="@+id/detailFragment"
android:layout_width="0dp"
android:layout_weight="1"
android:background="#cccccc"
android:layout_height="match_parent">
</FrameLayout>
</LinearLayout>
XML EXPLANATION:
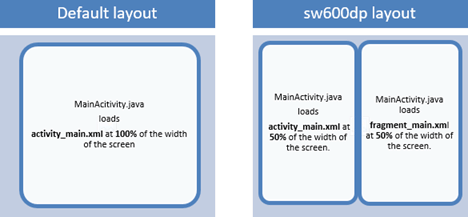
- By setting both components layout_weight to one, they both will take up fifty percent of the screen.
- The background color is optional but was added so that you can see the second fragment better and see how both fragment takes up fifty percent of the screen.
- A layout will be programmatically added to the element later.
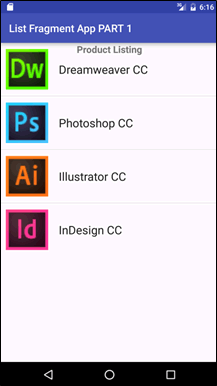
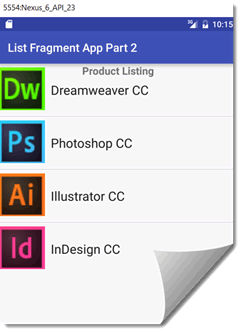
- CHECK POINT: Run the app with two emulators—one with a small screen and one with a large screen. You should see that on a small screen just the ListView is displayed and on a large screen the ListView is displayed on the left side and is taking up fifty percent of the screen while the other fragment is taking up the other fifty percent. Rotate both device and you will see on a small device the ListView EXPAND to take of the whole screen and on the large device the spacing is even more obvious.
Screenshot with Nexus 6:
Screenshot with Nexus 10:
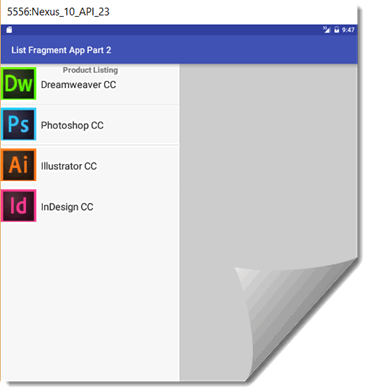
NOTE: activity_main.xml is the SAME for both the default layout and the sw600dp layout EXCEPT the sw600dp activity_main.xml take up 50% of the screen to accommodate the fragment_main.xml which takes up the remaining 50%. It is important to note that the MainActivity.java file loads one or both files depending on which l