Java Tutorial
Android Studio is designed mainly for writing Java for Android apps. However, you can use it to write generic Java code.
Setup For Java Programming
We will set up the Android Studio environment and perform some simply test.
- Create a simple app (See Test Environment)
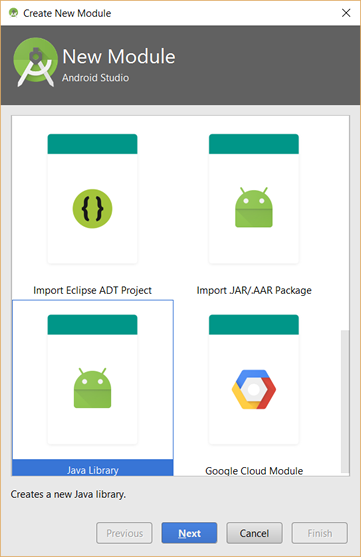
- Select File > New > Module... and in the New Module Window that appears, select Java Library and then click the Next buton.
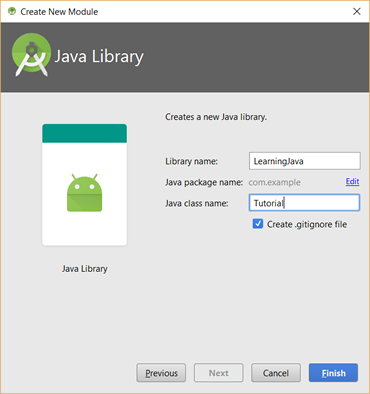
- In the Create New Module that appears, in the Library name field type LearningJava and in the Java class name field type Tutorial and then click the Finish button.
NOTE: This will create a Library and a Class in code when you click the Finish button.
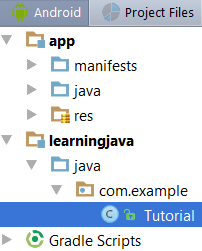
- In the Android View, click the learningjava Module folder and then double-click on the Tutorial class to open it.
- In the Tutorial.java tab that opens, between the two curly braces add a blank line and type psvm and then press the Tab key. This will create the following highlighted code which is a main() method declaration.
NOTE: Typing psvm is a Live Template code that gets expanded when you type it and press the Tab key.
package com.example;

public class Tutorial {
	 public static void main(String[] args) {

	 }
}
CODE EXPLANATION: - The com.example reprsents the package - The key word public class {...} defines the class definition - The public static vodid main(){...} represents the main() method declaration. It is used in this tutorial
to output result in the Run panel. It is NOT used when creating Android Studio apps.
- Between the two curly braces of the main() method declaration code block, type sout and then press the Tab key. This will create the following highlighted code which will create the code to print to the System output console. Then, type Hello, World between the double quotes.
package com.example;

public class Tutorial {
	 public static void main(String[] args) {
			System.out.println("Hello, World");
	 }
}
NOTE: The System.out.println statement is NOT used for Android apps—only for generic Java code. - CHECK POINT: Right-click inside of the previous code and select Run 'Tutorial.main()' from:the menu in the Run panel or press CTRL + SHIFT + F10. After a while you should see "Hello, World" in the Run panel:
ALTERNATIVELY: You can also click on the green Run button on the left side margin of the code window.

TIP: If you want to move this panel to the right of the screen, click on the gear icon () on the top right corner of the Run panel and select Move to > Right from the menu. - CHECK POINT: Change the text "Hello, World" to something else (e.g., "Hello, Cornelius") and then click the green Run button in the Run panel (See screenshot above). You should see the output gets updated.
- Add a String variable and then add another String output statement:
package com.example; public class Tutorial { public static void main(String[] args) {
String myCustomMessage = "This is my custom message."; System.out.println("Hello, World"); System.out.println(myCustomMessage); } } - CHECK POINT: Click the Run button. You should see both:
- the default message (Hello, World) and
- the custom message based on the String variable (This is my custom message.)
Create A Class
We will create a class and its getters and setters. Remember, classes are blueprints (or templates) for an object. They are NOUNS within an app.
- Right-click on the package (com.example) and then select New > Java Class from the menu. In the Create New Class dialog box that appears, in the Name field type a class name (e.g., Player) and then click the OK button:
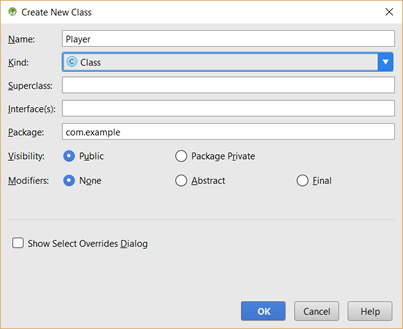
- CHECK POINT: You should see that a Player.java tab was created and some class stub code added to the page.
Create Fields
Fields are used to define what are called field variables. These fields are called properties when creating an object (e.g, myObject.property) using the dot.syntax. To determine what fields are needed, ask yourself the question, "What would be somethings that an object would have?" In the case of a Player class, we used playerName, score, level, and lives. Notice that lives are plural because a player could have more than one life.
- In the class add the following highlighted fields:
public class Player {
  String playerName;
  int score;
  int level;
  int lives;
}
Create A Constructor
Now that we have fields defined, we can create a constructor which is used to INTIALIZE the DEFAULT values of those class variables (e.g., set playerName = "unknown", score=0, level=1, and lives=3) which can be overwritten later.
- After the last class variable, create a constructor using the following highlighted code.
public class Player {
  String playerName;
  int score;
  int level;
  int lives;
  public Player(){
     playerName = "Not yet defined";
     score = 0;
     level = 1;
     lives = 9;
  }
}
Create An Object
Now that we have a class (a blueprint), we can now create an object from it.
- Go back to the Tutorial.java class, delete the code in the main() method declaration code block and type the following highlighted code to create an object.
package com.example; public class Tutorial { public static void main(String[] args) {
Player Cornelius = new Player();
System.out.println("What is player name? " + Cornelius.playerName);
System.out.println("What is game score? " + Cornelius.score);
System.out.println("What is game level? " + Cornelius.level);
System.out.println("How many lives does the player have? " + Cornelius.lives);} } - CHECK POINT: Click the Run button. You should see the following result in the Run panel:
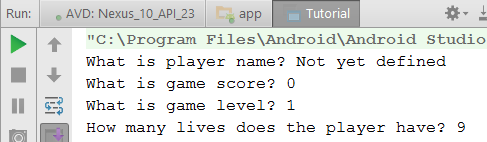
- Add the following highlighted code below the previous highlighted code:
package com.example;

public class Tutorial {
	 public static void main(String[] args) {
  Player Cornelius = new Player();
  System.out.println("What is player name? " + Cornelius.playerName);
  System.out.println("What is game score? " + Cornelius.score);
  System.out.println("What is game level? " + Cornelius.level);
  System.out.println("How many lives does the player have? " + Cornelius.lives);}
  Cornelius.playerName = "Cornelius";
  System.out.println("What is player name? " + Cornelius.playerName);
}
CODE EXPLANATION: - The constructor is used to set the INITIAL VALUE(S) of a class. However, you can change those initial values at any time after the object is created through properties. However, using the above approach is not a good programming practice to allow external code to ACCESS the internal working of a class DIRECTLY.
- CHECK POINT: Click the Run button. You should see the last line of the output is set to the new name for the Cornelius' object: Cornelius.
Set Fields To Private
A better approach of changing the value of a class is to set its fields to private and then use a concept of getters and setters to access or change those values.
- Add the keyword private to each of the fields (class variables):
public class Player {
  private String playerName;
  private int score;
  private int level;
  private int lives;
  public Player(){
     playerName = "Not yet defined";
     score = 0;
     level = 1;
     lives = 9;
  }
}
CODE EXPLANATION:
- The private keywords are used to limit access to the fields only from WITHIN its class but not OUTSIDE of its class. - CHECK POINT: If you click the Tutorial.java tab, you see that it no longer has ACCESS to the fields in the Player.java class. If you hover over any one of the red properties, you see a tool tip displayed stating that those properties have private access in 'com.example.Player' because the keyword private were added.

- In the Tutorial.java file, delete all of the lines with the red properties highlighted to TRANSFER ACCESS back to Player.java class.
package com.example;

public class Tutorial {
  public static void main(String[] args) {
     Player Cornelius = new Player();

}
Create Getters And Setters
To provide access outside of a class after you have made the fields private, you have to create what is called getters and setters.
- In the Player.java file, OUTSIDE of the construct code block, type the following highlighted code to create a "getter" and a "setter" method:
public class Player {
  private String playerName;
  private int score;
  private int level;
  private int lives;
  public Player(){
     playerName = "Not yet defined";
     score = 0;
     level = 1;
     lives = 9;
  }
  public String getPlayerName(){
     return playerName;
  }

  public void setPlayerName(String player) {
     playerName = player;
  }

}
CODE EXPLANATION:
- By convention, a getter is prefixed with the word "get" and always has the return keyword of the field that is private. It will GET and RETURN the current value when accessed from outside code.
- By convention, a setter is prefixed with the word "set" and the field value is SET to the argument value that will be passed into it from the outside code. It may have the word return (See next series of steps). - Go back to the Tutorial.java file, add the following highlighted code to INDIRECTLY ACCESS the playerName property:
package com.example;

public class Tutorial {
  public static void main(String[] args) {
     Player Cornelius = new Player();
     Cornelius.setPlayerName("Cornelius");
     System.out.println(Cornelius.getPlayerName());
}
- CHECK POINT: Click on the Run button. You should see that the output displays "Cornelius" instead of "Not Defined Yet"
- Go back to the Player.java and REPLACE playerNane = player; with the following highlighted code to add some validation code to the existing code:
public class Player {
  private String playerName;
  private int score;
  private int level;
  private int lives;
  public Player(){
     playerName = "Not Defined Yet";
     score = 0;
     level = 1;
     lives = 9;
  }
  public String getPlayerName(){
     return playerName;
  }

  public void setPlayerName(String player) {
     if(player.length() < 4)
     {
      return;
     }
     else
     {
     playerName = player;
     }
  }

}
CODE EXPLANATION:
- If the player name is less than four then the code is returned with the default value ("Not yet defined"); otherwise, the code is set to the new value.
- For experience developer, you could have written a shorten version of the "if" statement:
if(player.length() < 4)
returns;
playerName = player; - CHECK POINT: Go back to the Tutorial.java and then click the Run button again. You should see in the output panel "Cornelius." Now, change the argument to two letters:
Cornelius.setPlayerName("Co");
- CHECK POINT: Click the Run button again. This time, you should see the output yield the default text "Not yet defined" instead of "Co" because it was returned because the lenght was less than four.
Overload Constructor
The previous constructor is called a no argument constructor because as the name implies it has no argument. However, you can create MULTIPLE constructors within the SAME class and have the outside code dictate which constructor to use based on if it has no argument or the set number or arguments. This process is called overloading a constructor. The no argument constructor will get you DEFAULT values; whereas, the overloaded constructor can allow you to set one or all of the fields (class variables) to DIFFERENT VALUES. The constructor name and its parameters is called the constructor mehtod SIGNATURE.
- In the Player.java class, add the following highlighted code to create another constructor:
public class Player {
  private String playerName;
  private int score;
  private int level;
  private int lives;

  public Player(){
     playerName = "Not Defined Yet";
     score = 0;
     level = 1;
     lives = 9;
  }

  public Player(String player){
     setPlayerName(player);
     score = 0;
     level = 1;
     lives = 9;
  }

  public String getPlayerName(){
     return playerName;
  }

  public void setPlayerName(String player) {
     if(player.length() < 4)
     {
      return;
     }
     else
     {
     playerName = player;
     }
  }

}
CODE EXPLANATION:
- It is important to note that the second constructor has one property that is set OUTSIDE of the class (e.g., (setPlayerName(player);) and three properties that are set to INITIAL VALUES (e.g., score = 0, level = 1; and lives = 9).
- Go back to the Tutorial.java file and add the following highlighted code to update the first object and to create another object.
package com.example;

public class Tutorial {
  public static void main(String[] args) {
     Player Cornelius = new Player();
     Cornelius.setPlayerName("Cornelius");
     System.out.println(Cornelius.getPlayerName());

     Player Jones = new Player ("Jones");
     System.out.println(Jones.getPlayerName());

}
CODE EXPLANATION:
- Unlike the first object where the setPlayerName() method had to be used to set the player's name, the second object player's name was set at the SAME TIME the object was created by passing it INTO the constructor as an argument. This is a better approach to use then the no argument constructor because it eliminate the need to use setPlayerName method AFTER the object is created instead of WHEN the object is created.
- CHECK POINT: Click the Run button. You should see results of both objects (that is, "Cornelius" and "Jones").
Automate Getters/Setters
While you could write a getter and setter for each field, it can become very tedious and error prone if you have to write a lot of them. To save you time, you can let Android Studio create them for you AUTOMATICALLY based on the fields in the class:
- In the Player.java file place the cursor below the setPlayerName code block and then right-click and select Generate... from the menu (or Press ALT + INSERT) and then select Getter and Setter from the menu.
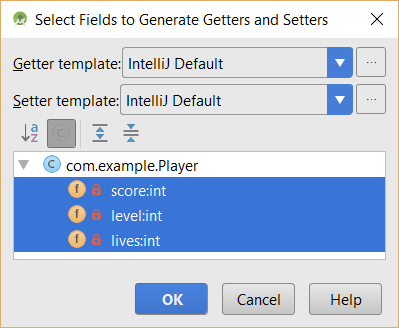
- In the Select Fields to Generate Getters and Setters dialog box that appears, SHIFT+CLICK on all three of the fields to select them and then click the OK button:
NOTE: It is important to note that the playerName field is NOT listed because a getter and setter has already been created MANUALLY for it in the previous steps and Android Studio is "smart enough" to exclude it from the list.
- CHECK POINT: You should see that three set of getters and setters are AUTOMATICALLY created for you. You can still modify them as needed.
public class Player { private String playerName;CODE EXPLANATION:
private int score;
private int level;
private int lives;
public Player(){
playerName = "Not Defined Yet";
score = 0;
level = 1;
lives = 9;
}
public Player(String player){
setPlayerName(player);
score = 0;
level = 1;
lives = 9;
}
public String getPlayerName(){
return playerName;
}
public void setPlayerName(String player) {
if(player.length() < 4)
{
return;
}
else
{
playerName = player;
}
}
public int getScore() {
return score;
}
public void setScore(int score) {
this.score = score;
}
public int getLevel() {
return level;
}
public void setLevel(int level) {
this.level = level;
}
public int getLives() {
return lives;
}
public void setLives(int lives) {
this.lives = lives;
}
}
- You may have noticed that when you had the setters created AUTOMATICALLY, Android Studio added the word "this" to the front of the variables in them (e.g., this.level). Because the field name (class variable) and the local variable can have the SAME name (e.g., level for both), the word "this" helps to distinguish between the two. Moreover, method name and the argument that is passed as a variable into the setter method can also have the same word so you can have five words with the same name.
private int level ... public void setLevel(int level) {- So it is best practice to use the word "this" to make it clear that "this" refers to the class variable at the top of the class. It is also best practice to use the word "this" is a constructor as well.
this.level = level;
}
- Now replace the three remaining default values in the second constructor with getter methods:
public class Player {
  private String playerName;
  private int score;
  private int level;
  private int lives;

  public Player(){
     playerName = "Not Defined Yet";
     score = 0;
     level = 1;
     lives = 9;
  }

  public Player(String player, int score, int level, int lives){
     setPlayerName(player);
     setScore(score);
     setLevel(level);
     setLives(lives);
  }

  public String getPlayerName(){
     return playerName;
  }

  public void setPlayerName(String player) {
     if(player.length() < 4)
     {
      return;
     }
     else
     {
     playerName = player;
     }
  }

public int getScore() {
    return score;
}

public void setScore(int score) {
    this.score = score;
}

public int getLevel() {
    return level;
}

public void setLevel(int level) {
    this.level = level;
}

public int getLives() {
    return lives;
}

public void setLives(int lives) {
    this.lives = lives;
}

}
- Go back to the Tutorial.java file and modify the following highlighted code to read:
package com.example;

public class Tutorial {
  public static void main(String[] args) {
     Player Cornelius = new Player();
     Cornelius.setPlayerName("Cornelius");
     System.out.println(Cornelius.getPlayerName());

     Player Jones = new Player ("Jones", 2, 2, 2);
     System.out.println(Jones.getPlayerName());
     System.out.println(Jones.getScore());
     System.out.println(Jones.getLevel());
     System.out.println(Jones.getLives());

}
- CHECK POINT: Click the Run button. You should see the second Player object has its DEFAULT values REPLACED with CUSTOM values:
Jones
2
2
2