OPTION 1: PhoneGap Build
Before creating an app, start by creating a web site or use an existing web site with standard HTML5, CSS3, and optionally any JavaScript framework (Bootstrap, jQuery Mobile, AngularJS).
PHASE 1: Create Web Site
First, we need to create a web site and add a few tags that are used by mobile devices.
- Create a web site or use an existing web site.
- Add the following line inside of the head tag inside of the index.html file:
<meta name="viewport" content="user-scalable=no, initial-scale=1, maximum-scale=1, minimum-scale=1, width=device-width" />
- Add the following line above the closing body tag (</body>) inside of the index.html file:
<script type="text/javascript" src="cordova.js"></script>
PHASE 2: Create Debug Version
After you create a web site, you may want to convert it into a debug version of the app to see how things work. You could skip this step once you become more efficient in how to create an app.
- Zip your web content (HTML, CSS, JS, Images) and give it a descriptive name (e.g., HelloWorldApp.zip).
- Go to the PhoneGap Build Cloud Service (https://build.phonegap.com/). You may want to take some time to preview this home page to see what is available.
- If you have not already done so, sign up for the PhoneGap Build service by clicking the Sign up button at the top of the page and provide all the necessary information needed.
- Return to the PhoneGap Build home page and click the Sign In button.
- Click the + new app button, click the Upload a .zip file button, navigate the zip file you created earlier, and then click the Open button.
- Click the Ready to Build button.
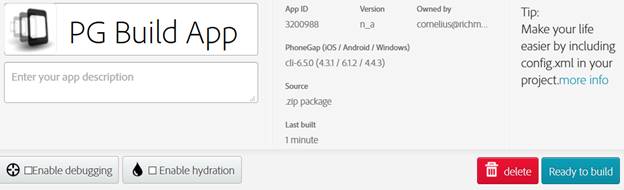
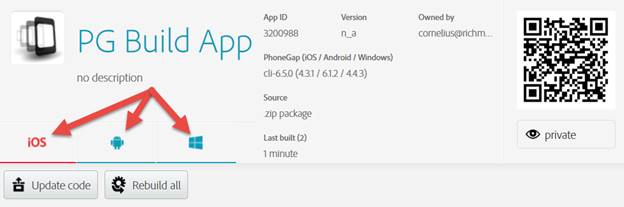
- CHECK POINT: You should see the platform icons (IOS, Android, and Windows) get highlighted. The IOS icon is highlighted in red because it needs additional information.
- If necessary, download a QR Reader on your mobile device.
- Using the QR Reader, take a snapshot of the QR code (See screenshot above).
- On your mobile device, click the following prompts:
- Click OK on the Open URL prompt
- Click SAVE on the Download file? prompt
- Click Open on the 1 file download prompt
- Click Install on the Do you want to install this application?... prompt
- Click Open again
- CHECK POINT: The app will be downloaded to your mobile device.
- Test the app on your mobile device.
PHASE 3: Add Assets and Config File
If you don’t add graphic assets and a config.xml file to the zip file, the PhoneGap Build Cloud Service will use default values and images. This is great for initial test, but you will want to include these items before you create a release version of the app.
- Create Assets (icon, splash screens) in a folder called res (short for resources).
NOTE: See list of Splash Screen Generators under resources for ways to create these resources automatically.
- Create a config.xml file or use an existing config.xml file and update it.
NOTE: This file is used to “configure” your app with specific settings (e.g., app name, app version, author, platforms, plugins, internet access, preferences, etc.) For details on what to add to the config.xml file, click here.
- Delete initial zip file.
- Rezip files to include asset folder and the config.xml with the same name (HelloWorldApp).
- Go back to PhoneGap Build, click the Update Code button, click the Browse… Button, navigate to the newly created zip file, and then click the Upload button.
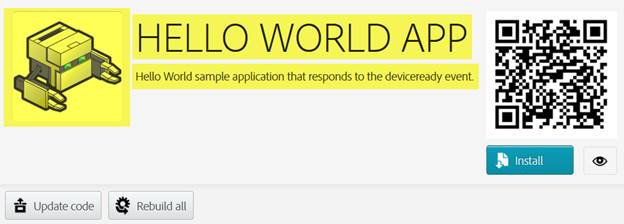
- CHECK POINT: Because a config.xml file was included in the zip file this time, you should see the app image, app name, and a short description that was gleaned from the config.xml file
- Click the Rebuild button to update the app with the new content.

- Using the QR Reader, take a snapshot of the QR code (See screenshot above).
- On your mobile device, click the following prompts:
- Click OK on the Open URL prompt
- Click SAVE on the Download file? prompt
- Click Open on the 1 file download prompt
- Click Install on the Do you want to install this application?... prompt
- Click Open again
- CHECK POINT: The app will be downloaded to your mobile device.
- Test app on your mobile device.
PHASE 4: Digitally Sign App
Once an app has been created, it must be DIGITALLY signed to create a RELEASE version instead of a DEBUG version of the app before it can be submitted to an app store (e.g., Google Play, Apple App Store).
- If you have not already done so, download the Java Development Kit (JDK), double-click the file and follow the instructions on the JDK web site on how to install it.
- Open the command prompt from within Windows by typing command in the search field at the bottom of the screen: (VERIFY BULLETS BELOW)
- Type cd.. and press the ENTER key.
- Type cd Program files and press the ENTER key.
- Type cd Java and press the ENTER key.
- Type cd jdk1.8.0_25 (or whatever is the later version) and press the ENTER key.
- Type cd bin and press the ENTER key.
TIP: You can also set up a system variable to avoid having to do these steps.
- Type the following syntax and change what is highlighted to your information:
keytool -genkey -v -keystore Your_personal_file_title.keystore -alias Your_personal_alias -keyalg RSA -keysize 2048 -validity 10000
CAUTION: Ensure you write the password down that you will enter in the next step and do not lose it. Note also that when you are TYPING your password, the large block insertion will not move pass the first letter in your password.
- Enter your profile when prompted:
- key store password: mykeystore$500
- first and last name: Cornelius Chopin
- organizational unit: skip
- name of your organization: Rich Media Creative Services
- city: Round Rock
- state: Texas
- two letter country code: US
- is correct? yes
- key password: Press the Enter key to add the SAME password as key store password mykeystore$500
- CHECK POINT: This will create an Android Keystore file in the CURRENT directory: (e.g., C:\Users\Cornelius) with the name you gave it. You can use it with whatever app you generate (e.g., https://build.phonegap.com).
PHASE 5: Create Release Version
Now that you have created a signing key, you can use it to digitally sign the app to create a release version instead of a debug version that can be sent to an app store.
- Click the down arrow next to No Key selected text, select the newly created key, enter the certificate and key store passwords, and then click the submit key button.
- CHECK POINT: This is now show the lock icon as being unlock.
- Click the Rebuild button again.
- This time, click the apk button to download the APK to your computer.
- CHECK POINT: Notice the file name has the word “release” included in it. This is the file that can be used to submit your app to an app store.
PHASE 6: Upload App
Once the release version of the app is created, you can UPLOAD it to Google Play or Apple App Store.
NOTE: You will need to pay $25 one-time fee to Google to create as many apps as you want. However, you will need to pay $99 every year to Apple to create as many apps as you want.
- Go to the Google Play Console and sign up if you have not already done so.
- Click the Launch Play Console button.
- Click the CREATE APPLICATION and add the necessary information.