OPTION 3: PhoneGap CLI
If you are a code geek, you may want to use the PhoneGap CLI approach.
PHASE 1: Create Web Site
Create or use an existing responsive web site using standard HTML5, CSS3, and any JavaScript framework (Bootstrap, jQuery Mobile, AngularJS)
PHASE 2: Install PhoneGap CLI
The PhoneGap CLI provides a command line interface (CLI) for creating PhoneGap apps as an alternative to using the PhoneGap Desktop App for those who prefer working at the command line. It has some additional features over the PhoneGap Desktop for building, running, and packaging your PhoneGap applications on multiple platforms.
Before you can use the PhoneGap CLI, you will need to download and install node.js and git:
- node.js - a JavaScript runtime to build JavaScript code
- git - used in the background by the CLI to download assets. It comes pre-installed on some operating systems. To see if you already have it installed, type git from the command line.
- Install the PhoneGap CLI via npm with the following command from the Terminal app (Mac) or Command Prompt (Win).
$ npm install -g phonegap@latest
NOTES:
- The $ symbol is used to indicate the command prompt and should not be typed.
- npm is the node package manager and installed with node.js. The npm command fetches the necessary dependencies for the PhoneGap CLI to run on your local machine. It creates a node_modules folder with the necessary code needed to run the CLI.
- The -g flag specifies that folder to be installed at the global location so it can be accessed from anywhere on your machine (defaults to /usr/local/lib/node_modules/phonegap on Mac).
- OS X Users: You may need to prefix this command with sudo to allow installation to restricted directories and type the following instead: $ sudo npm install -g phonegap@latest
- Type phonegap at the command prompt.
- CHECK POINT: You should see a list of commands that can be used with phonegap.
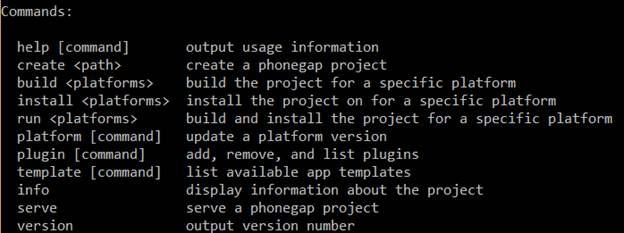
TIP: You can access the PhoneGap CLI usage text at any time by adding the keyword help, or the -h or --h attribute with any phonegap command (e.g., $ phonegap create help, $ phonegap serve -h).
PHASE 3: Create Stub App
You can create a stub app by creating the app, adding the platform(s) and the plugins.
A – create app
P – add platform(s)
P – add plugin(s), if necessary
- Type the following command to create a stub app:
$ Phonegap create HelloWorldApp com.richmediacs.helloworldapp
NOTE:
- HelloWorldApp is the name of the folder that the app will be created in.
- com.richmediacs.helloworldapp is the app unique ID
- Navigate to the folder that the folders and files were created in (e.g., C:/Users/Cornelius/HelloWorldApp).
NOTE: If you click the plugins or platforms folder, you will see that they are currently both empty. This will be resolved later.
- Drill down to the www folder and then click the index.html file.
- CHECKPOINT: You should see the app loads in the browser.
- Type cd/ and then the name of the folder (HelloWorldApp) to change the directory to that folder.
$ cd/HelloWorldApp
- Type the following command to add the Android platform:
$ Phonegap platform add android
NOTE: You can do the same thing for ios by typing: Phonegap platform add ios
- CHECKPOINT: If you double-click the platforms folder, you will see that it added platform content there. If you click the plugins folder, you will see that it also added some default plugins.
NOTE: You can add additional plugins as needed. See next step.
- (Optional) Type the following command to add the admobpro plugin:
$ Phonegap plugin add cordova-plugin-admobpro
- Now, build the app by type the following command:
$ Phonegap run android
NOTE:
- You can do the same thing for ios by typing: Phonegap run ios
- You can also zip up the content of the www folder along with the config.xml file and upload it to the PhoneGap Build Cloud service. (See OPTION 1: PHASE 2)
PHASE 4: Add Web Site
Now that we have the default content working, let’s replace it with our own web content in the www folder.
MOVE your web content to the www folder.
PHASE 5: Convert To App
SEE PHASE 2-6 FROM OPTION 1