OPTION 4: Android Studio
PHASE 1: Create Web Site
Create or use an existing responsive web site using standard HTML5, CSS3, and any JavaScript framework (Bootstrap, jQuery Mobile, AngularJS)
PHASE 2: Install Android Studio
First, choose one of two OS installation options below:
Window Installation
- Download the latest version of Android Studio for Windows
- Double-click the installer icon and follow the prompts and buttons to install the Android Studio.
Mac Installation
- Download the latest version of Android Studio for Mac
- Double-click the installer icon to run the installer and accept the license agreement.
- Drag and drop the application into the Applications folder on your Mac to install Android Studio
PHASE 3: Create Stub App
Now that we have Android Studio installed, let’s create a stub app.
- Create a folder where you want the app content to be saved.
- Open Android Studio and select File > New > New Project...
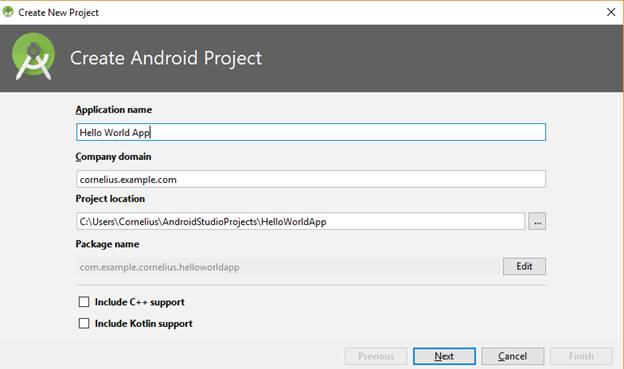
- In the Create New Project dialog box that appears, add the following info and then click the Next button:
- Application Name
- Company Domain
- Project Location
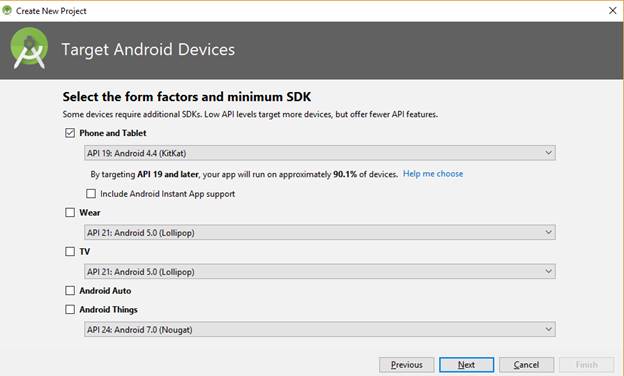
- In the Target Android Devices dialog box that appears, accept the defaults for this simple project and the click the Next button.
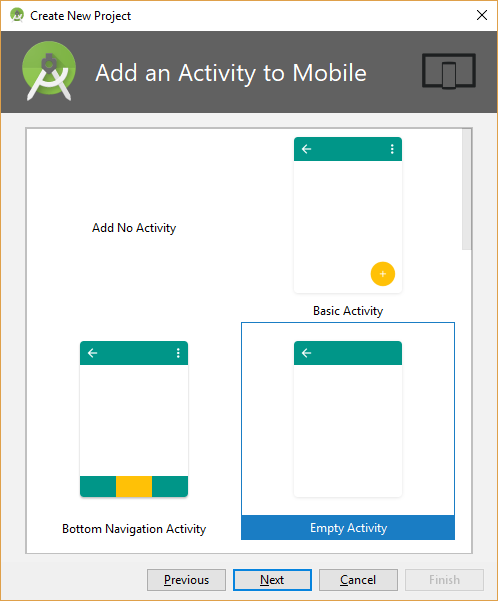
- In the Add an Activity to Mobile dialog box that appears, select the Empty Activity option and then click the Next button.
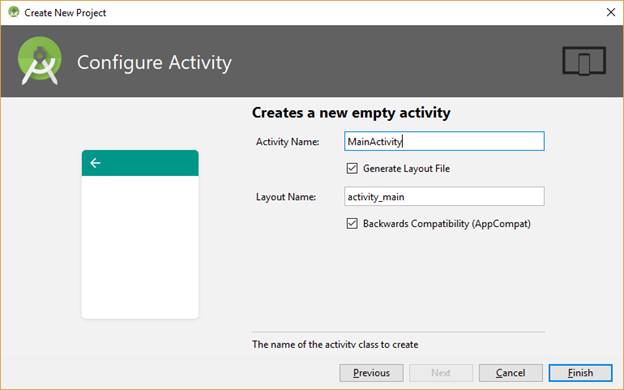
- In the Add an Config Activity dialog box that appears, select the Empty Activity option and then click the Finish button.
- CHECK POINT: After Gradle finish building the app, click the Run button to run the app on a mobile device or in an emulator to see if it works with the default settings. You should see the app loads with the phrase Hello World.
- In the Android panel, click res > layout and then double-click the activity_main.xml file to open it.
- In the Design view, select the TextView and then press the Delete key.
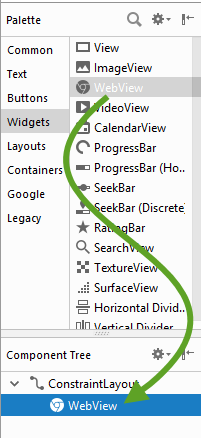
- From the Palette panel select the Widgets category, and then drag-and-drop a WebView component the below the ConstraintLayout component in the Component Tree panel.
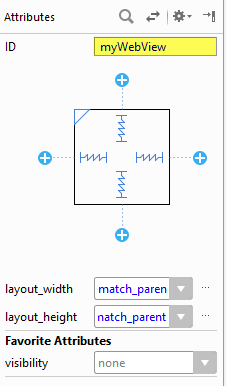
- With the WebView component selected, in the Attributes panel, give the WebView component an ID of myWebView.
- Open the MainActivity.java file and add the following highlighted code within the MainActivity() class:
public class MainActivity extends AppCompatActivity {
private WebView view;
@Override
- Add the following highlighted code within the onCreate() method below the setContentView() method statement:
setContentView(R.layout.activity_main);
String myURL = “file:///android_asset/www/index.html”;
WebView view = (WebView) findViewById(R.id.myWebView);
view.loadUrl(myURL);
view.getSettings().setJavaScriptEnabled(true);
view.setWebChromeClient(new WebChromeClient());
NOTES:
- The setJavaScriptEnabled(true); set the JavaScript to be enabled as the method implies.
- The setWebChromeClient() method is used so that the page does not load in another browser window.
- Notice the triple forward slashes (file:///). However, this could be any web url (e.g., http://www.mycompanyname.com/) instead of a file name. However, you may have to give your app internet permission in the AndroidManifest.xml file by writing the following highlighted code: (VERIFY IF THIS IS STILL NEEDED)
<manifest xmlns:android="http://schemas.android.com/apk/res/android"
package="com.example.cornelius.helloworldapp" >
<uses-permission android:name="android.permission.INTERNET"/>
- Click inside the first instance of the red word WebView and then press ALT+ENTER.
- CHECK POINT: Pressing ALT+ENTER imported the WebView at the top of the file.
import android.support.v7.app.AppCompatActivity;
import android.os.Bundle;
import android.webkit.WebView;
- Right-click the app folder, select New > Folder > Assets Folder, and then click the Finish button.
NOTE: This will create an empty assets folder.
- Right-click on the newly created assets folder, select Directory, type www into the text field of the New Directory dialog box, and then click the OK button.
NOTE: This will create a www directory.
- Right-click the newly created www directory, select New > File, type index.html into the text field of the New File dialog box, and then click the OK button.
NOTE: This will create the index.html file.
- Write the following HTML code into the index.html file that appear in one of the tabs.
<!DOCTYPE html>
<html>
<body>
<h1>Hello World App</h1>
</body>
</html>
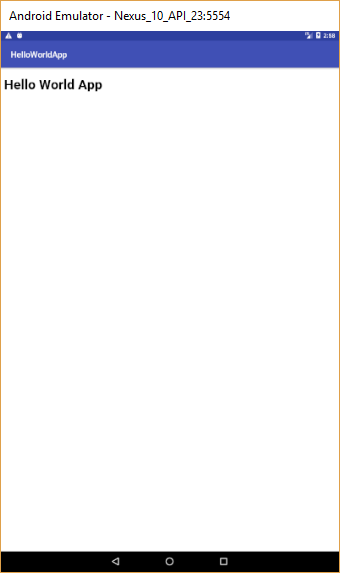
- CHECK POINT: Click the Run button to run the app on a mobile device or in an emulator to see if it works with the default settings. You should see the app loads with the phrase Hello World App as a title.
- Write the following highlighted HTML code into the index.html file.
<!DOCTYPE html>
<html>
<head>
<script src="app.js"></script>
</head>
<body>
<h1>Hello World App</h1>
<label for="name">Enter Name:</label>
<input id="name" value="" placeholder="Enter your name"/>
<button onclick = "myMsg()">Display Message</button>
<br><br>
<button><a href="page2.html">Page 2</a></button>
</body>
</html>
- Right-click the www folder AGAIN, select New > File, type app.js into the New File dialog box that appears, and then click the OK button.
- Type the following JavaScript code into the app.js file that appears:
function myMsg()
{
alert("Hello, " + document.getElementById("name").value + "!!");
};
- Right-click the www folder AGAIN, select New > File, type page2.html into the New File dialog box, and then click the OK button.
- Write the following HTML code into the page2.html file that appears.
<html>
<body>
<h1>Page 2</h1>
<button><a href="index.html">Go to Home Page</a></button>
</body>
</html>
- Click the Run button, select a device either from the Connected Devices (if you have a device connected to your computer) or Available Emulators, and then click the OK button.
- CHECKPOINT: You should see the app load on your device or emulator. Test it to see if it is working correctly by:
- Entering a name in the Enter Name text field and then Clicking the Display Message button to see an alert with a message display.
- Clicking the Page 2 button to see Page 2 displayed and then clicking the Go To Home Page button to go back to the home page.
NOTE: If you navigate to Page 2 and then click the Back button on the emulate or your mobile device, you may be taken to a previous loaded app and not the current app home page. This will be resolved in the upcoming steps.
- In the MainActivity.xml file BELOW the closing curly brace of the MainActivity class, type the following highlighted word (onBack) and then press the ENTER key:
view.setWebChromeClient(new WebChromeClient());
}
onBack
- CHECK POINT: You should see that the word expanded to the following highlighted code:
view.setWebChromeClient(new WebChromeClient());
}
@Override
public void onBackPressed() {
super.onBackPressed();
}
- Modify the newly created code to the following highlighted if/else statement:
@Override
public void onBackPressed() {
if(view.canGoBack())
{
view.goBack();
}
else
{
super.onBackPressed();
}
}
- Also, if you want to remove the app title, add the following highlighted code:
protected void onCreate(Bundle savedInstanceState) {
requestWindowFeature(Window.FEATURE_NO_TITLE);
super.onCreate(savedInstanceState);
- If necessary, you may need to change the extension:
From:
public class MainActivity extends AppCompatActivity {
To:
public class MainActivity extends Activity {
- Click inside the red word Activity and press ALT+ENTER.
- Click the Run button, select a device either from the Connected Devices (if you have a device connected to your computer) or Available Emulators, and then click the OK button. You should see that the title has been removed.
PHASE 4: Add Web Site
Now that we have the default content working, replace it with your own web content in the assets folder
- Delete the HTML files (index.html and page2.html) and the JavaScript file (app.js).
- MOVE your web content to the assets folder.
TIP: It may be easier to move the content from outside of Android Studio and then return.
- CHECK POINT: Click the Run button to run the app on a mobile device or in an emulator to see if it works as expected.
PHASE 5: Convert To App
SEE PHASE 2-6 FROM OPTION 1 or use Android Studio to create a debug and release version of your app.