Create New Project
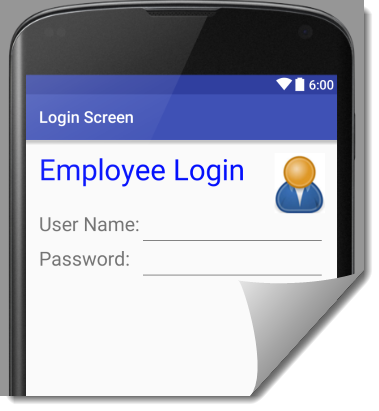
In this tutorial, we will create a login screen.
- Open Android Studio and select File > New > New Project... from the menu.
- In the New Project dialog box that appears, type Login Screen for the Application name.
- Type example.com as the Company Domain and accept the other defaults and then click the Next button.
- In the Target Android Devices dialog box that appears, select only the Phone and Tablet checkbox, its default Minimum SDK and then click the Next button.
- In the Add an activity to Mobile dialog box that appears, select the Empty Activity option and then click the Next button.
- In the Customize the activity dialog box that appears, accept the defaults and click the Finish button.
As in many objects that are created, we will:
- Create objects (with elements and styles)
- Give objects names (with ids and resource strings)
- Tell objects to do something (with Java code)
Even within the Java code, you still do the same thing:- Create objects
- Give objects names
- Tell objects to do something
NOTE: While you can do most of these items in any combination, we will do it in the order above to start with the simple concepts (creating and naming objects) and then move to the more advanced concept (adding code).
Create Objects with Elements (and Optional Styles)
Modify or drag and drop the following components that are needed for the app onto the screen. These components are XML elements that get compiled to their appropriate object type when the app is built.
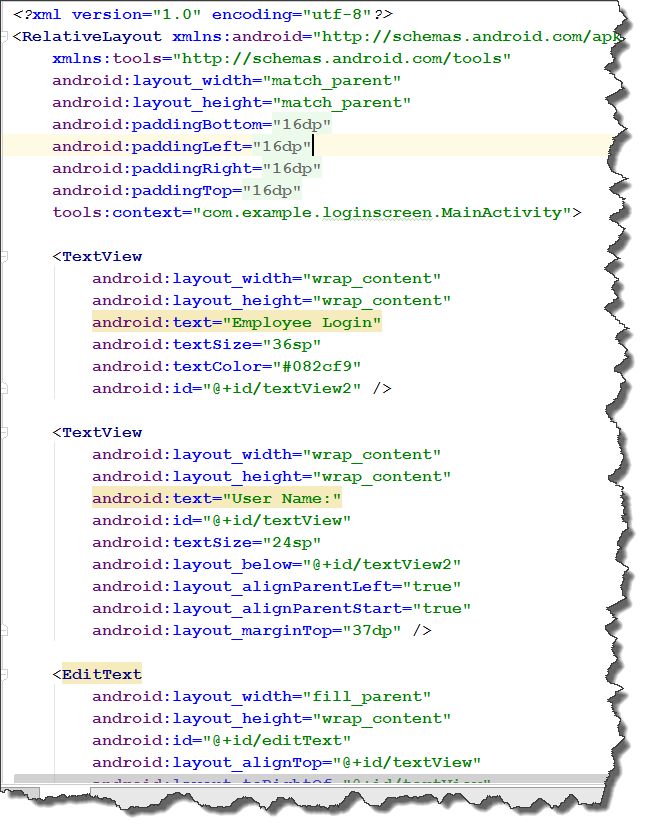
- From the Android view under the layouts folder, open content_main.xml .
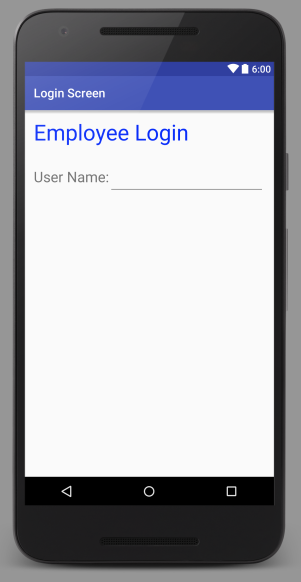
- In Design view, double-click on the Hello World text and change it to Employee Login in the text field.
- In the Properties panel, change the textSize property to 36sp. Optionally, change the textColor property to another color (e.g., blue).
NOTE: The unit of measurement when working in Android Studio for text is sp which stands for scalable independent pixels. While dp (device independent pixels) is used for most everything else, sp is best used for text so that it can scale correctly. The sp suffix is used so that the text can scale based on the user's customize size preference.
- In the Palette panel under the Widget folder, drag and drop a PlainTextView component below the Employee Login title and pin it to the left of the screen and below the title and then double-click it and type User Name: in the text field. Then, in the Properties panel change the textSize property to 24sp.
NOTE: You should see arrows that point up and to the left as you drag the component to the screen along with some tooltips. - In the Palette panel under the Text Fields folder, drag and drop a Plain Text component and pin it to the right and top of the User Name component that was added earlier. Then, in the Properties panel, change the layout:width property to fill_parent.
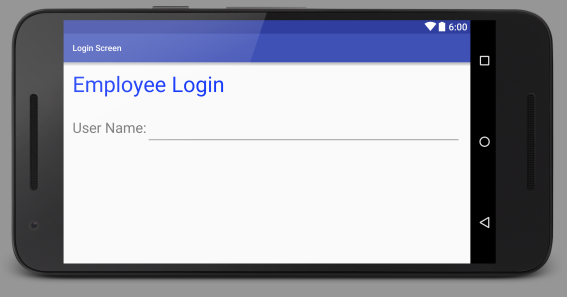
- CHECKPOINT: Click the Go to next state button (
 ) to change the orientation to landscape. You should see that the input field's width change to accomodate the landscape view because its property was set to match its parent width (excluding the User Name text field width). Optionally, open an AVD and then press CTRL+F11 to toggle the layout view to see how it reacts to an orientation change.
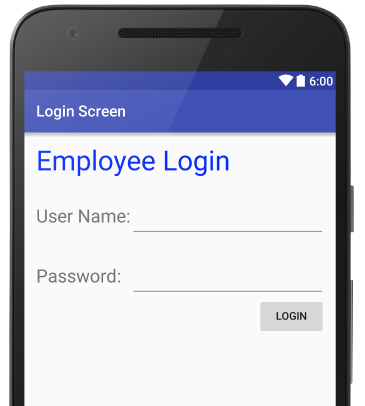
- Below the last two components that were added, repeat steps 4-6 but use:
- Password: for the first component text name.
- a Password instead of a Plain Text component for the second component.
- In the Palette panel under the Widget folder, drag and drop a Button component and pin it to the right of the screen and below the last Plain Text component. Double-click on it and give it a name of Login in the text field.
- CHECKPOINT: Open an AVD and then press CTRL+F11 repeatably to toggle the layout to change the view to see how it reacts to the orientation change. You should see the the Login button is "pinned" to the right of the screen regardless of the orientation. Optionally, you can click on the Text tab at the bottom of the screen to see the XML elements and their attributes that were created from the components that were added to the screen.
- Click on the Design tab to switch back to that view.
OPTIONAL: Add an Image
- Create or find a small image that can be used as a logo.
TIP: You can use Google to find one.

- Copy the image from its location and return to Android Studio.
- Right-click the drawable folder and paste the image into that folder.
NOTE: You can also drag-and-drop an image from your computer to the drawable folder. - Drag and drop a ImageView component to the right of the title Employee Directory and pin it the to top and right of its parent.
- In the Properties panel Project tab, scroll down to the src properties, press the browser button and navigate to and select the image you want to use.
NOTE: It is important to note that the image extension (e.g., *.jpg, *.png, *.gif) will not be shown in the xml file. Also, an image has to be in all lower case letters? (Need to be verified).
android:src="@drawable/login_icon" />
Give Objects Names with IDs (and optional string resources)
While you could have done this at the SAME time you create each component above, we wanted to do it in a systematic approach. However, in real production it would be best to create the components and give them names at the same time they are created.
IMPORTANT CONCEPT TO REMEMBER: It is important to name every component that will be used by Java code with an id. The id is used to store a reference of the element in a Java object as you will see later.
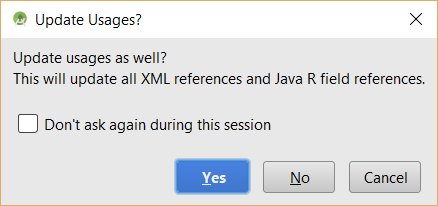
- Double-click on the following components and give them the following id names. In the Update Usages? dialog box that appear, click the Yes button.
- usernameInputField
- passwordInputField
- loginButton
IMPORTANT CONCEPT TO REMEMBER: It is not necessary to give the other components a more decriptive id names because they will not be used with Java code. You will see later that it is important to set every strings in your app that can be converted to another language to a string resource (e.g., @id/my_string_name) instead of a string literal (e.g., "my literal string in quotes").
(Optional) Give Text Field A Hint
- In the Properties panel, add a hint property to any of the Edit Text component:
android:layout_toEndOf="@+id/textView"
android:hint="Enter Full Name" />
- CHECK POINT: Preview the app in a emulator. You should see the hints INSIDE of the Text Fields. If you start typing inside of one of the hint,, the hint's message will disappear completely.
Tell Objects To Do Something with Code
Again, you could have written some code as you created the components like adding an onClick handler to the button. However, we wanted to do this step in a a logical manner.
- In the Properties panel, scroll to the onClick property field and type loginEventHandler.
- Click the Text tab at the bottom of the screen again.
- Click inside the loginEventHandler text, press ALT+ENTER and select Create 'loginEventHandler(View)' in 'MainActivity' from the list.
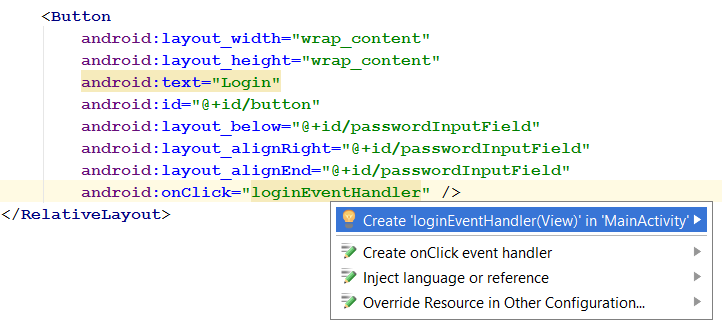
- CHECK POINT: Notice that the MainActivity.java opens and AUTOMATICALLY create the event handler stub for the onClick() method. You could have manually added the onClick attribute to the button in the *.xml file and manually type the loginEventHandler code in the *.java file (But why, when you can automate the process).
- Add the following code between the curly braces:
public void loginEventHandler(View view) {
   Log.i("Info", "The Login button was pressed.");
}
CODE EXPLANATION:
- The loginEventHandler has two view arguments. The first defines the data type of View and the second is the name of the View (which is 'viewed" with a lower case v).
- The ".i" on the Log class refers to information. The first argument is a title that is used to filter the message and the second argument is the message itself.
- IMPORTANT CONCEPT TO REMEMBER: While it is obvious that a button can be made clickable, it is important to remember that ANY viewable component can be made clickable (e.g., image, text, etc.).
- It is best practice to create a static variable that will hold the String tag (e.g., private static final String TAG = "MainActiviry"). The word final means it is a constant and will not change. Then, when you use it, you would type: Log.i(TAG, "String goes here...")
TIP: If you did not create the String tag FIRST, you can still create it AFTER you write the Log statement (Log.i(TAG, "String goes here...");). Click inside of the word TAG and press ALT+ENTER and select Create constant field 'TAG' from list:
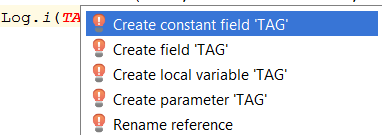
Then, select a Target Class:

Then, type the type name in quotes after the equal in the code that is automatically created:
private static final String TAG = "MainActivity";
// OR
private static final String TAG = MainActivity.class.getSimpleName();
- Press ALT+ENTER again to AUTOMATICALLY import the View class (e.g., import android.view.View;) at the top of the code.
- Open the logcat panel at the bottom of the screen, right-click inside it and select Clear All from the menu, if neccessary.
- CHECK POINT: To see if the code associated with the button is working correctly, switch to (or start) the AVD and then click the Login button. You should see the message, "The Login button was pressed." in the logcat panel.
- Write the following highlighted code to the existing code block to create a popup message when the Login button is pressed.
public void loginEventHandler(View view) {
   Log.i("Info", "The Login button was pressed.");
   Toast.makeText(getApplicationContext(),"ACCESS GRANTED", Toast.LENGTH_LONG).show();
}
CODE EXPLANATION:
- Toast is a strange name for a popup message class.
- The makeText() method is used as the name implies to make text for the popup message.
- The first argument is the Context text and the second is the popup message you want to display and the third argument determines the time displayed (e.g., Toast.LENGTH_SHORT (2 sec), Toast.LENGTH_LONG (3.5 sec)).
- The show() method is used as the name implies to show the popup message. It could have been written on a separate line (e.g., Toast.show();) instead of daisy chained together.
- You could replace getApplicationContext() with the word this to shorten the code.
- While the code is unusual, it is basically the same except the for popup message itself so you could simply copy and paste if from somewhere else in your code or from an online resource.
- You could used a long-hand approach to create a Toast object. However, while this approach is not concise, it does show the various Toast's methods better (highlighted in blue). See next section on the setGravity() method.
Toast toast = Toast.makeText(getApplicationContext(), "Toast message goes here.", Toast.LENGTH_SHORT);
toast.setGravity(Gravity.TOP|Gravity.LEFT, 25, 200);
toast.show();
(Optional) Position Toast
The default align for a Toast is at the bottom of the screen. However, you could add some additional code to "align" the toast wherever you want using the following syntax (e.g., myToast.setGravity(Gravity.POSITION, X, Y);). The positions can Gravity.TOP, Gravity.BOTTOM, Gravity.CENTER, Gravity.RIGHT, Gravity.LEFT ,etc. The X and Y are the the x and y coordinates from its Gravity position. You can also set other position like bottom right by specifying something like myToast.setGravity(Gravitiy.BOTTOM | Gravity.RIGHT, 100, 200);)
- Comment out the existing Toast statement.
- Write the following highlighted code:
// Toast.makeText(getApplicationContext(), "ACCESS GRANTED TO: " + usernameString + ": "
   + passwordString, Toast.LENGTH_LONG).show();
Toast toast = Toast.makeText(getApplicationContext(), "ACCESS GRANTED", Toast.LENGTH_SHORT);
toast.setGravity(Gravity.TOP|Gravity.LEFT, 25, 200);
toast.show();
- CHECK POINT: Switch to (or start) the AVD and then click the Login button. You should see the Toast message "ACCESS GRANTED" and then the Toast fades out.
(Optional) Create Custom Toast
With a little more code, you can also create your own custom toast and display it instead of the boring default Toast:
- CREATE IT: Create a custom xml layout file that will be used as the custom view for the Toast.
- INFLATE IT: Inflate layout using LayoutInflater.
- RELATE IT: Create Toast and assign custom layout.
- Select File > New > XML > Layout XML File to create a layout for the custom Toast.
- In the Customize the Activity dialog box that appears, type custom_toast in the Layout File Name text field and click the Finish button.
- In the Layout folder, double-click on custom_toast.xml to open it.
- In Text View, add the following highlighted elements:
<?xml version="1.0" encoding="utf-8"?>
<LinearLayout xmlns:android="http://schemas.android.com/apk/res/android"
    android:layout_width="match_parent"
    android:layout_height="match_parent"
    android:orientation="vertical"
    android:id="@+id/custom_toastID"
    android:background="#CCC"
    android:paddingTop="30dp">
</LinearLayout>
- In Design View, drag-and-drop an ImageView component from the Palette panel.
- In the Properties panel, click on the browse button and in the Resource dialog box that appears under the Project tab, scroll down under the Drawable folder and select login_icon that was added earlier and then click the OK button.
- In Design View, drag-and-drop an Large Text component from the Palette panel below ImageView so that it is centered.
- Double-click on the Large Text component and in the Text field type ACCESS GRANTED.
- Modify the Toast code to read:
TIP: Or, you can format the layout however you feel comfortable with doing.
// Toast.makeText(getApplicationContext(), "ACCESS GRANTED TO: " + usernameString + ": " + passwordString, Toast.LENGTH_LONG).show();
/* Toast toast = Toast.makeText(getApplicationContext(), "Toast message goes here.", Toast.LENGTH_SHORT);
    toast.setGravity(Gravity.TOP|Gravity.LEFT, 25, 200);
    toast.show(); */
    // Inflate layout using LayoutInflater ----------------------------
    LayoutInflater myInflater = getLayoutInflater();
    View appearance = myInflater.inflate(R.layout.custom_toast, (ViewGroup) findViewById(R.id.custom_toastID));
    // Create Toast ----------------------------------------------------
    Toast myToast = new Toast(MainActivity.this);
    myToast.setDuration(Toast.LENGTH_LONG);
    myToast.setGravity(Gravity.CENTER,0,0);
    // Assign Toast to custom layout view ------------------------------
    myToast.setView(appearance);
    myToast.show();
- CHECKPOINT: Switch to (or start) the AVD and then click the Login button. You should see the CUSTOM Toast instead of the default Toast.

(Optional) Add Additional Logic
- Add a private instance variable for the userNameTextField that is in the XML file ABOVE the @Override statement but within the MainActivity class:
public class MainActivity extends AppCompatActivity {CODE EXPLANATION:
private EditText userNameTextField;
@Override
- A private instance variable is created outside of the onCreate() method so that it can be used anywhere.
- Add the following highlighted code to display the user name in the pop up message WITHIN the loginEventHandler method:
public void loginEventHandler(View view) {CODE EXPLANATION:
userNameTextField = (EditText) findViewById(R.id.usernameInputField); String usernameString = userNameTextField.getText().toString();
Log.i("Info", "The Login button was pressed");
Toast.makeText(getApplicationContext(),"ACCESS GRANTED TO: " + usernameString, Toast.LENGTH_LONG).show();
}
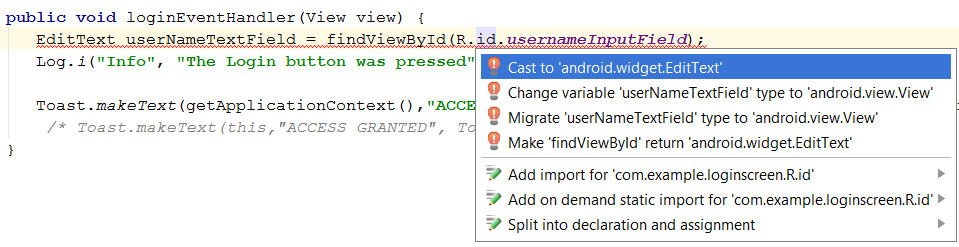
- Because userNameTextField is an EditText variable type on the left side of the equal sign, the findViewById has to be CAST into that type. The (EditText) statement casts it into the correct type. To do this AUTOMATICALLY, click inside the findViewById method and press ALT+ENTER and then select Cast to 'android.widget.EditText' from the menu.
- The Java's findViewById() method is akin to the JavaScript's getElementById() method that is used to access an HTML element. In this case, the findViewById() method is used to access an XML element.
- The R.id.<xml element> is a reference to an xml element. Where <xml element> is the id of an xml element (e.g., usernameInputField).
- Since a string is needed for the Toast method, the userNameTextField which is an EditText data type has to be converted to a string, The String usernameString = userNameTextField.getText().toString(); is used to accomplish that task. Notice String is used to set the data type on the left side of the equal sign and the toString() method that is similar to (EditText) is used to cast the value to a string on the right side of the equal sign. Unlike int and double which are primitives, a String is a class and is the reason why it starts with a capital "S." Just like in HTML forms where you have to convert an input text field to a string, you have to do the same in Java. However, in Java instead of using String(), you can use ".toString()" to do the same thing.
- CHECK POINT: Perform the following steps:
- Click the Run icon (
 ) and switch to (or start) the AVD.
 - Enter a name into the User Name text field and then click the Login button.
You should see the message, "ACCESS GRANTED TO: <Username>" in the popup message. Where <Username> is the name you entered into the User Name text field.
- Click the Run icon (
OPTIONAL: Add Additional Logic
In these optional steps, we will add conditional logic to see if the correct user name and password are entered. While the username and password is typically retrieved from a database, we will HARDWIRE these values to keep things simple.
- Add a private instance variable for the userNameTextField that is in the XML file ABOVE the @Override statement but within the MainActivity class:
public class MainActivity extends AppCompatActivity {CODE EXPLANATION:
private EditText userNameTextField;
private EditText passwordTextField;
@Override
- A private instance variable is created outside of the onCreate() method so that it can be used anywhere.
- Modify and add the following highlighted code:
public void loginEventHandler(View view) {CODE EXPLANATION:
userNameTextField = (EditText) findViewById(R.id.usernameInputField);
passwordTextField = (EditText) findViewById(R.id.passwordInputField);
// Log.i("Info", "The Login button was pressed");
String usernameString = userNameTextField.getText().toString();
String passwordString = passwordTextField.getText().toString();
if(usernameString.equals("John Doe") && passwordString.equals("admin")){
Toast.makeText(getApplicationContext(), "ACCESS GRANTED TO: " + usernameString + ": "
+ passwordString, Toast.LENGTH_LONG).show(); }
else
{
Toast.makeText(getApplicationContext(), "ACCESS DENIED", Toast.LENGTH_LONG).show();
}
}
- Additional code has been added for the password that is similar to the user name code.
- A conditional if/else statement was added to check to see if the BOTH the user name and password is corret (e.g., John Doe and admin). Notice the two conditions (e.g., usernameString.equals("John Doe") && passwordString.equals("admin")) use the equals() method instead of the double equal sign (==) that you may be accustom to in other programming language. This is used to test a string value.
- CHECK POINT: Perform the following steps:
- Click the Run icon and switch to (or start) the AVD.
- Enter the following and then click the Login button:
- John Doe as the name into the User Name: text field
- admin as the password into the Password: text field
You should see the message "ACCESS GRANTED TO: <Username> : <Password>" displayed in the popup message.
- Enter the following and then click the Login button:
- Any other name as the name into the User Name: text field
- Any other password as the password into the Password: text field
You should see the message "ACCESS DENIED" displayed in the popup message.
- OPTIONAL: Instead of using the Toast object, you could replace it with a Snackbar object. Comment out ( // ) the Toast object so that you can see the similarities and differences in the Snackbar syntax and then add the following highlighted lines in the else part of the "if/else" statement:
else
{
    // Toast.makeText(getApplicationContext(), "ACCESS DENIED", Toast.LENGTH_LONG).show();
    Snackbar.make(view, "ACCESS DENIED", Snackbar.LENGTH_LONG).setAction("Action", null).show();
}
- CHECK POINT: Perform the following steps:
- Click the Run icon () and switch to (or start) the AVD.
- Enter a name into the User Name text field and then click the Login button.
You should see the message, "ACCESS GRANTED TO: <Username>" in the Snackbar message. Where <Username> is the name you entered into the User Name text field.
Like the previous three steps of:- Creating an object
- Giving an object a name
- Telling object to do something
- Click the Run icon (
These step are also done in code (See highlighted comments):package com.example.loginscreen;
import android.content.Intent;
import android.os.Bundle;
import android.support.design.widget.Snackbar;
import android.support.v7.app.AppCompatActivity;
import android.view.View;
import android.widget.Button;
import android.widget.EditText;
import android.widget.Toast;
public class MainActivity extends AppCompatActivity {
// STEP 1: CREATE OBJECTS ---------------------------------------------------------
private Button login_btn;
private EditText userNameTextField;
private EditText passwordTextField;
// --------------------------------------------------------------------------------
@Override
protected void onCreate(Bundle savedInstanceState) {
super.onCreate(savedInstanceState);
setContentView(R.layout.activity_main); // STEP 2: GIVE OBJECT A NAME ------------------------------------------------------// --------------------------------------------------------------------------------- // STEP 3: TELL OBJECT TO DO SOMETHING -------------------------------------------- login_btn = (Button) findViewById(R.id.loginButton);
login_btn.setOnClickListener(new View.OnClickListener() {
@Override
public void onClick(View view) {
userNameTextField = (EditText) findViewById(R.id.usernameInputField);
passwordTextField = (EditText) findViewById(R.id.passwordInputField);
// Log.i("Info", "The Login button was pressed.");
String usernameString = userNameTextField.getText().toString();
String passwordString = passwordTextField.getText().toString();
if(usernameString.equals("John Doe")&& passwordString.equals("admin")) {
Toast.makeText(getApplicationContext(), "ACCESS GRANTED TO: " + usernameString + ": "
+ passwordString, Toast.LENGTH_LONG).show();
// Intent detailPage = new Intent(MainActivity.this, DetailActivity.class);
Intent detailPage = new Intent(getApplicationContext(), DetailActivity.class);
detailPage.putExtra("UserNamePassed", usernameString + ", you are login!");
startActivity(detailPage);
}
else
{
// Toast.makeText(getApplicationContext(), "ACCESS DENIED", Toast.LENGTH_LONG).show();
Snackbar.make(view, "ACCESS DENIED", Snackbar.LENGTH_LONG).setAction("Action", null).show();
}
}
});
} // --------------------------------------------------------------------------------
(NOT WORKING WITH VIEW.ONCLICKLISTENER) Alternatively, you may see some developers "implement" the onClick Event Listener as an INTERFACE INSIDE the main class. In the previous code, notice the onCreate() method is wrapped around everything. However, in the code below, notice the onClick() method is separate from the onCreate() method. Also, note OnClickListener package has been imported. Major changes highlighed in bold below:
package com.example.loginscreen;

import android.content.Intent;
import android.os.Bundle;
import android.support.design.widget.Snackbar;
import android.support.v7.app.AppCompatActivity;
import android.view.View;
import android.view.View.OnClickListener;
import android.widget.Button;
import android.widget.EditText;
import android.widget.Toast;

public class MainActivity extends AppCompatActivity implements OnClickListener {

    private Button login_btn;
    private EditText userNameTextField;
    private EditText passwordTextField;

    @Override
    protected void onCreate(Bundle savedInstanceState) {
        super.onCreate(savedInstanceState);
        setContentView(R.layout.activity_main);
        login_btn = (Button) findViewById(R.id.loginButton);
        login_btn.setOnClickListener(MainActivity.this);
    }
    @Override
    public void onClick(View view) {
        userNameTextField = (EditText) findViewById(R.id.usernameInputField);
        passwordTextField = (EditText) findViewById(R.id.passwordInputField);
        // Log.i("Info", "The Login button was pressed.");
        String usernameString = userNameTextField.getText().toString();
        String passwordString = passwordTextField.getText().toString();
        if(usernameString.equals("John Doe")&& passwordString.equals("admin")) {
            Toast.makeText(getApplicationContext(), "ACCESS GRANTED TO: " + usernameString + ": "
            + passwordString, Toast.LENGTH_LONG).show();
            //Intent detailPage = new Intent(MainActivity.this, DetailActivity.class);
            Intent detailPage = new Intent(getApplicationContext(), DetailActivity.class);
            detailPage.putExtra("UserNamePassed", usernameString + ", you are login!");
            startActivity(detailPage);
        }
        else
        {
            //Toast.makeText(getApplicationContext(), "ACCESS DENIED", Toast.LENGTH_LONG).show();
            Snackbar.make(view, "ACCESS DENIED", Snackbar.LENGTH_LONG).setAction("Action", null).show();
        }
    }
}
OPTIONAL: Add Event Listener
The previous code used what is called an event handler approach. However, it is best practice to use an event listener approach even though it requires more code.
While adding the onClick attribute to a component (typically a button) is easier to implement and you don't need make a reference (Button login_btn = (Button) findViewById(R.id.loginButton);) in the Java code for the object that is being clicked, it is not the best programming practice because it couples the code with a component which should be separate. This is typically called tightly couped. To use what is called loosely couple, we will separate the presentation layer (xml) from the code layer (Java).
- Delete the onClick attribute from the Login button either by delete it in the activity_main.xml (e.g., android:onClick="loginEventHandler") or from the Properties panel (e.g., loginEventHandler).
NOTE: The onClick attribute will not be needed because the button click will be code in the Java file instead of the XML file.
- Add a private instance variable for the userNameTextField that is in the XML file ABOVE the @Override statement but within the MainActivity class:
public class MainActivity extends AppCompatActivity {CODE EXPLANATION:
private EditText userNameTextField; private EditText passwordTextField;
private Button login_btn;
@Override
- A private instance variable is created outside of the onCreate() method so that it can be used anywhere.
- Now that we have three private instance variables, it is important to note that they correspond to the three components from the XML file that are being used in code. Hence, any component that you used in your code that you need to refer to in code needs to be made a private variable. You don't have to do it for all components only the ones that will be used in code.
- Add the following line of code in the onCreate method:
TIP: First, type Button login_btn = (Button) findViewById(R.id.loginButton);. Then, click within the code and press ALT+ENTER and to automatically add the import package at the top of the file (e.g., import android.widget.Button;). Press ALT+ENTER again and select Cast to 'android.widget.Button' from the menu to cast the generic view on the right side of the equal sign to a Button view. This will add (Button) to the code. You could have just as easy type it if you want to.
public class MainActivity extends AppCompatActivity {CODE EXPLANATION:
@Override
protected void onCreate(Bundle savedInstanceState) {
super.onCreate(savedInstanceState);
setContentView(R.layout.activity_main);
login_btn = (Button) findViewById(R.id.loginButton);
}
}
- IMPORTANT CONCEPT TO REMEMBER: The highlighted line of code is used to STORE a REFERENCE (a hook) of an XML component element (e.g., XML Button: <Button />) by using its id (e.g., R.id.loginButton) INSIDE of a Java object (Java Button: login_btn) so that it can be used by the JAVA code. This is a common programming step that you will use quite often.
- Write the following highlighted code below the previous code that was added:
public class MainActivity extends AppCompatActivity {CODE EXPLANATION:
@Override
protected void onCreate(Bundle savedInstanceState) {
super.onCreate(savedInstanceState);
setContentView(R.layout.activity_main);
login_btn = (Button) findViewById(R.id.loginButton); login_btn.setOnClickListener(new View.OnClickListener()){};
}
}
- The highlighted line of code is used to register a listener for the button so that when it is clicked other actions can take place.
- With cursor inside the curly braces, press ALT+ENTER and select Implement Methods from the menu and in the dialog box that appears, accept the default and press the OK button to AUTOMATICALLY write the following highlighted code:
protected void onCreate(Bundle savedInstanceState) {CODE EXPLANATION:
super.onCreate(savedInstanceState);
setContentView(R.layout.activity_main);
Button login_btn = (Button) findViewById(R.id.loginButton);
login_btn.setOnClickListener(new View.OnClickListener() {
@Override
public void onClick(View view) {
}
});
}
- The @Override is used to override the default onClick method.
- The onClick method is the same as onClick attribute in the XML file.
- Cut the following highlighted code from the loginEventHandler method and paste it between the curly braces in the onClick method:
protected void onCreate(Bundle savedInstanceState) {CODE EXPLANATION:
super.onCreate(savedInstanceState);
setContentView(R.layout.activity_main);
login_btn = (Button) findViewById(R.id.loginButton);
login_btn.setOnClickListener(new View.OnClickListener() {
@Override
public void onClick(View view) {
userNameTextField = (EditText) findViewById(R.id.usernameInputField);
passwordTextField = (EditText) findViewById(R.id.passwordInputField);
// Log.i("Info", "The Login button was pressed.");
String usernameString = userNameTextField.getText().toString();
String passwordString = passwordTextField.getText().toString();
if(usernameString.equals("John Doe")&& passwordString.equals("admin")) {
Toast.makeText(getApplicationContext(), "ACCESS GRANTED TO: " + usernameString + ": " + passwordString, Toast.LENGTH_LONG).show();
}
else
{
// Toast.makeText(getApplicationContext(), "ACCESS DENIED", Toast.LENGTH_LONG).show(); Snackbar.make(view, "ACCESS DENIED", Snackbar.LENGTH_LONG).setAction("Action", null).show();
}
}
});
}
- Notice the Content agrument can be written in one of three ways. However, the last option is the most perferred option because it is the most flexible and reliable.
- Toast.makeText(this...
- Toast.makeText(MainActivity.this...
- Toast.makeText(getApplicationContext()...
- Delete the empty loginEventHandler event handler code that is left after you cut from it:
public void loginEventHandler(View view) {CODE EXPLANATION:
}
- It is important to note that the event handler code was created OUTSIDE of the onClick method; whereas, the event listener was created INSIDE of the onClick method so that that the code can run when the app in created so that the listener can be active.
- Change v to view in two locations in the code:
public void onClick(View view) {Snackbar.make(view, "ACCESS DENIED", Snackbar.LENGTH_LONG).setAction("Action", null).show();
- CHECKPOINT: Click the Run icon () and switch to (or start) the AVD. Perform the same checkpoint steps as the previous example. You should see the app behave the same but with the added advantage of the code layer (Java) being separated from the presentation layer (XML).
OPTIONAL: Navigate to Another Activity
Remember, an activity is akin to an HTML page. We will write the code that will take the user to another page if the login is successful.
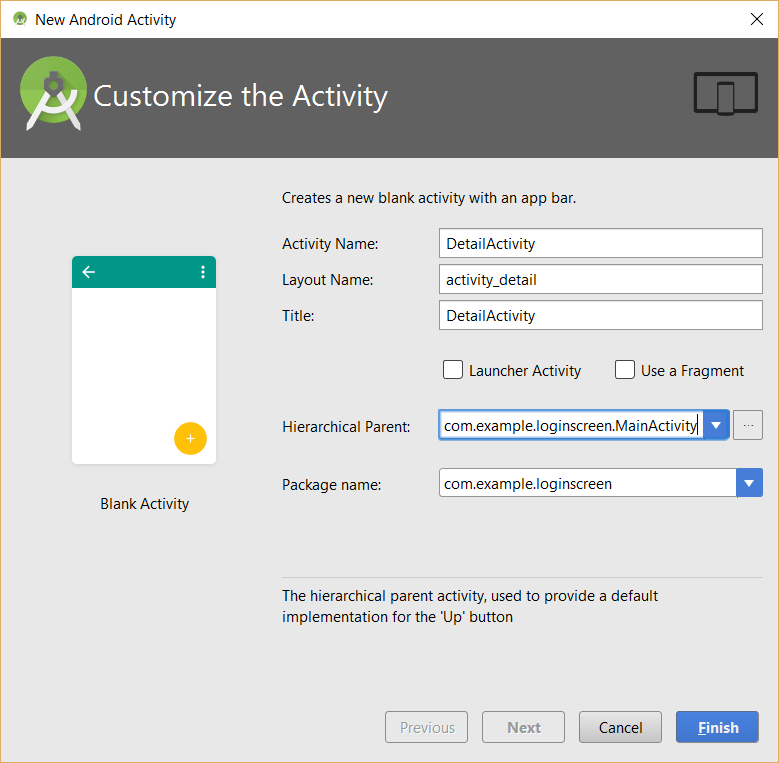
- Select File > New > Activity > Blank Activity.
- In the Customize the Activity dialog box that appears:
- Type DetailActivity in the Activity Name text file
- Click the browse button and select MainActivity from the list.
NOTE: This will write the following line of code in this file that is responsible for showing the Back button on older Android devices:
getSupportActionBar().setDisplayHomeAsUpEnabled(true);
- Ensure the Package name is set to com.example.loginscreen.
- Click the Finish button.
- Type DetailActivity in the Activity Name text file
- CHECK POINT: This will create three files:
- MainActivity.java
- activity_detail.xml and content_detail.xml
The two xml files makes up the detail page. If you open the activity_detail.xml file, you see that it has an include element to the content_detail.xml file (e.g., <include layout="@layout/content_detail" />).
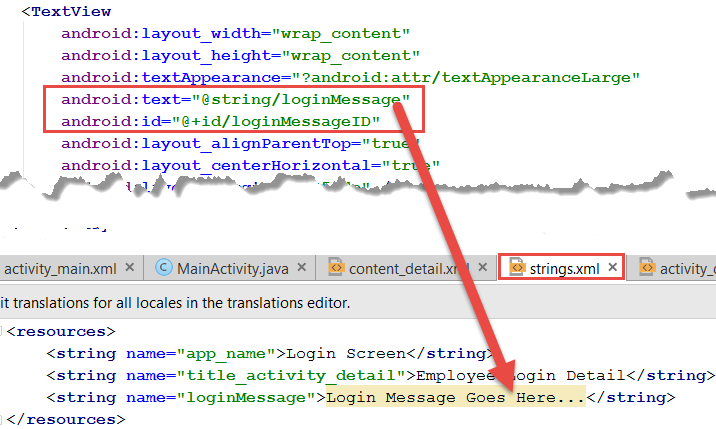
- Open the strings.xml file and modify the file to read:
<resources>
    <string name="app_name">Login Screen</string>
    <string name="title_activity_detail">Employee Login Detail</string>
</resources>
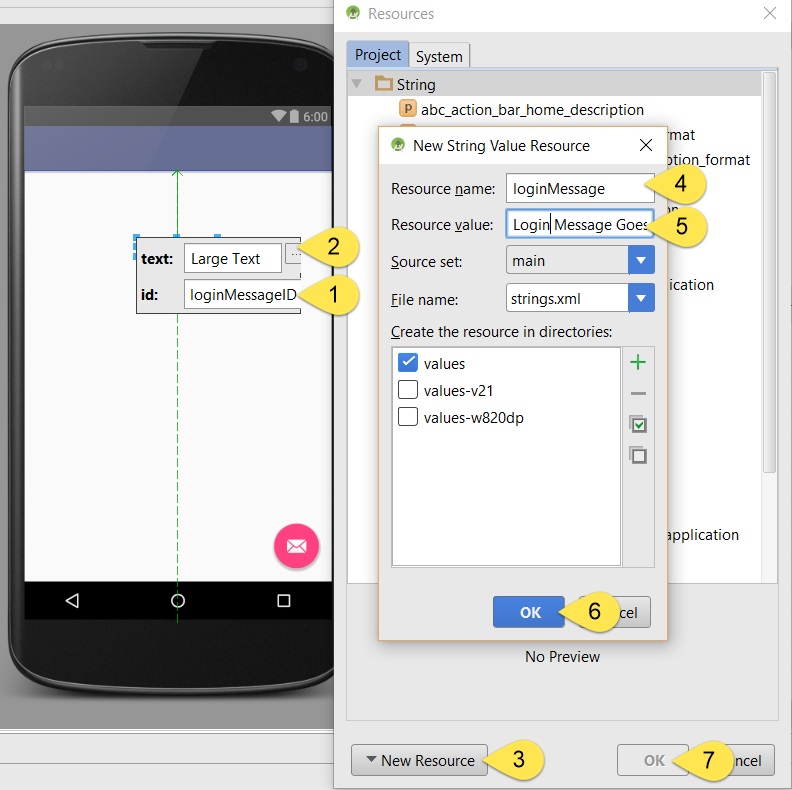
- Open the content_detail.xml file and drag and drop a Large Text component to the top and center of the screen and then:
- Double-click it and in the id text field, enter loginMesssageID
- Click the small button (...) and In the Resources dialog box that appears
- Click the New Resource button and select New String value...
- In the New String Value Resource dialog box that appears, in the Resource name text field, enter loginMessage
- In the Resource value text field, enter Login Message Goes Here...
- Click the OK button to click the New String Value Resource dialog box
- Click the OK button again to close the Resources dialog box
- CHECK POINT: This is the visual way of create both the component resource string and its id value. Behind the scene, the data is written in two files:
In the content_detail.xml file, the loginMessage is set as a resource string (@string/loginMessage) which points to the strings.xml file which has the actually text that is shown on the screen. The id is set directly in this file. Note, however, it starts with "@+id/" along with the id name.
- In the MainActivity.java file, add the following highlighted code in the first part of the "if" statement:
if (usernameString.equals("John Doe") && passwordString.equals("admin")) {CODE EXPLANATION:
Toast.makeText(getApplicationContext(), "ACCESS GRANTED: " + usernameString + ": " + passwordString, Toast.LENGTH_LONG).show(); Intent detailPage = new Intent(MainActivity.this, DetailActivity.class); // Intent detailPage = new Intent(getApplicationContext(), DetailActivity.class);
startActivity(detailPage);
}
- Unlike the onClick handler that uses this, the onClick event listener uses MainActivity.this because it is nested inside of the login_btn.setOnClickListener so you have to add MainActivity to the front of this to get the correct reference.
- The startActivity method takes one argument which is the Intent (e.g., detailPage) itself. Th e intent is respondable for:
> Triggering a Broadcast Receiver
> Starts a Service via an activity or Broadcast Receiver
> Navigate from activity to activity
> Pass data from one activity to another and back
- Instead of using MainActivity.this, use could have used getApplicationContext(). Doing so makes it easier to reference without having to target the parent element (See Commented code above).
(e.g., Intent detailPage = new Intent(getApplicationContext(), DetailActivity.class);)
- If you are not passing additional information to another activity as we will do i the next step, instead of using two lines of code to start another activity, you could use a single line of code by passing the intent as an argument in the startActivity() method: startActivity(new Intent(MainActivity.this, DetailActivity.class));
- CHECK POINT: Perform the following steps:
- Click the Run icon () and switch to (or start) the AVD.
- Enter the following and then click the Login button:
- John Doe as the name into the User Name: text field
- admin as the password into the Password: text field
You should see the message "ACCESS GRANTED TO: <Username> : <Password>" displayed in the popup message AND the screen should change to reflect the Detail activity (e.g., page).
- Click the Run icon (
OPTIONAL: Pass Data to Another Activity
Now that we have seen how to navigate to another page, in the section we will show how to pass information from the Login page to the Detail page.
- Open MainActivity.java and add the following highlighted code:
Intent detailPage = new Intent(getApplicationContext(), DetailActivity.class);
CODE EXPLANATION:
detailPage.putExtra("UserNamePassed", usernameString + ", you are login!");
startActivity(detailPage);
- The putExtra method is used to put (or set) "extra" information that can be passed to another page. In the DetailActivity.java file, you will see the getExtra method used to "get" the extra information. The first argument is used a a key that will be used on the detail page. The second argument is any string that you want to write.
- Open DetailActivity.java and add the following highlighted code:
public class DetailActivity extends AppCompatActivity {CODE EXPLANATION:
private TextView loginTextView;
@Override
protected void onCreate(Bundle savedInstanceState) {
super.onCreate(savedInstanceState);
setContentView(R.layout.activity_detail);
Toolbar toolbar = (Toolbar) findViewById(R.id.toolbar);
setSupportActionBar(toolbar);
loginTextView = (TextView) findViewById(R.id.loginMessageID);
Bundle extras = getIntent().getExtras();
if(extras != null){
String myLoginString = extras.getString("UserNamePassed");
loginTextView.setText(myLoginString);
}
- A private instance variable (private TextView loginTextView;) is created and then assigned to a TextView object (loginTextView = (TextView) findViewById(R.id.loginMessageID);).
- The Bundle is used...
- Notice the getIntent() method is called first and then the getExtra() method is called next from the main activity.
- The variable extras is checked with an "if" state to ensure it is not empty and if so it is converted to a string.
- The getString() method is passed the key from the main activity (UserNamePassed).
- The setText() method is used to set the string value to the loginTextView component.
- CHECKPOINT: Click the Run icon () and switch to (or start) the AVD. Perform the same checkpoint steps as the previous example. You should see that when you enter the correct username and password and then click the Logn button, you will be taken to the detail screen with a custom message displayed (e.g., John Doe, you are login!).