Create New Project
In this tutorial, we will create an training app that will provide Q&A session on a particular topic:
- Open Android Studio and select File > New > Project.
- In the New Project dialog box that appears, type Bitmap vs Vector for the Application name.
- Type example.com as the Company Domain and accept the other defaults and then click the Next button.
- In the Target Android Devices dialog box that appears, select only the Phone and Tablet checkbox, its default Minimum SDK and then click the Next button.
- In the Add an activity to Mobile dialog box that appears, select the Blank Activity option and then click the Next button.
- In the Customize the activity dialog box that appears, type Bitmap vs Vector in the Title text field, accept the other defaults and then click the Finish button.
The ABCs Of Creating An Object
As in many objects that are created, we will:
- Create objects (with elements and styles)
- Give objects names (with ids and resource strings)
- Tell objects to do something (with Java code)
Even within the Java code, you still do the same thing:- Create objects
- Give objects names
- Tell objects to do something
NOTE: While you can do most of these items in any combination, we will do it in the order above to start with the simple concepts (creating and naming objects) and then move to the more advanced concept (adding code).
Create Objects with Elements
In this version, we will simple drag and drop components that are needed for the app onto the screen. These components are XML elements that get compiled to their appropriate Java objects type when the app is built.
- From the Android view under the layouts folder, open content_main.xml if it is not already open.
- In Design view, right-click on the Hello World text and select Delete from the menu.
- From the Palette panel, drag-and-drop four buttons and center them horizontally on the stage with a margin of about 40dp between them.
NOTE: You can see the margin value and center guide line as you drag a button on the phone.
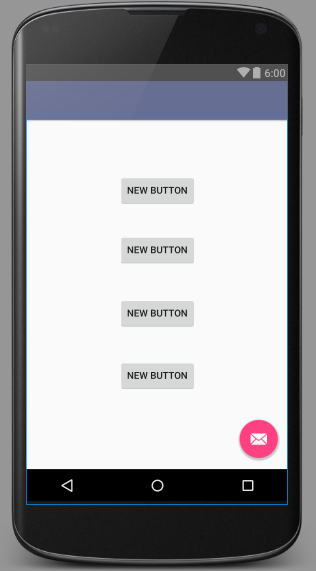
- Click on each button and then in the Properties panel or in the Text view, change the:
- layout_width to 400dp
- layout_height to 80dp
- textSize to 20sp (attribute needs to be added in Text View)
- Move the four button after adding these attributes because they will shift the button downward.
TIP: In Text view, set the attributes that are common to all buttons for the first button on the first three lines in the <Button> element and then copy and paste those three lines into the other buttons. You will be selecting two line to replace them with three lines of code:
<Button
    android:layout_width="400dp"
    android:layout_height="80dp"
    android:textSize="20sp"
    android:text="Bitmap/Vector Definitions"
    android:id="@+id/definitionButtonID"
    android:layout_marginTop="37dp"
    android:layout_alignParentTop="true"
    android:layout_centerHorizontal="true" />
- The unit of measurement when working in Android Studio for text is sp which stands for scalable independent pixels. While dp (device independent pixels) is used for most everything else. sp is best used for text so that it can scale correctly based on the user customized size preferences.
Change Default Launcher Icon
Before you publish your app you will want to change the default green Android icon ( ![]() ) that shows on a user phone or tablet.
) that shows on a user phone or tablet.
- Find an image that you want to use to create the various mipmap icons.

- Select File > New > Image Asset and then in the Asset Studio dialog box that appears, select the browser (
 ) button and select the image you want to use.
 - Modify any other options you want.
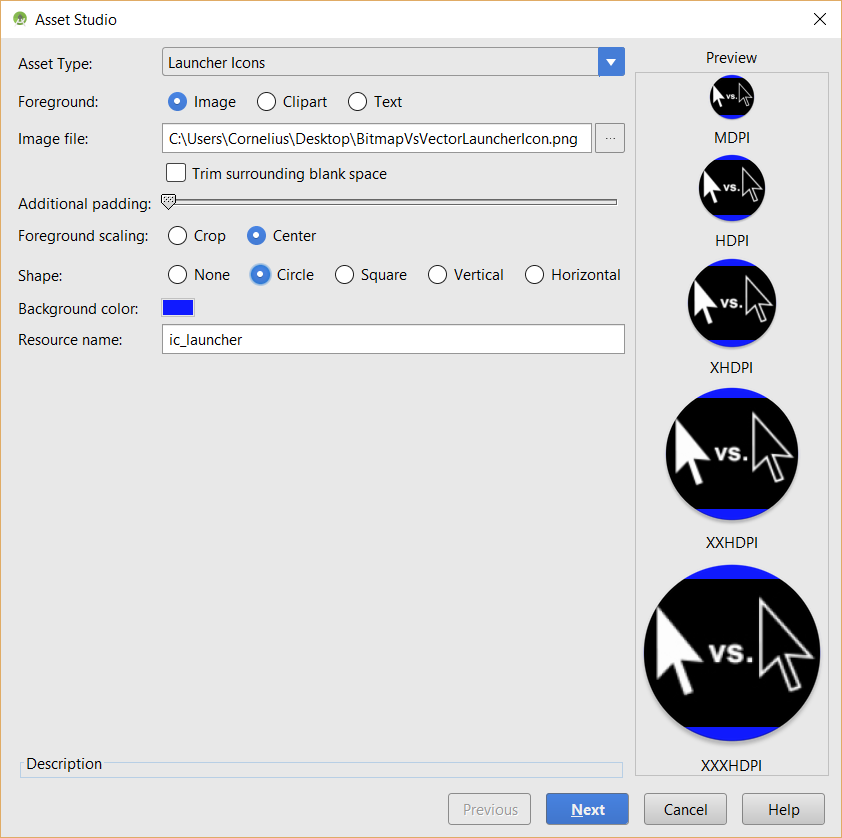
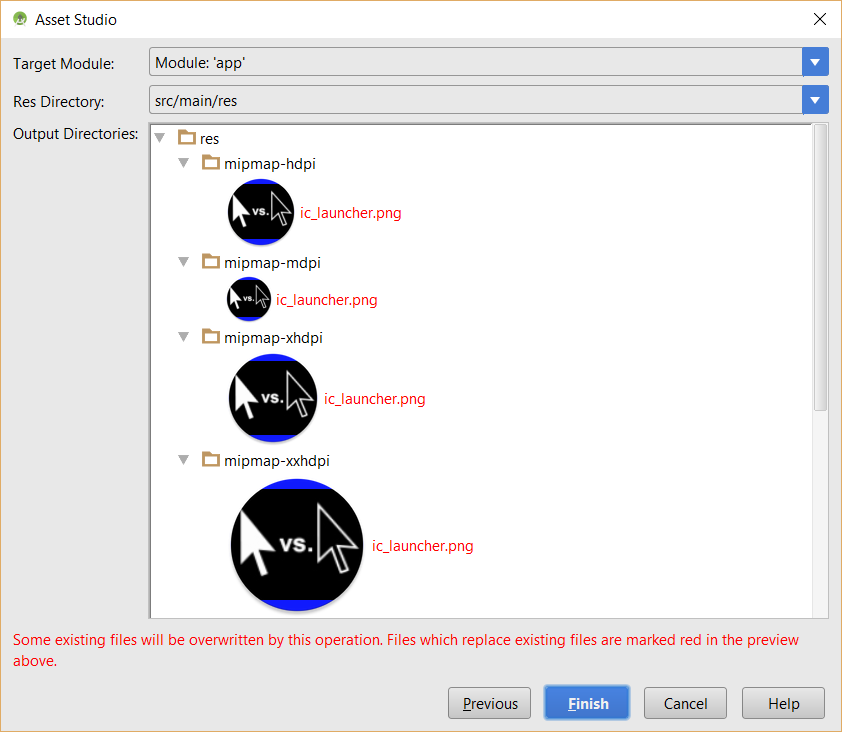
- In the next screen that appears, click on the Finish button.
NOTE: Notice the warning in red that states that some of the files wlll be overwritten. That's OK because you don't ever want to have the green Android icon as your launcher icon if you want to publish your app. If you scroll down, you will see that it created an additional icon called ic_launcher-web.png that can be seen in the res folder in Project view.
- Open up the AndroidManifest.xml file and change the icon name (ic_launcher) to your icon name:
<?xml version="1.0" encoding="utf-8"?>
<manifest xmlns:android="http://schemas.android.com/apk/res/android"
    package="com.example.bitmapvsvectorqa">

    <application
        android:allowBackup="true"
        android:icon="@mipmap/android_icon"
- CHECK POINT: Launch the app on an emulator or phone and you should see the new laucher icon displayed.
- (Optional) Since the default icon is no longer needed, you can safely delete them from all of the mipmap folders.
Add Background Images (Optional, may be done later. If Create Button States is done, this process does not have to be done at all.)
While optional, adding background images will help to distinguish your app from a typical default app design.
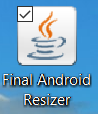
While you could create all the various drawable images files yourself, there are tools that can automate the process for you and you don't have to worry about knowing the dimension size for each image--a big time saver.. We will be using a tool is called Final Android Resizer that is located at https://github.com/asystat/Final-Android-Resizer. Click on the download link to download the jar file.
- Double-clikck on the Final Android resizer icon to open it.
- In the dialog box that appears,
- Click on the Browser button and navigate to project res folder.
- Select an input density (e.g., xxhdpi).
- Select all of the input densities except tvdip since we are not designing for tv.
- Drag and drop a large background image to the drop area.
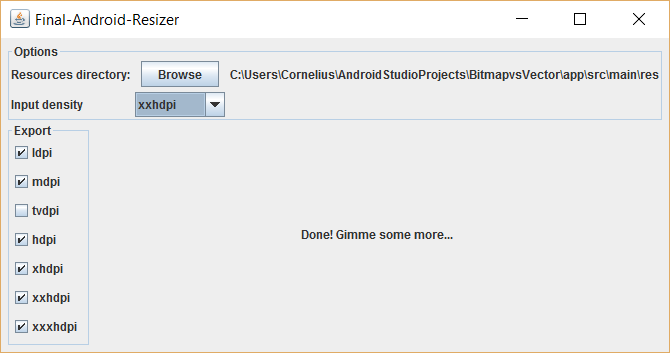
NOTE: When you drag and drop an image it will AUTOMATICALLY create the folder and images in the res folder.
- Add a background attribute in the content_main.xml file at the end of the opening RelativeLayout element tag.
<RelativeLayout xmlns:android="http://schemas.android.com/apk/res/android" ... tools:context="com.example.bitmapvsvectorqa.MainActivity"
CODE EXPLANATION:
tools:showIn="@layout/activity_main"
android:background="@drawable/bg">
Because the name is the SAME in each folder, the Android OS will retrieve the correct image based on the device dpi capability.
- CHECK POINT: You should see the background image being displayed behind the buttons.
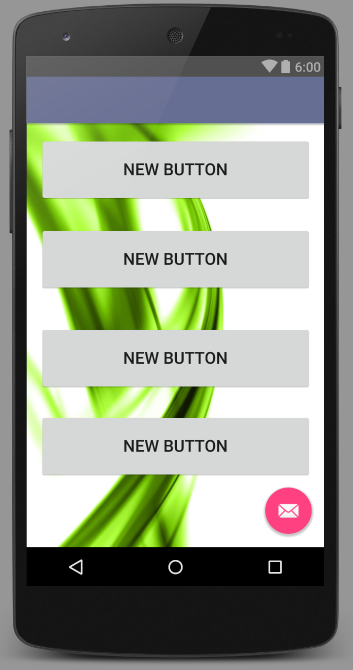
- Copy and paste an image that will be used as the buttons' background (e.g, button_background_default.png) into the drawable folder.
- Add a background attribute in the content_main.xml file at the end of the Button element and set its value to button_background_default. Also, add a textColor attribute and set its value to #ffffff (white).
<Button
    android:layout_width="400dp"
    ...
    android:background="@drawable/button_background_default"
    android:textColor="#ffffff"/>
- Copy and paste the two attributes added in the previous step to the other three buttons:
- CHECK POINT: You should see the background image being displayed INSIDE the buttons.
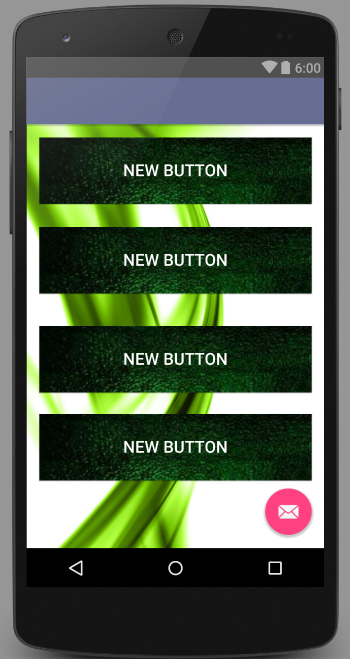
Create Button States (optional, can be done later)
To make the button even more interactive, you can added multiple states (normal and pressed) to the button by creating a custom layout and assigning it to the buttons.
- Copy an image that can be used as the "pressed" state for the buttons (e.g., button_background_pressed.png ) into the drawable folder. If you did not do the previous process (Add Background Images) include another image for the "normal" state as well in the copy and paste operation. (e.g., button_background_default.png).
- Right-click on the drawable folder and select File > New > XML > Layout XML File.
- In the Customize the Activity dialog box that appears, type custom_button_states as the Layout File Name and selector as the Root Tag.
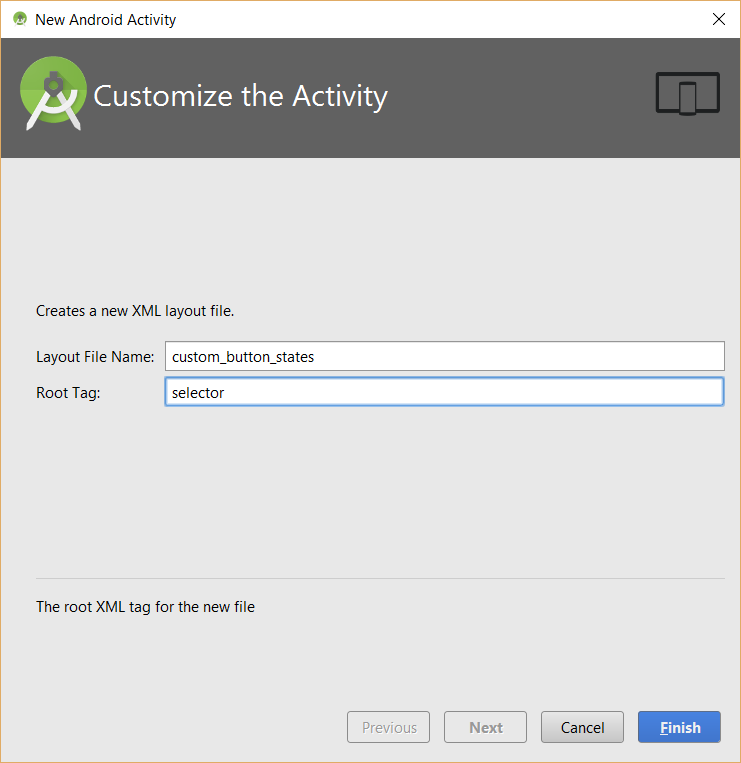
- Click the Finish button.
- In the custom_button_states.xml file that appears, add the following highlighted code:
<?xml version="1.0" encoding="utf-8"?>
<selector xmlns:android="http://schemas.android.com/apk/res/android"
    android:layout_width="match_parent"
    android:layout_height="match_parent">
    <item android:drawable="@drawable/button_background_pressed" android:state_pressed="true" />
    <item android:drawable="@drawable/button_background_default" />
</selector>
CODE EXPLANATION:
- The two <item> elements are used to define the default and pressed states of a button.
- It is helpful to think of each <item> element as a separate state (normal and pressed).
- The state_pressed="true" attribute is used to register the press state. There is no need to have an attribute for the default state. - In the content_main.xml file REPLACE the background property (android:background="button_background_default") for EACH button with:
android:background="@drawable/custom_button_states"
CODE EXPLANATION:
- Notice that the background image was replaced an *xml file. - CHECK POINT: To see if the code associated with the button is working correctly, switch to (or start) the AVD and then click the ANY button. Press and hold on any button and you should see that the state of the button change to the pressed state that was defined in the custom_button_state.xml file.
Create Additional Portraits Layouts
Review Lecture 43 in the Android Lollipop and Marshmallow Tutorial Apps by Smartherd Developers, Global IT Training Experts.
Create Additional Landscape Layouts
Review Lecture 44 in the Android Lollipop and Marshmallow Tutorial Apps by Smartherd Developers, Global IT Training Experts.
Give Objects Names / IDs
While you could have done this at the SAME time you create each component above, we wanted to do it in a systematic approach. However, in real production it would be best to create the components and give them names at the same time they are created.
IMPORTANT CONCEPT TO REMEMBER: It is important to name every component that will be used by Java code with an id. The id is used to store a reference of the element in a Java object as you will see later.
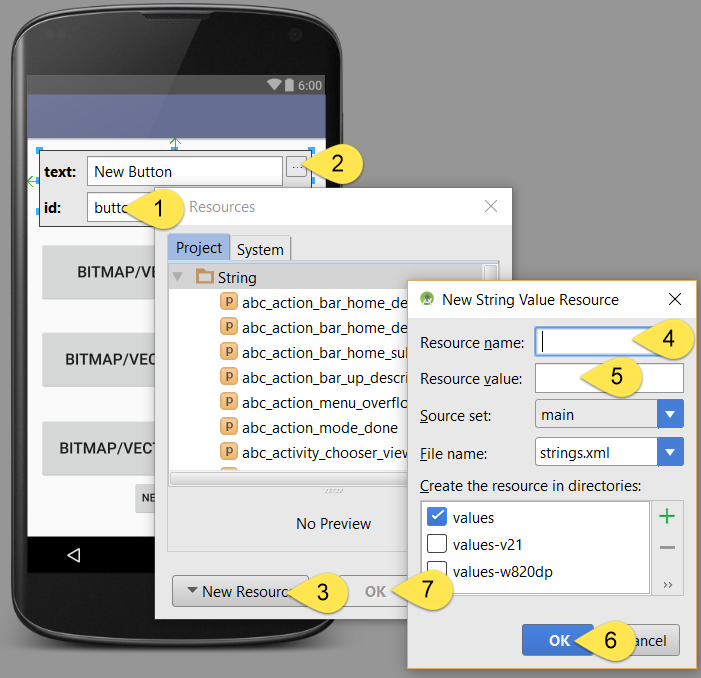
- Double-click on the first button and then follow the yellow tabs below:
- In the id text field, enter definitionsButtonID.
- Click on the Resources button to open the Resources dialog box.
- In the Resources dialog box, click on the New Resource drop-down at the bottom of the dialog box and select New String Value... option
- In the New String Value Resource dialog box that appears, in the Resource name text field type defintionsButton (In our case, we are using the same name as the id value but without "ID").
- In the Resource value text field type Bitmap/Vector Definitions which will be the button label name.
- Click the OK button to close the New String Value Resource dialog box.
- Click the OK button to close the Resourcs dialog box.
NOTE: While these steps may seem tedious, they because easy after you do them a few times. More importantly, they perform several tasks, they give a button:- a name
- an id
- a resource string
- Repeat the previous steps but change the Resource names and values as shown in the Component Tree panel below for the other three buttons

- CHECK POINT: In the Values folder, double-click on the strings.xml file to open it up. You should see the string resources that were created for the four buttons (highlighted below):
<resources>
<string name="app_name">Bitmap vs Vector Q&A</string>
<string name="action_settings">Settings</string>
<string name="formatsButton">Bitmap/Vector Formats</string>
<string name="conversionButton">Bitmap/Vector Conversion</string>
<string name="optimizationButton">Bitmap/Vector Optimization</string>
<string name="definitionsButton">Bitmap/Vector Definitions</string>
</resources>
IMPORTANT CONCEPT TO REMEMBER: It is important to set every strings in your app that can be converted to another language to a string resource (e.g., @id/my_string_name) instead of a string literal (e.g., "my literal string in quotes").
Tell Objects To Do Something with Code
Again, you could have written some code as you created the components like adding an onClick handler to the button. However, we wanted to do this step in a a logical manner.
- In the Properties panel, scroll to the onClick property field and type buttonEventHandler for EACH button.
TIP: After entering the first buttonEventHandler text, copy and paste it for the other three button onClick property.
NOTE: Each button will use the SAME event handler in the Java Code that will be created in the next two step. - Click the Text tab at the bottom of the screen again.
- Click inside the buttonEventHandler text for ANY one of the button, press ALT+ENTER and select Create onClick event handler from the list.
- In the Choose Activity to Create the Method dialog box that appears, click the OK button.
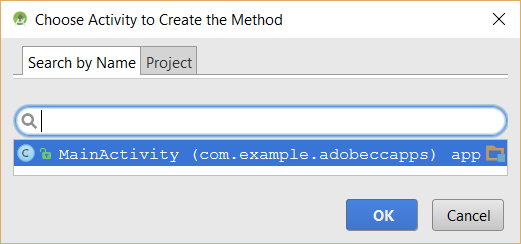
- CHECK POINT: Notice that the MainActivity.java opens and AUTOMATICALLY create the event handler stub for the onClick() method. You could have manually added the onClick attribute to the button in the *.xml file and manually type the loginEventHandler code in the *.java file (But why, when you can automate the process).
- Add the following highligted code between the curly braces:
public void buttonEventHandler(View view) {
  Log.i("Info", "A button was clicked.");
}
CODE EXPLANATION:
- The buttonEventHandler has two view arguments. The first one defines the data type of View and the second is the name of the View (which is "viewed" with a lower case v).
- The ".i" on the Log class refers to information.
- The first argument is a title that is used to filter the message and the second argument is the message itself.
- IMPORTANT CONCEPT TO REMEMBER: While it is obvious that a button can be made clickable, it is important to remember that ANY viewable component can be made clickable (e.g., image, text, etc.).
- It is best practice to create a static variable that will hold the String tag (e.g., private static final String TAG = "MainActiviry"). The word final means it is a constant and will not change. Then, when you use it, you would type: Log.i(TAG, "String goes here...")
TIP: If you did not create the String tag FIRST, you can still create it AFTER you write the Log statement (Log.i(TAG, "String goes here...");). Click inside of the word TAG and press ALT+ENTER and select Create constant field 'TAG' from list:
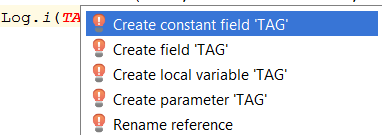
Then, select a Target Class:

Then, type the type name in quotes after the equal in the code that is automatically created:
private static final String TAG = "MainActivity";
// OR
private static final String TAG = MainActivity.class.getSimpleName(); - If necessary, press ALT+ENTER again to AUTOMATICALLY import the View class (e.g., import android.view.View;) at the top of the code.
- Open the logcat panel at the bottom of the screen, right-click inside it and select Clear All from the menu, if neccessary to see the result easier.
- CHECK POINT: To see if the code associated with the button is working correctly, switch to (or start) the AVD and then click the ANY button. You should see the message, "A button was clicked." in the logcat panel.
- Delete or comment out the previous line of code and write the following highlighted code in the existing code block.
public void buttonEventHandler(View view) {
//Log.i("Info", "A button was clicked.");
switch (view.getId()){
case R.id.definitionsButtonID:
Log.i("Info", "The Definitions button clicked.");
break;
case R.id.formatsButtonID:
Log.i("Info", "The Formats button clicked.");
break;
case R.id.conversionButtonID:
Log.i("Info", "The Conversion button clicked.");
break;
case R.id.optimizationButtonID:
Log.i("Info", "The Optimization button clicked.");
break;
}
}
CODE EXPLANATION:
- The second view in the buttonEventHandler is called an event object. It "sneaks in" properties (e.g., name, id) of THE SPECIFIC object (button) that was clicked on. This way, you don't have to create a separate onClick event handler for EACH button. Then, a method like getID() can be used to ascertain the id of the specific button that was clicked.
- The condition (view.getId()) in the switch statement is used to check for which button was clicked and the case statements are used to respond to the correct condition and perform the desired action (e.g., Log.i...). - CHECK POINT: To see if the code associated with the button is working correctly, switch to (or start) the AVD and then click the ANY button. You should see the message, "The <APP NAME> button was clicked." in the logcat panel. Where, APP NAME is the correct id name of the button that was clicked.
Create New Activities (Pages)
Now that we have all of the buttons created and working within the same activity (page), we will now create MULTIPLE activities (pages) that corresponds to each button.
Navigate To New Activities (Pages)
Now that we have created new activities, we need to write the code to navigate to those activities.
- Comment out or delete the four Log statements.
- In the MainActivity.java file, add the following highlighted code in the first part of the "if" statement:
    public void buttonEventHandler(View view) {
        // Log.i("Info", "A button was clicked.");
        switch (view.getId()){
            case R.id.dw_buttonID:
                // Log.i("Info", "The Dreamweaver button clicked.");
                Intent dwPage = new Intent(MainActivity.this, DWActivity.class);
                startActivity(dwPage);
                break;
            case R.id.ps_buttonID:
                // Log.i("Info", "The Photoshop button clicked.");
                Intent psPage = new Intent(MainActivity.this, PSActivity.class);
                startActivity(psPage);
                break;
            case R.id.ai_buttonID:
                // Log.i("Info", "The Illustrator button clicked.");
                Intent aiPage = new Intent(MainActivity.this, AIActivity.class);
                startActivity(aiPage);
                break;
            case R.id.id_buttonID:
                // Log.i("Info", "The InDesign button clicked.");
                Intent idPage = new Intent(MainActivity.this, IDActivity.class);
                startActivity(idPage);
                break;
        }
    }
}
CODE EXPLANATION:
- The startActivity method takes one argument which is the Intent (e.g., detailPage) itself. The intent is respondable for:
> Triggering a Broadcast Receiver
> Starts a Service via an activity or Broadcast Receiver
> Navigate from activity to activity
> Pass data from one activity to another and back
- Instead of using MainActivity.this, use could have used getApplicationContext(). Doing so makes it easier to reference without having to target the parent element (See Commented code above).
(e.g., Intent detailPage = new Intent(getApplicationContext(), DetailActivity.class);)
- If you are not passing additional information to another activity as we will do i the next step, instead of using two lines of code to start another activity, you could use a single line of code by passing the intent as an argument in the startActivity() method: startActivity(new Intent(MainActivity.this, DetailActivity.class)); - CHECK POINT: To see if the code associated with the button is working correctly, switch to (or start) the AVD and then click the ANY button. You should see that it will take you to the corresponding activity (page). Click the Back button (
 ) to return to the main activity (home page).