If you are using PhoneGap CLI (Command Line Interface), you need to download SDKs. However, if you are using PhoneGap Build Cloud-based service you DO NOT need to download SDKs.
Setting up an Android work emulator environment allows you to fully test an application for the Android market on a variety of OS versions.
- To download the Android SDK, go to developer.android.com and click on the "Get the SDK" link at the bottom of the page. (or simply go to developer.android.com/sdk)
NOTE: If you are using Eclipse, you can also download the Eclipse ADT. - Click on "GET THE SDK FOR AN EXISTING IDE" and then click the Downloading the standalone Android SDK Tools for Windows button or Downloading the standalone Android SDK Tools for Mac button.
- Click on the checkbox to agree with the terms and conditions and then click on the download button.
NOTE: The download comes on a Mac as a .zip file and on Windows as a standard installer. You will need to install the Java SE development kit (JDK) for Windows and Mac. If the installer doesn't find it, you will be alerted to install it before you can install the SDK. - Once downloaded, double-click to install it to the default folder (e.g., C:\Users\Cornelius Chopin\AppData\Local\Android\android-sdk).
TIP: Create a shortcut to this folder. NOTE: You may need to show hidden folders in order to navigate to SDK. - Launch the SDK Manager. On the PC, double-click the icon. On the Mac, right-click and then select "Open."
NOTE: On the Mac, copy the downloaded folder (AndroidSDK-MacOSx) to the desktop in a new folder called Android and then open the folder tools.- In the Android SDK Manager dialog box, select the latest stable releases of the Android Tools.
- Select the latest stable releases of the APK, etc. for the phones/tablets devices you like to install.
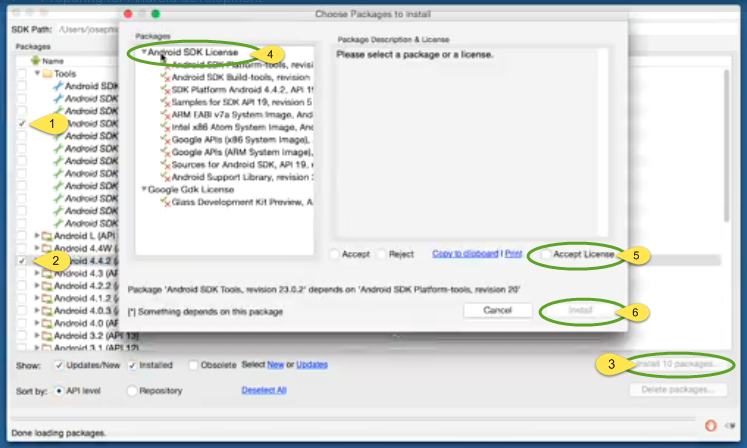
TIP: You don't need to select the previews or wearables if you are just wanting to demo standard handheld devices. - Click to Install the XX packages... button (where XX represents the number of packages)
- Choose a license (Android SDK License)
- Select the Accept license checkbox
- Click the Install button
NOTE: It may take a while to install packages, etc.
- On the Android SDK Manager log dialog box that appears, click the Close button.
- CHECK POINT: You should see the packages the word "installed" in the Status column of the Android SDK Manager for each package.
Manage Android Virtual Device (AVD)
An AVD is a configuration that combines the profiles of:
- hardware/software
- device itself
- Android OS versions to emulate
- With the Android SDK manager opened, choose Tools > Manage AVDs.... There are two views:
- The Android Virtual Devices shows any existing AVDs and allows you to edit, delete or launch in the emulator.
- The Device Definitions displays a list of devices. It can also be used as a starting point to create your own AVD.
- Select a phone type (e.g., Nexus One) that is similar to what you need and then click Create AVD... button.
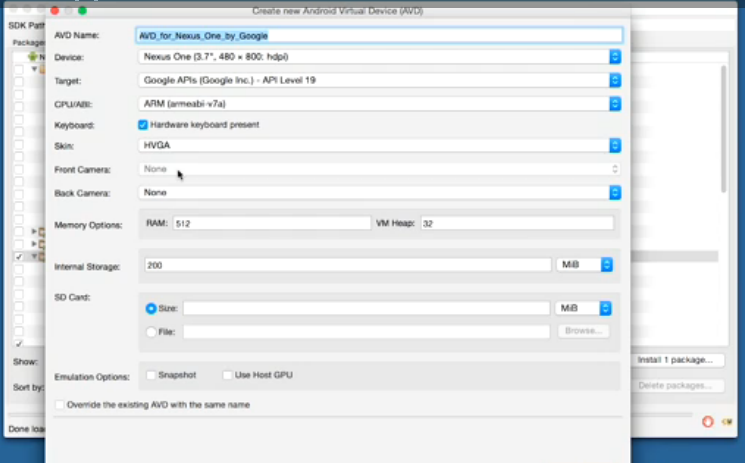
- In the Create New AVD dialog box that appears with some of the fields already completed if you chose a Device definition, add the following options:
- Select a Target: (e.g., Android 7.0 - API Level 31). NOTE: A target is a version of the SDK that you want to use
- CPU/ABI: Arm NOTE: Most manufactures uses ARM.
- Skin: HVGA NOTE: HVGA is a standard baseline skin. The OK button should now be enabled letting you know you meet the minimum requirement that is needed. However, you can add other options as necessary (camera, memory, storage, etc.)
- SD Card: 128
- Click the OK button.
- In the Confirming dialog box that appears that shows the details, click the OK button again.
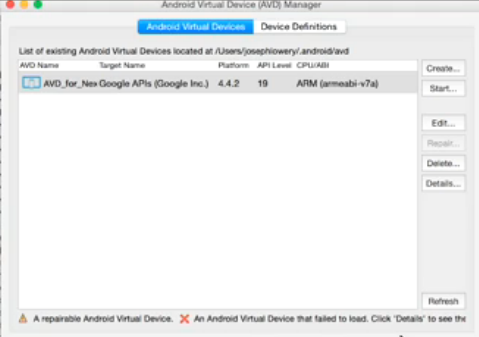
- CHECK POINT: In the Android Virtual Devices view, you should see the new AVD:
Test App In Emulator
The next step is to test your app using an emulator.
- Select from one of the AVDs created earlier (e.g., Nexus One).
- Click Start... button to launch the emulator.
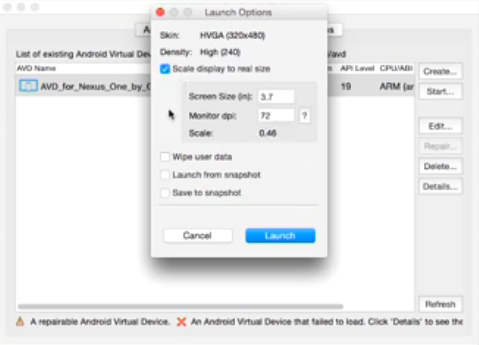
NOTE: What you choose in the dialog box that appears will vary depending on the emulator size you want to display and you current system - Set the following options:
- Choose the scale display to real size checkbox.
NOTE: Otherwise, the display will be small. - Change the screen size to a multiple of 3.7 so it will fit the monitor better. (e.g., 7.4)
- Click the Launch button.
- Choose the scale display to real size checkbox.
- Once the emulator is displayed, drag out that lock icon to open it.
NOTE: If this is the first time using the emulator, you may see the learn how-to-use-Android-type screens.

- Click the browser icon button.
NOTE: Once the browser loads, you should see the current version of the Google homepage. - Type in the URL to your app using the following syntax: http://10.0.2.2/path_to_app/index.html.
CAUTION: Android doesn't recognize the localhost or 127.0.0.1. - Click the Return button and navigate the app using either the app itself or the navigation keys.
It is important that you set up as many different emulators as needed to provide you with feedback on how an app is working.