iOS Development
SPECIAL NOTE: While you can use a PC (http://goo.gl/53A99M) or review video at gotoandlearn (http://gotoandlearn.com/play.php?id=133), it is better and easier to use a Mac to develop an iOS app. Ultimately, you will still need a Mac to upload your app to the Apple store.
While you can download Xcode, create an iOS app and test it on a simulator, you cannot test it on an actual iOS device (e.g., iPad, iPhone). Developing an iOS app is very complex compared to Android:
- Apple requires you to digitally sign EACH app with a digital key before it can be loaded onto a device for both development and release versions of an app.
- You have to register each of your iOS devices with Apple in order for the development certificates to work.
- A different certificate is needed when you when you want to submit an app to Apple App Store.
Beside having your own Mac, to develop for iOS devices (e.g., iPhone, iPad or iPod Touch) and test them on an simulator, you'll need the following free items:
- a basic Apple registration (developer.apple.com/register)
- an Apple ID
NOTE: You may already have an Apple ID if you have used iTunes or an app for the Apple App Store. - the iOS SDK installed
- the iOS Xcode framework installed (http://developer.apple.com/xcode)
NOTE: It is best to install it on the main drive root directory.
However, if you want not only to develop but also publish an app or copy it to an iOS device for testing, you need to join Apple iOS Developer Program which currently cost $99/year which gives you the following abilities:
- create provisional profiles for your devices
- copy your app on your devices
- technical support from Apple
- publish to the App Store (however, there is no guarantee that it will be accepted)
The bottom line is that Apple requires that you register ALL of the following:
- DEVELOPER: The developer himself or herself has to be register with Apple:
- add a certificate on the Apple site
- generate a request for a signed certificate (RSC) on your computer
- upload RSC back to the Apple site
- generate authenticated certificate
- save certificate locally to be used by PhoneGap Build, etc.
- APP: Each iOS app whether development on production needs a unique ID that consist of a:
- prefix - a generated 40 characters string of numbers and letters
- suffix - a reverse domain notation (e.g., com.richmediacs.app_name) that can can be explicit for a single app or use a wildcard for multiple apps.
- DEVICE(S): Each device has to be give a provisional profile (p12 file).
- start process of Apple's website
- enter device UUID (Universally Unique Identifier) from iTunes
- create provisional profile that links the develop, app and device together
- copy provisional profile to iTunes and sync with device
IMPORTANT NOTE: Be sure to make backup copy of ALL of the files that you are going to create in a safe and secure place
Add Environment Pathss
- Go to Finder and locate the paths to the tools and platforms folders in the sdk folder that need to be added to the Environment variables.
- Start the Terminal and type in cd /dev-tools/adt-bundle-mac-x86_64-20130219/sdk/platforms and press the Enter key.
- Type pwd to print working directory and copy the path that is shown. (e.g., /dev-tools/adt-bundle-mac-x86_64-20130219/sdk/platform-tools
- Type sudo vim /etc/paths
NOTE: vim is the vim editor - In the Password field that appears, type in your password
- Paste the folder that you copied early below that other paths (e.g., /dev-tools/adt-bundle-mac-x86_64-20130219/sdk/platform-tools)
- Paste again but delete platform- (e.g., /dev-tools/adt-bundle-mac-x86_64-20130219/sdk/tools).
- Press the ESC key and then type :wq and then press the ENTER key to save the changes.
Simulate iOS Device
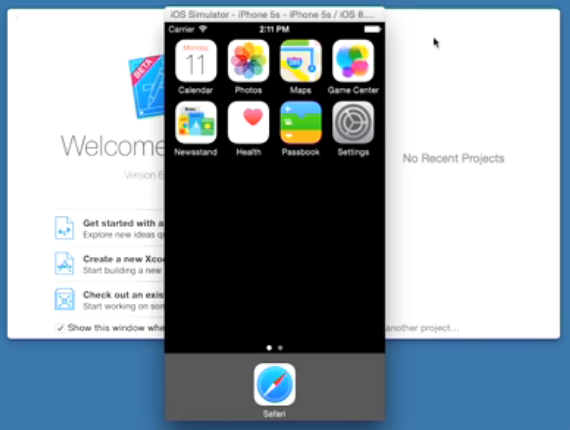
Xcode uses a set of simulator tools to test apps to see how it may perform in the real world.
- Open up Xcode.
- Choose Xcode > Open Developer Tool > iOS Simulator.
NOTE: By default, it opens in iPad mode.
- Choose Hardware > Device > iPhone 5s (or whatever device you want to use).
WHY: To switch to another device type. If all you have is an iPad switch back to it.
- Click the Safari icon in the simulator and then enter the URL to the app (e.g., http://localhost/AdobeCC_Apps/index.html).
- CHECK POINT: Test app to see if it is functioning correctly. Also, check to see how the orientation change from portrait to landscape and vice-versa (CMD + > and CMD + <).
Remember, there are three steps needed to test iOS app on your device.
- Authenticate Certificate (Developer)
- Create ID (App)
- Create Provisional Profile (Device)
1. Authenticate Certificate (Developer)
This is the first of three steps which requires switching back and forth from Apple web site and your computer. The first action is to complete a development certificate that will allow you to sign your apps so they can run on iOS devices.
The processes are (See screenshot below):
- Select Certificate Type (Development or Production)
- Create Signing Request (CSR)
- Generate
- Download
Select Certificate Type
- Once your registration has been confirmed, go to developer.apple.com and then click Member Center to sign in.
- Sign in with your Apple ID and then click the Sign In button:
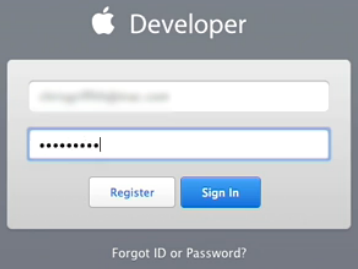
NOTE: Although there is a free option to access and develop a portal, you'll have to choose the paid option in order to generate the required certificates.
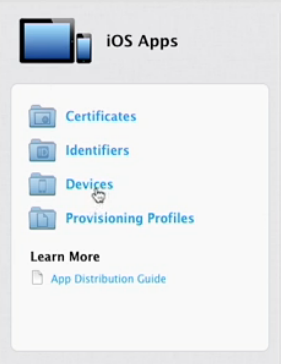
- Click on Certificates, Identifiers, and Profiles link to access the portal.
WHY: These are the three processes you will be doing to test an iOS app. - Under iOS Apps, click the Certificates link.
NOTE: In the Certificates section, you'll see all of the certificates that you have created with their expiration date which is one year from its creation. If you're just starting, there won't be any and you'll see a welcome screen.
- click the Plus button in the upper right corner.
WHY: To add a certificate.
NOTE: When you are ready to submit your application to the Apple App Store, you will need to return to this page and generate the deployment certificate.

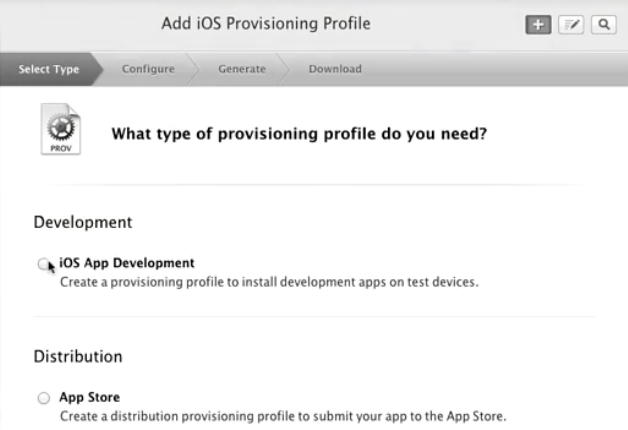
- Select the iOS App Development radio button.
NOTE: When you are DEVELOPING an app, choose iOS App Development. If you are PUBLISHING an app, you will choose App Store and Ad Hoc.
- Click the Continue Button at the bottom of the page (Not shown in screenshot).
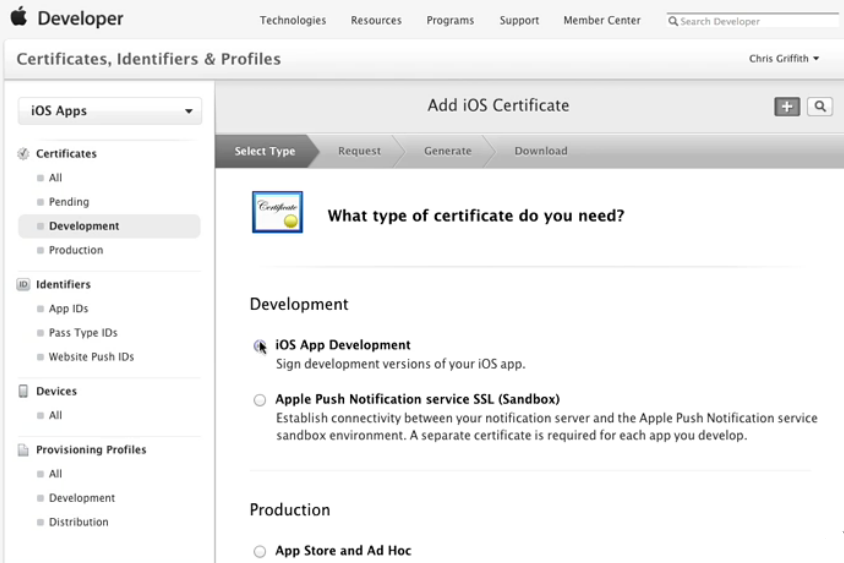
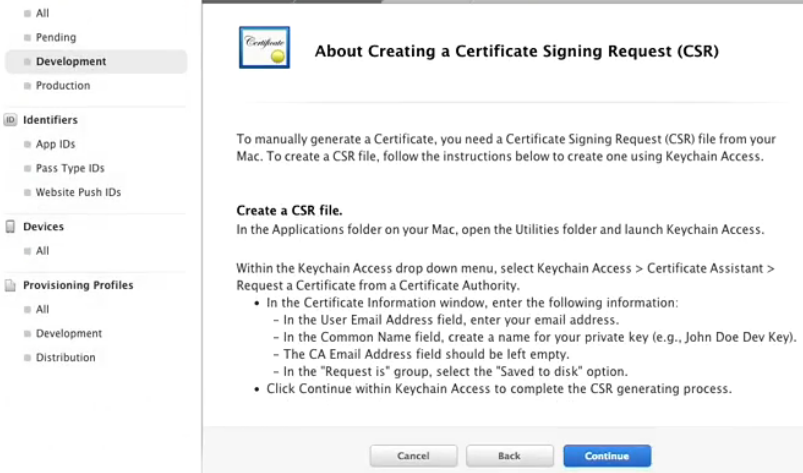
- CHECK POINT: You should see steps necessary to create a Certificate Signing Request (CSR), which is created on your own computer by the Apple Utility Keychain Access app.
KeyChain Access
The Keychain Access app on the Mac is used to generate certificate signing requests.
- Minimize the browser.
- Open the utilities folder and click on the KeyChain Access app.
- When the Keychain Access app open, select KeyChain Access > Certificate Assistant > Create Certificate Authority... menu option.
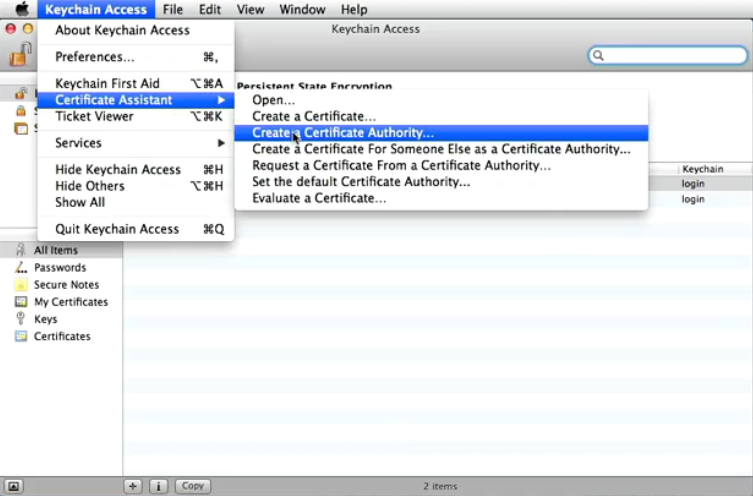
- From the menu choose Certificate Assistant > Request a Certificate From a Certificate Authority .
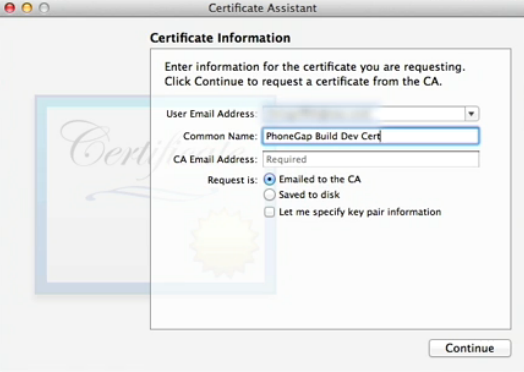
- In the Certificate Assistance dialog box that appears, enter or select:
- User Email Address (e.g. cornelius@richmediacs.com)
- Common Name for Apps Certificate (e.g., PhoneGap Build DevCert)
- CA (Certificate Authority) Email field - leave blank even though it says it is required
- Request is: Saved to Disk radio button
- Click the Continue button.
WHY: To save it to desktop with the default name.
NOTE: Save a copy of the file when you are finished with all three steps to a safe and secure place.
- In the Save As dialog box that appears, click the Save button
WHY: To save certificate to computer (e.g., Desktop).
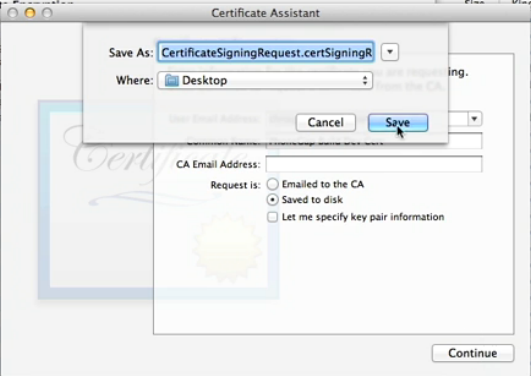
- On the Certificate Assistance dialog box, click the Done button.
NOTE: As with all certificates, it's a good idea to make sure you save a copy in a safe and secure place.
- Maximize the browser window again and scroll down to the bottom of the screen if necessary and then click the Continue button.
Create Certificate Signing Request (CSR)
The certificate signing request.csr file that was generated needs to be uploaded.
- Click the Choose File... button
WHY: To upload CSR file.
Navigate to the CSR on desktop, select it and then click the Open button.
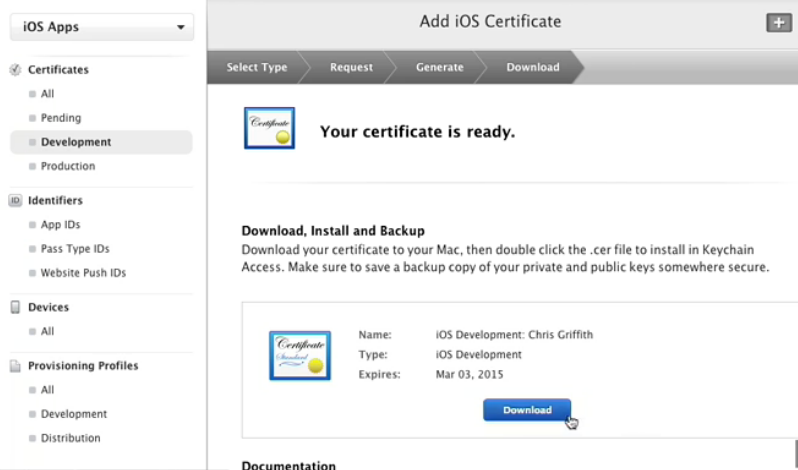
Generate Certificate
- Click the Generate button.
WHY: To link the CSR to your iOS developer account in order to create the authenticated certificate.
Download Certificate
- Click the Download button.
WHY: To download the CSR locally (e.g., Desktop).
NOTE: It will renamed something like iOS_development.serv. Again, back up this file in a secure place. The certificate that was just created and downloaded needs to be imported back into the KeyChain Access app.
- Locate file in the Download folder using Finder and drag it to the desktop icon from within the Finder (or directly to your desktop if you wish).
NOTE: If you're going to be use PhoneGap Build service you need to take some additional steps. You need to bring the generated authenticated certificate into your computer and then export it again in a different format using the Keychain Access app again.
- Open the Keychain Access app again if necessary and choose File > Import Items....
- Navigate to the CSR file (*.cer extension) on the desktop that will be named ios_development.cer, select it and then press the Open button.
WHY: To see the files added to your list of certificates.
- At the top of the panel on the left under Keychains, select login and then select My Certificates in the category panel below (See screenshot).
WHY: To filter for just installed certificates so that you can see all of the certificates that you have on your Keychain Access.

- Locate the certificate just installed.
NOTE: It should be named iPhone developer and your name. Another way to locate this file is by its expiration date. It will be one year from the date it was created.
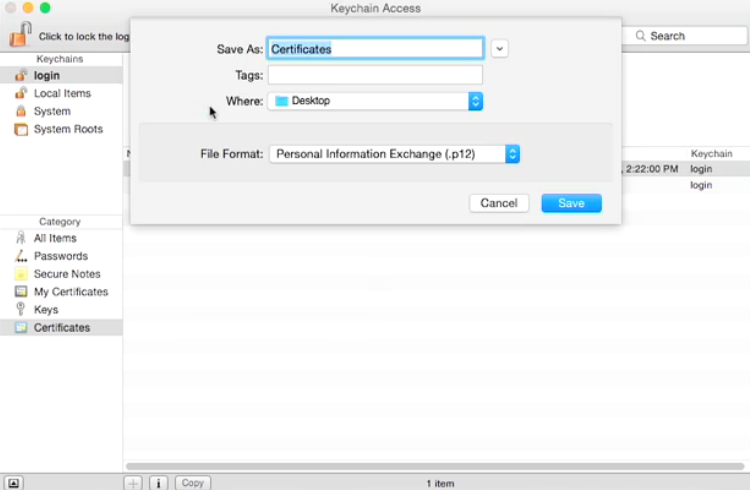
- With imported certificate selected, select File > Export Items... and give it a meaningful name (e.g., iOS PhoneGap Build Cert) and ensure File Format is Personal Information Exchange (.p12).
- Click the Save button.
- In the dialog box that appears, enter a password.
WHY: To protect the certificate.
- Enter the same password again in the Verify text field and then click the OK button.
CAUTION: Remember this password because there is no way to recover it.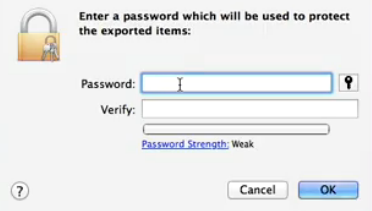
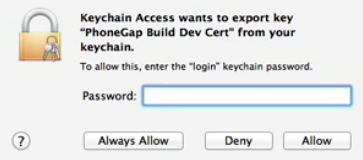
- In the KeyChain Access dialog box that appear, enter your system password and then click the Allow button.
NOTE: This will be the system password and not the KeyChain Access password.
- CHECK POINT: You should see the files on your desktop.
NOTE: Save a copy of the file when you are finished with all three steps to a safe and secure place.
2. Create ID (App)
An App ID is a unique identifier that is used by the device. You'll need to register your app with Apple with a name and an App ID.
- On the Certificates, Identifiers & Profiles page, under Identifiers, click App IDsl.
WHY: This will display a list of iOS App IDs. If you haven't created an App ID, you'll see an intro message.

- Click the Add button.in the upper right corner
WHY: To create a new App ID.
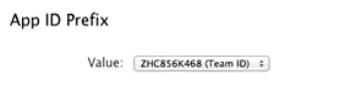
. - On the Register an App ID screen, label your App ID with a descriptive name (e.g., PhoneGap Build demo)
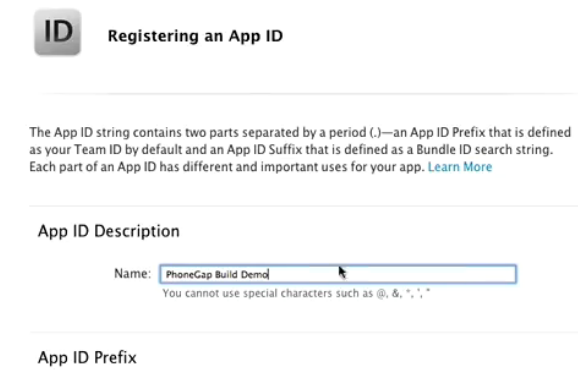
NOTE: This is to identify the key which is made from a prefix and a suffix. If this is your FIRST app, you won't have an option to choice the prefix, the Team ID will be displayed and used. However, if you have multiple apps, you will see a drop down list of options to choice from. You will than need to specify the the suffix in one of two types: Explicit or Wildcard.
- Select the Wildcard App ID radio button.
NOTE: If you need any of the more advanced services like in-app purchase and when you're ready to commit to developing a single app, you choose the Explicit App ID. You then need to select the services you want from the list at the bottom of the page (e.g., In-App Purchase, Game Center). The Wildcard App ID option omits the services, but allows you to build and test multiple applications. The suffix in the Bundle ID field uses a reverse domain notation.
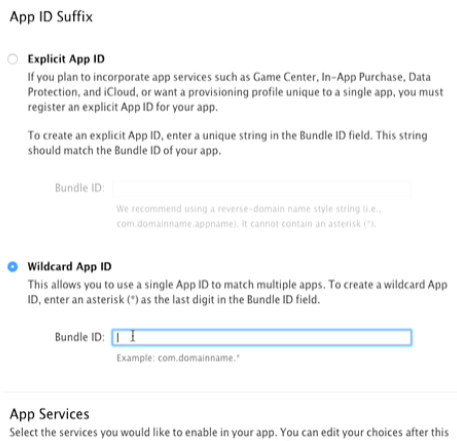
- Enter Bundle ID in the text field using reverse domain notation (e.g., com.richmediascs.myAppName).
- Add another dot and an asterisk to the ID (e.g., com.richmediacs.my_app_name.*).
- Click the Continue button.
- Confirm choices on the Review screen and then click the Submit button.
WHY: To complete your app registration.
- Scroll down and click the Done button.
NOTE: You will be returned to the list of App IDs where you can see the ID that was just added. If you need to modify or delete it, just select it from the list and click the Edit button. There are two kinds of App IDs:
Explicit App IDs - if you plan to incorporate app services such as GameCenter, In App Purchase, Data Protection, iCloud, or want provisioning profiles unique to a single app, you MUST register Explicit App ID for your app.
Wild Card App IDs. - This allows you to use a SINGLE app ID that will match MULTIPLE apps.
CAUTION: The ID attribute of the widget element or through the edit app page has to MATCH the ID for the provisioning profile. If it does not, your app will not be build correctly.
3. Create Provisional Profile (Device)
The last step is to install an associated provisioning profile on your device. This provisioning profile enables your app to run by identifying you through your development certificate AND your device by listing its unique device identifier. This is where all of the parts come together (e.g., app ID, certificate, etc.)
- On the iOS Account Overview page, click the Devices link
- CHECK POINT: You should see a list of all of your devices including ones that may be disabled.. If you have not registered any, you see the "Getting Started" message.
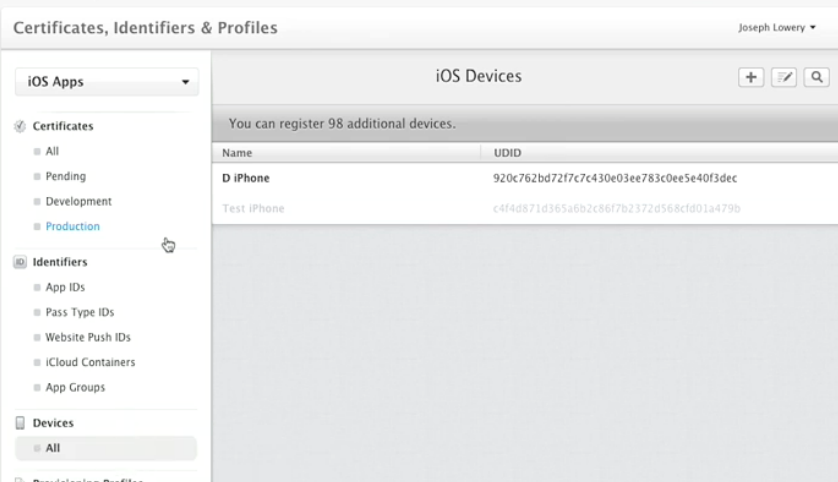
- Click the Plus icon (+) located in the upper right.
WHY: To register a new device. You'll notice that there are two options: Register Device and Register Multiple Devices. You can register up to 100 devices.
- Click on the Register Device radio button and give the device a name,(e.g., Development iPad).
WHY: To name the device that will be used. However, to enter the device UDID requires some additional steps:

- Plug in your device into your computer via a USB port.
- Open iTunes on your Desktop (not device).
- When iTunes opens, choose your device.
NOTE: Depending on which version of iTunes you are using, you may see a device list to choose from. On newer versions, it will shows an small icon for the iPhone or iPad. It will display the "Summary Screen," where you see the serial number.
- On the device summary screen that appears, click ONCE on the serial number located in the upper left.
WHY: To show the UDID which is a 40 characters string.
NOTE: This will change from a serial number to a unique 40-character identifier number.
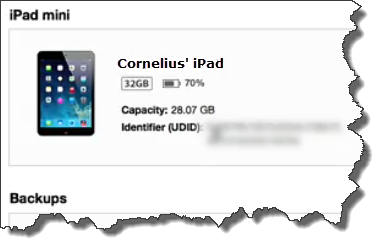 CAUTION: Be careful to click only one on the serial number because you can view four different pieces of data about the device.
 - Right-click on the UUID and then choose the Copy button.
- Return the the page in the browser and paste into the UUID field.
- Scroll down and click the Continue button.
- On the Review and register page that appears, if detail looks correct, click the Register button.
- Click the Done button.
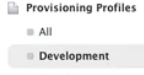
NOTE: You should see your new device listed. You'll need a separate Provisioning Profile for the development stage and for distribution of your app. We're just starting out, so let's scroll down a little bit more so you can see all the options here under Provisioning Profiles on the left side navigation. There's an option for All and then separated out into Development and Distribution.
- Go to Development.
NOTE: It will show you any that Provisioning Profiles that you have set up. If you don't have any, you see the Getting Started message.
- Click the Plus icon (+)
WHY: To create a provisional profile.
- CHECK POINT: If development, select iOS App Development and if distribution, you will select Distribution.
- In this case, select Development.
- Scroll down and click the Continue button.
- Select the app ID that was created earlier from the drop-down list.
NOTE: Remember, It must MATCH your profile with an associated app ID.
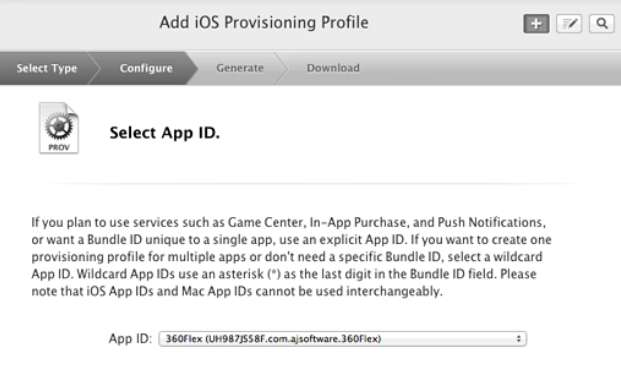
- Click the Continue button.
- Select the previously created certificate for the app.
NOTE: If you have created multiple Provisional Profiles click Select All.
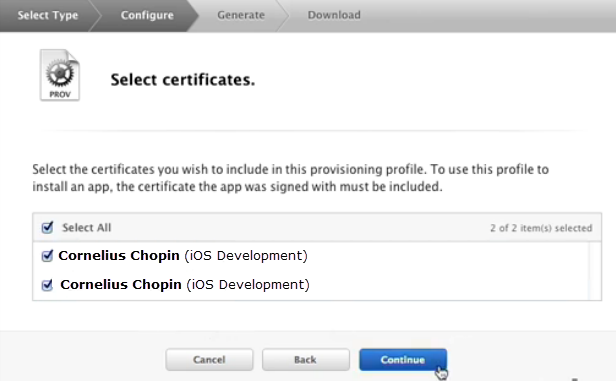
- Click the Continue button.
- Select your device.
NOTE: If you did have multiple devices registered, select all of them.
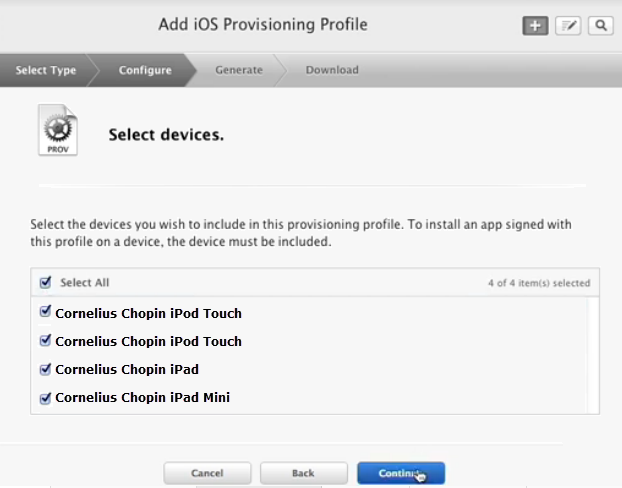
- Select your device (e.g., Development iPhone Profile) and click the Continue button.
- Give the profile a descriptive name (e.g., PhoneGap Build Profile).
NOTE: Ensure that all the values are correct, the profile type, the app ID, the number of certificates and devices.
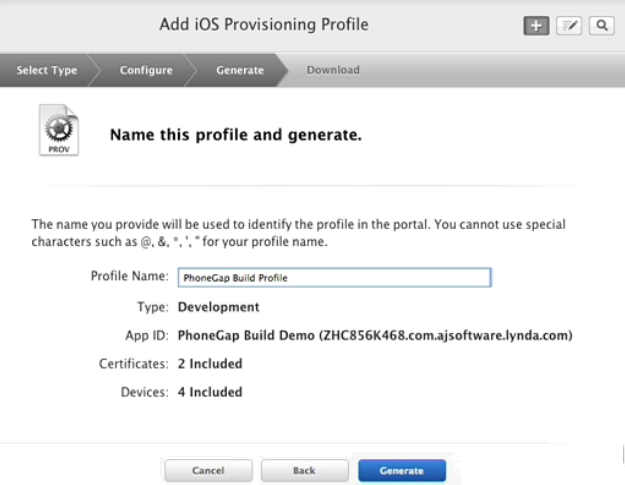
- Click the Generate button.
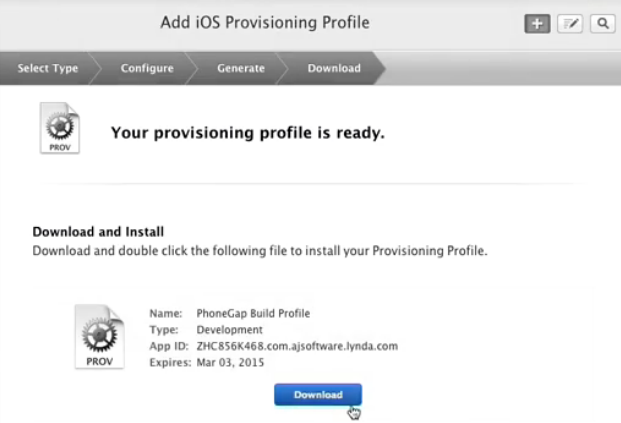
NOTE: The development profile will be generated and ready for download.
Install Profile On Actual Device
We need to install the development profile onto our actual device or devices you'll be deploying to.
- Download the profile and show it in Finder and drag it to the Desktop icon in Finder.
NOTE: Save a copy of the file when you are finished with all three steps to a safe and secure place. The next step is to install the Provisioning Profile on your device. And again, yo will need to use iTunes.
- Open iTunes and make sure that you are in the Apps section.
NOTE: You will see the PhoneGap Build mobile provision profile on the Desktop (or wherever you saved it.)
- Drag the Provisioning Profile from the desktop to the Apps section.
NOTE: If this is your first time, you won't get any kind of confirmation. If you have done this before, you will get a replace dialog box. However, there is no harm if you want to drag it in again to see if it in which case click the Replace button.
- Click on the device.
- Go back to your iPhone (or whatever your device is) and click the Sync button.

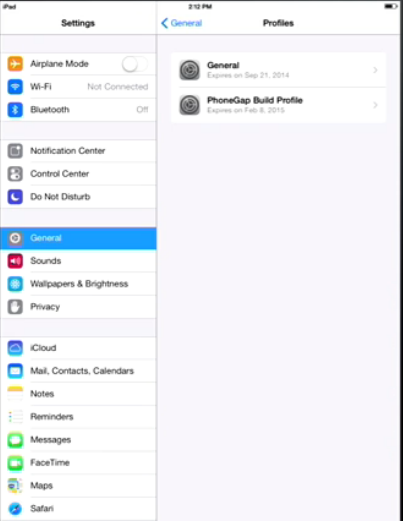
NOTE: The provisioning profile will be loaded onto device. Once device is synced, to verify that the provisioning profile has been loaded onto an iOS device, open up the Settings app and scroll down to the General setting an you will see the Profiles link listed.
Upload Certificates to PhoneGap Build
The certificates need to be uploaded to the PhoneGap Build service.
- Return to Build.PhoneGap.com and signed back into the PhoneGap Build system.
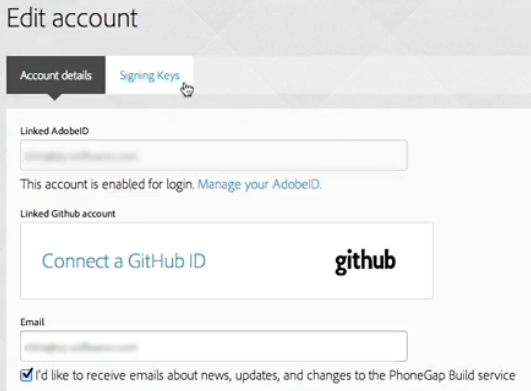
- Click on the Account Options and then click Edit Account.
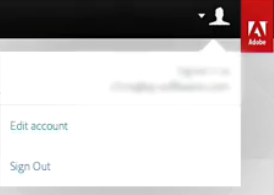
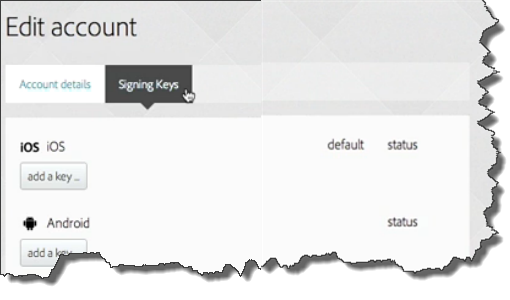
- In the Edit Account page that appear, click on the Signing Keys tab.
NOTE: You can upload each of the various signing keys for each specific platform your want to compile for.
- Click the Add Key... button under the iOS section and give the key a name.
- Give key a descriptive name in the title field, (e.g., PhoneGap Build development).
- Click the Choose File button, then select the P-12 file from your computer.
WHY: To upload the P-12 file.
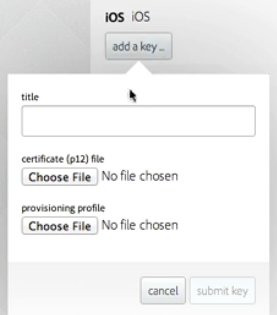
- Click the Choose File under the provisioning profile and then select the provisional profile (See screenshot above).
WHY: To upload our provisioning profile.
- With these two files selected, click the submit key button.
NOTE: This will upload these two files to be stored on the PhoneGap Build servers. Once they have been uploaded, you will see it listed as an iOS key. Although the certificate and provisioning profile have been uploaded, this key is still locked. In order to enable the PhoneGap Build servers to use our credentials, they need to be unlocked.
- Click the lock icon for the signing key you wish to unlock.
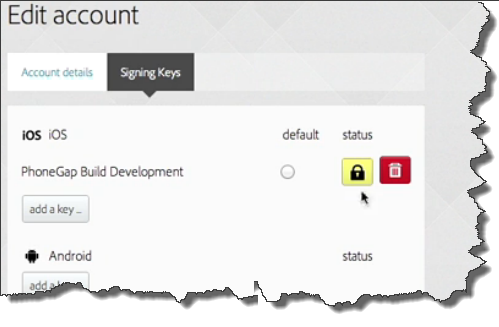
- Enter the certificate password that you used to generate the certificate.

NOTE: PhoneGap Build will keep this key in an unlocked state for one month. However, you can return to this screen and unlock it again. You also have the option to set a key as the default signing key. This can be useful if you're working on multiple apps for various clients.