To emulate physical devices, you can use Android Studio emulator to create virtual devices. When Android Studio was installed it created a virtual device using the latest version of Android by default. You can use the Android Virtual Device (AVD) Manage to SEE what virtual devices you currently have or CREATE new ones.
- To view virtual device(s), go to Tools > Android > AVD Manager or click on the AVD Manager icon (
 ) at the top of the screen.
- In the Your Virtual Devices window that appears, you will see a default device (e.g., Nexus) listed and any other virtual devices that you have created earlier.
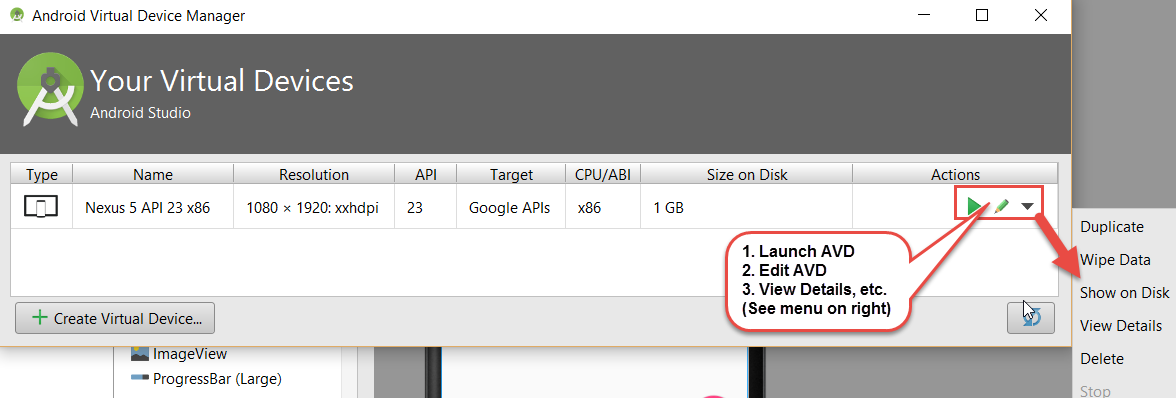
- (Optional) If you want to start with a fresh copy of a virtual device, select it and then click on the down arrow on the right and select Wide Data and in the Confirm Data Wipe dialog box that appears, click the Yes button.
- To view details, click the drop down menu on the right side of the screen and select View Details...
- To change the device settings, click on the edit icon (pencil) on the right side of the screen and make the changes you need to:
- device name
NOTE: If you want to emulate a more recent device, click the Change... button. - Android version
NOTE: If you want to change the Android version, click the Change... button. If you don't see the Android version you need, go back to the SDK Manager and install the API Level that you want. - device it is emulating (e.g., Nexus)
NOTE: You can create devices for various form factors. For Android TV, for phones, for Android Wear devices such as watches, and for tablets. - target API
- start-up size and orientation
- enable performance (you can only select one)
- host GPU (recommend leaving checked for best performance)
- store a snapshot for faster startup
- Show/Hide Advanced Settings button (for additional settings)
TIP: You can reduce the amount of memory that each device can use (e.g.,1024 megabytes) so the multiple devices can run at the same time.- Camera
- Network
- Emulated Performance
- Memory and Storage
- RAM
- VM Heap
- Internal Storage
- SD card
- Device Frame
- Keyboard (Use your keyboard instead of the device keyboard)
- device name
- Click the Finish button.
To run virtual device,
- Click the Start button icon (
 ) the right side of the screen.
NOTE: It may take a while for the AVD to load. When you click the Play button, Android Studio will start Gradle-build and then prompt you to select a virtual or real device from the list.
- If you see the Welcome message, press GOT IT. If you want to get rid of these notification, swipe down and then swipe right for each notifications.
- Once the virtual device is up and running, drag the lock icon upward to unlock the device.
- Click the icon to show all of your apps.

- Click the home button to go back to the home screen.

- Return to Android Studio and press SHIFT+F10 or click the Run button ( ) at the top of the screen.
- In the Choose a running device dialog box that appears, select a device.
- Click the OK button.
- Click ALT+TAB on Windows, or CMD+TAB on MAC to bring device to the front of the screen and then you should see your app on your device.
TIP: To toggle the orientation from portrait to landscape and back again, click the CTRL+F11 on the PC or Mac. It is also good practice to keep the device open, change the code and then run again to avoid having to wait for the virtual device to open again.
New Features in Android Studio Emulator 2.0
- Faster than the previous version and start more quickly
- There are two separate windows; however, if you move the main window the control panel will move to snap to it.
- You can resize the emulator window by dragging the lower right corner.
- You can rotate the emulator by clicking on the Rotate Left or the Rotate Right buttons. Beside landscape and potrait, you can now rotate the app upside down by double-clicking on the Rotate Right button twice. To go back, click the Rotate Right button twice again
- The three main control buttons (Back, Home and Overview) are also on the control panel (
- You can see the keyboard short-cut to the control panel icon by hover over them.
- To see some extended controls you can click on the three dots (...) at the bottom of the control panel.
- In the extended controls, you can control:
- Location (virtual location)
- Cellular (emulate cellular network)
- Battery (emulate battery life)
- Phone (emulate incoming phone call and SMS)
- Directional pad (emulator D-pad behavior)
- Fingerprint (emulate fingerprint)
- You can also click on the Settings and Help icons.
(Optional) Create New Virtual Device
You can create as many virtual devices as you need to test your app to emulate physical (real) devices.
- Close any existing virtual devices to free up memory.
- Open the AVD Manager by selecting Tools > Android > AVD Manager or click on the AVD Manager icon ( ) at the top of the screen.
- Click the Create Virtual Device button at the bottom of the window (See screenshot above).
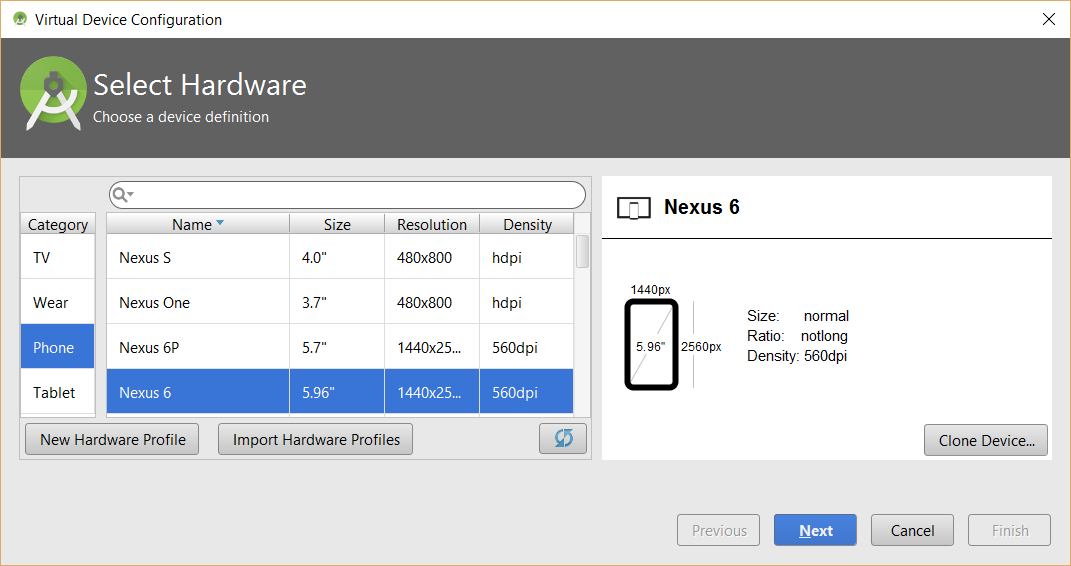
NOTE: You can choose from any of the form factor (TV, Phone, Tablet, Wear and Glasses) to create a device. - From the category list on the left side of the window, choose a form factor (e.g., Phone)
- Select a target device from the list (e.g., Nexus 6),
- (Optional) Click the New Hardware Profile button if you want to make any changes and then click the OK button.
ALTERNATIVE: You can click the Clone Device... button and then make necessary changes to create a new virtual device. - Click the Next button.
- In the System Image dialog box that appears select a system image (Android version) (e.g., Marshmallow).
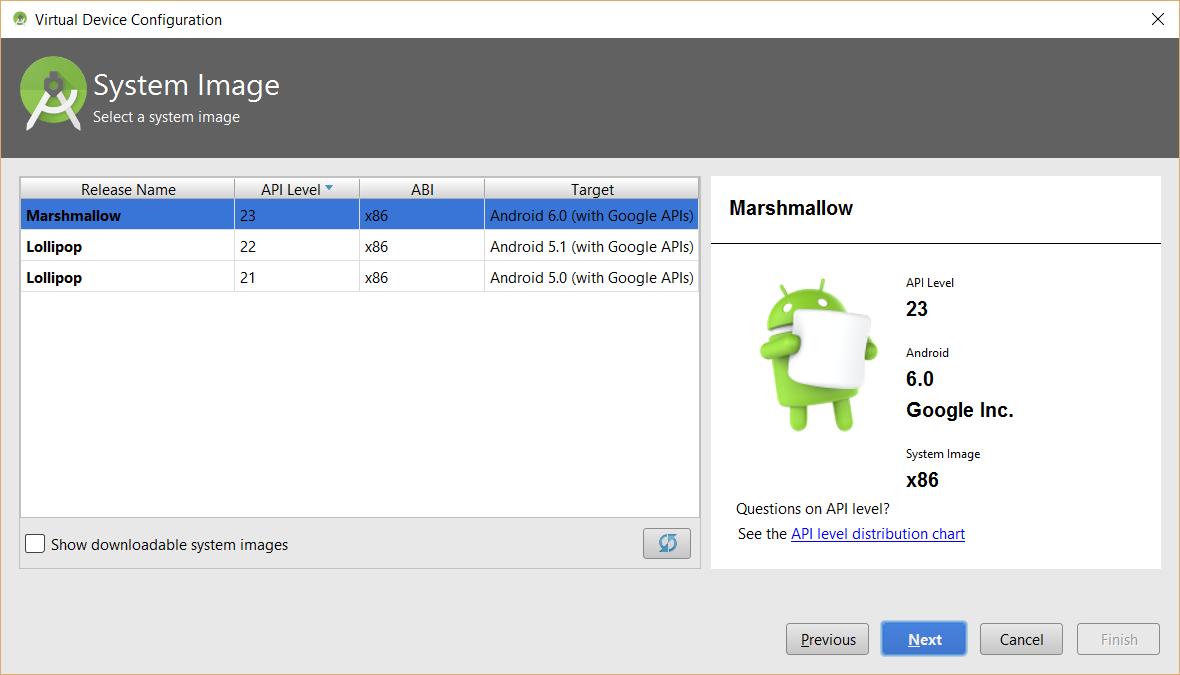
- Click the Next button.
- (Optional) In the Verify Configuration dialog box that appears, if you have enough memory, click the Show Advanced Settings button and scroll down and reduce the amount of RAM (e.g., 1G) that the device uses so the multiple devices can run at the same time.
EXAMPLE: If you have a lot of memory, you may want to set HAXM to 3G and each AVD to 1G. It is also a good idea to increase the VM-Heap to 256 to avoid errors with some apps and check the Enable Keyboard input checkbox to allow typing with computer's keyboard instead of on-screen virtual device keyboard.
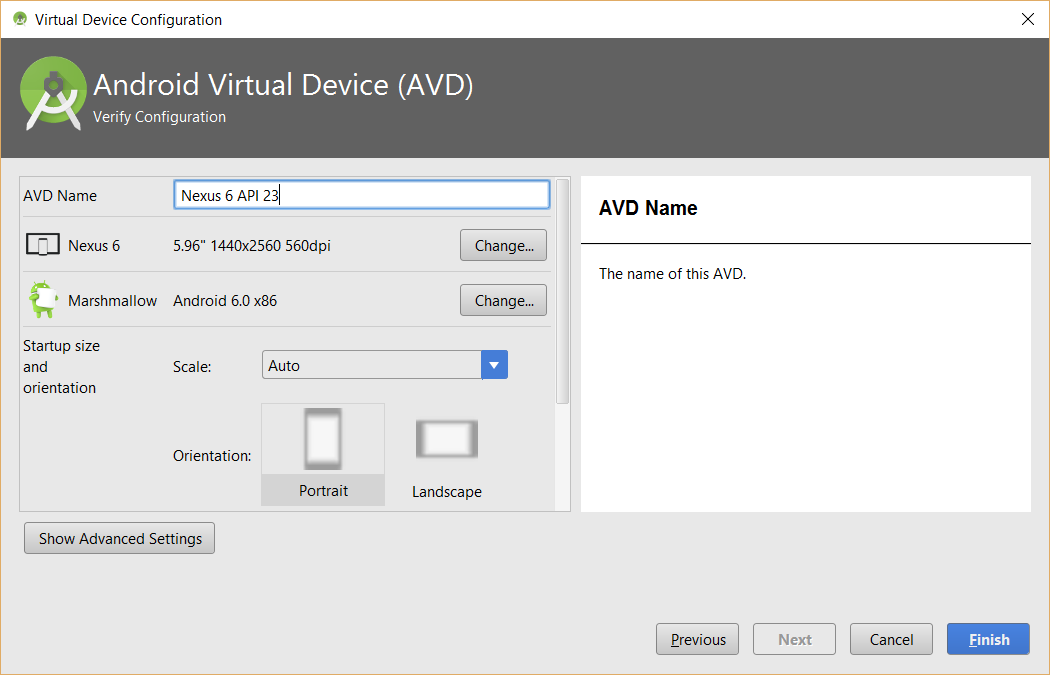
- Click the Finish button to create the device.
- Close the AVD manager and all other virtual devices and then click on the Run button at the top of the screen to run the app.
NOTE: Notice this time you are starting the app not the device first. - In the Choose Device dialog box that appears, choose Launch Emulator radio button instead of Choose running device radio button, then choose a new device from the drop-down list and then click the OK button.
NOTE: You should see the run window and the console panel and then the device should start up. - When the lock screen appears, drag the lock icon upward.
- CHECK POINT: Click the OK button to any messages you see and the app should appear.
(Optional) To run on more than one device:
CAUTION: Both virtual and physical devices (see next topic) can run at the same time. However, there is a memory limitation to the number of virtual devices that can run at the same time. Remember, this is why it is best to reduce the amount of RAM that each devices uses.
- Click the Back button on the device to return to the home screen.
- Return to Android Studio and open the AVD manager and choose another virtual device (e.g., Nexus 5) and click the Start button.
- Repeat step 2 for as many devices as you need.
- Arrange devices on the screen by dragging them next to each other.
- Once the lock screen appears on the other devices,drag the lock icon upward.
- Return back to Android Studio and click the Run button again.
- To run the app simultaneously on two or more devices, hold down the SHIFT key and click to select multiple devices and then click the OK button.
- CHECK POINT: Go back to the two devices to see the app runs on all devices.