Test Environment
Before creating a real app, you may want to test the development environment on a sample app to see how everything works. As a common practice, a "Hello World" app will be created.
- Open Android Studio and from the Welcome screen, click Start a new Android Studio project and give the app a name (e.g., "Hello World").
TIP: To start Android Studio on the Mac, click on the spotlight icon at the top of the screen (or CMD+SPACEBAR) and type Android Studio.- In the New Project dialog box that appears:
- Type an Application name (e.g., Hello World) in the text field. It will be used in several places:
- on the app's home page
- as part of the app's icon name
- as part of the package name
- Type the Company Domain (e.g., example.com) in the text field.
NOTE: Company Domain does not need to be a actual domain. - CHECKPOINT: The Company Domain will be used to convert to the MAIN package name that is dimmed out in the next field. It is updated to reflect a reverse domain notation and the application (ID) name. However, you can edit this name by clicking on the Edit link to the right of the screen. It is a unique name that is used to identify the app in the app store.
TIP: By using the same package name for all of your sample apps, you willl be able to replace any existing apps on your testing devices each time you install a new one and you will not have a host of apps that you will have to find and delete.
- Accept the default project location.
NOTE: By default, Android Studio creates a project subfolder under the home folder called AndroidStudioProjects but you can place the project anywhere you want. You could, for example, you could click on the browser button and create an new folder on the Desktop and save your project them for convenience). By default, configurations are global to the entire Android Studio installation. Notice also the project is AUTOMATICALLY named the SAME as the Application name but WITHOUT spaces (e.g., ...AndroidStudioProjects\HelloWorld).
- Click the Next button.
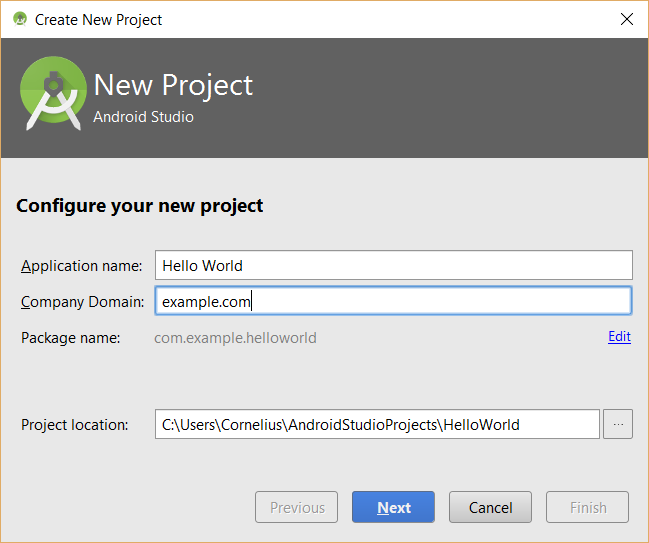
NOTE: The package name is important because no two apps in the Google Play store can have the same name.
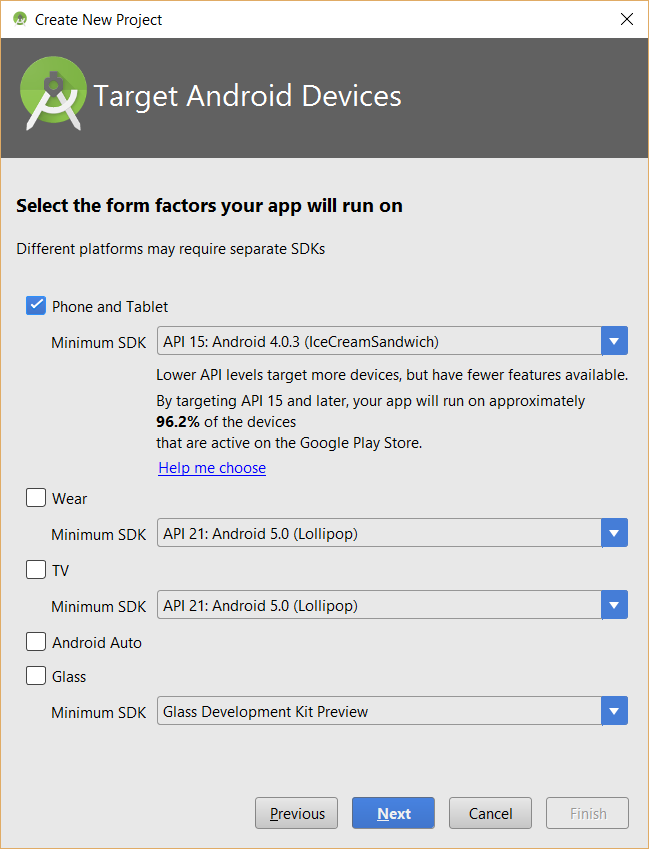
- In the Target Android Devices dialog box that appears, select a form factor(s) you want to use. By default, Phones and Tablets are selected. Keep the default.
- Choose a Minimum SDK that will be required for your app to run. Keep default.
NOTE: If you're not sure, click the Help me choose link to see a listing of all the currently-active versions of Android. Click a link to learn about each. You can also click on the link at the bottom of the screen or go to https://developer.android.com/about/dashboards/.
- Click the Next button.
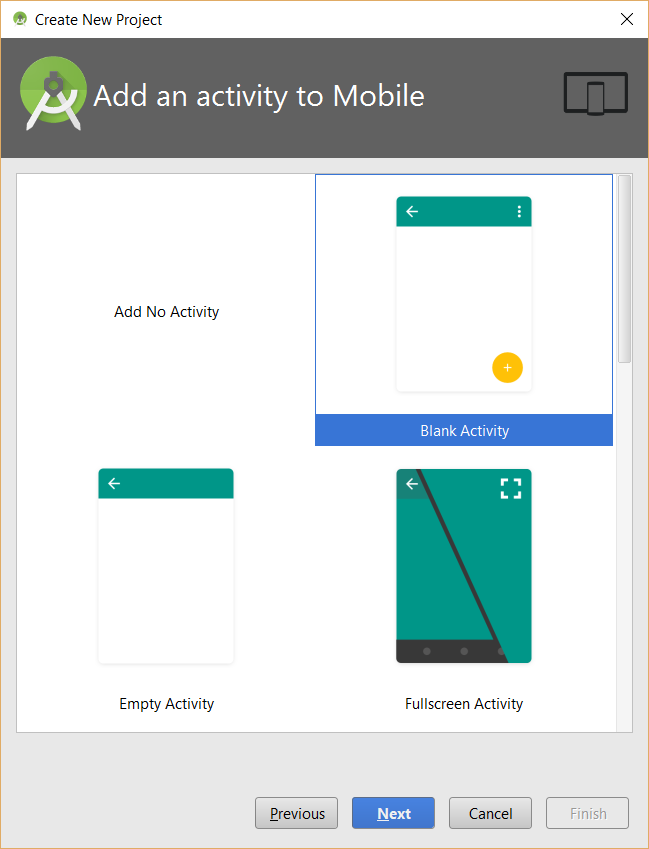
- In the Add an activity to Mobile dialog box that appears, select an Activity (e.g., Blank Activity). Keep default.
NOTE: An activity is the app's primary screen. The blank activity is a very simple template that will display a text on the screen. As an example, the Master Detail Flow template creates a master and detail activities and uses the Fragments API so that the app will look different on various devices. An activity is similar to a View control in iOS app development.
- Click the Next button.
- In the Customize the Activity dialog box that appears, review options that will be created.
NOTE: The Name and Title are Java classes and will not be seen by any user. The Layout Name and the Menu Resource Name are resource identifiers. They can be left at their default values.
- Click the Finish button to create the project.
NOTE: If only a single screen is being used, leave the values at their defaults.
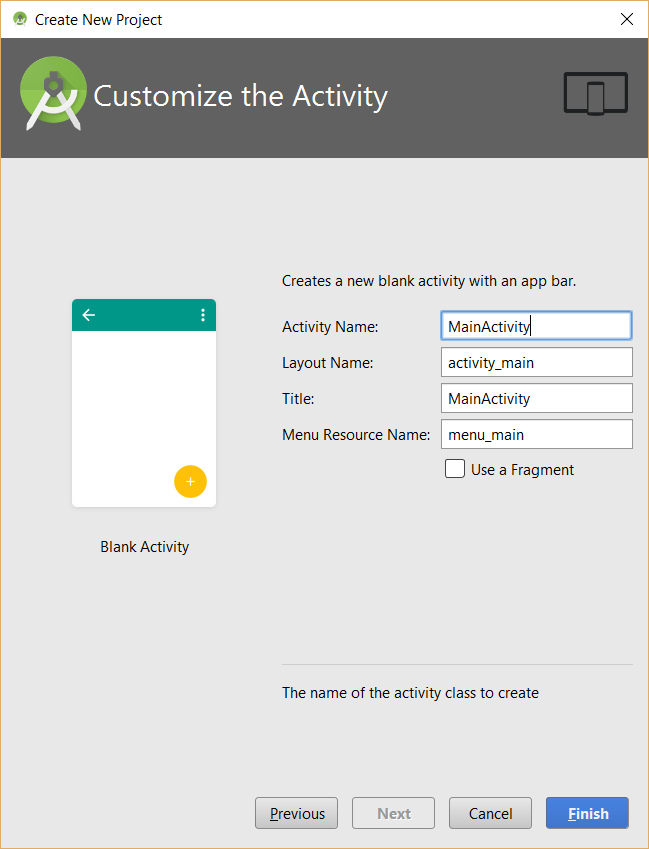
NOTE: For every activity (akin to a page) that is created as a *.java file, there is a corresponding xml file. The *.java file has a method called setContentView (e.g., setContentView(R.layout.activity_main;) which is used as the name implies to set the content view for that page. The folowing describe the inputs above:- Activity Name is the Java file that will be created for the project's code
- Layout Name is an XML file that will be created for the project's layout
- Title is as the name implies the app's title that will be shown at the top of the app???
- Menu Resource Name is an XML file that will be created for the project's menu
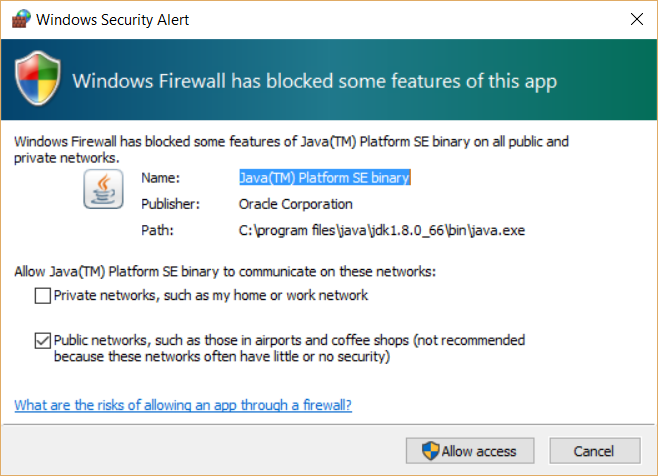
- If the Windows Security Alert dialog box appears, unselect Public and select Private and then click the Allow access button.
NOTE: The first time an Android Studio project is created, it takes a while to complete because it has to download components locally. However, when you create other projects, it should go quickly. If you see the Tip of the Day dialog box, you can click the Next Tip button to learn more about Android Studio or simply close the dialog box.
- Pay attention to the message (e.g., indexing) at the bottom of the screen. When the message goes away, you are ready to develop an app.
- If you get a Rendering problem, from the drop down menu, switch to a different AVD.
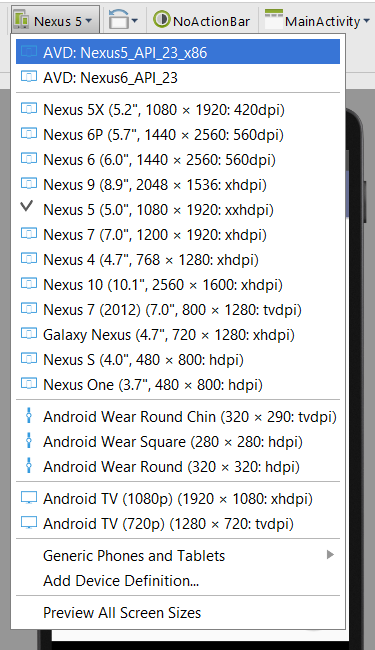
- CHECK POINT: By default, there will two tabs that are open for each project you create. The Java file is for the main activity class which is a collection of Java classes and the other is its associated XML file that defines the layout. Also, by default, a virtual device will be displayed (e.g., Nexus 4). If you want to change that view, select another device from the list.
Review Project Tab
There are several views in the Project window. If you don't see it:
- Click the Project tab in the left panel.
- Click the Project link in the lower left corner of the screen.
1. Android View
The Android is the default view which organizes assets by type to shows the most important folders and files but does not reflect the actual structure on the computer. In this view, files are hidden that are are used to manager Android Studio so you can focus on files that are modified the most (manifest, java, resources, and Gradle Scripts).
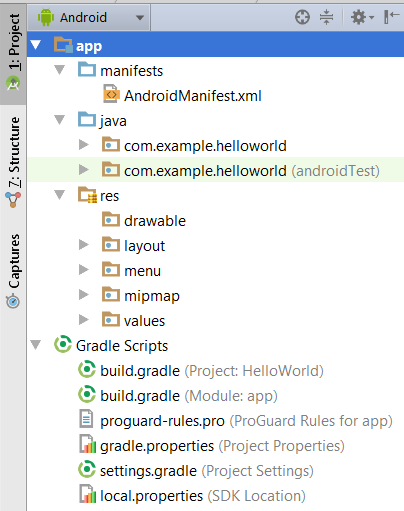
app folder contains:
- manifests folder - has the manifest file
- AndroidManifest.xml
- java folder - has all of the Java classes
- com.example.helloworld
- com.example.helloword (androidTest)
- res folder - has the resources files
- drawable
- layout
- menu
- mipmap
- values
Gradle Scripts contains:
- build.gradle (Project HelloWorld)
- build.gradle (Module app)
- proguard-rules.pro (ProGuard Rules for app) - to manage the ProGuard tool which can help to minimize and obfuscate the code in the Android app package before it is uploaded to an app store.
- gradle.properties (Project Properties)
- settings.gradle (Project Settings)
- local.properties (SDK location)
It is best practice to used the Android view for most development work and use the Project view to view other project files that are not needed on a regular basis.
NOTE: Gradle is the build engine or tool that is used to create an app.
2. Project View
To see the actual directory structure, switch to the Project view (ALT+1 (PC) or CMD+1(Mac)). Android Studio project directory and file names that are always the same. If you hover over the top-level node, you will see the actual location of the project.
TIP: To see the actual folder in your file manager, right-click on the top-level item and select Reveal in Finder on the Mac or Reveal in Explorer on Windows.
NOTE: The other views arrange the structure for a particular perspective or purpose.
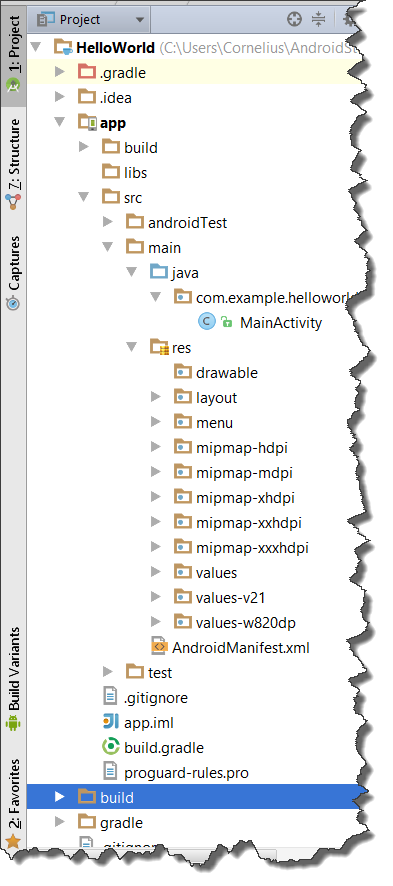
If you click on the top-level node, you will see all of the project assets:
- .gradle and .idea - contains project configuration information for the development enviroment used by Android Studio. Folder are seen in Windows but hidden on the Mac.
- app folder - contains all the actual app assets.
- build folder - contains all of the compiled resources used during packaging. This include the apk (androiid package) which is the app binary file that is use to create the app for a device.
- libs (libraries) folder - contains other dependences (e.g., third-parties JAR files). You can add any java library (e.g., jar file) and then register it as a library so that it can be included in project's class path.
NOTE: Notice there is also an external libraries folder that includes pointers to the API platform being used. (e.g., API 21 for Android 5). - src (sources) folder - contains all of the Java source files and project resources. It has main, java and res folders as in the Android view
- androidTest - contains test cases
- main folder - contain the Android Manifest configuration file where the activities and services are registered.
- java folder - contains all of the Java packages (e.g., MainActivity.java).
- class(es) - MainActivity which extends a supper class called ActionBarActivity)
- res folder - contains the app resources files that are compiled at runtime and are represented by a generated java class called R (for resource). Like CSS, you target items in the res folder by IDs that are assigned to them.
NOTE: Whenever a change is made to a resource (graphic, xml), the R class is regenerated automatically in the background.
The R.java contains a reference to all of a project's resource files. It provide connections between the *.java and resource files.
- src folder - contais source files.
- main - containes Java, resource and manifest files/
- test - contains an example unit test (e.g., ExampleUnitTest) for Java testing
- Android Test - used for Java specific testing.
- drawable folders - contains image resources with the same image names but in difference directories with qualifiers (e.g., hdpi, mdip, xhdpi) on them that represent particular device densities.
- mipmapxxxdpi folders (where xxx represents various pixel densities: h (high), m (medium), xh (extra high), xxh (extra extra high) and xxxh (extra, extra, extra high) - contains graphics that appears on the launcher screen. The framework decides which version of a graphic will be used for a given device.
- layout folder - contains one or more layout resources (e.g., activity_main.xml and content_main.xml) based on screen sizes and resolutions that defines the screen layout apearance in an xml file. Activity_main.xml is the app's screen container. The content_main.xml is within the activity_main.xml in an <include> tag and can be access by pressing the CTRL or CMD key and clicking on the resource link. It contains components (e.g., LayoutView, TextView, Button) that are used in an app. There are two layut views that can be seen: Text view which is the raw xml file or the Design view which is the graphical representation of the layout.
- menu folder - contains an xml menu resource files (e.g., menu_main.xml) that defines the app's menu
- values folders - contains value dimension, string and style xml resources resource strings:
- color.xml -
- demins.xml -
- strings.xml - create string resource identities (or ids) so they can be localized or changed for different languages (e.g., English, Spanish).
- styles.xml -
- NOTE: You could see other value folders with different names that are used like CSS to override settings in the default value folder. For example, you could have a folder called values_v23 that has files that are used to override settings when running on a device that's using API 23 or greater.
- AndroidManifest.xml file - contains that androidmanifest.xml configuration file that defines the app package. It has the app elements which defines the launcher icon, label (a string that identify the app), theme (defines the appearance of the app), activities (contains an intent-filter element which defines how the activity is used) and permissions (if a feature can be used).
- java folder - contains all of the Java packages (e.g., MainActivity.java).
- assets - uncompiled assets that you want to be included when the app is package can be added to a project and placed in this folder. You have to manually create this folder and add content (e.g., audio, fonts, images, *.txt, *.xml, *.html, etc.)
NOTE: To create this folder right-click on the main folder and choose New > Directory, name it assets and then click the OK button. - .gitignore—contains exclusion files that should be ignore when uploading to git
- app.iml—contains information about the app module itself.
- proguard-rules.pro file - used to manage the ProGuard tool which can minimize and obfuscate the code in the Android app package before it is uploaded to an app store. (MAY NEED TO DELETE AS OF ANDROID 2.0)
- Many of the folders are defined in the app.iml file.
- gradle—contains gradle-wrapper for systems that do not have gradle installed.
- other gradles files, etc.
- local.properties—local path to Android SDK
TIP: Since this file is different for each user, if you are creating exercise files, you can delete this file and it will be created again on the student computer. - build.gradle (app build script that can be configured) - used to tell Android Studio what versions, etc. to use.
NOTE: There is another build.gradle in the project folder that is used for high level instructions that you typically do not change. - settings.gradle indicates which module the current project include.
- Extrenal Libraries—(not actually a directory) represents Android APIs and JDKs.
The app folder is a module directory. Each project can have multiple modules with each module represented by a directory. To see what module(s) are included in a project, select File > Project Structure... and in the Project Structure dialog box that appears, in the left panel, you will see what Module(s) are included with the project:
- If you click on a module (e.g.,app), you can make changes to the Properties, Signing, Flavors, Build Types, and Dependencies configurations. You will be making changes that are part of the module.
- If you click on the items above the Modules, you can make changes that are part of the project and not the module.
3. Project Files
Project Files directories:
If you are a new Android developer, this is the view that you should be using because it filters out most of the files that are not requires.
4. Packages View
This view presents Java classes and resource files all together in single tree format.
Other views include:
5. Scratches
This view allows you to copy "scratches" of code that you can use later. To do this, copy some code and then from the menu select Tools > New Scratch File.... so that it appears in a new scratch file. Close the scratch file and then switch to the Android scope and then return the the Scratches panel. You should now see the scratch file listed.
6. Problems
Show files that need fixing. To test:
- Create an error (e.g., remove a required semicolon) from a *.java file and then close it.
- Return to the Problems panel and then navigate to the file that has a "problem" and double-click it to open it
- To go to the "problem" area press the F2 key and the cursor will go to the location of the problem. You may need to expand the code to see it.
- Fix the problmem (e.g., add the required semicolon) and you should see the problem item removed from the Problems panel.
7. Production
Show Java, resource and generated files that are required for production when the app is package.
8. Tests
Show files that are required for jUnit tests. To test a test:
- Navigate to the test file (ExampleUnitTest) and click on it to open it. It has a simple test to see if a class will work.
- Right-click on the class and select Run "ExampleUnitTest" from the menu.
NOTE: This is only a Java test and does not anything to do with an app.
9. Android Instrumentation Tests
Thisr test that works with virtual and physical devices. To test:
- Navigate to the test file (ApplicationTest) and click on it to open it.
- Right-click on the class and select Run "ApplicationTest" from the menu.
NOTE: For more information, go to the link in the test file (e.g., http://d.android.com/tools/testings/testing_android.html).
Review Structure Tab
The Structure tab (CMD+7 on Mac or ALT+7 on Windows) can be used to show a "structure" view of the Java classes along with their methods. They are shown by default in the order they are declared. However, you can sort them in any order you want (e.g., alphabetically, by visibility--access modifier). You can also determine what members of the class is going to be displayed. By defualt, you will see fields and non-public members.
Captures Tab
The Captures tab can be used to "capture" the result of other panels (e.g., Memory) for review later.
Build Variants Tab
The Build Variants tab can be used to "build" different "variants" of your app. By default, you will used the debug variant. However, when you are ready to publish your app for deployment, you will need to use the release variant to build your app.
Favorites Tab
The Favorites tab can be used to save your "favorites" classes and other resources that you like to use often. By default, you will see three items available (Project, Bookmarks and Breakpoints). You can add items to the Favorites from the one of the Project windows. Find what you want to save to Favoriates and then right-click on it and select Add to Favorites and then add to the Project or to an New Favorite List. To open a Favorite, double-click on it.
Message Tab
The Message tab (CMD+0 on Mac or ALT+0 on Windows) can be used to provide a listing "messages" from the Gradle build tool. It is different from the Problems tab that is used for Java errors. The Message tab is used to display messages when the app is being built. Double-click on the TODO comment to have the cursor move to the place where the comment is. You can also filter your TODO comment based on the currrent file or a scope (e.g., Project, Android, Package)
Android Monitor Tab
The Android Monitor tab is used to access to logcat output. By default there is only the Memory monitor. However, if you double-click on the Anroid Monitor tab, it will allow you to view the CPU, Network and GPU monitors as well. However, these monitors will only be active when you are running a virtual or physical device. Whenever you run your app, the Android Monitor window will open automatically.
TODO Tab
The TODO tab is used to show a list of "To Dos" comments that you want to write to yourself or others. To write a TODO comment start with a double slash, type the word TODO follow by a space and then the comment (e.g., // TODO Add more code to this class later). Then, the TODO comment will be shown in the TODO panel.
Terminal Tab
The terminal tab is used to open a command prompt. On Windows, it opens a simple command prompt and on the Mac, it opens the terminal app. You can run any command that you can on your Operating System (e.g., ls or dir for directory listing on teh Mac and Windows, respectively).
Gradle Tab
The Gradle tab is used to ...
Android Model Tab
The Android Model tat is used to ...
Modify Gradle Scripts
The Android project window has a virtual folder called GradleScripts that contain two Gradle scripts and other configuration files in one place.

There are two build scripts with the SAME name, one is for the project and the other is for the module.
- build.gradle (Project: HelloWorld) - Top-level build file where you can add configuration options common to all sub-projects/modules. It has two references to a jcenter() method that is used to manage dependencies in the repositories method. The jcenter() reference a Maven repository and is where the Java class libraries are stored on-line and that you reference in the build script. There is also a class path that indicates the package and version of the current Gradle plug-in. (e.g., classpath 'com.android.tools.build:gradle:1.5.0'). Typically, you don't have to update this file as it will be automatically updated if you upgrade to a new version of Android Studio and reopen a project.
- build.gradle (Module: app) - where the applicationId, minSdkVersion, compiledSdkVersion, targetSdkVersion, versionCode, versionName, BuildToolsVersion, etc. is set, (See below for details). These value can be set by:
- Choosing File > Project Structure... and selecting the app from the list of Module(s) in the left panel.
- Changing any value in the panel to the right to be reflected in the build.gradle file.
NOTE: You can also set the buildTypes. You can set multiple build types (e.g., debug, release) and create multiple packages. And also the dependencies. The compile line of code reference the Android suport libraries that is used to build the app that uses classes that are backward compatible to older Android version.
- proguard-rules.pro (ProGuard Rules for app) - See above for details
- gradle.properties (Project Settings) - determines how Gradle behaves during the compilation and packaging process. By default, every process is commented out. However, you can look at the references to learn more how to configure them. For basic apps, you do not need to update this file.
- settings.gradle (Project Settings) - used to configure app:
- application ID or app package - a unique global string that identifies an app.
- minSdkVersion - indicates the oldest Android version that will supported on an app store.
- targetSdkVersion - the version of the SDK that is used to compile and package an app. It is best practice to set this to the most recent version of Android.
- versionCode and versionName - The versionCode is always an integer. The versionName is a always a string. These values can be configure in the build.gradle file.
- buildToolsVersion - This value must match a version of the build tools installed.
NOTE: To check this value, select Tools > Android > SDK Manager. You typically may have more than one version of the Build Tools installed. - dependencies - always have two compile directives. One referring to jar files in the libs folder that are part of the app's class path and one referring to the support library. Typically you have to copy the jaf file to that location and then add it it to the library. You also have one or more dependencies file for the support libraries and support repository.
- local.properties (SDK location) - indicates where the SDK is located. If you had multiple copies of the SDK, you can change this value either in this file or with the user interface.
If you were to delete this file, it would be automatically recreated the next time you open the project.
TIP: If you plan to create exercise files, it is best to delete this file so that a new version will be recreated on the student computer.
If you have another copy of the the SDK, you could reset it in this local.properties file or use the Project Structure... menu: Choose File > Project Structure... This file will be created automatically the first time each project is opened.- SDK: With the Android SDK Location option selected in the left panel, change the SDK location in the right panel.
- JDK: You can also change the JDK version (e.g., Java 8). Remember, in the section on Prepping for Android, in Windows, an Environment Variable named JAVA_HOME was set to this location. On the Mac, it is automatically located.
- NDK: You can also set the NDK location.

Modify Manifest File
The AndroidManifest.xml is an XML file at the top level of the project that describes to the Android Virtual Machine (ARM):
- app's name (e.g., Hello, World).
- app's package name (e.g., com.examples.HelloWorld)
- app's version code (e.g., android.versionCode) - This is a runningNUMBER that identify app version number. it is used to programmatically determine if and app needs to be upgraded.
- app's version name (e.g., android.versionName) - This is a STRING that is displayed TO the user (<major>.<minor><point> - 1..2.3)
- app's minimum OS version (e.g., android.minSdkVersion)
- app's activit(ies) which is akin to HTML pages
- app's image (e.g., ic_laucher)
- app's permission(s) if any
- app's launch activity via intent
- app's configuration (e.g., service and content provider)
There are several ways to access this file:
- From the Project view, click on the app, src and then a main folder (physical location).
- From the Android view, click on the manifests folder (virtural location).
- Press the SHIFT key twice and type AndroidManifest and select it from the list.
The structure of the manifest file is as follow:
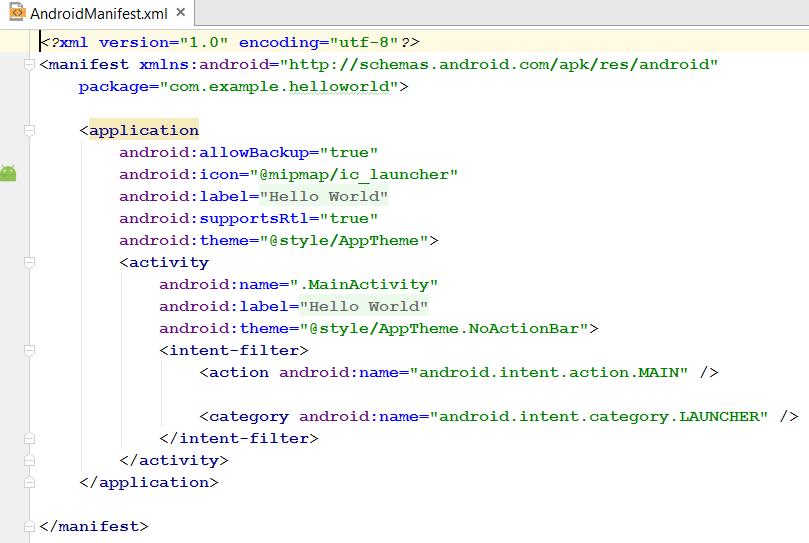
- manifest - root element with xmlns (xml namespace) attribute of android (http://schemas.android.com/apk/res/android) which is used by ALL attributes in the file with this prefix (e.g., android:allowBackup, android:icon, android:label, etc.). It also has a package attribute which is used as a unique global app identifier that uses a reverse domain notation along with the name of the app (com.example.helloworld) and MUST match the ApplicationId in the GradleBuild file and the default package in the Java classes in java folder.
NOTE: Since the ApplicationId appears in so many locations, it is best practice to change it using the refactoring menu by clicking on the string and then pressing SHIFT+F6 and then clicking on the Rename package button.- application - describe app's appearance and more (e.g., icon, label, theme,etc.) via attributes:
- allowBackup - used to determine if the app will be backup to Google.
- icon - control the graphic that is displayed on the launcher screen.
- label - the app name
- supportsRtl - determine right-to-left text rendering
- theme - app's theme
NOTE: In the icon and theme attributes, the @ character followed by a string indicates the name of the resources folder where the file is located (e.g., @mipmap/ic_launcher). Notice that the label attribute is both in the application and activity elements. The label at the activity element is what a user will see in the title bar of the screen. The label in the application element is what is displayed on the home screen. If you hover over on of them, a tooltip will pop up showing that it is actually a resource like the other attributes (e.g., @string/app_name). Double-click on either of these strings to show the name that is actually in the file. Then, hold down the CTRL (PC) or CMD (Mac) key and click on it to open the strings.xml file to make any changes and then save the file.
TIP: It is best practice to use a string resource and not a literal string when referring to a string in the app's manifest file.- activity - EACH screen in an app is known as an activity that has to be listed in the manifest file that is the name of a Java class. An activity is a screen with an interface (e.g., buttons, etc.), unlike a service that runs in the background and does not have an interface. A Broadcast receiver runs in the background and make invoke an interface regardless of the app that is running (e.g., a notitication that the battery is running low, an email alert, etc.).
- name - the name of the Java class. To open it, hold the CTRL (PC) or CMD (Mac) key and click on it.
NOTE: Notice the dot (.) in front of the package name that represents the default package (e.g., com.example.helloworld). So this code could have been written as com.example.helloworld.MainActivity. However, the dot makes the syntax more concise. - label - overrides the label for screen.
- theme - overrides the theme for app.
- intent-filter - The first activity that opens when an app load is called the launcher activity which is defined in the intent filter element. There are two elements in the intent-filter. The intent-filter can also be used to open activities from apps when other apps request data.
- action - usually set to MAIN (e.g., <action android:name="android.intent.action.MAIN" />) that serves as a starting point for an app.
- category - usually set to LAUNCHER (e.g., <action android:name="android.intent.category.LAUNCHER" />) which indicates that can be launch from the launcher icon.
- name - the name of the Java class. To open it, hold the CTRL (PC) or CMD (Mac) key and click on it.
- activity - EACH screen in an app is known as an activity that has to be listed in the manifest file that is the name of a Java class. An activity is a screen with an interface (e.g., buttons, etc.), unlike a service that runs in the background and does not have an interface. A Broadcast receiver runs in the background and make invoke an interface regardless of the app that is running (e.g., a notitication that the battery is running low, an email alert, etc.).
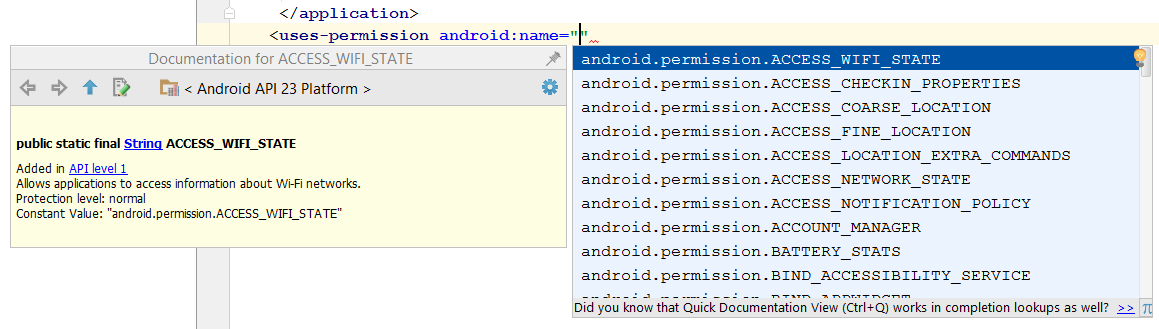
- uses-permission (not shown in screenshot above by default but can be added) - used to ask for permission to use certain features on an end user device (e.g., WIFI). The app store will inform the user of permissions that are being requested when an app is installed and he or she has the option to stop the installation. You should only add the permissions that the app actually intend to use and then add Java code to take advantage of those permissions.
TIP: As a child element of the <manifest> element, if you type the word uses, you will see a list of permissions.- Select uses-permission and then press the Enter key
- Select android.permission.ACCESS_WIFI_STATE from the list and press the ENTER key again
- Close the tag with "/>"
- application - describe app's appearance and more (e.g., icon, label, theme,etc.) via attributes:
NOTE: It is important to note that an app's configurations are splitted between the Gradle script and the app manifest file.
Modify Resources
Every Android project has a res folder with a host of resource folders in it.
- From the Project view, click on app, src, main and then the res folder (physical location).
- From the Android view, click on app and then the res folder. Under this folder are the sub-folders that defines:
- drawable - graphical resources
- layout - activities or screen appearance (e.g., activity_main.xml) in an xml file
- menu - menus and action bar items (e.g., menu_main.xml) in an xml file
- mipmap - launcher icons (e.g., *.png)
- values - strings, dimensions and styles in xml files (e.g., strings.xml)
However, there are other resources that can be created (e.g., color, xml, transistion) that can be defined in its own file manually or automatically with Android Studio. The SDK document describe these resources detail. To define a brand color that can be used in an app:
- Choose File > New... > Android resource file from the list.
- In the New Resource File dialog box that appears, assigned it a resource ID name (e.g., my_brand_color.xml).
NOTE: The resource ID naming convention uses all lower case, no space or no special characters. - Choose Color from the Resource type drop-down
NOTE: Notice that the Directory name was automatically set to a folder named color.
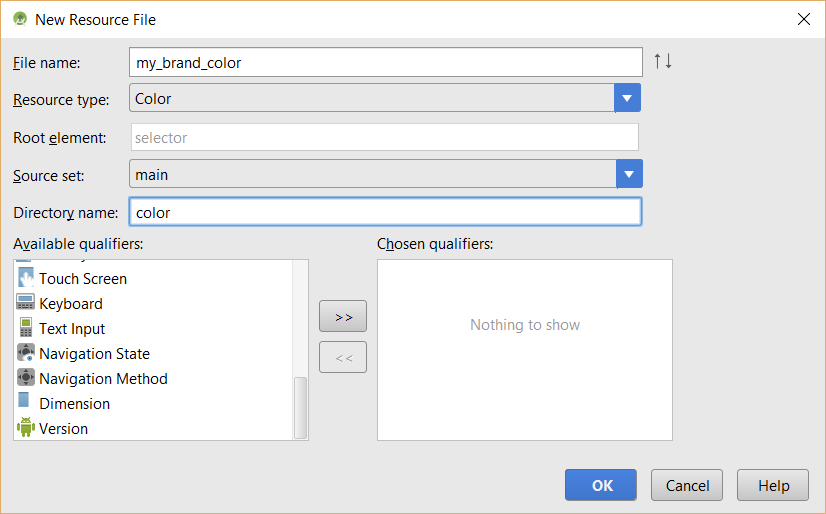
- Click the OK button.
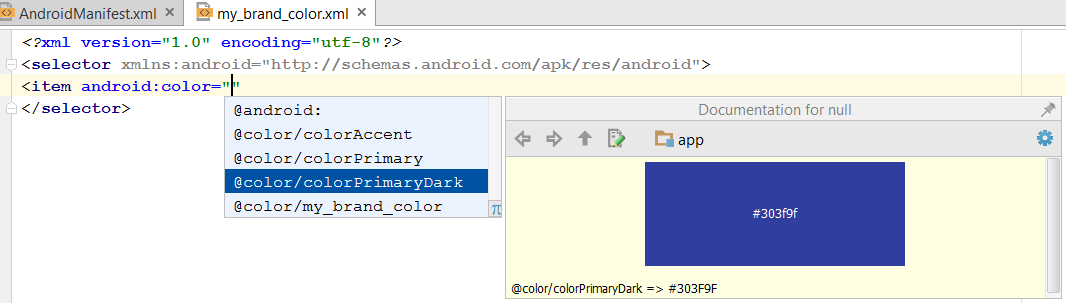
NOTE: This will automatically create an XML file with and an xml namespace (See below).
- Inside the selector element, add an item element with the following highlighted code:
TIP: Type <it and then select item from the list and press the Enter key. You will be provided a list of colors and their preview to choose from or you can type a literal hex color value (e.g., #0F0) and then close the tag with "/>"
<selector xmlns:android="http://schema.android.com/apk/res/android">
<item android:color="#0F0"/>
</selector>
- Save changes by pressing CTRL+S (PC) or CMD+S (Mac).
- From the Android view, under the app, res and then layout folder, double-click on the activity_layout.xml file to see it in Design view.
- CHECK POINT: You should see the text (e.g., Hello, World) is black.
- In the Properties panel, scroll down to the textColor field and click to select it and then click the browser icon with the three elliplse (...).
- Scroll down to the newly created colorID (e.g, my_brand_color), select it and then click the OK button.
- CHECK POINT: Return to the file and click on the Text tab at the bottom of the screen to see the file in Text view. You should see the attribute added to the TextView (e.g., android:textColor="@color/my_brand_color").
- (Optional) Change the text size manually by adding the following attribute below that last one:
TIP: Type textSize and press the Enter key to add most of the code.
android:textColor="@color/my_brand_color"
android:textSize="32sp"
- CHECK POINT: Save changes by pressing CTRL+S (PC) or CMD+S (Mac) and previewing the app again in Design and Text view. You should see the font size is bigger.
NOTE: Like a tag or emeent selector in CSS, if you wanted to change the color for all instances that have this resource assigned to it, simply change the value in the resource file and it will automatically cascade to the other instances in the app.
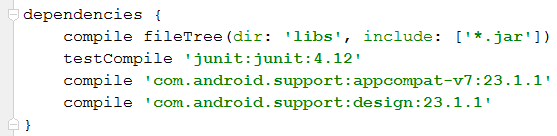
Modify Support Libraries
Android Studio's dependency system is based on the Maven repository which is a host of libraries where developers can add or download libraries. If you open the build.gradle file, you will see a list of support libraries in the dependencies directives. These libraries were automatically included when you selected the Support Repository checkbox when Android Studio was installed.
- appcompat library - will allow features to be added that will work on older version of the API back to version 7.
- design library - includes components (e.g., floating action button or fab) that you can add to an app.
You can find the Support Repository by clicking on the SDK Tools tab in the SDK Manager, and then you'll see the Support Repository listed here. During compilation, the build process looks at these directives and unique identifiers for the libraries and the versions you want to use. First, it looks at the local repository copy of the SDK installation to get them. However, if it doesn't, it can be manually added from a remote repository.
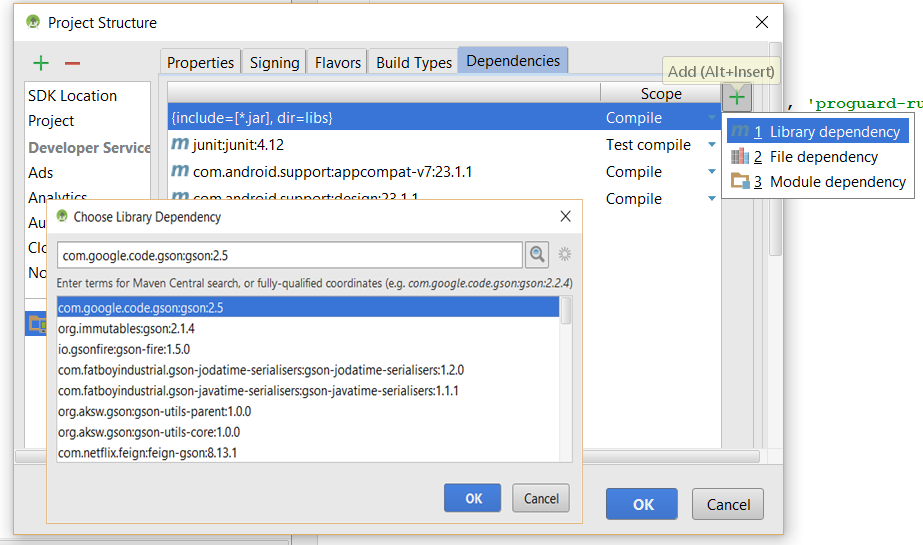
If you want to work with JSON (JavaScript Object Notation) formatted data and wanted to use Google's GSON library to include as a dependency, you could follow these steps:
- Choose File... > Project Structure and in the dialog box that appears, click on the app Module and then click on the Dependencies tab.
- CHECK POINT: Notice that the number of lines match the number of lines in the dependencies block in the gradle.build file.
- Click the plus (+) button and select Library dependency from the drop-down list to see a listing of all the known dependencies.
- In the Choose Library Dependency dialog box that appears, type GSON in the Search field or scroll down and find it and then click the OK button.
- Click the OK button again to close the Project Structure dialog box.
- CHECK POINT: You should see it added to the existing list of libraries and as a new compiled directive in the build.gradle file.
- To test it, go to the MainActivity class and type the following highlighted code in the onCreate method to create an instance of that class:
Gson gson = new Gson();
NOTE: Because the library was added as a dependency in the build.gradle file earlier, notice that Android Studio recognize the class and its package to perform auto-complete.
- CHECK POINT: Click on the plus (+) sign next to the import statement at the top of the file to expand it. You should see that it added the import statement for that class.
The bottom line is that you don't have to add a Java library (*.jar) to the projects folder and then adding it to the class path using this method. In the build.gradle file, notices there is a section on repositories that has a reference to a method called jcenter. If you hold down the CTRL or CMD key and then hover the cursor over this method, you see that it is returning an instance of the class named MavenArtifactRepository that is referencing the Bintray website. If you learn how dependencies work, you can add your own repositories to this list and expand the capabilities of the gradle build system.
There are several online open source libraries that are available for Android development. Type in a search field (e.g., gson) to search for a particular library.
- Bintray (https://bintray.com)
- The Central Repository (http://search.maven.com)
Add JAR file to Dependency
Whenever possible, you should use dependencies that refer to remote files. However, that is not always the case (e.g., your own library or a third party library). So you have to add them manually to your project.
- Copy a *.jar file from somewhere
- Switch to the Project scope and navigate to the app/libs directory and paste the *.jar file into it and in the Copy dialog box that appears, click the OK button.
ALTERNATIVE: You can also drag-and-drop the *.jar file from the File Explorer on Windows or Finder on Mac. - CHECK POINT: The *.jar file classes might not be available to the app even though the build.gradle file has a directive that specific all jar file in the library be included (e.g., compile fileTree(dir: 'libs' , includes: ['*.jar']).However, if you attempt to create an instance of the class, you may not see that version from the library. To resolve this, right-click on the *.jar file and select Add As Library... and then in the Create Library dialog box that appears, click the OK button which will add it to the dependencies in the build.gradle which will make the library classes immediately available in your app. Now, if you create an instance of the class library, it will show up in the list of classes available.
Add JAR file to Module
Beside adding a JAR file from remote library dependencies or local JAR file dependencies, another way is to "wrap" a JAR file or files with its own module. Which option you choose depends on the project complexity or your own perferences.
- Create a new module by selecting File > New > New Modules... and in the New Module dialog box that appears, select the .JAR/.AAR package and then click the Next button.
NOTE: There is a host of module that you can choose from (e.g., Phone, Tablet, Wear, TV, Glass) - In the next screen that appears, browser to the JAR file that you want to import by clicking on the Browse button and then clicking the OK button and then click the Finish button.
- Choose File > Project Structure... and choose the app module and then click on the plus icon (+) at the bottom of the screen and select Module dependency from the drop-down list to tie the module to the app and then click the OK button twice.
- CHECK POINT: You can add any Java code that is part of that module and it will be available to your app module.
Developer Docs/Training
Google provides useful documentation and training on-line at developer.android.com/develop, installed off-line documentation with the Android Studio installation or in-place documentation within code. These documentations allow a developer to learn the Android framework by Java Classes and APIs that can be searched or viewed by API version number or name. To access the in-place documention of a selected Class, press CTRL+Q (PC) or F1 (Mac) or hold down the CTRL key and move cursor over a Class name.
On the developer website listed above you can find information on:
- Training
- API Guides
- References
- Tools
- Google Services
- Samples
News - http://android-developers.blogspot.com/
Questions about Android and programming in general - http://stackoverflow.com/
Import and Export Settings
Once you have established your Android Settings (PC) or Preferences (Mac) to see its Appearance and Behaviors and if they get corrupted or you want to use them on another computer, you can export the current settings and then import them onto another computer so that you don’t have to go through the same steps again.
- Go to File > Export Settings and in the Export Setting dialog box that appears choose the settings you want to export by clicking on the checkboxes.
TIP: You can also click on the Select All or Select None buttons to select and then deselect the settings you want to save.
- In the Export setting to text field, provide a path to where you want the settings to be saved (e.g., /User/Cornelius/Desktop/setting.jar) and then click the OK button.
TIP: You can change the extension on the settings.jar to settings.zip to see the files structure.
- In the Export Complete dialog box click the Reveal in Finder (Mac) or Reveal in Explorer (PC) button to go the folder the setting is located in.
- Close the current project and delete the preference folder (e.g., AndriodStudioPreview).
- Mac: Go to the Preferences folder (e.g., ~/Library/Preferences).
- Windows: Go to Settings folder in the Android Studio Home directory.
- Restart Android Studio:
- Mac: Go to the Applications folder and double-click on Android Studio
- Windows: Go to the Start menu and select Android Studio
NOTE: If you are using a beta version find and double-click on the installer. - In the Complete Installation dialog box that appears, you could import the setting from a previous version of Android that you currently have installed or you could import from a custom location. However, we want to use the third option to manual import the settings.
- CHECK POINT: You should now see the Welcome screen because Android Studio does not have preferences or settings file to work with. And if you click the select the default option for all of the prompts and then click the Finish button, Android Studio will open the welcome screen. Open an existing Android Studio project and open an *.java file. You should see that all of your settings (e.g., font, method dividers) are gone.
- Select File > Import Settings… and then navigate to the import file. If you placed it on the desktop, select:
- Mac: CMD + D
- Windows: CTRL + D
- Select the settings.jar file and then click the OK button.
- In the Select Components to import dialog box that appears, select the settings that you want to import.
TIP: You can also click on the Select All or Select None and then click to select or deselect a setting.
- Then, click the OK button.
- In the Restart Needed dialog box that appears, click, the OK button to restart Android Studio.
- CHECKP POINT: Go back to the *.java file and you should see your settings restored.
Import Eclipse with ADT
To import a project from Eclipse with ADT (Android Developer Tools), once you import the project, you will need to make some configuration changes to the build.gradle file to make is compatible with a current version of Android Studio.
- From the Android Studio’s Welcome screen, click on the Import project (Eclipse ADT, Gradle, etc) link from the list and navigate to the project and then click the OK button
- In the Import Project from ADT (Eclipse Android) dialog box that appears, click the Next button.
- On the next screen, keep all of the default checkbox options and then click the Finish button to import the project.
- CHECK POINT: In the Message panel that appears, you may see that the project failed because it failed to find target with hast string ‘android-XX’ in …/Android/sdk where XX is the version that the app was created with.
TIP: To find out what Android version that corresponds to, open up the SDK Manager and look at the version level next to the API level. (e.g., Android 4.2 (Jelly Bean) is API 17). You could download that API level but it is better to upgrade to the new API level explained next. - Open the Project window and navigate to the app module and click on the build.gradle file to open it.
- Change:
- compileSdkVersion and targetSdkVersion to the latest version (e.g., 17 to 23)
- compile dependencies to the latest version(s) (e.g., ….support-v4:23.0.0).
NOTE: You may get a warning that the support library might not be installed. Click the Try Again link at the top of the screen to sync the gradle file with the project. You may also see a message at the bottom of the screen informing you that there is a more recent version of the support library. Change it to the latest version (e.g., ….support-v4:23.2.0) and then click the Sync Now link. - CHECK POINT: You should not see any warnings or errors. Run the app on your device to see if it works properly.