If you access the database DIRECTLY through myPHPMyAdmin there no need to connect to it. However, when using a PHP script you have to CONNECT to the database INDIRECTLY. PHP can connect to most databases (e.g., PostgreSQL, SQLite, Sybase) servers. If you use a database that does not have DIRECT support, you will need to use a PHP Open Database Connectivity (ODBC) method with ODBC drivers to connect to a database.
However, we will be using the MySQL server that comes bundle with XAMPP.
Setup Server
Once you create a database and its tables, phpMyAdmin will create a folder with the same name as the database in a server folder. In our case, it is C:/xampp/mysql/data/employee_directory1234 with database related files in it. It is important to remember that data for an application get saved in one folder (e.g., C:/xampp/mysql/data/) while the application get saved in another (e.g., C:/xampp/htdoc/). This is true for all applications that you build.
Before you can connect to a database, you have to first setup a testing or remote server. The process is more involved than creating a static website:
- You MUST setup a application from a particular folder for a particular server (e.g., for PHP the folder is htdocs, for IIS the folder is wwwroot).
- You MUST have the files for your application residing in this folder (it will not work from your desktop). The reason for this is that in order for a file to be "served" from a server, it has to be in a server's root directory and viewed from a browser (it will not render if you click on a file in the File Explorer).
- Create a folder in the server's root directory and name it EmployeeDirectory. In our case, this is htdocs folder (e.g., C:\xampp\htdocs\EmployeeDirectory\).
- Setup server from within your HTML editor. In Dreamweaver, perform the following steps:
- Open up Dreamweaver and select Site > New Site... from the menu
- In the dialog box that appears, click on the Site link in the left panel to select it to setup LOCAL FOLDER:
- In the Site Name's text field, give the site (app) a name. In our case, Employee Directory.
- Click on the folder icon next to the Local Site Folder's text field and navigate to the local site root directory. In our case, it is C:\xampp\htdocs\EmployeeDirectory\ and then click the Select Folder button to enter the path into the Local Site Folder's text field.
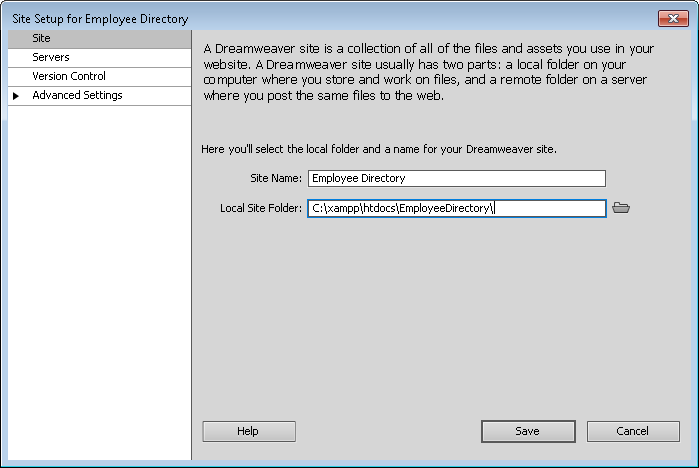
CAUTION: Be careful to use a SINGLE back slash (\) instead of a DOUBLE back slash (\\) in the Local Site Folder text field.
- Click on the Servers link in the left panel to select it to setup REMOTE OR TESTING FOLDER:
- In the screen that appears, click on the plus sign (+) to create a new server.
- In the next screen that appears, add or select the following information:
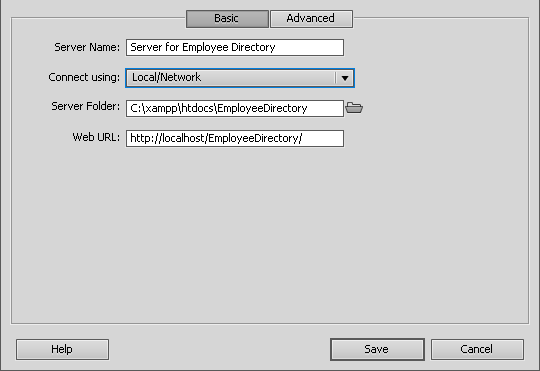
- With the Basic tab selected, enter a server name. In our case, Server for Employee Directory.
- From the drop down menu next to Connect Using, select Local/Network.
NOTE: If you are using an ISP, you will need to select an FTP option instead of Local/Network and enter all of the necessary data provided to you by your ISP. You can also click on the Test button to confirm that the remote server connected successfully.
- Click on the folder icon next to the Server Folder's text field and navigate to the local server root directory. In our case, it is the same as the site root directory: C:\xampp\htdocs\EmployeeDirectory\.
- In the Web URL's text field enter: http://localhost/EmployeeDirectory/.
NOTE:
- This URL is how you access it from within a browser. You may want to bookmark it so that you have easy access to it.
CAUTION: It is important to note that the slashes in the path for the Server Folder can be FORWORD OR BACK SLASHES ( \ ) depending on the OS:
- Mac/UNIX - Forward slash
- Windows - Back slash
Whereas, the slashes for the Web URL MUST ALWAYS BE FORWARD SLASHES ( / ).
- Click on the Advanced tab to select it.
- In the Testing Server section, click on the Server Model's drop-down menu and select PHP MySQL.
- Click the Save button to save the server settings.

- Select the Testing server radio button.
NOTE: If you have an ISP you may wish to select the Remote server option.

- Click the Save button for Site settings.
- Open up Dreamweaver and select Site > New Site... from the menu
Connect To Database Server
To establish a connect with the MySQL database, you use the mysql_connect() method that takes at least three arguments and then assign it to a variable (e.g., $db_connection).
SYNTAX: $db_connection = mysql_connect (hostname, username, password);
Once you are through with using the database (e.g., after making a query), it is best practice to close the database connect with the mysql_close() method.
- Create a new blank HTML page and save it as connection.php (not .html) in the site root directory (e.g., C:\xampp\htdocs\EmployeeDirectory\).
- Write the following PHP code. Comment is optional but recommended.
CAUTION: The user name and password is case sensitve. So corneliuschopin is not the same as CorneliusChopin as the user name.<?php // 1. CONNECT to database management system (DBMC) In our case, MySQL. $db_connection = mysql_connect("localhost", "CorneliusChopin", "admin"); ?>
CODE EXPLANATION:- ALL PHP scripts need to be "wrapped" in a set of PHP tags ("<?php // code goes here... ?>"). Notice that the PHP script is a self closing tag like a <hr /> , <br /> or <img /> tag. However, unlike an HTML tag, a PHP tag has a quetion mark in the opening tag (e.g., (<?php).
The hostname is the server IP address where the database is hosted remotely or if running locally it is set to localhost. - mysql_connect() method is used to "connect" to a database which is set to a variable (e.g., $db_connection).
- The username and password are the same ones you created when you created the database.
- If you were to test this page in a browser, while a connection may have been made, there is currently no indication if the connection was successful or not. This will be resolved in the next step.
- ALL PHP scripts need to be "wrapped" in a set of PHP tags ("<?php // code goes here... ?>"). Notice that the PHP script is a self closing tag like a <hr /> , <br /> or <img /> tag. However, unlike an HTML tag, a PHP tag has a quetion mark in the opening tag (e.g., (<?php).
- Add the following highlighted code to verified that a database connection was made or not:
<?php
// 1. CONNECT to database management system (DBMC) In our case, MySQL.
$db_connection = mysql_connect("localhost", "CorneliusChopin", "admin") or die("Cannot CONNECT to database server");
print $db_connection;
?>
CODE EXPLANATION:- The die() method is invoked if a database connection was not made and will stop (kill) the script. You can pass it a literal string (e.g., "Cannot connect to database server") or a function to do whatever you want (e.g., redirect a user to a custom error page.). You will see later how to use an "if/else" statement instead of the die() method to check if the database connection was successful.
- The print command is executed if the database connection is successful. However, the result is not very informative but let's know a connection was successful.
- CHECK POINT: Save the file and preview it in a browser. You should see a pointer variable to the connection (e.g., Resource id #3) displayed on the page. This lets you know the connection was made successfully.
- Replace the die() method
AND
the non-informative print statement (print $db_connection;) with an "if" statement to create a custom and more informative message if the database connection is successfully.
CAUTION: You cannot have the die() method and a custom message at the same time so you HAVE to replace it.
<?php
// 1. CONNECT to database management system (DBMC) In our case, MySQL.
$db_connection = mysql_connect("localhost", "CorneliusChopin", "admin");
if($db_connection)
{
  print ("Database server connected successfully.");
}
?>
CODE EXPLANATION:- The "if" statement (e.g., if($db_connection)
{
print ("Database server connected successfully.");
}) is used to see if the variable (e.g., $db_connection) is true (that is, if the database server connection was successful, the variable would return a true statement).
- The print method allows the message (e.g., Database server connected successfully.") to be display on the page only if the connection was successful.
ALTERNATIVE FOR GEEKS ONLY:
You could have entered the mysql_connect() method DIRECTLY INSIDE the "if" statement to avoid having to create the $db_connection variable: if(mysql_connect("localhost", "CorneliusChopin", "admin")). However, using the $db_connection variable makes the "if" statement easier to read. - The "if" statement (e.g., if($db_connection)
{
print ("Database server connected successfully.");
}) is used to see if the variable (e.g., $db_connection) is true (that is, if the database server connection was successful, the variable would return a true statement).
- CHECK POINT: Save the file and preview it in a browser. You should see the message "Database server connected successfully." being displayed on the page.
- Add an "else" statement code block below the "if" statement code block to display a message IF the server connection was not successful.
<?php
// 1. CONNECT to database management system (DBMC) In our case, MySQL.
$db_connection = mysql_connect("localhost", "CorneliusChopin", "admin");
if($db_connection)
{
  print ("Database server connected successfully.");
}
else
{
 print ("Could not CONNECT to database server.");
}
?>
ALTERNATIVE FOR GEEKS ONLY:
You could write a more fancy format for the error using some HTML and CSS like this for the print statement instead.print ("<p style='color:red; font-weight:bold; text-transform:uppercase'>Could not CONNECT to database server</p>");
- Temporary change one of the mysql_connect() arguments so that the connection will not be successful. In this case, an X was added to the username.
$db_connection = mysql_connect("localhost", "CorneliusChopinX", "admin");
- CHECK POINT: Save the file and preview in a browser again. You should see a warning message AND the print message that were written to the screen:
- "Warning: mysql_connect(): Access denied for user..."
- The print message "Could not CONNECT to database server."
Handle Errors
Getting useful information when an error occurs can save you a lot of debugging time. Instead of getting generic information from your script, you can use the error suppressor operator (@) along with ANY method (e.g., mysql_error(), include()) to display more useful information about errors and warnings. Displaying error messages is good for debugging purposes; however, they should be turned off on a LIVE web site or application.
- Add an "@" symbol in front of the $db_connection mysql_connect method:
$db_connection = @mysql_connect("localhost", "CorneliusChopinX", "admin");
- CHECK POINT: Save the file and preview it in a browser again. You should see the previous warning was SUPPRESSED but the custom print message still displays.
- The @ is an error suppressor operator that can be used in front of any SQL method to suppress any error or warning messages that might be invoked. It is important to note that this operator does not STOP errors from happening but only suppress them from being DISPLAYED so that you can handle the error yourself with some custom error messages as will be done in the next step.
- In the "else" code block, modify the print statement to read as follow:
else
{
  print ("<p>Could not CONNECT to database server: <br />". mysql_error() . "</p>");
}
- CHECK POINT: Save the file and preview it in a browser again. You should see the custom error message and the sql_error message (See below). The result is a combination of HTML (e.g., <p>, <br />) and PHP (e.g., mysql_error method) that has been "stringed together" with the concatenator operator ( . ). This is similar to not adding the @ to the mysql_connect() method.
Could not CONNECT to database server:
Access denied for user 'CorneliusChopinX'@'localhost' (using password: YES)
- Remove the temporary change you made to one of the variables and save the file again so the database server connects successfully. In this case, the X was removed but the @ symbol was kept to maintain the custom message:
$db_connection = @mysql_connect("localhost", "CorneliusChopin", "admin");
// X was removed from CorneliusChopin — don't add this comment
Select A Database
After you make a CONNECTION to a Database Management System (DBMS), the next step is to SELECT a database from the DBMS. Unless it is a new DBMS there is likely more the one database and you have to select one. Before a PHP script can COMMUNICATE (e.g. perform queries on it) with a database, the database must first be SELECTED.
- Write the following highlighted code below the first print statement to close the connection:
<?php
// 1. CONNECT to database management system (DBMC) In our case, MySQL.
$db_connection = @mysql_connect("localhost", "CorneliusChopin", "admin");
if($db_connection)
{
  print ("Database server connected successfully.");
  // 2. SELECT (NOT CONNECT) to a database from a DBMC
  $db_selection = @mysql_select_db("employee_directory1234");
  // Check if selection was NOT successful
  if(!$db_selection)
  {
	print("Could not SELECT database");
  }
}
else
{
  /* print ('<p style="color:red; font-weight:bold;
  text-transform:uppercase">Could not connect to database</p>');  OR */
  print ("<p>Could not CONNECT to database server: <br />". mysql_error() . "</p>");
}
?>
ALTERNATIVE FOR GEEKS ONLY:
You could have entered the mysql_select_db() method DIRECTLY INSIDE the "if" statement to avoid having to create the $db_selection variable: if(!@mysql_select_db("employee_directory1234")). However, using the $db_selection variable makes the "if" statement easier to read.CODE EXPLANATION:- Notice that the SECOND "if" statement is NESTED inside of the FIRST "if" statement. It is used to check if a database was NOT selected.
- The mysql_select_db method is used to "select" a database. However, the exclamation point ( ! ) is a NOT operator which makes the "if" statement read "Not selected".
- CHECK POINT: Save the file and preview it in a browser again. You should see the message "Database server connected successfully." being displayed as before.