It is important to authenticate users especially as it relates to ensuring only authorized users have access to administrative pages (i.e., add, update or delete employees) as well as having only register users view specific pages. This is done by creating pages that allow users to log in or log out through a authentication framework in order to access pages that requires authentication. Other pages are accessible to the public.
CAUTION: It is best NOT to provide a link to administrative pages to prevent hackers from attempting to hack site. Instead, provide a link that the administrative users have to enter manually. This also prevent search engines from indexing that link. However, you should provide links (login and logout) to other users (members, client login, guests, etc.)
The Login page allows a user to enter a username (or email) and password that will be checked against a username(or email) and password in the database. If there is a match, the user is relocated to the appropriate page. If there is not a match, the user is presented with a message on the same page or another page that states that the username, email or password was invalid.
Session variables are used to allow user to navigate from page to page without having to login multiple times. Once a user is logged in, a session variable is created. Any page that restrict access will check for a session variable and allow or restrict access to that page depending if the login is successful or not. If not successful, the user will be redirected to another page. The user is also allowed to log out to close the session variable.
While you could use two separate pages, one to process the form and the other to display the form, it is best practice to use a SINGLE page that can handle both using conditional statements. The syntax would be similar to this:
if (form has been submitted)
{
Process the form
}
else
{
Display form
}
The submit button in a form has to be clicked FIRST in order for a form to be processed. So to determine is a form has been submitted, you can check to see if a variable is set in the form. Fortunately, PHP has a method for checking to see if ANY variable is set called isset(). Guess what it does?
if (isset($_POST["aVariable"])
However, if a user submitted a form without completing it, a variable may not be set and an error will be displayed. To prevent this from happening, a hidden field can be created to indicate that the form has been successfully when the form is submitted. The hidden field has a value of true and will always be set if the form is submitted. Hence, when the page first loads, the conditional statement is FALSE because the "submitted" value has not been set and the form will be displayed. When the form is submitted, the value of the hidden field becomes TRUE so the form will be processed.
<input type="hidden" name="submitted" value="true">
The code that will be created will perform the following tasks:
- PART A: CREATE STATIC CONTENT
- Create Static Login Form
- PART B: ADD DYNAMIC SCRIPTS
- Add Login Script
- Add Error Message Script
- Add Server Variables Script
- Add Logout Script
- Add Restrict Admin Pages Script
- Add Session Variables Script
- OPTION 1: Forgot Password
- OPTION 2: Remember Me Checkbox
- OPTION 3: Registration Link
PART A: CREATE STATIC CONTENT
Create Static Login Form
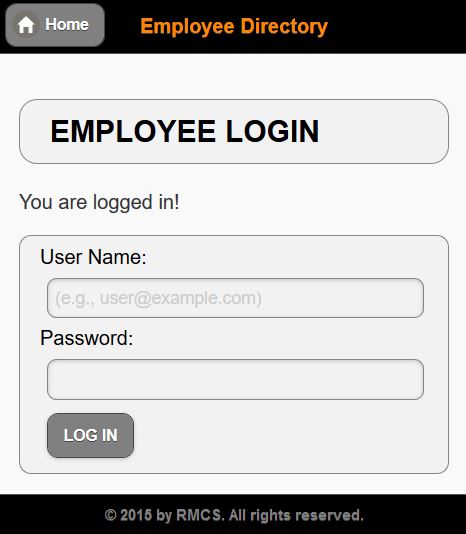
- Open the employee_login.php page that you created earlier.
- Write (or copy) the following highlighted code below the
<h2>
tag.
WHY: To create a static form for the Login Page.
<?php require('includes/connection.inc.php')?>
<?php require('includes/header.inc.php')?>
<div data-role="content">
<h2 class="ui-body ui-body-a ui-corner-all">EMPLOYEE LOGIN</h2><p>You are logged in!</p>
<form action="employee_login.php" method="post">
<div class="ui-body ui-body-a ui-corner-all">
<label for="email">User Name:</label>
<input type="text" name="username" size="20" placeholder="(e.g., user@example.com)" data-mini="true"/>
<label for="password">Password:</label>
<input type="password" name="password" size="20" data-mini="true"/>
<input type="submit" name="submit" value="LOG IN" data-inline="true" data-mini="true"/>
</div>
</form>
</div>
<?php require('includes/footer.inc.php')?>
CODE EXPLANATION:
- Spaces have been purposely added in the code to show where the if/else code will be wrapped around later.
- Spaces have been purposely added in the code to show where the if/else code will be wrapped around later.
- CHECK POINT: Save the file and preview it in a browser. You should see the static message ("You are logged in!) and the static login form.
PART B: ADD DYNAMIC SCRIPTS
Now, it is time to write some conditional statements to show or hide content as needed.
Add Login Script
- Wrap the following highlighted if/else statement AND print statement around the two HTML sections (message and form).
WHY: To check to see if the form has been submitted and if so process it; otherwise, just display it.
<?php require("includes/connection.inc.php")?>
<?php require('includes/header.inc.php')?>
<div data-role="content">
<h2 class="ui-body ui-body-a ui-corner-all">EMPLOYEE LOGIN</h2><?php
// Check to see if the form has been submitted:
if (isset($_POST["username"]))
{
// Process the form once it is submitted:
print "<p>You are logged in!</p>";
}
else
{
// Display the form to screen
print '<form action="employee_login.php" method="post">
<div class="ui-body ui-body-a ui-corner-all">
  <label for="email">User Name:</label>
  <input type="text" name="username" size="20" placeholder="(e.g., user@example.com)" data-mini="true"/>
  <label for="password">Password:</label>
  <input type="password" name="password" size="20" data-mini="true"/>
  <input type="submit" name="submit" value="LOG IN" data-inline="true" data-mini="true"/>
</div>
</form>';
}
?>
</div>
<?php require('includes/footer.inc.php')?>
CODE EXPLANATION:
- The $_POST["submitted"] denotes a form variable with a name of submitted which matches the name of the hidden field.
- The value of the action attribute for the <form> tag is set to the SAME name of the file (e.g., employee_login.php). This is called self-posting where the file is submitted "on top" of itself to be processed. This will cause the form variables to be defined and processed.
- Notice that the first print statement has double quotes because there is no quotes inside of it; whereas, the second print statement has single quotes because the attributes have double quotes.
- Also, note both print statements end in a semicolon.
- Notice in the code the PHP code block is not SPLIT into to separate PHP code blocks like in some of the other PHP code shown. As a result, the print statement is used to "print" out any static HTML content.
- Select the comment and the print statement in the first part of the "if" statement and delete them:
// Process the form once it is submitted:
print "<p>You are logged in!</p>";
- These lines will be added back but it is easier now just to delete them
- Replace the two lines that were deleted in the previous step with the following nested if statements. Comments are optional. Be careful to nest it between the opening and closing curly braces of the first "if" statement.
<?php require("includes/connection.inc.php")?>
<?php
<?php require('includes/header.inc.php')?>
<div data-role="content">
<h2 class="ui-body ui-body-a ui-corner-all">EMPLOYEE LOGIN</h2>
<?php print (isset($_GET['failed']))?"<p class='error'>Enter valid username or password</p>": "";?>
<?php require("includes/connection.inc.php")?>
// Check to see if the form has been submitted:
if (isset($_POST["username"]))
{
// Convert form POST variables to REGULAR variables
$username = $_POST["username"];
$password = $_POST["password"];
// If either form field is empty, post back to page
if( (!$username) or (!$password))
{
header("Location: employee_login.php");
}
// Create query. Store reference of SQL Statement in a variable. Filter query based on form variables.
$query_Login = "SELECT UserName, Password FROM passwords WHERE UserName = '$username' AND Password = '$password'";
// Execute query
$rs_Login = mysql_query($query_Login);
// Determine number of record return from database
$numRow = mysql_num_rows($rs_Login);
if ($numRow != 0)
{
header("Location: index.php");
}
else
{
header("Location: employee_login.php");
}
}
else
{
// Display the form to screen
print '<form action="employee_login.php" method="post">
<div class="ui-body ui-body-a ui-corner-all">
<label for="email">User Name:</label>
<input type="text" name="username" size="20" placeholder="(e.g., user@example.com)" data-mini="true"/>
<label for="password">Password:</label>
<input type="password" name="password" size="20" data-mini="true"/>
<input type="submit" name="submit" value="LOG IN" data-inline="true" data-mini="true"/>
</div>
</form>';
}
?>
</div>
<?php require('includes/footer.inc.php')?>
- CHECKPOINT: Save the file and test it in a browser by entering valid and non-valid usernames and passwords and then pressing the LOG IN button. You should see that the page go nowhere when there is a invalid username or password and it takes you to the Employee Master Page (index.php) when there is a valid username and password.
Add Error Message Script
It is best practice to provide an error message if the user enter an invalid username of password.
- Add the following highlighted URL query string to the LAST header method:
WHY: This query string will be used next to see if the page has been submitted and check for invalid username or password.
header("Location: employee_login.php?failed=true");
- Add the following highlighted code anywhere you want the error message to appear. In this case, it was added below the
<h2>
tag:
<h2 class="ui-body ui-body-a ui-corner-all">EMPLOYEE LOGIN</h2>
<?php print (isset($_GET['failed']))?"<p class='error'>Enter valid username or password</p>": "";?>
<form action="admin_login.php" method="post" name="formLogin" id="formLogin">
CODE EXPLANATION:
Because the code is inline, instead of using the traditional "if" statement, another conditional operator called trinary is used. If the opening statement [ (isset($_GET['failed'])) ] is true than the first clause [ "<p class='error'>Enter valid username or password</p>" ] after the question mark (?) is executed. Otherwise, the second clause [ "" ] which is an empty string after the colon [ : ] is executed.
Add Server Variables Script
It is best practice to add server variables when you want to refer to the SAME page.
- Add the following two additional SERVER variables below the POST variables. Comments are optional:
// Convert form POST's arrays to REGULAR variables
$Fullname = $_POST['userName'];
$password = $_POST['password'];
$self = $_SERVER['PHP_SELF'];
$referer = $_SERVER['HTTP_REFERER'];
- Replace the static form action's variable VALUES with their dynamic variable VALUES counterpart:
From this: <form action = "employee_login.php" method = "post">- $PHP_SELF is a built-in server variable that is used to replace the location of the current page.
To this: <form action = $self method = "post">
Or this: <form action = "<?php print (PHP_SELF) ?>" method = "post">
- Update the following two headers with the following code:
From this: header("Location: employee_login.php");
To this: header("Location: $referer");
From this: header("Location: employee_login.php");
To this: header("Location: $referer?failed=true"); - CHECKPOINT: Save the file and test the page again. You should not see any changes but the page is more dynamic.
Add Logout Script
It is important for a user to log out so that the another user can not use the same computer with previous user still login. The Log User Out behavior will be used to destroy the session variables.
Add Restrict Admin Pages Script
Add note and code for restrict page here...
Add Session Variables Script
Add note and code for session variables here....
OPTION 1: Forgot Password
OPTION 2: Remember Me Checkbox
OPTION 3: Registration Link