Before you can provide login capability, you need to already have a table in the database with usernames and passwords so that the login page can match them. Instead of having an administrator user enter usernames and passwords for users (e.g., visitors), you can allow them to create their own username and password. This can be accomplished by creating a registration page that will allow a user to "register" his or her own username and password into the database.
The code that will be created will perform the following tasks:
- PART A: CREATE STATIC CONTENT
- Create Static Form and Form Elements
- PART B: ADD DYNAMIC SCRIPTS
- Add Sticky Form Script
- Add Validate Form Fields Script
- Option 1: Send Confirmation Email
- Option 2: Check for Unique Username
CREATE STATIC CONTENT
Create Static Form and Form Elements
- Open the employee_registration.php page that you created earlier.
- Write (or copy) the following highlighted code below the
<h2>
tag:
WHY: To create the STATIC VERSION of the registration form.
<?php require("includes/header.inc.php")?>
<div data-role="content">
<h2 class="ui-body ui-body-a ui-corner-all">EMPLOYEE REGISTRATION</h2>
<!-- The form is created OUTSIDE of the conditional statement so that it will ALWAYS be displayed. -->
<div class="ui-body ui-body-a ui-corner-all">
  <form action="employee_registration.php" method="post">
  <p>First Name: <input type="text" name="first_name" size="20" data-mini="true"/></p>
  <p>Last Name: <input type="text" name="last_name" size="20" data-mini="true"/></p>
  <p>Email Address: <input type="text" name="email" size="20" data-mini="true"/></p>
  <p>Password: <input type="password" name="password1" size="20"data-mini="true"/></p>
  <p>Re-enter Password: <input type="password" name="password2" size="20" data-mini="true"/></p>
  <p><input type="submit" name="submit" value="REGISTER" data-inline="true" data-mini="true"/></p>
  <input type="hidden" name="submitted" value="true" />
  </form>
</div>
</div>
<?php require("includes/footer.inc.php")?>
CODE EXPLANATION:- The <div> with class="ui-body ui-body-a ui-corner-all" is used to style the form container to have rounded edges (See screenshot below).
- The action method's value of the <form> tag is set to the SAME name as the file itself (e.g., employee_registration.php). This process is called SELF POSTING or POST BACK and is used to submit the form on TOP OF ITSELF in order for the variables to be defined.
- The jQueryMobile data-mini="true" attribute is used to minimize certain form elements height.
- The jQueryMobile data-inline="true" is used to ensure the button behave like an inline element and does not expand 100% the width of its parent container.
- The type="hidden" attribute will be used later.
- CHECK POINT: Save the file and preview it in a browser. You should see the form displayed with all of the form elements when the page loads. If you enter some data into the text fields and then click the REGISTER button, the data will disappear. This will be resolved in the next step.

CREATE DYNAMIC SCRIPTS
Add Sticky Form Script
A Sticky Form is a form that remembers the values that were entered into it if the form is not submitted correctly so that a user does not have to re-enter those values. The syntax for a form variable to to sticky is:
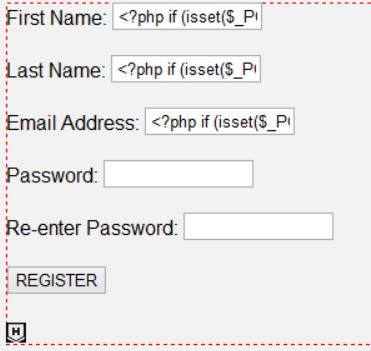
<input type="text" name="first_name" size="20" value="<?php if (isset($_POST["first_name"])) {print htmlspecialchars($_POST["first_name"]); } ?>"
The value attribute of a form variable is set to a PHP script that check to see if the variable is set and if so it will display the result in the form element after parsing it with the htmlspecialchars method. The htmlspecialchars method converts certain HTML tags into entities (e.g., <h1> entity is <h1>) to avoid problems if a user enters HTML tags into a form field.
- Add the following highlighted PHP scripts to the first three form elements within the form
<input>
tags as value attributes with dynamic PHP scripts as their values.
CAUTION: Be careful to ensure that they are nesting inside of the closing input tag and paragraph tags ( /> </p>).<?php require("includes/header.inc.php")?>
<div data-role="content">
<h2 class="ui-body ui-body-a ui-corner-all">EMPLOYEE REGISTRATION</h2>
<!-- The form is created OUTSIDE of the conditional statement so that it will ALWAYS be displayed. -->
<div class="ui-body ui-body-a ui-corner-all">
<form action="employee_registration.php" method="post">
<p>First Name: <input type="text" name="first_name" size="20" data-mini="true"
value="<?php if (isset($_POST["first_name"])) {print htmlspecialchars($_POST["first_name"]);} ?>"/></p> <p>Last Name: <input type="text" name="last_name" size="20" data-mini="true"
value="<?php if (isset($_POST["last_name"])) {print htmlspecialchars($_POST["last_name"]);} ?>"/></p>
<p>Email Address: <input type="text" name="email" size="20" data-mini="true"
value="<?php if (isset($_POST["email"])) {print htmlspecialchars($_POST["email"]);} ?>"/></p>
<p>Password: <input type="password" name="password1" size="20" data-mini="true"/></p>
<p>Re-enter Password: <input type="password" name="password2" size="20" data-mini="true"/></p>
<p><input type="submit" name="submit" value="REGISTER" data-inline="true" data-mini="true"/></p>
<input type="hidden" name="submitted" value="true" />
</form>
</div>
</div>
<?php require("includes/footer.inc.php")?>
CODE EXPLANATION:- These three scripts create what is called a STICKY FORM. You cannot preset the value of password input fields; however, you can preset other form variables:
- combo box – add selected = "selected" as an attribute
- radio button / check box – add check = "checked" as an attribute
- textarea – place the value between the textarea tags (e.g., <textarea name="Feedback">Preset text goes here...</textarea>).
- CHECK POINT: Save the file and preview it in a browser. You should see the same registration form as before. However, if you look at the form in Design view in Dreamweaver, you will see the PHP script inside of the first three form elements. Also, if you enter some data into the text fields and then click the REGISTER button, the data will STICK to its original values.
Add Validate Form Fields Script
Anytime you create a form, you should validate the form elements using client-side JavaScript, server-side script or both. When creating a registration page, you want to ensure that all critical form elements get a value or that they are the right data type. This is especially true of text input fields.
- Add the following highllghted PHP conditional statements between the
<h2>
tag and the form's comment:
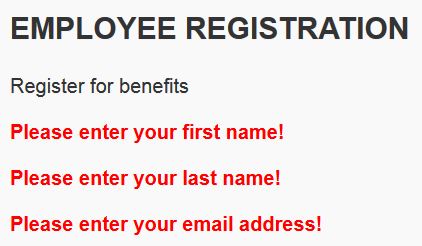
<h2 class="ui-body ui-body-a ui-corner-all">EMPLOYEE REGISTRATION</h2>
<?php
print "<p>Register for benefits</p>";
// Check to see if the form has been submitted:
if (isset($_POST["submitted"]) )
{
$missingField = FALSE; // Set $missingField FLAG  to TRUE if "if" statement is TRUE.
// Check each form variable to see if any one is empty
  if (empty($_POST["first_name"]) && isset($_POST["first_name"]))
  {
    $missingField = TRUE;
    print '<p class="error">Please enter your first name!</p>';
  }
}
?>
<!-- The form is created OUTSIDE of the conditional statement so that it will ALWAYS be displayed. -->
CODE EXPLANATION:- The first print statement will always print "Register for benefits" because it is outside of the conditional statement. It could have been created as regular HTML but was shown to prove that any HTML code could be written within a PHP script.
- The first "if" statement will check to see if the hidden text field variable (e.g., $_POST["submitted"]) is set. When the page is first loaded, this variable is not set. However, when the form is submitted by clicking on the REGISTER button, this variable will be set and the content of this "if" statement will be executed because the condition will become TRUE. (e.g. This is SELF POSTING or POST BACK that was mentioned earlier.
- The $missingField variable is what is called a FLAG variable. It is used to set a boolean value (in this case, initially FALSE) and then set its value to TRUE if the SECOND "if" statement resolves to TRUE. This flag variable is included in EACH of the "if" statement to ensure that all of the form variables have been filled out BEFORE the form can be submitted.
- The second nested "if" statement will check to see if the first_name form field is empty AND that it is set. Both conditions become true when data is entered into the first name form field AND the form is submitted by clicking on the REGISTER button.
- CHECK POINT: Save file and preview it in a browser by clicking on the REGISTER button WITHOUT entering any information into the input fields. You should see the message, "Please enter your first name!":

- The red text is the result of the CSS class called .error in the header.inc.php file with a definition of color: red.
- Write two additional "if" statements below the first nested "if" statement that is similar to the first_name form for the last_name and email field:
<h2 class="ui-body ui-body-a ui-corner-all">EMPLOYEE REGISTRATION</h2>
<?php
print "<p>Register for benefits</p>";
// Check to see if the form has been submitted:
if (isset($_POST["submitted"]) )
{
$missingField = FALSE; // Set $missingField FLAG  to TRUE if "if" statement is TRUE.

// Check each form variable to see if any one is empty
  if (empty($_POST["first_name"]) && isset($_POST["first_name"]))
  {
    $missingField = TRUE;
    print '<p class="error">Please enter your first name!</p>';
  }

  if (empty($_POST["last_name"]))
  {
    $missingField = TRUE;
    print '<p class="error">Please enter your last name!</p>';
  }

  if (empty($_POST["email"]))
  {
    $missingField = TRUE;
    print '<p class="error">Please enter your email!</p>';
  }

}
?>
<!-- The form is created OUTSIDE of the conditional statement so that it will ALWAYS be displayed. -->
- CHECK POINT: Save the file and test it in a browser by clicking on the REGISTER button WITHOUT entering any information into the input fields. You should see that all three messages are displayed when the REGISTER button is clicked:
- Add the following three additional conditional statements for both of the password input fields and $missingField variable:
if (empty($_POST["email"]) && isset($_POST["email"]))
{
$missingField = TRUE;
print '<p class="error">Please enter your email address!</p>';
}

if (empty($_POST["password1"]))
{
 $missingField = TRUE;
 print '<p class="error">Please enter a password!</p>';
}

if ($_POST["password1"] != $_POST["password2"])
{
 $missingField = TRUE;
 print '<p class="error">Your password did not match your confirmed password!</p>';
}

if (!$missingField)
{
 print "<p>You are now registered!<br />Okay, you are not really registered but...</p>";
 // Clear posted values by emptying the $_POST array
 $_POST = array();
}

}
?>
CODE EXPLANATION:- The first "if" statement checks to see if the first password field is not empty. The second "if" statement checks to see if the password entered MATCH the first password that was set in the first password field so there is no need to check if it is empty.
- The third "if" statement checks to see if there is no $missingField flag set. It basically says, " If no field is left empty, if(!$missingField) say "If $missingField is not FALSE--which means $missingField is TRUE" then "register the user." If there is no missing fields the $missingField variable will still be FALSE.
- The $_POST = array(); clears the posted values by emptying the $_POST array
- CHECK POINT: Save the file and preview it in a browser by entering two passwords with different values and then click on the REGISTER button without entering any information into the other input fields. You should see that all four messages are displayed.

OPTION 1: Send Confirmation Email
It is best practice to let the user know that his or her registration was successful. One way of doing this is to send a confirmation e-mail to the user. See the Enhancement tab for details.
OPTION 2: Check for Unique Username
It is important to check to ensure that two users do not have the same username. See the Enhancement tab for details.
OPTION FOR ALL PAGES: Implement Output Buffering (Move To ENHANCEMENTS)
As we have already seen, normally, any HTML or PHP print() statement outside the PHP script is immediately sent to the browser. However, there are several methods (e.g., header(), setcookies()) that can only be called if nothing (including HTML or a blank space) has been sent to the browser; otherwise, a header already sent error message will be displayed. To avoid this error, you can implement what is called output buffering.
With output buffering any HTML or PHP print() statement will be placed in a memory buffer and then it can be sent to the browser or cleared without being sent to the browser if needed.
To begin output buffering, add a ob_start() method to the top of the script and an ob_end_flush() method at the end of the script to send the content of the buffer to the browser. You can also use ob_end_clean() method to delete the content of the buffer without sending it to the browser.
We will add the first two methods in the header.inc.php and footer.inc.php pages, respectively, so that is can be used by all pages within the site or app.
- In the employee_login.php page, add the following code below the "You are logged in!" print statement:
{ // Correct email and password!
print "<p>You are logged in!</p>";
header("Location: index.php");
}
- The highlighted code is used to redirect a user to another page. (In this case, index.php).
- CHECK POINT: Save the file and preview it in a browser. You should see that you are taken to the index.php page if you have a new version of PHP. However, if you have an other version of PHP you will see the header not sent error because the header() method was used WITHOUT output buffering.
- Open the header.inc.php page and add the following line to the top of the file above the <!doctype html> tag:
<?php ob_start();?>
<!doctype html>
<html>
- Open the footer.inc.php page and add the following line to the the very bottom of the file below the </html> tag:
</html>
<?php ob_end_flush();?>
- PHP automatically executes the ob_end_flush method at the end of a script if it does not exist; however, it is still good idea to use it.
- CHECK POINT: Save the file and test it in a browser. You should see the file works as expected. The ob_end_flush() method will send the content of the buffer to the browser and then turn off output buffering.