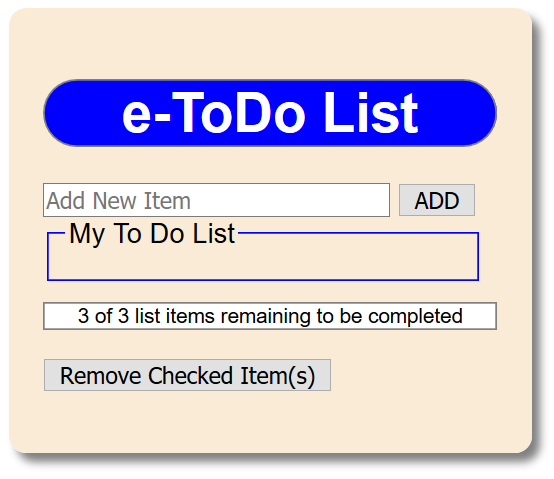
e-ToDo List
Create Static Content
First, let’s create content that is need for our application by creating the HTML framework and then adding the static view components.
Create HTML Framework
Let’s first create a blank framework and tweak it for mobile devices if necessary.
- Open Dreamweaver, select File > New… (or CTRL+N), and in the dialog box that appears:
- ensure that the New Document option is selected
- Document Type is set to HTML
- Framework set to NONE
- Doc Type set to HTML5
- In the Title field, type e-ToDo List
- Click the Create button
WHY: To create a blank HTML framework
- Select File > Save (or CTRL+S) and in the dialog box that appears navigate to where you want to save the file. In the File name text field, type a descriptive HTML name (e-ToDoList.html) and then click the Save button.
- If app is intended to be viewed on a mobile device, add the following highlighted code:
<!doctype html>
<html lang="en">
<head>
<meta charset="utf-8">
<meta name="viewport" content="width=device-width, initial-scale=1">
<title>e-ToDo List</title>
</head>
<body>
</body>
</html>
Create View
Now that we have a framework established, let’s add static view components to it.
- In between the
<body>
tags, add the following highlighted HTML code:
WHY: To create a static view of the app.
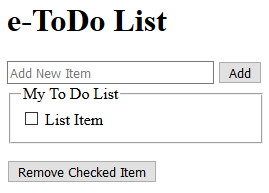
<body> <div> <h1>e-ToDo List</h1>
NOTE: This is standard HTML code. There is nothing dynamic here.
<form>
<input type="text" size="30" placeholder="Add New Item">
<input type="submit" value="ADD">
<fieldset style="width:230px">
<legend>My To Do List</legend>
<div>
<input type="checkbox"> <span>List Item</span>
</div>
</fieldset>
</form>
<p><button>Remove Checked Item(s)</button></p> </div> </body>
- CHECK POINT: Save the file and preview it in a browser. It looks like a normal HTML page. However, if you click any of the buttons, they will not work because they have not yet been programmed.
Create Basic CSS Style
Now that we have created the basic HTML content, let's "style" the application with some CSS goodness.
- Create a new CSS file and name it e-ToDoList.css. Add the following highlighted CSS styles to it:
WHY: To "style" the application so it can look better.
body {
font-family: Arial;
}
/* Panel styles ---------------------------------------*/
.panel {
width: 265px;
background-color:antiquewhite;
margin: 10px;
padding: 20px;
-webkit-box-shadow: 5px 5px 5px gray;
box-shadow: 5px 5px 5px gray;
border-radius: 10px;
}
/* Fieeldset style -------------------------------- */
fieldset{border: 1px solid blue;}
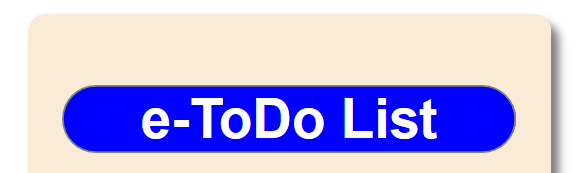
/* App Title styles -------------------------------- */
.app_title{
text-align: center;
border-radius: 25px;
background-color:blue;
color: white;
border: 1px solid gray;
} - Link the newly created CSS file to the page with the following highlighted
<link>
tag above the closing
</head>
tag:
<link href="e-ToDoList.css" rel="stylesheet" type="text/css">
</head> - Add the following highlighted classes below the opening
<body>
tag:
WHY: To associate the classes with the CSS styles.
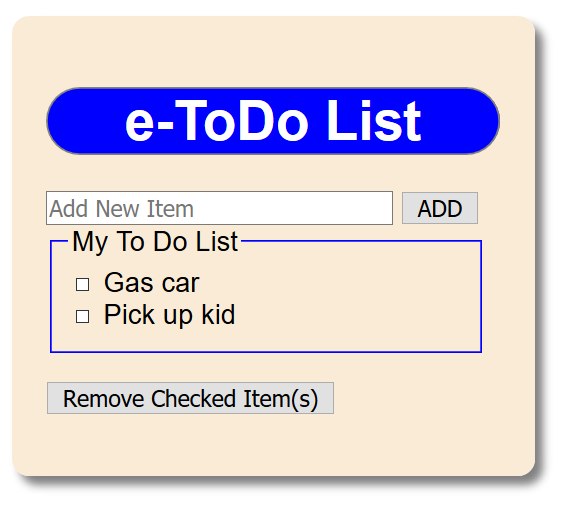
<body>
<div class="panel">
<h1 class="app_title">e-ToDo List</h1>
<form>
  <input type="text" size="30" placeholder="Add New Item">
  <input type="submit" value="ADD">
  <fieldset style="width:230px">
  <legend>My To Do List</legend>
  <div>
    <input type="checkbox"> <span>List Item</span>
  </div>
  </fieldset>
</form>
<p><button>Remove Checked Item(s)</button></p>
</div> - CHECK POINT: Save the file and preview it in a browser. You should see the application "styled" with the new CSS rules.
CHANGE SCREEN SHOT
Create Dynamic Content
Now that we have the standard framework in place, let’s add some dynamic content.
Link Framework and JS File
We will start first by:
- linking the AngularJS framework to the page via a CDN link,
- using a <script> tag, we will create an app (angular.module(“eToDoListApp”)) and then assign the app to a variable (var app)
- using the data-ng-app directive (or attribute) to associate the <body> tag with the app name created earlier (data-ng-app=”eToDoListApp”)
- Create a new JavaScript file and name it e-ToDoList.js. Write the following highlighted SCRIPT code below the JavaScript comment. You can delete the JavaScript comment if you want to. Then, save the file.
// JavaScript Document
var app = angular.module("eToDoListApp", []); - Add the following highlighted comment and scripts above the closing
</body>
tag
WHY: To link to the remote angularJS framework and the newly create local script (e-ToDoList.js).
<!-- AngularJS Scripts ---------------------------------------------- -->
<script src="https://ajax.googleapis.com/ajax/libs/angularjs/1.6.4/angular.min.js"></script>
<script type="text/javascript" src="e-ToDoList.js"></script>
</body>
CODE EXPLANATION:
- It is important that the AngularJS framework script is loaded FIRST before the script
that uses it. Otherwise, there will not be a reference to the framework and an error will
be throw - Add the following data-ng-app directive to the
<body>
tag:
WHY: To associate the <body> tag with the AngularJS framework making the <body> tag and all of its content an application. How easy was that!!!
<body data-ng-app="eToDoListApp">
Associate Controller with App (within the SCRIPT code)
Now that we have created an app, let’s associate it with a controller to “control” our app. We want to add the following functionality to our controller:
After entering a "to do" item:
- if a user click the Add button, have the "to do" item show in the list below
- if a user click the Remove Checked Item(s) button, delete the item or items that has been checked from the list.
Write the following highlighted code:
WHY: To assign a controller to the app and to give it a variable name of app_title.
var app=angular.module("eToDoListApp", []);
app.controller("eToDoListCtrl", function($scope) {
"use strict";
$scope.app_title ="e-ToDoList";

}); // End of Controller --------------------------
CODE EXPLANATION:
- There are two arguments that are passed to the controller. The first is the name of the
controller (eToDoListCtrl) and the second is the function (or how the controller will be used).
- The "use strict" statement is used to make the code more robust.
- The $scope.app_title variable will be used shortly to dynamically create the title of the app.
- NOTE: You may see an error in Dreamweaver that "angular in not defined." The reason for this
is because this script is written OUTSIDE of the app page and reference the AngularJS
framework script which is not included in this file. However, this is not an issue
when the app load because the the framework script will be loaded first and then the
other script will be loaded so it will have a reference to the AngularJS framework.
You will see this error in the file several times.
Associate Controller with App (within the HTML code)
Now that we have associated the controller with the app within the SCRIPT code, we now need to associate the SCRIPT code within the HTML code.
- Write the following highlighted code in the
<body>
tag:
WHY: To associate the controller code within the HTML code (or the view).
<body data-ng-app="eToDoListApp" data-ng-controller="eToDoListCtrl">
- Replace the static text (e-ToDoList) with a dynamic placeholder in the
<h1>
tag above the
<form>
tag:
<div class="panel">
	<h1 class="app_title">{{app_title}}</h1>
<form> - CHECK POINT: Save the file and preview it in a browser. You should see that the placeholder expression ({{app_title}}) was replaced with the dynamic text “e-ToDoList” at the top of the application. This ensure the application framework is working before we move forward.
- Add the following highlighted $scope.todoList array below INSIDE the controller code block:
<script>
var app=angular.module('eToDoListApp', []);
app.controller("eToDoListCtrl", function($scope) {
// Default Item -------------------------------------------------
$scope.todoList=[{todoText:'Gas car', done:false},{todoText:'Pick up kid', done:false}];
});
</script> - Add the following highlighted data-ng- directives to the
<div>
tag within the
<form>
tag. Replace the phrase "List Item" with a dynamic placeholder ({{x.todoText}}).
<form>
<input type="text" size="30" placeholder="Add New Item">
<input type="submit" value="ADD">
<fieldset style="width:230px">
<legend>My To Do List</legend>
<div data-ng-repeat="x in todoList">
<input type="checkbox" data-ng-model="x.done"> <span class="done-{{x.done}}">{{x.todoText}}</span>
</div>
</fieldset>
</form>CODE EXPLANATION:
- The data-ng-repeat directive is used to iterate through the todoList array.
- The data-ng-model directive is used to "model" the done property of the
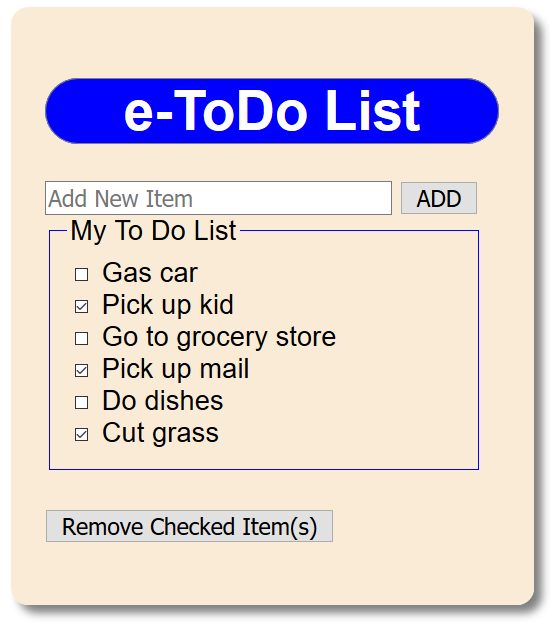
todoList array object. - CHECK POINT: Save the fileand preview it in a browser. Without doing anything, you should see the two default list items displayed in the todo list with an unchecked checkbox next to them.
CODE EXPLANATION:
The $scope.todoList variable is an array with two objects in it with:
- a todoText property set to an initial value of "Gas car" and "Pick up kid"
- a done property set to an initial Boolean value of false for both objects
Create "Add ToDo Item" Functionality
Now that we can see some default values displayed, let’s create an "add item" function so that if a user click the ADD button it will add the "to do" item to the list.
- Write the following highlighted code below the $scope.todoList statement:
WHY: To create the add function within the controller:
<script>
var app=angular.module("eToDoListApp", []);
app.controller("eToDoListCtrl", function($scope) {
// Default Item -------------------------------------------------
$scope.todoList=[{todoText:'Gas car', done:false},{todoText:'Pick up kid', done:false}];
// Add function -------------------------------------------------
$scope.todoAdd=function() {
  $scope.todoList.push({todoText:$scope.todoInput, done:false});
  $scope.todoInput="";
};

});
</script>
CODE EXPLANATION:
- The push() method of the todoList array is used to ADD a "to do" item to the
array when the ADD button is clicked with a todoText property that will be
equal to the what is typed in the input field and a done property with its
initial value set to false.
- The $scope.todoInput="" is used to CLEAR the input field once the the
input field value has been added to the array. - Add the following highlighted two data-ng- directives within the
<form>
tag and delete the text "List Item" in between the
<span>
tags:
<form data-ng-submit="todoAdd()">
  <input type="text" data-ng-model="todoInput" size="30" placeholder="Add New Item">
  <input type="submit" value="ADD">
  <fieldset style="width:230px">
  <legend>My To Do List</legend>
  <div data-ng-repeat="x in todoList">
     <input type="checkbox" data-ng-model="x.done"> <span data-ng-bind="x.todoText"></span>
  </div>
  </fieldset>
</form>
CODE EXPLANATION:
- The data-ng-submit directive is used to submit the form when the ADD button
is clicked and call (invoke) the todoAdd() method.
- The data-ng-model directive is used to "model" the data that is typed into
the input text field. - CHECK POINT: Save the file and preview it in a browser. Add a "to do" item to the text area and then click the Add button. You should see that the "to do" item gets added to the list below and then the input field is cleared.
Add "Remove ToDo Item" Functionality
Now that we can view and add items to the list, let's add code to remove item(s) from the list.
- Write the following highlighted code within the
<script>
tag below the todoAdd function:
WHY: To create a function that will remove an item or items from the list.
<script>
var app=angular.module('eToDoApp', []);
app.controller("eToDoListCtrl", function($scope) {
// Default Item -------------------------------------------------
$scope.todoList=[{todoText:'Gas car', done:false},{todoText:'Pick up kid', done:false}];
// Add function -------------------------------------------------
$scope.todoAdd=function() {
  $scope.todoList.push({todoText:$scope.todoInput, done:false});
  $scope.todoInput="";
};
// Remove function ---------------------------------------------
    $scope.remove=function() {
        var oldList=$scope.todoList;
        $scope.todoList=[];
        angular.forEach(oldList, function(x) {
            if (!x.done) {
                     $scope.todoList.push(x);
                         }
        });
    };

});
</script>
CODE EXPLANATION:
This function is used to:
- Create a new array named oldList based on the initial array (todoList) to hold
its data.
- Clear existing array (todoList)
- Then loop through the old array (oldList) and add BACK to the existing array
(todoList) ONLY the element(s) that has NOT been checked.
- The !x.done condition in the "if" statement is checking to see if the done
property is NOT (FALSE) or TRUE.
NOTE: When you select a checkbox to select it, you set the done property to true
because of the ng-model directive.
ANALOGY: The above function is akin to taking all of the cookies of the cookie jar
and placing them in another cookie jar, then eating the cookies you like (ones
that has been compledted) and placing the untouched cookies back in the original jar. - Add the following highlighted data-ng-click directive inside of the
<button>
tag:
WHY: So that the ng-click directive can be used to "listen" for a click event and when it happen call (invoke) the remove() function.
<p><button data-ng-click="remove()">Remove Checked Item(s)</button></p>
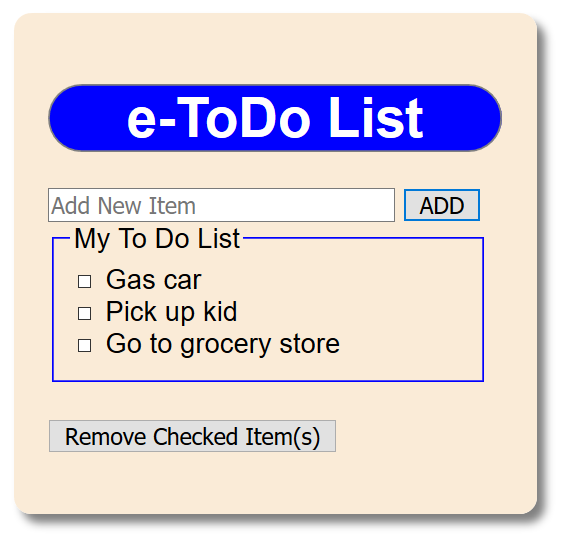
- CHECK POINT: Save your file and preview it in a browser. Add a "to do" list item and then click the Add button. Repeat several times to add more items. Then, select one or more "to do" item checkbox and then click the Remove Checked Item(s) button. You should see that the items that were selected got deleted. However, the items are not actually saved. To do that you will need to implement a Local Storage that will be discussed in an upcoming section.
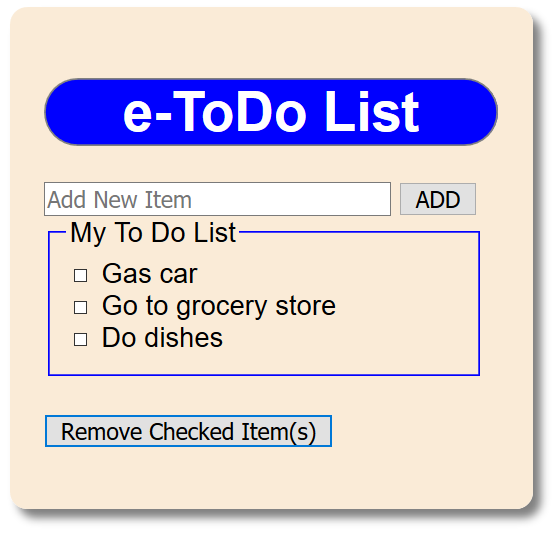
BEFORE:
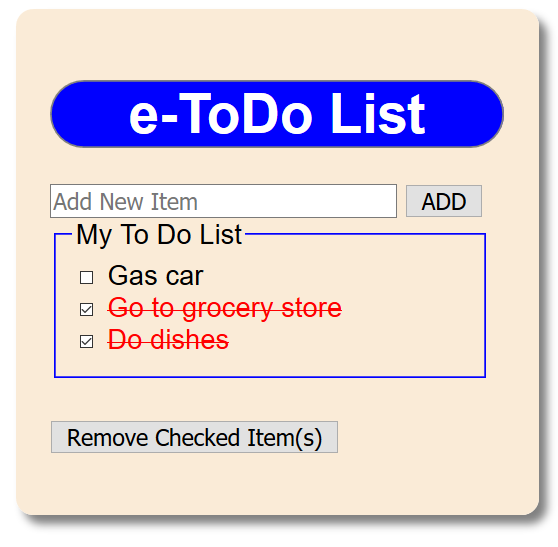
AFTER: Items are checked and the Remove Checked Item(s) button is pressed:
- CHECK POINT: Save your file and preview it in a browser. Add a "to do" list item and then click the Add button. Repeat several times to add more items. Then, select one or more "to do" item checkbox and then click the Remove Checked Item(s) button. You should see that the items that were selected got deleted. However, the items are not actually saved. To do that you will need to implement a Local Storage that will be discussed in an upcoming section.
Enhancements
There are several enhancements that can be added to improve and make the app look better:
- Suppress Add function when no text is entered in the input text field
- Add strike-through and change text to red when item is checked.
- Add X of X items remaining to be completed when items are added or deleted from list. Also format field.
- Add Local Storage
Suppress Add Function
Currently, if you press the ADD button WITHOUT entering text in the text input field, an EMPTY todo item will STILL be created with a checkbox next to it. To prevent this from happening, we will rewrite the add function in an "if/else" statement and check to see if text is entered into the text input field and if not do nothing; otherwise, perform the normal add function.
- Rewrite the todoAdd function to include an "if/else" statement with the following highlighted changes.
// Add function -------------------------------------
$scope.todoAdd=function() {
if($scope.todoInput.length === 0)
{
// Do nothing
}
else
{
$scope.todoList.push({todoText:$scope.todoInput, done:false});
$scope.todoInput = "";
}
};
CODE EXPLANATION:
- The length property of the todoInput text field will return the number of characters, if any. - CHECK POINT: Save the file and preview it in a browser. Click the ADD button repeatedly. You should see this time that nothing happens because the text input field is empty. Add text and click the ADD button again. You should see this time the text was added to the list.
Add Strike-through
While optional, it would be nice to have an item that is selected shown with a strike through and in a red font to mimic a traditional paper todo list.
- Write the following CSS style in the e-ToDoList.css file below the App Title styles:
/* App Title styles -------------------------------- */
    .app_title{
        text-align: center;
        border-radius: 25px;
        background-color:blue;
		color: white;
        border: 1px solid gray;
}
/* Input item styles ---------------------------------*/
.done-true {
text-decoration: line-through;
color: red;
} - Add the following highlighted class:
WHY: To make the class half static (done-) and half dynamic ({{x.done}}) to toggle the class on and off based on if the checkbox is selected.
<div data-ng-repeat="x in todoList">
<input type="checkbox" ng-model="x.done"> <span data-ng-bind="x.todoText" class="done-{{x.done}}"></span>
</div>
CODE EXPLANATION:
- If the class resolved to "done-true," that class will be added to the element
to show a strike through and see the font color to red. - CHECK POINT: Save the file and preview it in a browser. Add text and click the ADD button again. Repeat several times. Then, click a few of the check-boxes. You should see the list item receives a strike-through and a red font based on the CSS file that was created earlier.
Add X of X Items
While also optional, it would be nice to let the user know how many items that have remaining to be completed when an item is added or deleted from list.
- Add the following highlighted HTML with dynamic placeholders:
</form>
<p class="remain_display">{{remaining()}} of {{todoList.length}} list items remaining to be completed</p>
CODE EXPLANATION:
- The remaining() function will RETURN a value from the function. Normally, a
function performs a series a steps; however, when you want it to return a value,
the key word "return" is used as you will see shortly. - Add the following CSS style in the e-ToDoList.css file below the Input item styles:
WHY: To style the just created <p> tag.
/* Input item styles ---------------------------------*/
.done-true {
text-decoration: line-through;
color: red;
}
/* Remaining Items styles --------------------------- */
.remain_display {
text-align: center;
background-color: white;
font-size: 12px;
display: block;
border: 1px solid gray;
padding: 0 4px;
} - Write the following highlighted code below the the Remove function code block:
// Remove Function ---------------------------------
$scope.remove=function() {
var oldList = $scope.todoList;
$scope.todoList = [];
angular.forEach(oldList, function(x) {
if (!x.done) {
$scope.todoList.push(x);
}
});
};
// Remaining Function ------------------------------
$scope.remaining = function() {
var count = 0;
angular.forEach($scope.todoList, function(todo){
count += todo.done ? 0 : 1;
});
return count;
};

}); // End of Controller --------------------------
CODE EXPLANATION:
The ternary "if" statement (count += todo.done ? 0 : 1;) could also be REWRITTEN as a tradition "if" statement
- The initial value of the count variable is set to zero.
- The angular.forEach() method is used to loop the array (todoList) and run a function for each object
in that array against their done property to ascertain if they are true or false.
// Remove Function ---------------------------------
$scope.remove=function() {
var oldList = $scope.todoList;
$scope.todoList = [];
angular.forEach(oldList, function(x) {
if (!x.done) {
$scope.todoList.push(x);
}
});
};
// Remaining Function ------------------------------
$scope.remaining = function() {
var count = 0;
angular.forEach($scope.todoList, function(todo){
if(todo.done) {
count += 0;
}
else {
count += 1;
}
});
return count;
};

}); // End of Controller --------------------------
CODE EXPLANATION:
- The conditional statement todo.done is the shortcut for todo.done == true. Adding "== true" is not
necessary because it is IMPLIED to be true by default. For beginner developers, you may want to add
"== true" to the conditional statement because it makes it easier to understand.
- The remaining function will set a count variable to zero initially. Then, loop through the todoList
array for the number of elements in the array and if the done property is true for a given object, don't
add to the count (count + 0); otherwise if the done property is false (meaning a list item is not clicked),
add one to the count (count + 1). In essence what we are doing is "skipping" over any to do item that is
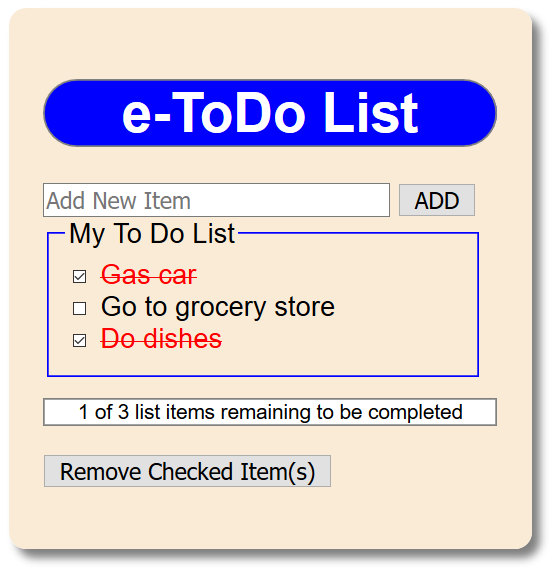
completed. - CHECK POINT: Save the file and preview it in a browser. Add text and click the ADD button again. Repeat several times. Then, click a few of the check-boxes. You should see the "x of x items remaining to be completed."
Add Local Storage
Currently, the app will work as expected. However, if you refresh the browser, the app will show its default state. To make the data persistent, we will add Local Storage so that if a user exit the browser and then open it back again, the data will still be available.
See Add Local Storage for details on how to implement Local Storage.
In order to save the data locally, we will need to create a local storage object. Then, when the page loads, check the local storage and load it or use the default data if no local storage exists.
- To retrieve data from the local storage object, we will use the getItem() method of the Local Storage object.
- To save data to the local storage object, we will use the setItem() method of the Local Storage object where any changes (add, delete, or update) in the data is made.
- Add the following highlighted variable ($scope.saved) and then wrap the todoList array with an "if/else" statement.
WHY: To add local storage functionality to area of the code to retrieve (get) or save (set) any change in data. This is typically after the push() method of the todoList array.
// Default Item ------------------------------------------------- $scope.app_title = "e-ToDo List";
$scope.saved = localStorage.getItem("todoLS");
if ($scope.saved !== null) {
alert("Save data to local storage");
$scope.todoList = JSON.parse($scope.saved);
}
else
{
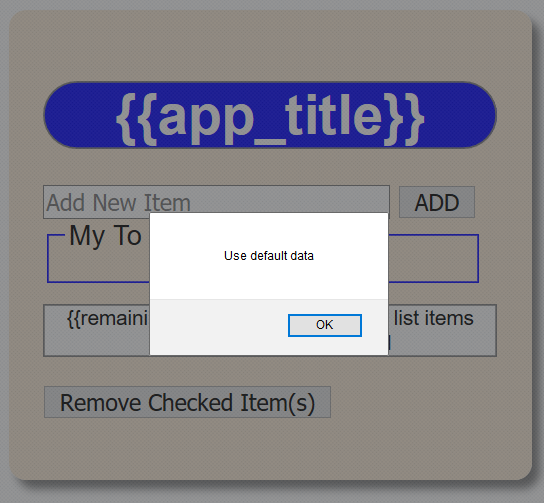
alert("Use default data");
$scope.todoList=[{todoText:'Gas car', done:false}, {todoText:'Pick up kid', done:false}];
}
localStorage.setItem("todoLS", JSON.stringify($scope.todoList));
// Add function -------------------------------------------------CODE EXPLANATION:
- The saved variable is used to get the saved data if there is any.
- If the saved variable is NOT NULL, the "if" portion of the conditional statement will be executed
which will result in data being saved to the Local Storage.
- If the saved variable is NULL, the "else" portion of the conditional statement will be executed
which will result in the default data being loaded from the array.
- The setItem() method is used to save the data to the Local Storage.
- The stringify() method of the JSON object is used to convert the todoList array data that is
passed as an argument to a "string" - CHECK POINT: Save the file and preview it in a browser. You should see the alert dialog box with the "Use default data" message displayed. This is because no data is currently saved to the Local Storage object. Click the OK button in the alert dialog box to dismiss it.
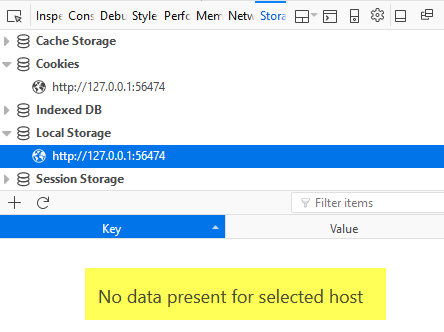
- Open the Web Developer Tool. In Firefox, press F12 and then click the Local Storage link. You should see the message "No data present for selected host" displayed.
SHOW SCREEN SHOT HERE
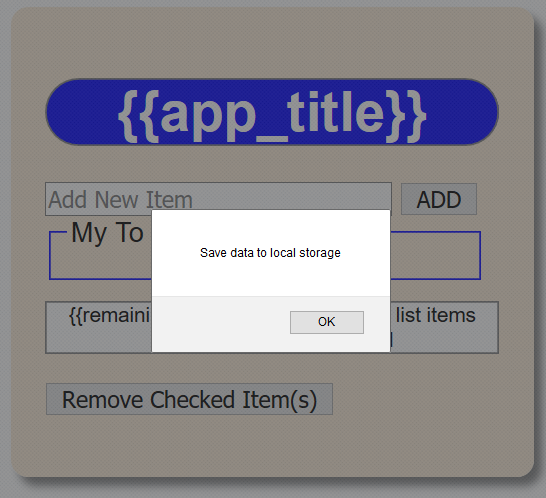
- Press the Refresh button (or F5). You should see the "Save data to local storage" message displayed in the alert dialog box. Click the OK button to dismiss it.
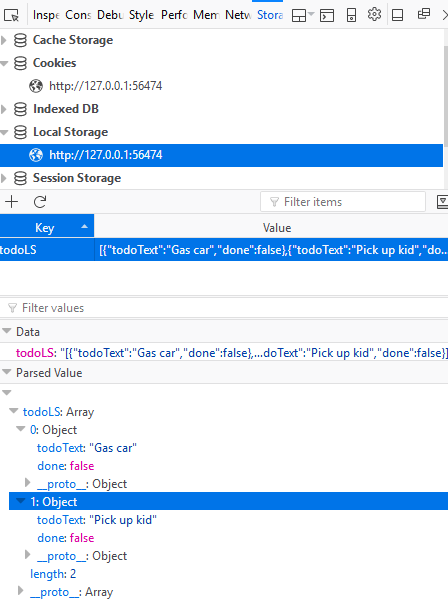
- Open the web developer tool again and then click the blue highlighted area of the Local Storage panel to see detail information about the saved data.
- Comment out the alert statements at the top of the controller code:
// Default Item -------------------------------------------------
$scope.saved = localStorage.getItem("todoLS");
if ($scope.saved !== null) {
// alert("Save data to local storage");
$scope.todoList = JSON.parse($scope.saved);
}
else
{
// alert("Use default data");
$scope.todoList=[{todoText:'Gas car', done:false}, {todoText:'Pick up kid', done:false}];
}
localStorage.setItem("todoLS", JSON.stringify($scope.todoList));
// Add function ------------------------------------------------- - Add the following two highlighted local storage code areas:
WHY: To "capture" the data and save it to the Local Storage for the add and delete operations.
NOTE: The code is the SAME for each two areas.
// Add function -------------------------------------------------
$scope.todoAdd=function() {
if($scope.todoInput.length === 0)
{
// Do nothing
}
else
{
$scope.todoList.push({todoText:$scope.todoInput, done:false});
$scope.todoInput = "";
localStorage.setItem("todoLS", JSON.stringify($scope.todoList));
}
};
// Remove function ---------------------------------------------
$scope.remove=function() {
var oldList=$scope.todoList;
$scope.todoList=[];
angular.forEach(oldList, function(x) {
if (!x.done) {
$scope.todoList.push(x);
}
localStorage.setItem("todoLS", JSON.stringify($scope.todoList));
});
};
// Remaining Function ------------------------------------------ - CHECK POINT: Save the file and preview it in a browser. Type a "to do" item and then click the ADD button. You should see the list gets updated with the information from the text field.
- CHECK POINT: Click the Refresh button (or F5). This time you should see that none of the "to do" item is shown even though the remaining message is displaying 3 of 3. This is because there is an error but the Local Storage functionality is working correctly.
- Open the browser's web developer tools (F12) and then click the console tab. You should see a ngRepeat:dupes error being reported.
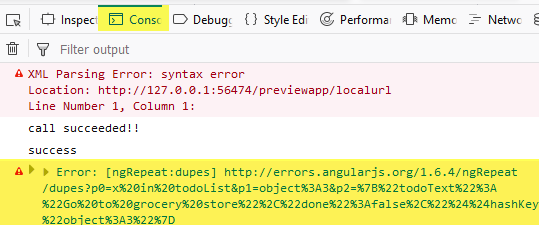
Extract from: https://docs.angularjs.org/error/ngRepeat/dupes
Error: ngRepeat:dupes
Duplicate key in a repeater are not allowed because AngularJS uses keys to associate DOM nodes with items. By default, collections are keyed by reference which is desirable for most common models but can be problematic for primitive types that are interned (share references).SOLUTION: To resolve this error either ensure that the items in the collection have unique identity or use the track by syntax to specify how to track the association between models and DOM.
Use 'track by' expression (e.g., track by $index) to specify unique keys which will cause the items to be keyed by their position in the array instead of their value.
- Add the following highlighted code in the <div> tag.
<div data-ng-repeat="x in todoList track by $index">
<input type="checkbox" data-ng-model="x.done"> <span data-ng-bind="x.todoText" class="done-{{x.done}}">List Item</span>
</div> - CHECK POINT: Save the file and preview it in a browser. This times the data render correctly.
Fix Strike-Through Problem
Currently, the application is working almost pefectly. However, if you check one or more "todo" items and then reload the page, the strikethrough feature does not persist. This will be resolved in the following steps.
- Add the following highlighted ng-data-click directive to the
<input>
tag:
WHY: To create a click event on the checkbox and call (invoke) the updateDoneStatus() function with the current array index.
<div data-ng-repeat="x in todoList track by $index">
  <input data-ng-click="updateDoneStatus($index)" type="checkbox" data-ng-model="x.done">
  <span class="done-{{x.done}}">{{x.todoText}}</span>
</div> - Add the following highlighted updateDoneStatus function below the Remaining Function code block:
// Update done status in array -------------------------
CODE EXPLANATION:
$scope.updateDoneStatus = function(id) {
if($scope.todoList.done)
{
$scope.todoList[id].done !== $scope.todoList[id].done;
}
localStorage.setItem("todoLS", JSON.stringify($scope.todoList));
};
}); // End of Controller ----------------------------
- This function checks to see if the the checkbox is checked or not, then reverse the done property inside of the todoList array. Then, set the localStorage.
- When you set the SAME TWO BOOLEAN values with the "!==" operator, you create what is known as a TOGGLE function. This is an important programming syntax to remember.
- CHECK POINT: Save the file and preview it in a browser. Add a few "todo" items and then click a few of them. Then, click the refresh button (F5) to reload the page. You should see that the strike-through now persist even afte the page loads.