Advance: SQL
You can fetch data from a PHP server running mySQL as long as the data is in the JSON format.
Turn on Server and Database
Before you create a site (or app), we need to ensure that the server and database are not only turned on but also that they are working correctly.
- Install XAMPP on the C drive if it is not already installed. Go to Apache Friends for instruction on how to install if necessary.
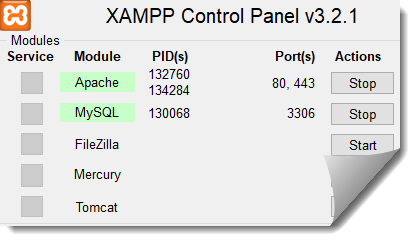
- Go to the C:/XAMPP directory and double-click xampp-control icon to open the XAMPP Control Panel
- Click the Start button for BOTH the Apache and MySQL to start both the Apache server and the MySQL database.
NOTE: Both modules text should be highlighted in green which means that they started successfully.
Create Database, Table, and Add Data
It is best practice to create the database, table and add data to it before you create your web or app.
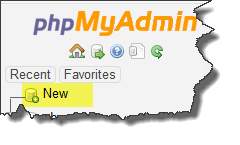
- In the browser of your choose, type http://localhost/phpmyadmin/ in the URL field and then press the ENTER key to start the phpMyAdmin console.
- In the left panel, click the New Database link to open the create database page.
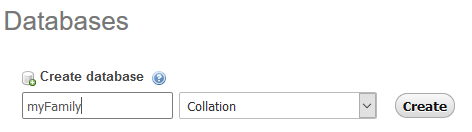
- In the Database Name field, give the database a name (myFamily) and then press the Create button to create an empty database.
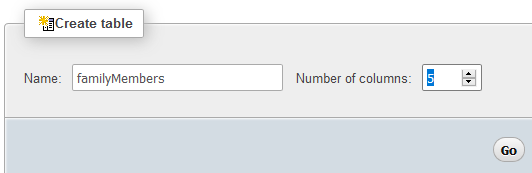
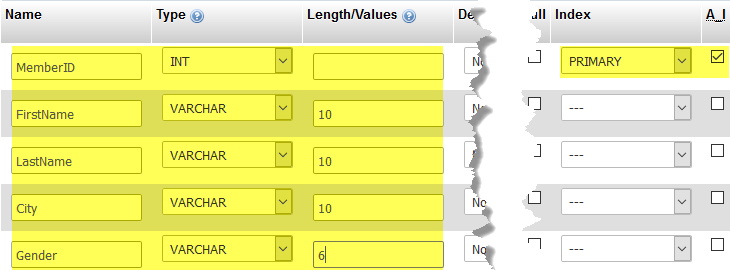
- In the left panel again, click the newly created database name (myfamily) and in the page that appears, type familyMembers in the Name field to create a table with that name. Change the Number of columns value to 5 and then click the Go button.
- In the page that appears, enter the following highlighted info. Then, click the Save button to define the columns in the table database.
- Click the Insert tab and then add the following highlighted data for the first row. Repeat for the other rows with:
- Sheila, Chopin, Round Rock, Female
- Joshua Chopin, Round Rock, Male
- Josiah Chopin, Round Rock, Male
Then, click the Go button.
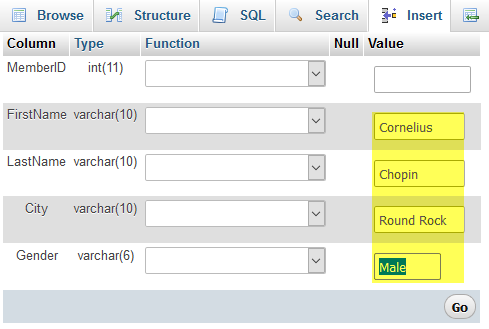
- Optionally, click the Browse tab to preview the data you just added:

Add User Login Information
Now, let's add a user login information.
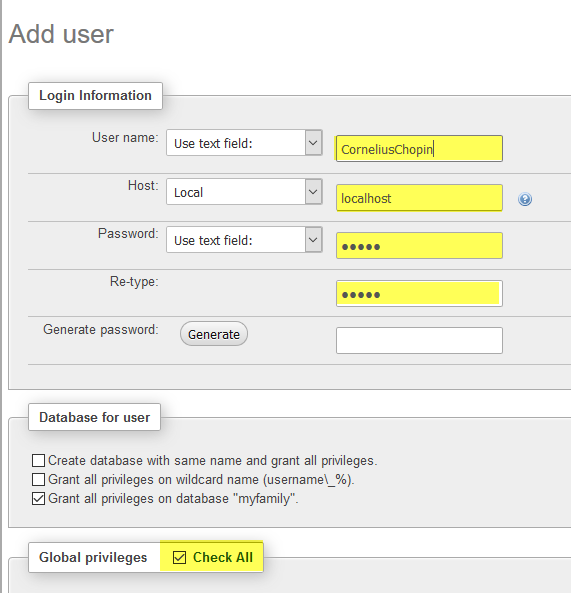
- Click the Privileges tab and then click the Add user button. In the Add user page that appears, add the following highlighted information with the password and Re-type (password) being admin. Then, click the Go button to add user login information.
Setup Site and Testing Server
Now, let's set up both the site and the testing server.
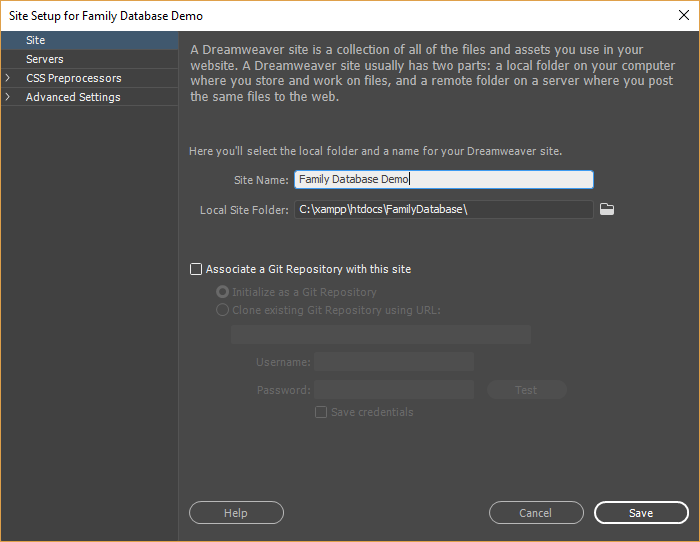
- Open Dreamweaver and select Site > New Site.. from the menu.
- In the Site Setup dialog box that appears, add a Site Name (Family Database Demo), click the folder icon next to the Local Site Folder text field, navigate to C:/xampp/htdocs and in the dialog box that appear, click the New Folder icon and name it FamilyDatabase and then click the Select Folder button.
- In the left pane, click the Servers link and then click the Add new server (plus sign icon) and in the dialog box that appears,
- Click the Testing Server instead of the Remote radio button.
- Double-click on the Server Name (Cornelius Server)
- In the dialog box that appears, add the following info.
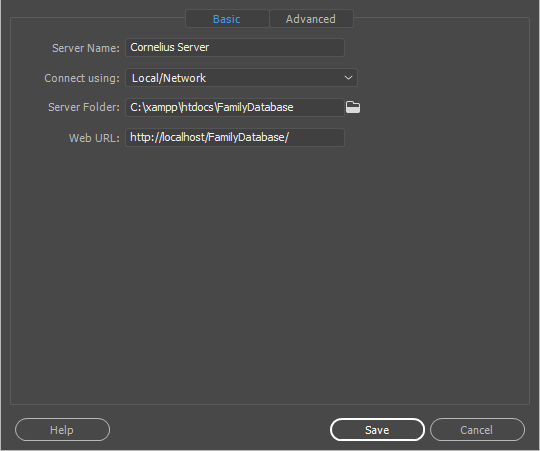
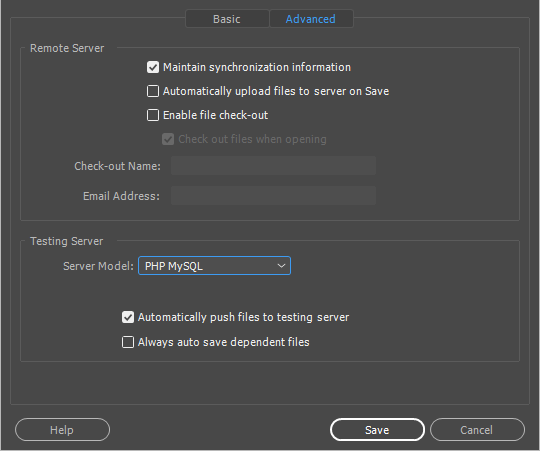
- Click the Advanced tab and in the Server Model dialog box select PHP MySQL and then click the Save button and then click the Save button AGAIN on the Site Setup dialog box to setup the testing server..
Test Server
While optional, it is good practice to create a test page to see if the server is working correctly.
- In Dreamweaver, select File > New... (or CTRL+N) and then:
- Select New Document
- From the Document Type select PHP
- Click the Create button.
- Delete ALL of the tags.
NOTE: All of the tags were deleted because this is a a purely script page that will be used to retrieve data from the database.
- Add the following highlighted code:
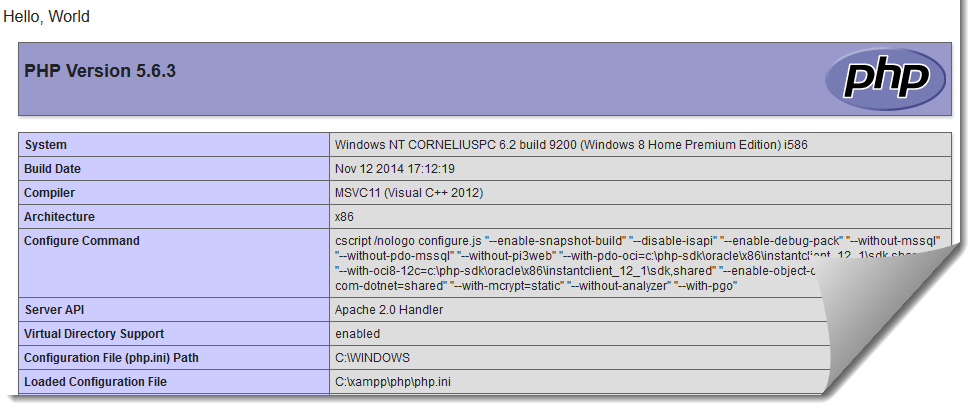
<?php
  echo("Hello, World");
  phpinfo();
?>
CODE EXPLANATION:
- The echo() method is used to display content on the page. You could also use the print() method (e.g., print("Hello, World");).
- You are not limited by including just a string, you can use any HTML tags or CSS styles as well. (e.g., ("<h1 style='color:red'>Hello, World</h1>");).
- Press File > Save (or CTRL+S) and save the file as familyJSON.php
- CHECK POINT: Save the file and preview it in a browser or in Live view. You should see the following:
Create PHP Script to Retrieve Data
Now that that server is working correctly, let's create a script that will retrieve data from the database that we created earlier.
- Delete the two lines in the PHP scripts as they were only used to test to see if the PHP script is working correctly.
- Add the following code in the empty PHP script
to:
- Add two headers (Access Control and Content-Type)
- Connect to server with user login credentials
- Query database for all records
- Loop through records to create JSON object
- Close database
- Display JSON object to page
<?php
NOTE: The code in the if statement are ALIGNED along the dots so that you can see the structure better. There is no penalty for white space.
// Add headers
header("Access-Control-Allow-Origin: *");
header("Content-Type: application/json; charset=UTF-8");
// Connect to server
$conn = new mysqli("localhost", "CorneliusChopin", "admin", "myfamily");
// Query Database
$result = $conn->query("SELECT FirstName, LastName, City, Gender FROM familymembers");
// Loop through records to create JSON object
$output = "";
while($rs = $result->fetch_array(MYSQLI_ASSOC)) {
if ($output != "") {$output .= ",";}
$output .= '{"FirstName":"' . $rs["FirstName"] . '",';
$output .= '"LastName":"' . $rs["LastName"] . '",';
$output .= '"City":"' . $rs["City"] . '",';
$output .= '"Gender":"' . $rs["Gender"] . '"}';
}
$output ='{"records" : ['.$output.']}';
// Close database connection
$conn->close();
// Display JSON object to page
echo($output);
?>
CODE EXPLAINATION:
For security reasons, typically, scripts are restricted to the SAME site. However, you can ALLOW cross-site access. Requests for data (CSS, images, scripts) from a different server other than the requesting page, are called cross-site HTTP requests which is common to do on the web. To do this, the following line was added to the code.
header("Access-Control-Allow-Origin: *");
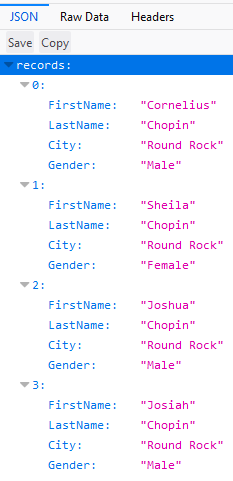
- CHECK POINT: Save the file and preview it in a browser using the http reference: http://localhost/FamilyDatabase/familyJSON.php. In Firefox, you can display the file is three ways (JSON, RawData, and Headers):
JSON:
RAW DATA: (You can also view the Pretty Print view by clicking on that tab.)

HEADERS:

Create PHP Page
Now that we have a database, a PHP script connected to it, we can now create a page that will call on the script and the script will call on the database to return the records needed.
- In Dreamweaver, select File > New... (or CTRL+N) and then:
- Select New Document
- From the Document Type select PHP
- In the Document Title, give it a name of Family Database Demo
- Click the Create button
- Press File > Save (or CTRL+S) and save the file as index.php (not index.html)
- Add the following highlighted code:
- Two scripts
- One style
- One heading
- One
<div>
tag with
<table>
tag and code in it
- CHECK POINT: Save the file and preview it in a browser or in Live view. You should see the following:
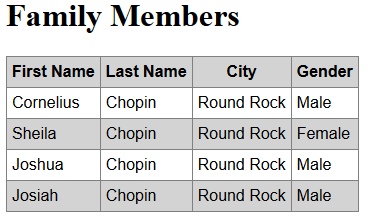
<!doctype html>
<html>
<head>
<meta charset="utf-8">
<title>Family Database Demo</title>

<style>
table, th, td {
  border: 1px solid gray;
  border-collapse: collapse;
  padding: 5px;
  font-family: Arial;
}
table tr:nth-child(odd){background-color: gray}
table tr:nth-child(even){background-color: white}
</style>

<script src="https://ajax.googleapis.com/ajax/libs/angularjs/1.6.4/angular.min.js"></script>

<script>
var app = angular.module('myApp', []);
app.controller('familyCtrl', function($scope, $http) {
    $http.get("familyJSON.php")
    .then(function (response) {$scope.names = response.data.records;});
});
</script>

</head>

<body>
<div ng-app="myApp" ng-controller="familyCtrl">
<h1>Family Members</h1>
  <table>
    <tr>
      <th>First Name</th>
      <th>Last Name</th>
      <th>City </th>
      <th>Gender </th>
    </tr>
    <tr ng-repeat="x in names">
      <td>{{x.FirstName}}</td>
      <td>{{x.LastName}}</td>
      <td>{{x.City}}</td>
      <td>{{x.Gender}}</td>
    </tr>
  </table>
</div>

</body>
</html>
See w3schools for fetching data with:
- PHP with MS Access
- ASP.NET with VB or MS Access
- ASP.NET with Razor and SQL Lite