e-NotePad
Create Static Content
First, let’s create content that is need for our application by creating the HTML framework and then adding the static view components.
Create HTML Framework
Let’s first create a blank framework and tweak it for mobile devices if necessary.
- Open Dreamweaver, select File > New… (or CTRL+N), and in the dialog box that appears:
- ensure that the New Document option is selected
- Document Type is set to HTML
- Framework set to NONE
- Doc Type set to HTML5
- In the Title field, type e-NotePad
- Click the Create button
WHY: To create a blank HTML framework
- Select File > Save (or CTRL+S) and in the dialog box that appears navigate to where you want to save the file. In the File name text field, type a descriptive HTML name (e-NotePad.html) and then click the Save button.
- If app is intended to be viewed on a mobile device, add the following highlighted code:
<!doctype html>
<html lang="en">
<head>
<meta charset="utf-8">
<meta name="viewport" content="width=device-width, initial-scale=1">
<title>e-NotePad</title>
</head>
<body>
</body>
</html>
Create View
Now that we have a framework established, let’s add static view components to it.
- In between the
<body>
tags, add the following highlighted HTML code:
WHY: To create a static view of the app.
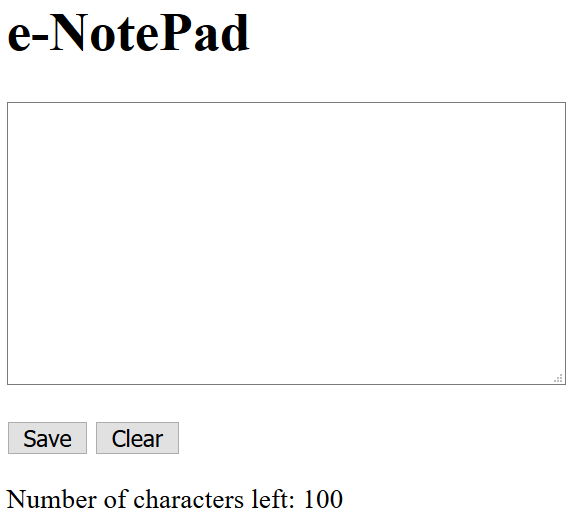
<body> <div> <h1>e-NotePad</h1>
NOTE: This is standard HTML code. There is nothing dynamic here.
<textarea cols="40" rows="10"></textarea>
<br/><br/>
<div>
<button>Save</button>
<button>Clear</button>
<p>Number of characters left: 100</p>
</div> </div> </body>
- CHECK POINT: Save the file and preview it in a browser. Type any text in the text area to see that it works like a normal HTML page. However, if you click any of the buttons (Save/Clear) they will not work because they have not yet been programmed.
Create Basic CSS Style
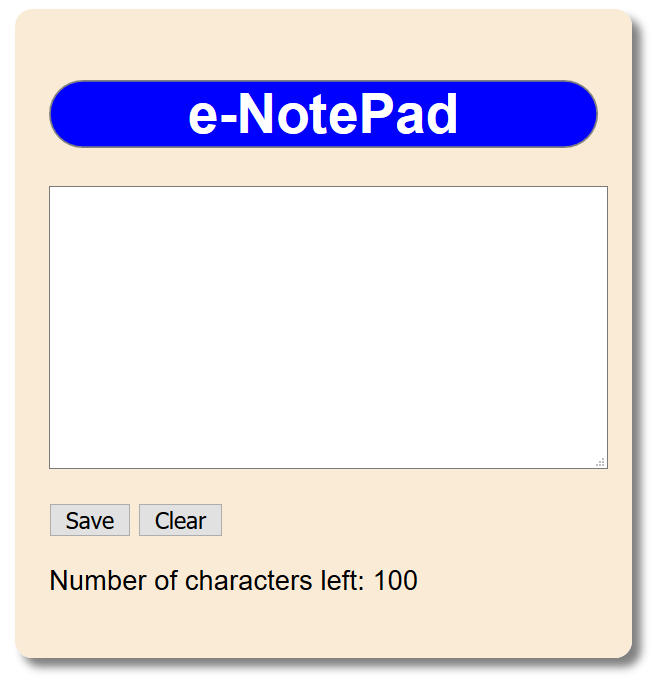
Now that we have created the basic HTML content, let's "style" the application with some CSS goodness.
- Create a new CSS file and name it e-NotePad.css. Add the following highlighted CSS styles to it:
WHY: To "style" the application so it can look better.
body {
font-family: Arial;
}
/* Panel styles ---------------------------------------*/
.panel {
width: 320px;
background-color:antiquewhite;
margin: 10px;
padding: 20px;
-webkit-box-shadow: 5px 5px 5px gray;
box-shadow: 5px 5px 5px gray;
border-radius: 10px;
}
/* App Title styles -------------------------------- */
.app_title{
text-align: center;
border-radius: 25px;
background-color:blue;
color: white;
border: 1px solid gray;
} - Link the newly created CSS file to the page with the following highlighted
<link>
tag above the closing
</head>
tag:
<link href="e-NotePad.css" rel="stylesheet" type="text/css">
</head> - Add the following highlighted classes below the opening
<body>
tag:
WHY: To associate the classes with the CSS styles.
<body>
<div class="panel">
<h1 class="app_title">e-NotePad</h1>
...
</div> - CHECK POINT: Save the file and preview it in a browser. You should see the application "styled" with the new CSS rules.
Create Dynamic Content
Now that we have the standard framework in place, let’s add some dynamic content.
Create App
We will start first by:
- linking the AngularJS framework to the page via a CDN link,
- using a <script> tag, we will create an app (angular.module(“eNotePadApp”)) and then assign the app to a variable (var app)
- using the ng-app attribute (or directive) to associate the <body> tag with the app name created earlier (ng-app=”eNotePadApp”)
Write the following highlighted SCRPT code below the
<title>
tag and the ng-app directive in the
<body>
tag:
WHY: To make the
<body>
tag of the HTML page an application.
<!doctype html>
<html lang="en">
<head>
<meta charset="utf-8">
<meta name="viewport"  content="width=device-width, initial-scale=1">
<title>e-NotePad</title>
<script src="https://ajax.googleapis.com/ajax/libs/angularjs/1.6.4/angular.min.js"></script>

<script>
  var app=angular.module("eNotePadApp", []);
</script>
</head>
<body ng-app="eNotePadApp">
<h1>e-NotePad</h1>
<textarea cols="40" rows="10"></textarea>
<br/><br/>
<div>
  <button>Save</button>
  <button>Clear</button>
  <p>Number of characters left:</p>
</div>
</body>
</html>
NOTE: We have just associated the <body> tag with the AngularJS framework making the <body> tag and all of its content an application. How easy was that!!!
Associate Controller with App (within the SCRIPT code)
Now that we have created an app, let’s associate it with a controller to “control” our app. We want to add the following functionality to our controller:
After entering text:
- if a user click the Clear button, have the text removed from the textarea
- show user how many characters there are left to type
- allow the user to save the note
Write the following highlighted code:
WHY: To assign a controller to the app and to give it a variable name of message with a temporary default value of “Hello, World.”
<script>
var app=angular.module("eNotePadApp", []);
app.controller("eNotePadCtrl", function($scope) {
$scope.message="Hello, World";
});
</script>
Associate Controller with App (within the HTML code)
Now that we have associated the controller with the app within the SCRIPT code, we now need to associate the SCRIPT code within the HTML code.
- Write the following highlighted code in the
<body>
tag:
WHY: To associate the controller code within the HTML code (or the view).
<body ng-app="eNotePadApp" ng-controller="eNotePadCtrl">
- Write the following
<h1>
tag below the opening
<body>
tag:
<body>
<h1>{{message}}</h1> - CHECK POINT: Save the file and preview it in a browser. You should see that the placeholder expression ({{message}}) was replaced with the phrase “Hello, World” at the top of the application.
- Delete the
<h1>
tag you just created AND delete the phrase “Hello, World” from within the $scope.message variable ($scope.message = "";):
WHY: They were only used to test to see if everything was set up correctly before we add real code to our application.
Add Clear Functionality
Now that we know our application is working correctly, let’s add our first functionality. We will add a clear function so that if a user click the Clear button it will clear the content of the note in the textarea.
- Write the following highlighted code below the $scope.message statement:
WHY: To add the clear routine in the <script> tag to create the clear function within the controller:
<script>
var app=angular.module("eNotePadApp", []);
app.controller("eNotePadCtrl", function($scope) {
$scope.message="";

// Clear Function ----------------------------
$scope.clear=function() {
$scope.message="";
};

});
</script> - Add the ng-click directive to the clear button tag:
WHY: To have the button “listen” for a click event and when it happens call (or invoke) the clear() function within the controller.
<button ng-click="clear()">Clear</button>
- Add the ng-model directive to the <textarea> tag:
WHY: To have the textarea tag “model” the message data from the controller.
<textarea ng-model="message" cols="40" rows="10"></textarea>
- CHECK POINT: Save the file and preview it in a browser. Add any text to the textarea and then click the Clear button. You should see that the text in the textarea gets deleted.
Add Characters Left Functionality
This is an optional functionality that you may want to add if you want to inform a user as to how many characters is left to type. Otherwise, you can delete the “Number of characters left:” paragraph from your application and skip these steps.
- Write the following highlighted code within the <script>
tag below the clear function:
WHY: To create the code to determine how many characters are left.
<script>
CODE EXPLANATION: The return 100 - $scope.message.length will “return” the current number of characters subtracted from the total (in our case, 100). The length property ascertain how long the message is by the number of characters. NOTE: You can change the 100 to whatever value you want to.
var app=angular.module("eNotePadApp", []);
app.controller("eNotePadCtrl", function($scope) {
$scope.message="";
// Clear Function ----------------------------
$scope.clear=function() {
$scope.message="";
};
// Left Function ---------------------------- $scope.left=function() {
var totalcharacterleft=$scope.message.length
return 100-totalcharacterleft;
};
});
</script>
- Replace the static number 100 with the following highlighted <span> tag inside of the <p> tag:
WHY: So that the ng-bind directive can be used to “bind” the left() function to this <span> tag and update the value based on what is type in the textarea dynamically.
<p>Number of characters left: <span ng-bind="left()"></span></p>
- CHECK POINT: Save your file and preview it in a browser. Add text and notice how the value at the end of the "Numbers of character left:" statement counts down. However, if you type too much text, the value will turn negative. Not exactly what we want to do. This can be resolved with some advance code but is beyond the scope of the beginner training. Note also that if you click the Clear button the value set back to the default value (100) because they are bound to the controller $scope.message variable.
Add Save Functionality
Now let’s add Save button to our application.
- Add the following highlighted code below the left() function code block:
WHY: To add a “pseudo” Save function that will invoke a dialog box.
<script>
var app=angular.module("eNotePadApp", []);
app.controller("eNotePadCtrl", function($scope) {
$scope.message="";
// Clear Function ----------------------------
$scope.clear=function() {
$scope.message="";
};
// Left Function ----------------------------
$scope.left=function() {
var totalcharacterleft=$scope.message.length
return 100-totalcharacterleft;
};
// Save Function ----------------------------
$scope.save=function() {
alert("Your note has been saved.");
};

});
</script> - Add the ng-click=”save” attribute (directive) to the Save button:
WHY: To invoke the save() function in the controller.
<button ng-click="save()">Save</button>
- CHECK POINT: Save the file and preview it in a browser. Add some text to the textarea and then click the Save button. You should see that a dialog box appears with the message, “Your note has been saved.” Click the OK button to dismiss the dialog box. However, in reality, this note did not get save anywhere. Do to that you need to implement a Local Storage.
Add Local Storage (Bonus)
See Add Local Storage for example on how to implement Local Storage.