e-Directory
Introduction
Any good Content Management System (CMS) will have five key functionalities.
The ability to:
- Add records to a data source
- View records from a data source
- Edit records in a data source
- Delete records from a data source
- Search records in a data source
In this training module, we will implement these functionalities.
Create Static Content for Main Section
First, let’s create content that is needed for our application by creating the HTML framework and then adding the static view components.
Create HTML Framework
Let’s first create a blank framework and tweak it for mobile devices if necessary.
- Open Dreamweaver, select File > New… (or CTRL+N), and in the dialog box that appears:
- ensure that the New Document option is selected
- Document Type is set to HTML
- Framework set to NONE
- Doc Type set to HTML5
- In the Title field, type e-Directory
- Click the Create button
WHY: To create a blank HTML framework
- Select File > Save (or CTRL+S) and in the dialog box that appears navigate to where you want to save the file. In the File name text field, type a descriptive HTML name (e-Directory.html) and then click the Save button.
- If the app is intended to be viewed on a mobile device, add the following highlighted code:
<!doctype html>
<html lang="en">
<head>
<meta charset="utf-8">
<meta name="viewport" content="width=device-width, initial-scale=1">
<title>e-Directory</title>
</head>
<body>
</body>
</html> - Create a folder in the same location as the e-Directory.html file and name it e-DirectoryEmployees.
- Download the images that will be used for this project into that folder (Project Images) and place the employee pictures in new folder called images.
Create View
Now that we have the basic HTML framework established, let’s add some static view components to it.
- In between the
<body>
tags, add the following highlighted HTML code:
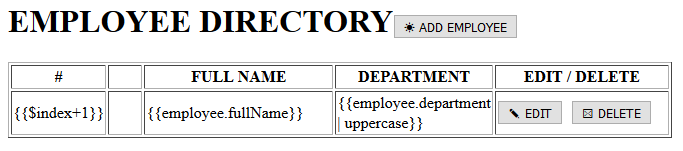
WHY: To create a static view of the application heading and main screen (a table).
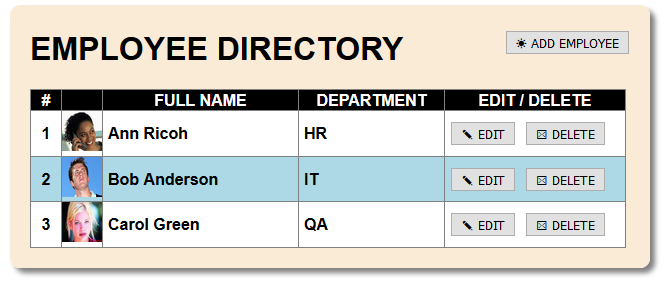
<body>
<div>
<h1>EMPLOYEE DIRECTORY<button>☀ ADD EMPLOYEE</button></h1>
<table border="1">
<tr>
<th width="20">#</th>
<th width="30"> </th>
<th width="185">FULL NAME</th>
<th width="135">DEPARTMENT</th>
<th width="170">EDIT / DELETE</th>
</tr>
<tr>
<td>{{$index+1}}</td>
<td><img alt="" height="40" width="40"
src="images/{{employee.image}}"></td>
<td>{{employee.fullName}}</td>
<td>{{employee.department | uppercase}}</td>
<td>
<button>✎ EDIT</button>
<button>☒ DELETE</button>
</td>
</tr>
</table>
</div>
</body>CODE EXPLANATION:
- This is standard HTML code with some placeholders ({{...}}) for dynamic content that will be used later.
- The pipe symbol and the word uppercase ( | uppercase) is an AngualarJS filter that will force all
characters to uppercase even if they are written in lower or mixed case (e.g., qa becomes QA). - CHECK POINT: Save the file and preview it in a browser. It looks like a normal HTML page. However, if you click the
EDIT , DELETE, or the ADD EMPLOYEE button, nothing will happen because they have not yet been programmed.
- Create a CSS file and name it e-DirectoryCSS. Add the following styles:
CAUTION: Do not add a space between the tr:nth in the CSS statement below or the alternating row colors will not render.
table tr:nth-child(odd){background-color: lightblue;}
table tr:nth-child(even){background-color: white;}
@charset "utf-8";
body {
	font-family: Arial;
}
/* Panel styles -------------------------------------------*/
.panel {
	width: 600px;
	background-color: antiquewhite;
	margin: 10px;
	padding: 20px;
	-webkit-box-shadow: 5px 5px 5px gray;
    box-shadow: 5px 5px 5px gray;
	border-radius: 10px;
}
.panel h1 {margin-top: 5px;}
/* Table styles ---------------------------------*/
table, th, td {
border: 1px solid gray;
border-collapse: collapse;
padding: 0px 5px;
font-family: Arial;
font-weight: bold;
}
table th {background-color: black;color: white;}
table tr: nth-child(odd){background-color: lightblue;}
table tr: nth-child(even){background-color: white;}
/* Thumbnail image ----------------------------- */
.thumbnail_image{float: left; margin-right: 20px;
box-shadow: 5px 5px 5px gray; border: 1px solid black;
height: 125px; width: 125px;
}
/* Other styles -------------------------------*/
h1 button {float: right;}
.row_image {padding: 0px;}
img{padding: 0; margin: 0; border: 0;}
form h2 {border: 1px solid black;
display: inline;
padding: 4px;
border-radius: 10px;
background-color: white;
}
form {
  width: 555px;
  height: 200px;
  background-color:lightblue;
  padding:20px;
} - Add the following
<link>
tag below the
<title>
tag.
WHY: To "link" the just created CSS file to the page.
<title>e-Directory</title>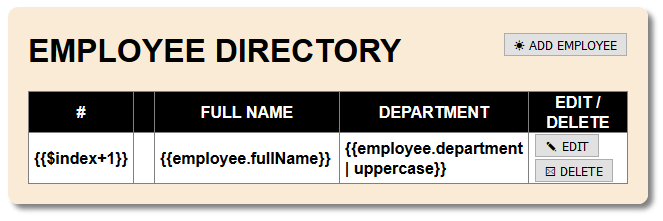
<link href="e-Directory.css" rel="stylesheet" type="text/css"> - Add the following CSS classes:
WHY: To link them to the styles in the external CSS file and to "style" the application.
<body>
<div class="panel">
<h1>EMPLOYEE DIRECTORY<button>☀ ADD EMPLOYEE</button></h1>
<table border="1">
<tr>
<th width="20">#</th>
<th width="30"> </th>
<th width="185">FULL NAME</th>
<th width="135">DEPARTMENT</th>
<th width="170">EDIT / DELETE</th>
</tr>
<tr>
<td style="text-align:center">{{$index+1}}</td>
<td class="row_image"><img alt="" height="40" width="40"
src="images/{{employee.image}}"></td>
<td>{{employee.fullName}}</td>
<td>{{employee.department | uppercase}}</td>
<td>
<button>✎ EDIT</button>
<button>☒ DELETE</button>
</td>
</tr>
</table>
</div>
</body> - CHECK POINT: Save the file and preview it in a browser. You should see the application looks a lot better.
NOTE: Don't worry that the EDIT and DELETE buttons are on top of one another. The reason for this is because the dynamic placeholders are taking up a lot of space. When the app is rendered with actual data, the buttons will sit side-by-side.
Link JavaScript Files
Now that we have the framework and the view components in place, let's add two JavaScript files - one local and one remote.
Add the following two <script> tags above the closing </body> tag:
<script src="https://ajax.googleapis.com/ajax/libs/angularjs/1.6.4/angular.min.js"></script>
<script src="e-Directory.js"></script>
</body>
Create Dynamic Content for Main Section
Now that we have connected the JavaScript files that we need, let’s add some dynamic content.
Create App
We will start first by:
- creating a new external JavaScript file and name it e-Directory.js
- creating an app (angular.module(“eShoppingListApp”)) and then assign the app to a variable (var app)
- using the data-ng-app attribute (or directive) to associate the <body> tag with the app name created earlier (data-ng-app=”eShoppingListApp”)
- Create a new external JavaScript file and name it e-Directory.js.
- Write the following SCRIPT in the e-Directory.js below the comment and then delete the comment.
// JavaScript Document var app=angular.module("eDirectoryApp", []); - Add the data-ng-app directive in the
<body>
tag:
WHY: To make the <body> tag of the HTML page an application.
</head>
<body data-ng-app="eDirectoryApp">
CODE EXPLANATION:
- The data-ng- prefix is used instead of the ng- prefix to make the application compatible to HTML5.
  It will also be used throughout the rest of this app.
- We have just associated the  <body> tag with the AngularJS framework making the <body> tag and all of
  its content an application. How easy was that!!!
Associate Controller with App (within the SCRIPT code)
Now that we have created an app, let’s associate it with a controller to “control” our app. We want to add the following functionality to our controller:
If a user click:
- the ☀ ADD EMPLOYEE button, show a form to allow a new employee to be ADDED.
- the ✎ EDIT button, show a form to allow an existing employee record to be EDITED.
- the ☒ DELETE button, show a dialog box to allow an existing employee record to be DELETED.
Write the following highlighted code below the app variable
WHY: To assign a controller to the app and create a user array to the current $scope.
var app = angular.module("eDirectoryApp", []);
app.controller("eDirectoryCtrl", function ($scope) {
"use strict";
$scope.employeesJSON = [];

/* Leave this line blank and the line above so that you don't inadvertently
add code blocks below the controller code block.*/
}); // End of Controller
CODE EXPLANATION:
- The $scope.employeesJSON is an array that will be populated with  default users in the next few steps.
- The "use strict" directive is used to define that JavaScript code should be executed in "strict mode."
  For example, you cannot use undeclared variables.
- If declared at the beginning of the code it will provide global scope.
- It is not a statement, but a literal expression and is ignored by earlier versions of JavaScript below JavaScript 1.8.5 (Ascriptive version 5).
- Why Strict Mode?
- makes it easier to write "secure" JavaScript.
- changes previously accepted "bad syntax" into real errors.
- EXAMPLE: In normal JavaScript, mistyping a variable name creates a new global variable. However, in strict mode, this will throw an error, making it impossible to accidentally create a global variable.
- EXAMPLE: In normal JavaScript, a developer will not receive any error feedback assigning values to non-writable properties.
- any assignment to a non-writable property, variable or object will throw an error:
- a getter-only property
- a non-existing property
- a non-existing variable
- a non-existing object
Populate Array with Data
Populate the blank array with some default data.
Add the following highlighted data in between the square braces ([...]) of the employee array.var app = angular.module("eDirectoryApp", []);
app.controller("eDirectoryCtrl", function ($scope) {
"use strict";
$scope.employeesJSON = [{
id: 0,
fullName: "Ann Ricoh",
department: "HR",
image: "ann_ricoh.jpg"
}, {
id: 1,
fullName: "Bob Anderson",
department: "IT",
image: "bob_anderson.jpg"
}, {
id: 2,
fullName: "Carol Green",
department: "QA",
image: "carol_green.jpg"
}, {
id: 3,
fullName: "Debra Samson",
department: "Admin",
image: "debra_samson.jpg"
}];
/* Leave this line blank and the line above so that you don't inadvertently
add code blocks below the controller code block.*/
}); // End of Controller
Associate Controller with App (within the HTML code)
Now that we have associated the controller with the app within the SCRIPT code, we now need to associate the SCRIPT code within the HTML code.
- Add the following highlighted data-ng-controller directive to the
<body>
tag along side of the data-ng-app directive:
WHY: To associate the controller with the application.
<body data-ng-app="eDirectoryApp" data-ng-controller="eDirectoryCtrl">
- Add the following highlighted data-ng-repeat directive in the SECOND
<tr>
tag:
WHY: To iterate through the employees array to create table rows dynamically.
<table border="1">
<tr>
<th width="20">#</th>
<th width="30"> </th>
<th width="185">FULL NAME</th>
<th width="135">DEPARTMENT</th>
<th width="170">EDIT / DELETE</th>
</tr>
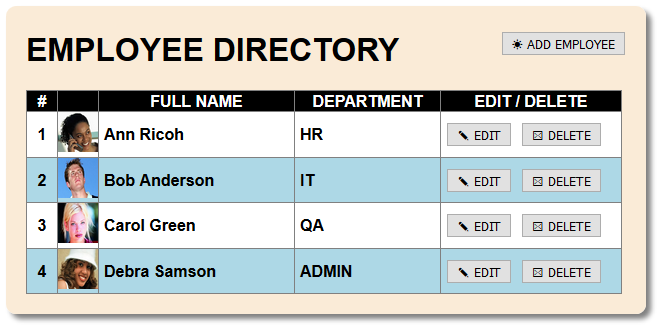
<tr data-ng-repeat="employee in employeesJSON">
<td style="text-align:center">{{$index+1}}</td>
<td class="row_image"><img alt="" height="40" width="40"
src="images/{{employee.image}}"></td>
<td>{{employee.fullName}}</td>
<td>{{employee.department | uppercase}}</td>
<td>
<button>✎ EDIT</button>
<button>☒ DELETE</button>
</td>
</tr>
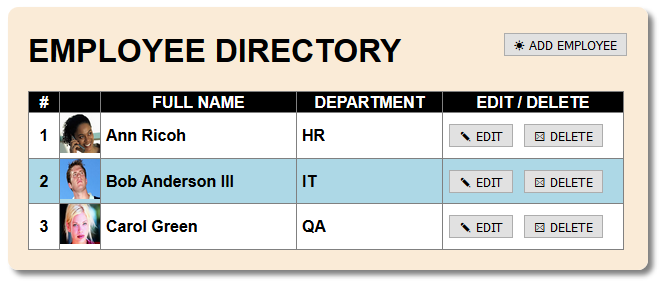
</table> - CHECK POINT: Save the file and preview it in a browser. You should see that the placeholder expressions {{...}}were replaced with data from the array of (employee) objects in a series of table rows. How easy was that!!!
Create Static Content for Form Section
Create Form
A form will be created inside of the <div class="panel> tag.
- Add the following highlighted
<form>
tag INSIDE of the
<div class="panel">
tag BELOW the
<h1>
tab and ABOVE the
<table>
tag.
WHY: To create a form that will serve both the ADD EMPLOYEE and EDIT EMPLOYEE functionality later.
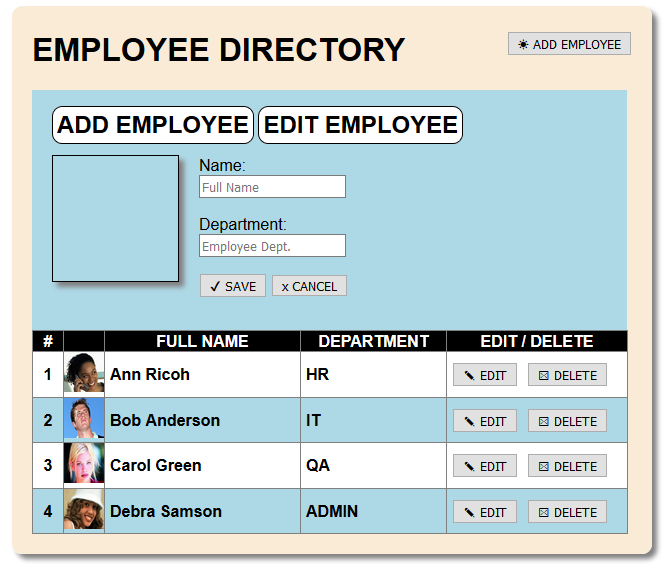
<h1>EMPLOYEE DIRECTORY<button>☀ ADD EMPLOYEE</button></h1>
<form name="addEditForm" style="padding-bottom:20px">
<h2>ADD EMPLOYEE</h2>
<h2>EDIT EMPLOYEE</h2>
<div>
<img alt="" class="thumbnail_image" src="images/{{image}}">
<p>
<label for="full_name">Name:</label><br/>
<input name="full_name" id="full_name" type="text" placeholder="Full Name">
</p>
<p>
<label for="department">Department:</label><br/>
<input name="department" id="department" type="text" placeholder="Employee Dept.">
</p>
</div>
<button>✔ SAVE</button>
<button>x CANCEL</button>
</form>
<table border="1"> -
CHECK POINT: Save the file and preview it in a browser. You should see that the form and form elements displayed above the table. Also note that both the ADD EMPLOYEE and EDIT EMPLOYEE titles are shown at the SAME time. This will be resolved shortly.
Create Dynamic Content for Form Section
First, we want to write some code to hide the form when the application first loads. Then, we will write code for the ADD EMPLOYEE and EDIT buttons.
Hide Form
- Add the following highlighted comment and code below the end of employeesJSON code block in the
e-Directory.js file:
$scope.employeesJSON = [{
            id: 0,
            fullName: "Ann Ricoh",
            department: "HR",
            image: "ann_ricoh.jpg"
        }, {
            id: 1,
            fullName: "Bob Anderson",
            department: "IT",
            image: "bob_anderson.jpg"
        }, {
            id: 2,
            fullName: "Carol Green",
            department: "QA",
            image: "carol_green.jpg"
        }, {
            id: 3,
            fullName: "Debra Samson",
            department: "Admin",
            image: "debra_samson.jpg"
        }];
// Initialize variables used in application --------------
$scope.hideForm=true;

/* Leave this line blank and the line above so that you don't inadvertently
add code blocks below the controller code block.*/
}); // End of Controller - Add the following data-ng-hide directive in the opening
<form>
tag:
<form name="addEditForm" style="padding-bottom:20px" data-ng-hide="hideForm">
...
</form> - CHECK POINT: Save the file and preview it in a browser. You should see that the form is now hidden from view.
Create "Add Employee" Functionality
Now that we can view all of the current employees, let’s add functionality to add new employees. We will first start by adding code to "see" the form again.
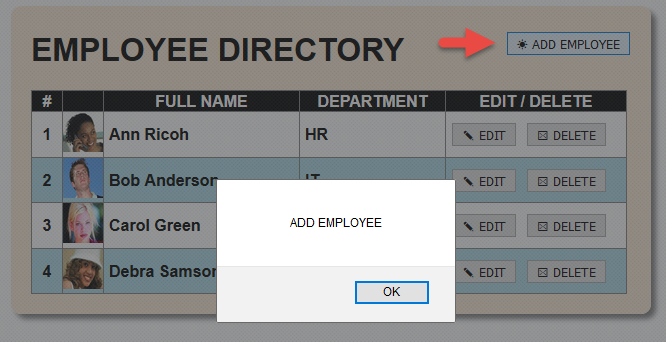
- Add the following highlighted data-ng-click directive in the ADD EMPLOYEE button HTML code:
WHY: To create the "stub" for the ADD EMPLOYEE functionality within the controller:
<div class="panel">
<h1>EMPLOYEE DIRECTORY<button data-ng-click="addEmployee()">ADD EMPLOYEE</button></h1>

<form name="addEditForm" style="padding-bottom:20px" data-ng-hide="hideForm">
CODE EXPLANATION:
- The data-ng-click directive is used to "listen" for a click event and when one happen call (or invoke)
the addEmployee() function - Add the following highlighted comment and addEmployee function below the $scope.hideForm=true statement:
$scope.hideForm=true;
// CREATE ADD EMPLOYEE FUNCTIONALITY ---------------------
$scope.addEmployee = function () {
alert("ADD EMPLOYEE");
};
CODE EXPLANATION:
- It is common practice for developer to create a "stub" code with some pseudo data (e.g., an alert
statement) to check to see if the code block was written correctly. This technique is particularly
useful for beginner developers.
- When a function is used for an event handler, it will be a no-name function (also called an anonymous
function) and is assigned to a variable (e.g., $scope.addEmployee = function () {code goes here...}; ).
A normal function will have a NAME used with the key word function (e.g., function addEmployee()
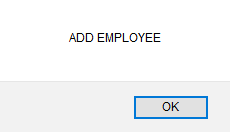
{code goes here...};) and MAY OR MAY NOT be assigned to a variable. - CHECK POINT: Save the file and preview it in a browser, and then click the ADD EMPLOYEE button. You should see the dark overlay and the alert dialog box with the message "ADD EMPLOYEE" appear. Click the OK button to dismiss it.
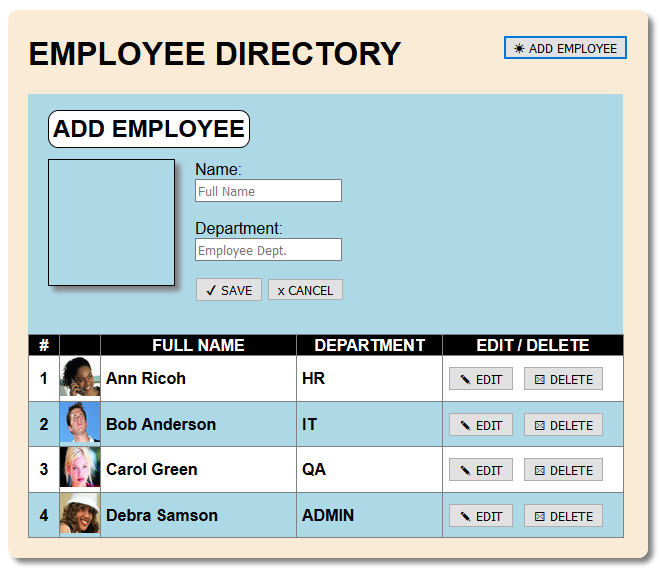
- Comment out the alert statement in the addEmployee function as it was only used to see if the code was working correctly. Then, add the following highlighted code:
// CREATE ADD EMPLOYEE FUNCTIONALITY ---------------------
$scope.addEmployee = function () {
// alert("ADD EMPLOYEE");
$scope.hideForm = false;
}; - CHECK POINT: Save the file and preview it in a browser, and then click the ADD EMPLOYEE button AGAIN. You should see this time that the form reappears. However, both the ADD EMPLOYEE and EDIT EMPLYEE titles are shown at the SAME time. This will be resolved in the next step.
- Add the following two directives
in the two
<h2>
tags in the form:
<form name="addEditForm" style="padding-bottom:20px" data-ng-hide="hideForm">
<h2 data-ng-show="hideTitle">ADD EMPLOYEE</h2>
<h2 data-ng-hide="hideTitle">EDIT EMPLOYEE</h2>
CODE EXPLANATION:
- Notice that there are two directives a data-ng-show and a data-ng-hide and they are BOTH set to
hideTitle which will be set to true in the next step. Since both are set to true and one uses
data-show-ng and the other uses data-hide-ng, one will be turned on and the other turned off. - Add the following $scope.hideTitle = true; statement below the $scope.hideForm = false statement in the addEmployee function:
WHY: To set the hideTitle variable to true in the controller to set the data-ng-hide to true to in the <h2> tag to hide the EDIT EMPLOYEE title.
// CREATE ADD EMPLOYEE FUNCTIONALITY ---------------------
$scope.addEmployee = function () {
// alert("ADD EMPLOYEE");
$scope.hideForm = false;
$scope.hideTitle = true;
}; - CHECK POINT: Save the file and preview it in a browser, and then click the ADD EMPLOYEE button AGAIN. You should see this time that the form reappears AND the EDIT EMPLOYEE title disappears.
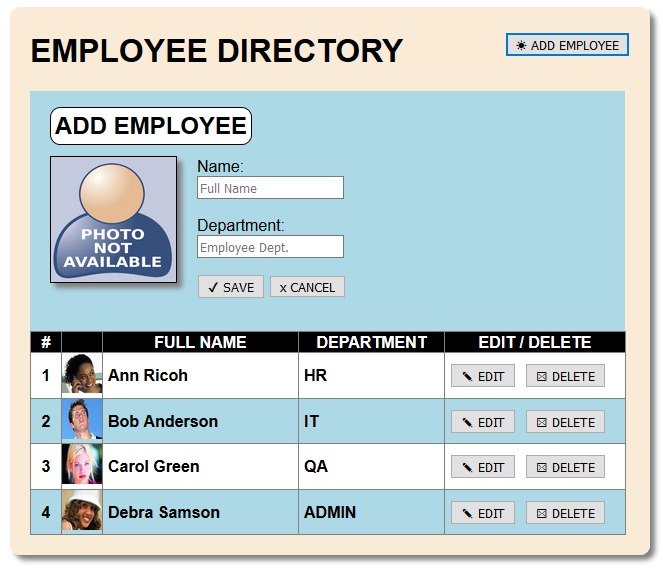
- Add the following highlighted $scope variables:
WHY: To add the main functionality for the ADD EMPLOYEE button.
// CREATE ADD EMPLOYEE FUNCTIONALITY ---------------------
$scope.addEmployee = function () {
// alert("ADD EMPLOYEE");
$scope.hideForm = false;
$scope.hideTitle = true;
$scope.fullName = "";
$scope.department = "";
$scope.image = "photo_not_available.png";
};

/* Leave this line blank and the line above so that you don't inadvertently
add code blocks below the controller code block.*/
}); // End of Controller - CHECK POINT: Save the file and preview it in a browser, and then click the ADD EMPLOYEE button AGAIN. You should see this time that the form reappears but this time with a PHOTO NOT AVAILABLE icon being displayed. While not obvious, the code is also responsible for CLEARING the Name and Department input fields. The SAVE button will be programmed later to "save" the data and display it in the table below the form.
Create "Cancel" Functionality
Now that we have added the Add Employee form and functionality, let's see how we can cancel this operation if we change our mind.
- Add the following highlighted data-ng-click directive to the CANCEL button HTML code:
<button data-ng-click="closeForm()">x CANCEL</button>
- Add the following highlighted code below the addEmployee function block code:
// CREATE ADD EMPLOYEE FUNCTIONALITY ---------------------
$scope.addEmployee = function () {
// alert("ADD EMPLOYEE");
$scope.hideForm = false;
$scope.hideTitle = true;
$scope.fullName = "";
$scope.department = "";
$scope.image = "photo_not_available.png";
};
// CANCEL FUNCTIONALITY  ---------------------------------
$scope.closeForm = function () {
$scope.hideForm = true;
};

/* Leave this line blank and the line above so that you don't inadvertently
add code blocks below the controller code block.*/
}); // End of Controller - CHECK POINT: Save the file and preview it in a browser, and then click the ADD EMPLOYEE button AGAIN. Then, click the CANCEL button. You should see that the form closes.
Create "Save Employee" Functionality for ADD EMPLOYEE Button
While we have created the add functionality, we have not yet added code to:
- Save the result to the array.
- Display the result in the list.
- Add the following data-ng-click directive in the SAVE button HTML code ABOVE the CANCEL button
<button data-ng-click="saveEmployee()">✔ SAVE</button>
<button data-ng-click="closeForm()">x CANCEL</button> - Add the following highlighted code below the CANCEL FUNCTIONALITY code block:
// CANCEL FUNCTIONALITY ----------------------------------
$scope.closeForm = function () {
$scope.hideForm = true;
};
// SAVE EMPLOYEE FUNCTIONILITY   -------------------------
$scope.saveEmployee = function () {
  alert("SAVE EMPLOYEE");
};

/* Leave this line blank and the line above so that you don't inadvertently
add code blocks below the controller code block.*/
}); // End of Controller - CHECK POINT: Save the file and preview it in a browser, and then click the ADD EMPLOYEE button AGAIN. Then, click the SAVE button. You should see the dark overlay and the alert dialog box with the SAVE EMPLOYEE message displayed. Click the OK button to dismiss it.

- Comment out the alert statement in the saveEmployee function as it was only used to see if the code was working correctly. Then, add the following highlighted code:
WHY: To ascertain how many objects (employees) are in the array of objects.
// SAVE EMPLOYEE FUNCTIONILITY -------------------------
$scope.saveEmployee = function () {
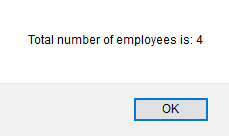
// alert("SAVE EMPLOYEE"); $scope.totalNumberEmployees = $scope.employeesJSON.length;
alert("Total number of employees is: " + $scope.totalNumberEmployees);
};
/* Leave this line blank and the line above so that you don't inadvertently
add code blocks below the controller code block.*/ }); // End of ControllerCODE EXPLANATION:
- The length property of the employeesJSON object is used to ascertain how many objects are in
the employee's array. - CHECK POINT: Save the file and preview it in a browser, and then click the ADD EMPLOYEE button AGAIN. Then, click the SAVE button. You should see the dark overlay and the alert dialog box with the following message displayed. Click the OK button to dismiss it.
- Comment out the alert statement in the saveEmployee function as it was only used to see if the code was working correctly. Then, add the following highlighted code:
CAUTION: Pay attention to the number of curly braces.
// SAVE EMPLOYEE FUNCTIONILITY   -------------------------
$scope.saveEmployee = function () {
  // alert("SAVE EMPLOYEE");
     $scope.totalNumberEmployees = $scope.employeesJSON.length;
     // alert("Total number of employees is: " + $scope.totalNumberEmployees);

    $scope.employeesJSON.push({
    "id": $scope.totalNumberEmployees,
    "fullName": $scope.fullName,
    "department": $scope.department,
    "image": "photo_not_available.png"
    });

    };

/* Leave this line blank and the line above so that you don't inadvertently
add code blocks below the controller code block.*/
};  // End of Controller
CODE EXPLANATION:
- The push() method of the employeesJSON object is used to add a new employee to the array
- The $scope.totalNumberEmployee is used to increment the id value in the object by 1
- The fullName, department, and image are properties that will be assigned values from the form elements
in the next step. - Add the following three highlighted data-ng-model = "..." to the placeholder elements.
WHY: To BIND the values of the form elements to the values in the array.
NOTE: The data-ng-model="image" model is currently not necessary but was added to future-proof the app in case you later add additional functionality to select an image from your computer system.
<form name="addEditForm" style="padding-bottom:20px">
<h3>ADD EMPLOYEE</h3>
<h3>EDIT EMPLOYEE</h3>
<div>
<img data-ng-model="image" alt="" class="thumbnail_image" src="e-DirectoryEmployees/{{image}}">
<p>
<label>Name:</label><br/>
<input data-ng-model="fullName" name="full_name" id="full_name" type="text" placeholder="Full Name">
</p>
<p>
<label>Title:</label><br/>
<input data-ng-model="department" name="department" id="department" type="text" placeholder="Employee Title">
</p>
</div>
<button data-ng-click="saveEmployee()">✔ SAVE</button>
<button data-ng-click="closeForm()">x CANCEL</button> </form> - CHECK POINT: Save the file and preview it in a browser, and then click the ADD EMPLOYEE button AGAIN. Then:
- Add a name and department in the input fields, click the SAVE button, and then click the OK button. Repeat again and add another name and department. You should see that the list below gets updated with the data you inputted. Click the OK button to dismiss the alert dialog box.
Create "Edit Employee" Functionality
Now that we can view and edit employees, let's see how we can edit an existing employee data and save it to the array. While we could create a separate code block for the edit functionality, since the edit and add functionality is similar, we will create a conditional statement inside of the addEmployee function to check for which code to execute.
- Add the following data-ng-click directive in the EDIT button HTML code:
WHY: To listen for a click event and when it happens call (or invoke) the addEmployee function in the controller code.
<button data-ng-click="addEmployee(employee.id)">✎ EDIT</button>
CODE EXPLANATION:
- Notice the employee.id argument that is being passed in the addEmployee function. It will resolve
  to the current id that will be used in the addEmployee function.
- The employee.id will be used to pass an argument to the addEmployee function. - Add the word "new" to the following data-ng-click directive in the ADD button HTML code:
WHY: To listen for a click event and when it happens call (or invoke) the addEmployee function in the controller code.
CAUTION: Be careful to use SINGLE instead of double quotes because double quotes is already used.
<h1>EMPLOYEE DIRECTORY<button data-ng-click="addEmployee('new')">ADD EMPLOYEE</button></h1>CODE EXPLANATION:
- The string "new" is added to the addEmployee() function so that it can be used in the addEmployee
function in the controller to distinguish it from the edit code. - Uncomment out the alert statement and then WRAP the current addEmployee code in an "if/else" statement along with the following highlighted code:
CAUTION: Be careful NOT to put this code in the saveEmployee function code block which is similar. Also, pay attention to the curly braces.
// CREATE ADD EMPLOYEE FUNCTIONALITY ---------------------
$scope.addEmployee = function (id) {

if(id==="new") {
alert("ADD EMPLOYEE");
$scope.hideForm = false;
$scope.hideTitle = true;
$scope.fullName = "";
$scope.title = "";
$scope.image = "photo_not_available.png";
}
else {
// Edit Employee ------------
alert("EDIT EMPLOYEE");
     }
};
CODE EXPLANATION:
- Notice the "id" argument that was added to the addEmployee function. It is used to determine if
the if or the else statement is executed in the conditional statement. - The triple equal sign (===) represents strict equality between two values. Both the type and
the value you're comparing have to be exactly the same. - CHECK POINT: Save the file and preview it in a browser, and then click the ADD EMPLOYEE button. You should see the alert dialog box with the ADD EMPLOYEE message. Click the OK button to dismiss it.
Now, click the EDIT button on one of the items. You should see the alert dialog box with the EDIT EMPLOYEE message. Click the OK button to dismiss it. This code was used to ensure that the "if/else" statement was coded correctly.

- Add the following highlighted code below the EDIT EMPLOYEE alert statement in the addEmployee statement:
// CREATE ADD EMPLOYEE FUNCTIONALITY ---------------------
$scope.addEmployee = function (id) {

if(id==="new") {
alert("ADD EMPLOYEE");
$scope.hideForm = false;
$scope.hideTitle = true;
$scope.fullName = "";
$scope.title = "";
$scope.image = "photo_not_available.png";
}
else {
//  Edit Employee ------------
alert("EDIT EMPLOYEE");
$scope.hideTitle = false;
$scope.hideForm = false;
$scope.fullName = $scope.employeesJSON[id].fullName;
$scope.department = $scope.employeesJSON[id].department;
$scope.image = $scope.employeesJSON[id].image;
   }
};
CODE EXPLANATION:
- The $scope.hideTitle = false; statement is used to show the EDIT EMPLOYEE title instead of the ADD
EMPLOYEE title.
- The $scope.hideForm = false; statement is used to show the form so that the fields can be edited.
- The three variables (fullName, department, and image) will assigned values from the employeesJSON
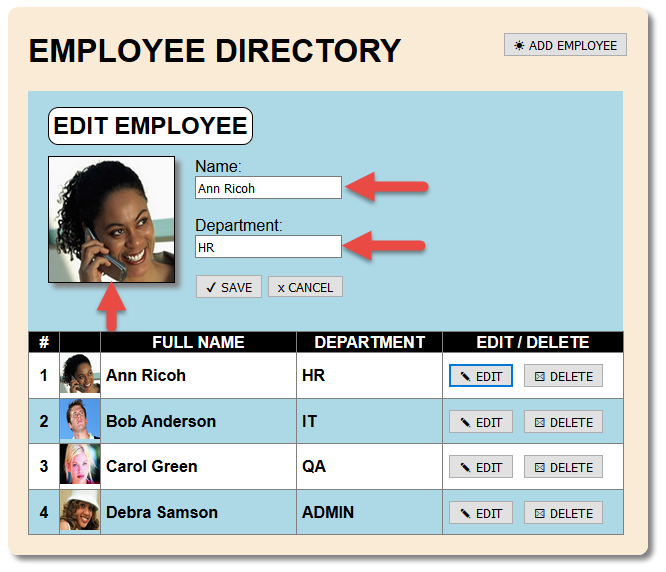
object based on a specific ID value. - CHECK POINT: Save the file and preview it in a browser, and then click the EDIT button on one of the list item. Then, click the OK button to dismiss the alert dialog box. You should now see the image, NAME, and DEPARTMENT fields prepopulated with data from the employeesJSON object.
- Comment out both alert statements in the addEmployee function:
// CREATE ADD EMPLOYEE FUNCTIONALITY ---------------------
$scope.addEmployee = function (id) {

if(id==="new") {
// alert("ADD EMPLOYEE");
$scope.hideForm = false;
$scope.hideTitle = true;
$scope.fullName = "";
$scope.department = "";
$scope.image = "photo_not_available.png";
}
else {
//  Edit Employee ------------
// alert("EDIT EMPLOYEE");
$scope.hideTitle = false;
$scope.hideForm = false;
$scope.fullName = $scope.employeesJSON[id].fullName;
$scope.department = $scope.employeesJSON[id].department;
$scope.image = $scope.employeesJSON[id].image;
   }
};
Create "Save Employee" Functionality for EDIT Button
Since the ADD EMPLOYEE button SAVE functionality is similar to the EDIT button functionality, we will add an "if/else" conditional statement like we did in the the addEmployee function code block:
- WRAP the current saveEmployee code in an "if/else" statement along with the following highlighted code:
// SAVE EMPLOYEE FUNCTIONILITY -------------------------
$scope.saveEmployee = function () {
if ($scope.addNewEmployee === true) {
// alert("SAVE EMPLOYEE FOR ADD EMPLOYEE BUTTON");
var totalNumberEmployees = $scope.employeesJSON.length;
// alert("Total number of employees is: " + totalNumberEmployees);
$scope.employeesJSON.push({
"id": $scope.totalNumberEmployees,
"fullName": $scope.fullName,
"department": $scope.department,
"image": "photo_not_available.png"
}); }
else {
alert("SAVE EMPLOYEE FOR EDIT BUTTON"); alert("Selected Employee Index for Save is: " + $scope.selectedEmployeeIndex);
$scope.employeesJSON[$scope.selectedEmployeeIndex].fullName = $scope.fullName;
$scope.employeesJSON[$scope.selectedEmployeeIndex].department = $scope.department;
}
}; /* Leave this line blank and the line above so that you don't inadvertently
add code blocks below the controller code block.*/ }); // End of Controller - Add the following $scope.selectedEmployeeIndex AND $scope.addNewEmployee statements:
WHY: To set the INTIAL and FINAL STATES for these variables.
// Initialize variables used in application --------------
$scope.hideForm=true;
$scope.addNewEmployee = false;
$scope.selectedEmployeeIndex = 0;
// CREATE ADD EMPLOYEE FUNCTIONALITY ---------------------
$scope.addEmployee = function (id) {
if(id==="new") {
// alert("ADD EMPLOYEE");
$scope.addNewEmployee = true;
$scope.hideForm = false;
$scope.hideTitle = true;
$scope.fullName = "";
$scope.department = "";
$scope.image = "photo_not_available.png";
}
else {
// Edit Employee ------------
// alert("EDIT EMPLOYEE");
$scope.addNewEmployee = false;
$scope.selectedEmployeeIndex = id;
alert("Selected Employee Index for Edit: " + $scope.selectedEmployeeIndex);
$scope.hideTitle = false;
$scope.hideForm = false;
$scope.fullName = $scope.employeesJSON[id].fullName;
$scope.department = $scope.employeesJSON[id].department;
$scope.image = $scope.employeesJSON[id].image;
     }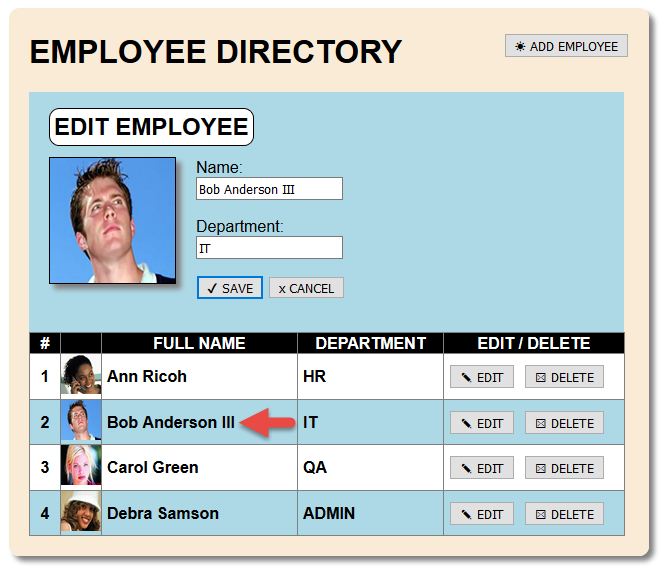
}; - CHECK POINT: Save the file and preview it in a browser, click the EDIT button on one of the list item, and then make some changes to the Name or Department input fields. Dismiss any alert dialog boxes. Then, click the SAVE button. You should see the selected list item get updated:
BEFORE:
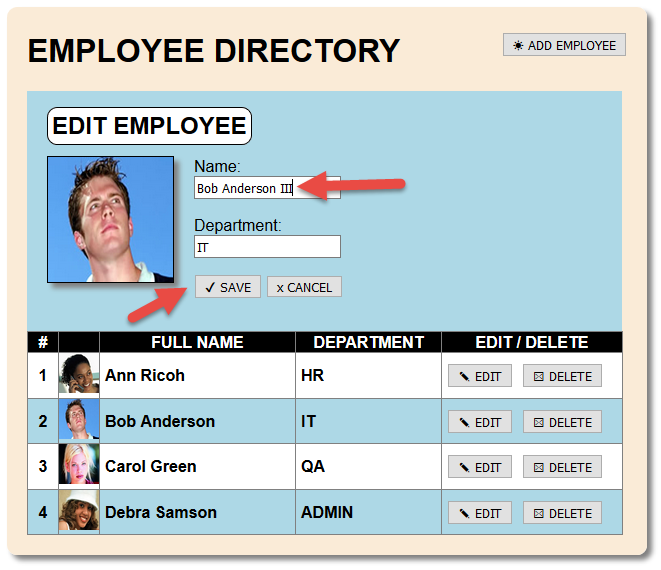
AFTER:
- Comment out all alert() statements in the entire code.
// SAVE EMPLOYEE FUNCTIONILITY   -------------------------
$scope.saveEmployee = function () {

if ($scope.addNewEmployee === true)
{
  // alert("SAVE EMPLOYEE");
$scope.totalNumberEmployees = $scope.employeesJSON.length;
// alert("Total number of employees is: " + $scope.totalNumberEmployees);

 $scope.employeesJSON.push({
    "id": $scope.totalNumberEmployees,
    "fullName": $scope.fullName,
    "department": $scope.department,
    "image": "photo_not_available.png"
    });
}
else {
 // alert("SAVE EMPLOYEE FOR EDIT BUTTON");
 // alert("Selected Employee Index for Save is: " + $scope.selectedEmployeeIndex);
 $scope.employeesJSON[$scope.selectedEmployeeIndex].fullName = $scope.fullName;
 $scope.employeesJSON[$scope.selectedEmployeeIndex].department = $scope.department;
     }
};

/* Leave this line blank and the line above so that you don't inadvertently
add code blocks below the controller code block.*/
}); // End of Controller - Add the following highlighted code OUTSIDE of the "if" statement:
WHY: To hide the form when the Save button is clicked for both the ADD EMPLOYEE and EDIT button regardless of the conditional statement.
// SAVE EMPLOYEE FUNCTIONILITY   -------------------------
$scope.saveEmployee = function () {

if ($scope.addNewEmployee === true)
{
  // alert("SAVE EMPLOYEE");
$scope.totalNumberEmployees = $scope.employeesJSON.length;
// alert("Total number of employees is: " + $scope.totalNumberEmployees);

 $scope.employeesJSON.push({
    "id": $scope.totalNumberEmployees,
    "fullName": $scope.fullName,
    "department": $scope.department,
    "image": "photo_not_available.png"
    });
}
else {
 // alert("SAVE EMPLOYEE FOR EDIT BUTTON");
 // alert("Selected Employee Index for Save is: " + $scope.selectedEmployeeIndex);
 $scope.employeesJSON[$scope.selectedEmployeeIndex].fullName = $scope.fullName;
 $scope.employeesJSON[$scope.selectedEmployeeIndex].department = $scope.department;
     }
$scope.hideForm = true; // Close form for both "EDIT" Save or the "ADD EMPLOYEE" Save
};

/* Leave this line blank and the line above so that you don't inadvertently
add code blocks below the controller code block.*/
}); // End of Controller - CHECK POINT: Save the file and preview it in a browser, and then click the EDIT button on one of the list item. Then, click the SAVE button. Then, click on the ADD Employee button and then click the SAVE button. Notice that the form is closed in either case.
Add Delete Functionality
Now that we can view, add, and edit employee's data, let's now add functionality to delete an employee.
- Add the following data-ng-click directive in the DELETE button HTML code below the EDIT button code:
WHY: To listen for a click event and when it happens call (or invoke) the deleteEmployee function in the controller code.
<button data-ng-click="addEmployee(employee.id)">✎ EDIT</button>
<button data-ng-click="deleteEmployee($index)">☒ DELETE</buttonCODE EXPLANATION:
- Notice the $index argument that is being passed in the deleteEmployee function. It will resolve
to the current row index that will be used in the deleteEmployee function. - Write the following highlighted code BELOW the closing addEmployee code block and ABOVE the closing comment in the controller code block:
else {
// alert("SAVE EMPLOYEE FOR EDIT BUTTON");
// alert("Selected Employee Index for Save is: " + $scope.selectedEmployeeIndex);
$scope.employeesJSON[$scope.selectedEmployeeIndex].fullName = $scope.fullName;
$scope.employeesJSON[$scope.selectedEmployeeIndex].department = $scope.department;
}
// Close form for both "EDIT" Save or the "ADD EMPLOYEE" Save
$scope.hideForm = true;
};
// DELETE EMPLOYEE FUNCTIONALITY -------------------------------
$scope.deleteEmployee = function () {
alert("DELETE EMPLOYEE");
};

/* Leave this line blank and the line above so that you don't inadvertently
add code blocks below the controller code block.*/
}); // End of Controller - CHECK POINT: Save the file and preview it in a browser, click the DELETE button on one of the rows. You should see the DELETE EMPLOYEE message displayed in an alert dialog box. Click the OK button to dismiss it.
- Add the following highlighted code below the comment in the deleteEmployee code block:
// DELETE EMPLOYEE FUNCTIONALITY -------------------------------
$scope.deleteEmployee = function (x) {
alert("DELETE EMPLOYEE");
$scope.employeesJSON.splice(x, 1);
};

/* Leave this line blank and the line above so that you don't inadvertently
add code blocks below the controller code block.*/
}); // End of Controller
CODE EXPLANATION:
- Notice the "x" that is passed as an argument into the deleteEmployee function. It is used to
ascertain the index value ($index) from the HTML code.
- The splice() method of the employeesJSON object is used to delete one element from the array
based on the table row index (x) that was passed into it. - CHECK POINT: Save the file and preview it in a browser, click the DELETE button on one of the rows. You should see the DELETE EMPLOYEE message displayed in an alert dialog box. Click the OK button to dismiss it. Then, you should see that row deleted from the table.
BEFORE:
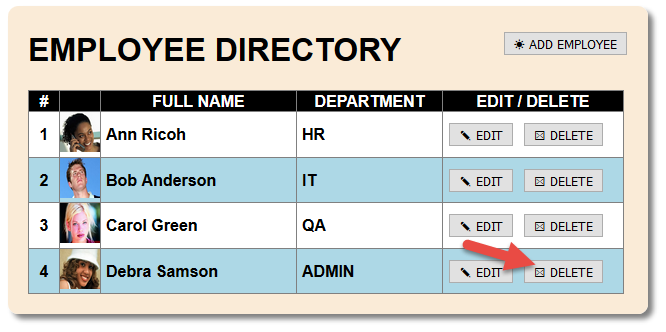
AFTER:
- Rewrite the following highlighted code:
WHY: To display a confirmation dialog box to give the user the option to cancel the delete operation or commit it.
NOTE: It is ALWAYS best practice to display a confirmation dialog box when deleting content.
// DELETE EMPLOYEE FUNCTIONILITY ----------------------
$scope.deleteEmployee = function (x) {
// alert("Delete Employee");
$scope.message = "Are you sure you want to delete this employee?";
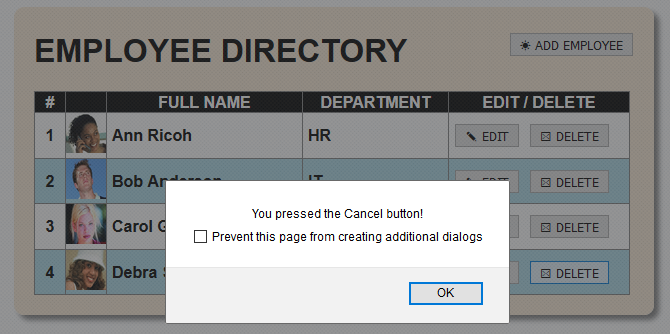
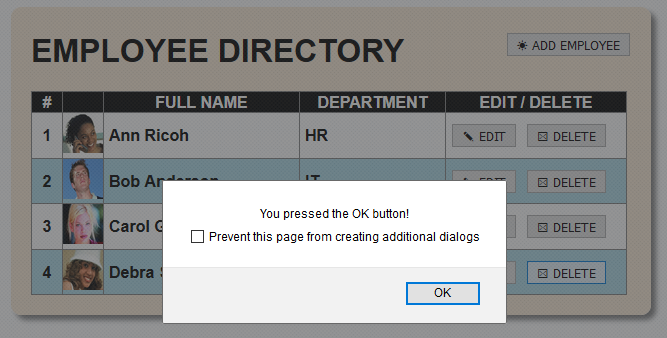
var choose = confirm($scope.message);
if (choose === true) {
alert("You pressed the OK button!");
$scope.employeesJSON.splice(x, 1);
} else {
alert("You pressed the Cancel button!");
}
};CODE EXPLANATION:
- The confirm() method is assigned to the message variable so that it can be used in the "if"
statement to determine if the OK or the Cancel button has been pressed. If the OK button is
pressed, it will return true and the first part of the "if" statement will be executed.
If the Cancel button is pressed, it will return false and the second part of the "if" statement
(the else statement) will be executed.
- The message variable is created so that it can be passed into the confirm() method. The message
could have been written inside of the confirm dialog box but it is best practice to create a
variable for a long statement and then use that variable as an argument to make the code easier
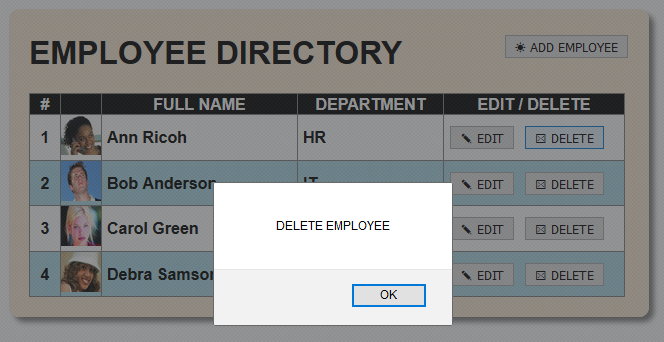
to read and update. - CHECK POINT: Save the file and preview it in a browser, click the DELETE button on one of the rows. You should see the "Are you sure you want to delete this employee?" message displayed in a CONFIRMATION dialog box. Click the CANCEL button.
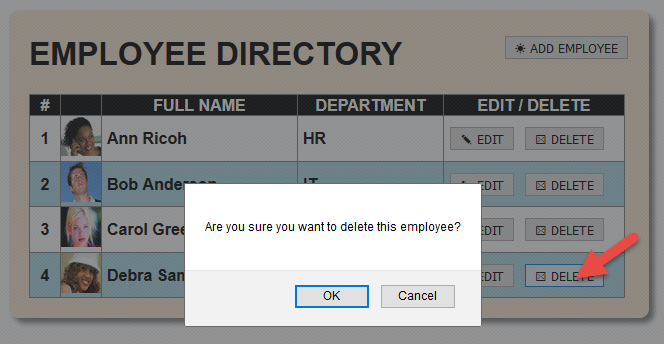
You should see the "You pressed the Cancel button!" message in an ALERT dialog box. Press the OK button to dismiss it.
Click the Delete button again, but this time when the "Are you sure you want to delete this employee?" confirmation dialog box appear, click the OK button. You should see the "You pressed the OK button!" message displayed in an ALERT dialog box.
Then, you should see the row that you clicked that the DELETE button disappeared.
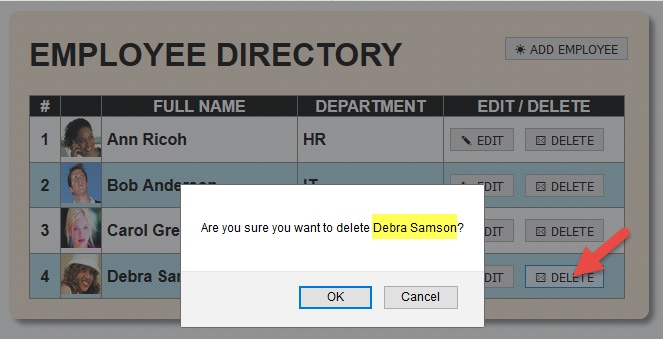
- (OPTIONAL) Modify the message's variable with the following highlighted code and comment out the two alert dialog boxes.
WHY: To personalize confirmation dialog box message for the given row.
// DELETE EMPLOYEE FUNCTIONILITY ----------------------
$scope.deleteEmployee = function (x) {
// alert("Delete Employee");
$scope.message = "Are you sure you want to delete " + $scope.employeesJSON[x].fullName + "?";
var choose = confirm($scope.message);
if (choose === true) {
// alert("You pressed the OK button!");
$scope.employeesJSON.splice(x, 1);
}
else
{
// alert("You pressed the Cancel button!");
}
}; - CHECK POINT: Save the file and preview it in a browser, click the DELETE button on one of the rows. You should see the "Are you sure you want to delete [EMPLOYEE NAME]?" message displayed in a CONFIRMATION dialog box. Click the OK button. You should see a "personalized" confirmation message. Press the OK button and you should see that row deleted from the table. If you click the Cancel button, nothing will happen except the dialog box will close.
Make Data Persistent
Currently, the data is not actually being saved when you update, edit, or delete content if you close the browser. There are two major ways to make the data persistent once you exit the application:
- Add Local Storage
- Create a SQL Database
Add Local Storage
See Add Local Storage for more detail on Local Storage.
In order to save the data locally, we will need to create a local storage object. Then, when the page loads, check the local storage and load it or use the default data if no local storage exists.
- To retrieve data from the local storage object, we will use the getItem() method of the Local Storage object.
- To save data to the local storage object, we will use the setItem() method of the Local Storage object where any changes (add, delete, or update) in the data is made.
- Add the following highlighted variable ($scope.saved) and then wrap the employeesJSON array with an "if/else" statement.
WHY: To add local storage functionality to area of the code to retrieve (get) or save (set) any change in data. This is typically after the push() method of the employeesJSON array.
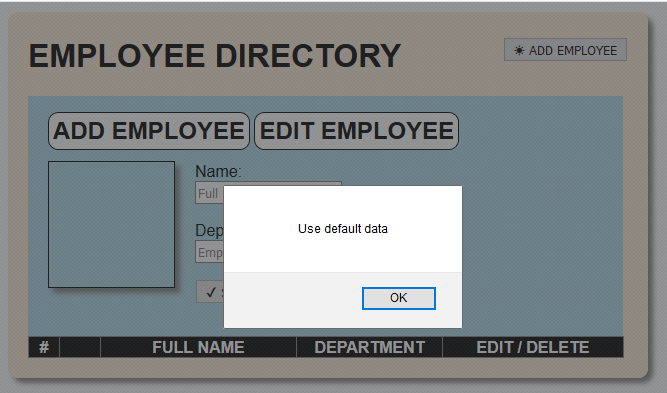
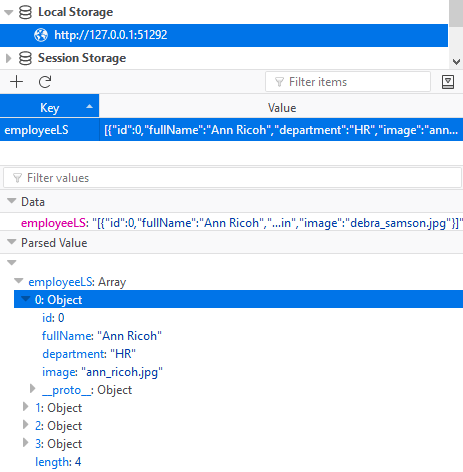
$scope.saved = localStorage.getItem("employeeLS");
if ($scope.saved !== null) {
    alert("Save data to local storage");
     $scope.employeesJSON = JSON.parse($scope.saved);
    }
    else
    {
     alert("Use default data");
     $scope.employeesJSON = [{
            id: 0,
            fullName: "Ann Ricoh",
            department: "HR",
            image: "ann_ricoh.jpg"
        }, {
            id: 1,
            fullName: "Bob Anderson",
            department: "IT",
            image: "bob_anderson.jpg"
        }, {
            id: 2,
            fullName: "Carol Green",
            department: "QA",
            image: "carol_green.jpg"
        }, {
            id: 3,
            fullName: "Debra Samson",
            department: "Admin",
            image: "debra_samson.jpg"
        }];
    }
    localStorage.setItem("employeeLS", JSON.stringify($scope.employeesJSON));
// Initialize variables used in application --------------
CODE EXPLANATION:
- The saved variable is used to get the saved data if there is any.
- If the saved variable is NOT NULL, the "if" portion of the conditional statement will be executed
which will result in data being saved to the Local Storage.
- If the saved variable is NULL, the "else" portion of the conditional statement will be executed
which will result in the default data being loaded from the array.
- The setItem() method is used to save the data to the Local Storage.
- The stringify() method of the JSON object is used to convert the employeesJSON array data that is
passed as an argument to a "string" - CHECK POINT: Save the file and preview it in a browser. You should see the alert dialog box with the "Use default data" message displayed. This is because no data is currently saved to the Local Storage object.
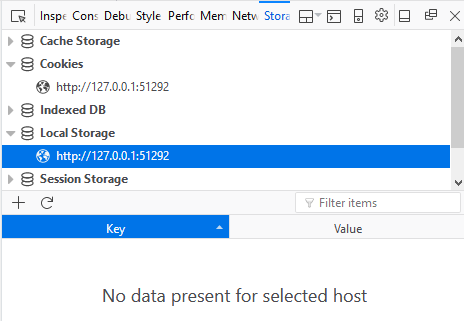
Open the Web Developer Tool. In Google Chrome, press F12 and then click the Local Storage link. You should see the message "No data present for selected host" displayed.
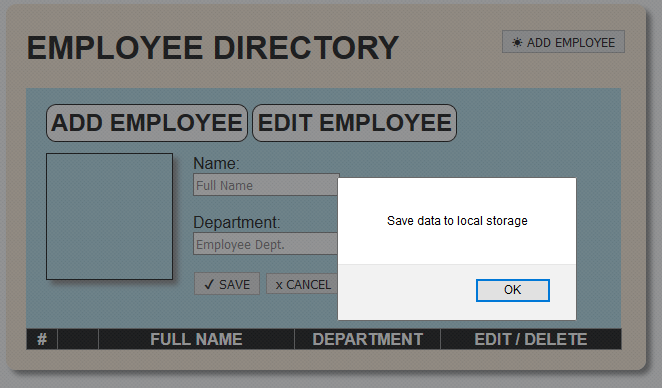
- Click the OK button in the alert dialog box to dismiss it, Then, press the Refresh button (or F5). You should see the "Save data to local storage" message displayed in the alert dialog box. Click the OK button to dismiss it.
- Click the blue highlighted area of the Local Storage panel to see detail information about the saved data.
- Comment out the alert statements at the top of the controller code:
var app = angular.module("eDirectoryApp", []);
app.controller("eDirectoryCtrl", function ($scope) {
"use strict";
$scope.saved = localStorage.getItem('employeeLS');
if ($scope.saved !== null) {
// alert("Save data to local storage");
$scope.employeesJSON = JSON.parse($scope.saved);
}
else
{
// alert("Use default data");
$scope.employeesJSON = [{ - Add the following three highlighted local storage code areas:
WHY: To "capture" the data and save it to the Local Storage for the add, update, and delete operations.
NOTE: The code is the SAME for each three areas.
// SAVE EMPLOYEE FUNCTIONALITY   -------------------------
$scope.saveEmployee = function () {
if ($scope.addNewEmployee === true)
{
// alert("SAVE EMPLOYEE");
$scope.totalNumberEmployees = $scope.employeesJSON.length;
// alert("Total number of employees is: " + $scope.totalNumberEmployees);
$scope.employeesJSON.push({
"id": $scope.totalNumberEmployees,
"fullName": $scope.fullName,
"department": $scope.department,
"image": "photo_not_available.png"
});
localStorage.setItem("employeeLS", JSON.stringify($scope.employeesJSON));
}
else
{
// alert("SAVE EMPLOYEE FOR EDIT BUTTON");
// alert("Selected Employee Index for Save is: " + $scope.selectedEmployeeIndex);
$scope.employeesJSON[$scope.selectedEmployeeIndex].fullName = $scope.fullName;
$scope.employeesJSON[$scope.selectedEmployeeIndex].department = $scope.department;
localStorage.setItem("employeeLS", JSON.stringify($scope.employeesJSON));
}
$scope.hideForm = true; // Close form for both "EDIT" Save or the "ADD EMPLOYEE" Save
};
// DELETE EMPLOYEE FUNCTIONALITY -------------------------------
$scope.deleteEmployee = function (x) {
// alert("Delete Employee");
$scope.message = "Are you sure you want to delete " + $scope.employeesJSON[x].fullName + "?";
var choose = confirm($scope.message);
if (choose === true) {
// alert("You pressed the OK button!");
$scope.employeesJSON.splice(x, 1);
localStorage.setItem("employeeLS", JSON.stringify($scope.employeesJSON));
}
else
{
// alert("You pressed the Cancel button!");
}
};
/* Leave this line blank and the line above so that you don't inadvertently
add code blocks below the controller code block.*/
}); // End of Controller - CHECK POINT: Save the file and preview it in a browser. Click the EDIT button, change the Name or the Department text field, click the SAVE button, and then refresh the browser. Click the DELETE button on one of the rows and then click the OK button to commit the deletion. You should see that even after you refresh the browser the data persist for both the edit and delete operation.
- CHECK POINT: Save the file and preview it in a browser. Click the ADD button and add a Name and Title in the text fields. Then, click the SAVE button. You should see the table gets updated with the information from the text fields.
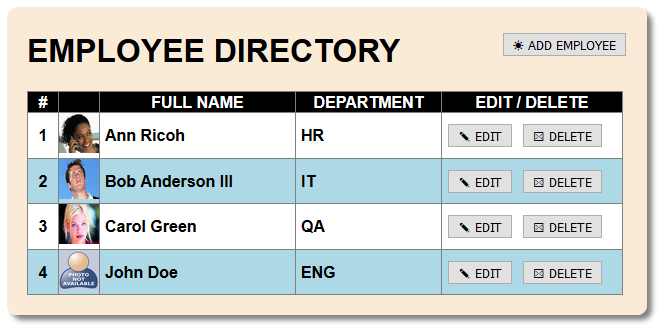
Click the Refresh button (or F5). This time you should see that none of the employee data is shown.
Open the browser's web developer tools (F12) and then click the console tab. You should see a ngRepeat:dupes error being reported.

Extract from: https://docs.angularjs.org/error/ngRepeat/dupes
Error: ngRepeat:dupes
Duplicate key in a repeater are not allowed because AngularJS uses keys to associate DOM nodes with items. By default, collections are keyed by reference which is desirable for most common models but can be problematic for primitive types that are interned (share references).SOLUTION: To resolve this error either ensure that the items in the collection have unique identity or use the track by syntax to specify how to track the association between models and DOM.
Use 'track by' expression (e.g., track by $index) to specify unique keys which will cause the items to be keyed by their position in the array instead of their value.
- Add the following highlighted code in the second
<tr>
tag.
<table border="1">
<tr>
<th width="20">#</th>
<th width="30"> </th>
<th width="185">FULL NAME</th>
<th width="135">DEPARTMENT</th>
<th width="170">EDIT / DELETE</th>
</tr>
<tr data-ng-repeat="employee in employeesJSON track by $index">
<td style="text-align:center">{{$index+1}}</td>
<td class="row_image"><img alt="" height="40" width="40"
src="images/{{employee.image}}"></td>
<td>{{employee.fullName}}</td>
<td>{{employee.department | uppercase}}</td>
<td> <button data-ng-click="addEmployee(employee.id)">✎ EDIT</button>
<button data-ng-click="deleteEmployee($index)">☒ DELETE</button>
</td>
</tr>
</table> - CHECK POINT: Save the file and preview it in a browser. This times the data render correctly.
Enhancements
While the app is basically complete, there are some things that we can do to enhance it both aesthetically and functionally.
These enhancements are optional and you can add them as you see fit:
- Add animation to form when Add Employee or Edit button is clicked
- Add total number of employees
- Add search feature
- Add validation if fields are empty on Add Employee function
- Update icon using Font Awesome
- Add “All employees have been deleted.” message
DB VERSION:
- Create a PHP / MySQL database version
- Add combo box instead of text field for department
- Add ability to add photos
Add Animation to Form
In order to do AngularJS animation, we need to load the angular-animate JavaScript and then add it as a dependent later:
- Add the following highlighted animate script:
<script src="https://ajax.googleapis.com/ajax/libs/angularjs/1.6.4/angular.min.js"></script>
<script src="https://ajax.googleapis.com/ajax/libs/angularjs/1.6.4/angular-animate.js"></script>
<script src="e-Directory.js"></script>
</body>
</html> - Add the following highlighted class and directives to the opening
<form>
tag:
<form name="addEditForm" style="padding-bottom:20px" data-ng-hide="hideForm"
class="animate" data-ng-show="nav">
...
</form>
CODE EXPLANATION:
- The data-ng-show directive is used to show or hide the form.
- The animate class is used to create the animation. - Add the following highlighted CSS code below the "Other styles" in the css file:
/* Other styles -------------------------------*/
h1 button {float:right;}
.row_image {padding:0px;}
img{padding:0; margin:0; border:0;}
form h2 {border: 1px solid black;
display: inline;
padding:4px;
border-radius:10px;
background-color:white;
}
form {
width: 555px;
height: 200px;
background-color:lightblue;
padding:20px
}
/* Toggle Form ---------------------- */
.animate {
-webkit-transition: all linear 0.25s;
-moz-transition: all linear 0.25s;
transition: all linear 0.5s;
}
.animate.ng-hide {
opacity:0;
height:0px;
} - Add the following highlighted dependent to the first line of code:
var app = angular.module("eDirectoryApp", ["ngAnimate"]); - CHECK POINT: Save the file and preview it in a browser. Then, click the EDIT, SAVE, or the ADD EMPLOYEE buttons. You should see the form now animates. It is important to note that these buttons work because they were ALREADY program to show and hide the form. We are taking advantage of this with the new code.
Add total number of employees
Now, let's write some HTML, CSS and JavaScript to keep track of how many employees are listed in the table.
- Add the following highlighted code below the closing
</table>
tag:
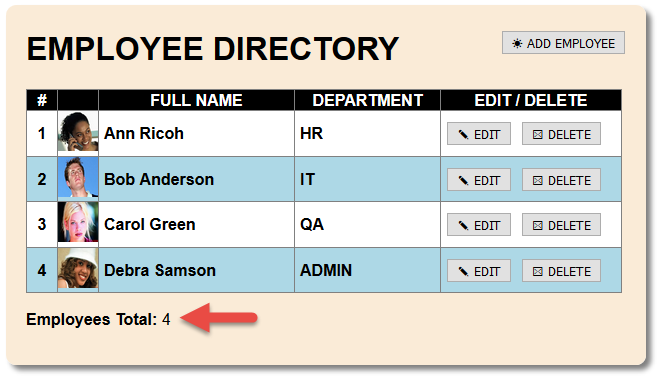
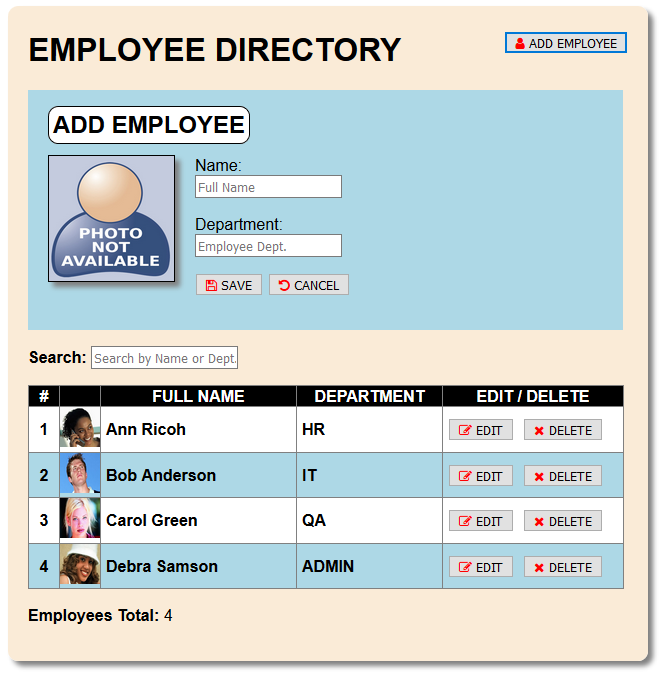
</table> <p><strong>Employees Total:</strong> {{employeesJSON.length}}</p> - CHECK POINT: Save the file and preview it in a browser. You should see the message "Employees Total: [X] where X is the total number of employees listed in the table.
Add validation if fields are empty on Add Employee function
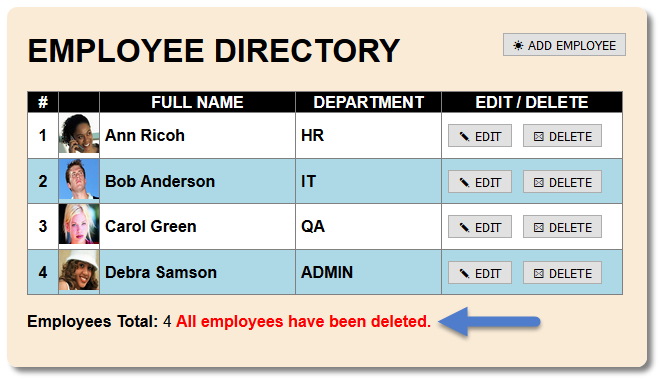
Now that we can display the total number of employees in the table, let's add some code to display another message if ALL of the employees are deleted from the table.
- Add the following highlighted
span>
tag to the
<p>
tag below the closing
</table>
tag:
</table>
<p><strong>Employees Total:</strong> {{totalNumberEmployees}}
<span style="color:red; font-weight: bold" data-ng-hide="hideMessage">
All employees have been deleted.</span></p> - CHECK POINT: Save the file and preview it in a browser. You should see the message displayed in red after the Employees Total.
- Add the following highlighted variable below the other variables:
// Initialize variables used in application --------------
$scope.hideForm=true;
$scope.addNewEmployee = false;
$scope.selectedEmployeeIndex = 0;
$scope.hideMessage = true; - CHECK POINT: Save the file and preview it in a browser. You should see the RED message is HIDDEN after the Employees Total.
- Add the following variable and "if" statement INSIDE of the "if" statement of the deleteEmployee function:
// DELETE EMPLOYEE FUNCTIONILITY ----------------------
$scope.deleteEmployee = function (x) {
// alert("Delete Employee");
$scope.message = "Are you sure you want to delete " + $scope.employeesJSON[x].fullName + "?";
var choose = confirm($scope.message);
if (choose === true) {
//alert("You pressed the OK button!");
// Remove from EmployeesJSON object
$scope.employeesJSON.splice(x, 1);
localStorage.setItem('employeeLS', JSON.stringify($scope.employeesJSON));
$scope.totalNumberEmployees = $scope.employeesJSON.length;
if($scope.totalNumberEmployees === 0)
{
alert("All employees have been deleted.");
$scope.hideMessage = false;
} } else {
// alert("You pressed the Cancel button!");
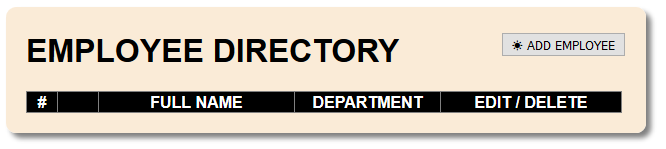
} }; - CHECK POINT: Save the file and preview it in a browser. Click the Delete button and the confirmation button until all of the rows in the table are deleted. You should see the message displayed in red after the Employees Total.

- Open the web developer tools and delete the Local Storage.
WHY: To restore the initial rows to the table with default values.
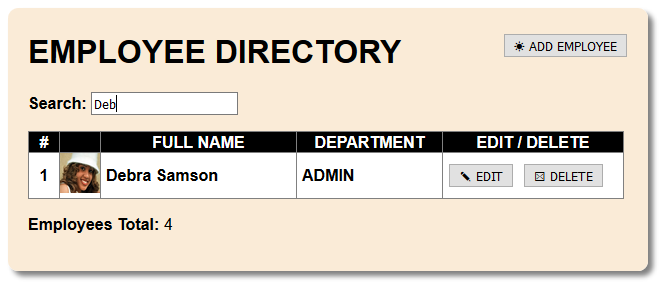
Add search feature
Another key feature of a CMS is the ability to be able to perform a search of records.
- Add the following code ABOVE the opening
<table>
tag but BELOW the closing
</form>
tag:
</form>
<p><strong>Search:</strong>
<input type="text"  data-ng-model="searchword" placeholder="Search by Name or Dept."></p>
<table border="1"> - Add the following highlighted filter in the SECOND
<tr>
tag:
<tr data-ng-repeat="employee in employeesJSON | filter:searchword track by $index ">
- CHECK POINT: Save the file and preview it in a browser. Type a name or department in the search field. You should see the list filtered to your input. Notice that the total number of employees does not change.
Update icon using Font Awesome
Currently, we are using regular character (e.g., x) or entities (e.g., ✎ for the edit icon) for the button icons. Here, we will enhance them with fonts from Font Awesome.
- Add the following
<link>
tag AFTER the existing link tag but BEFORE the closing
</head>
tag.
<!doctype html>
<html lang="en">
<head>
<meta charset="utf-8">
<meta name="viewport" content="width=device-width, initial-scale=1">
<title>e-Directory</title>
<link href="e-DirectoryCSS.css" rel="stylesheet" type="text/css">
<link rel="stylesheet" href="https://cdnjs.cloudflare.com/ajax/libs/font-awesome/4.7.0/css/font-awesome.min.css">
</head> - Replace all of the current icons with Font Awesome icons using the fa classes in a <span> tag in the
<h1>
tag and the
<form>
tag. Ensure there is a space between the closing
</span>
tag and the button label name (e.g., </span> ADD EMPLOYEE):
<h1>EMPLOYEE DIRECTORY<button data-ng-click="addEmployee('new')">
<span class="fa fa-user"></span> ADD EMPLOYEE</button></h1>
<form name="addEditForm" style="padding-bottom:20px" data-ng-submit="validateForm()" data-ng-hide="hideForm"
class="animate" data-ng-show="nav">
<h2 data-ng-show="hideTitle">ADD EMPLOYEE</h2>
<h2 data-ng-hide="hideTitle">EDIT EMPLOYEE</h2>
<div>
<img data-ng-model="image" alt="" class="thumbnail_image" src="e-DirectoryEmployees/{{image}}">
<p>
<label for="full_name">Name:</label><br/>
<input  data-ng-model="fullName" name="full_name" id="full_name" type="text" placeholder="Full Name">
</p>
<p>
<label for="department">Department:</label><br/>
<input data-ng-model="department" name="department" id="department" type="text" placeholder="Employee Dept.">
</p>
</div>
<button data-ng-click="saveEmployee()"><span class="fa fa-save"></span> SAVE</button>
<button data-ng-click="closeForm()"><span class="fa fa-undo"></span> CANCEL</button>
</form> - Replace all of the current icons with Font Awesome icons using the fa classes in a
<span>
tag in the
<table>
tag. Ensure there is a space between the closing
</span>
tag and the button label name (e.g., </span> ADD EMPLOYEE):
<table border="1">
<tr>
<th width="20">#</th>
<th width="30"> </th>
<th width="185">FULL NAME</th>
<th width="135">DEPARTMENT</th>
<th width="170">EDIT / DELETE</th>
</tr>
<tr data-ng-repeat="employee in employeesJSON | filter:searchword track by $index ">
<td style="text-align:center">{{$index+1}}</td>
<td class="row_image"><img alt="" height="40" width="40" src="images/{{employee.image}}"></td>
<td>{{employee.fullName}}</td>
<td>{{employee.department | uppercase}}</td>
<td>
<button data-ng-click="addEmployee(employee.id)"><span class="fa fa-edit"></span> EDIT</button>
<button data-ng-click="deleteEmployee($index)"><span class="fa fa-remove"></span> DELETE</button>
</td>
</tr>
</table> - CHECK POINT: Save the file and preview it in a browser. Click the ADD Employee button and then tab to . You should see the new icon displayed in the app:

- (OPTIONAL) Add the following highlighted CSS to the CSS style sheet below the Toggle Form classes:
WHY: To colorized the icons.
/* Toggle Form ---------------------- */
.animate {
-webkit-transition: all linear 0.25s;
-moz-transition: all linear 0.25s;
transition: all linear 0.5s;
}

.animate.ng-hide {
opacity:0;
height:0px;
}
form {
width: 555px;
height: 200px;
background-color:lightblue;
padding:20px;
}
/* Font Awesome ----------------------- */
.fa{color:red;} - CHECK POINT: Save the file and preview it in a browser. Click the ADD Employee button. You should see the new icon displayed in the app with a different color. You can the icons to whatever color you want. It was set to red so that you can see it better.
Validate Form
When dealing with form elements, it is important to validate form elements to ensure that that are filled in (required) and the correct information is entered.
- Add the following highlighted data-ng-submit directive to the opening <form> tag:
WHY: This directive will be used to call (invoke) the validateForm() method when the SAVE button is clicked.
<form data-ng-submit="validateForm()" name="addEditForm" style="padding-bottom:20px" data-ng-hide="hideForm"
class="animate" data-ng-show="nav">
CODE EXPLANATION:
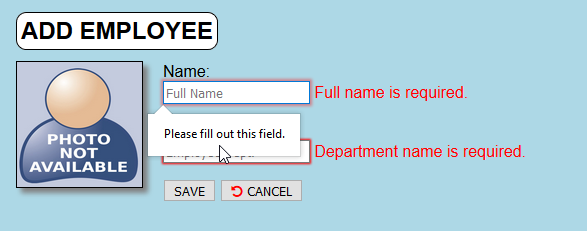
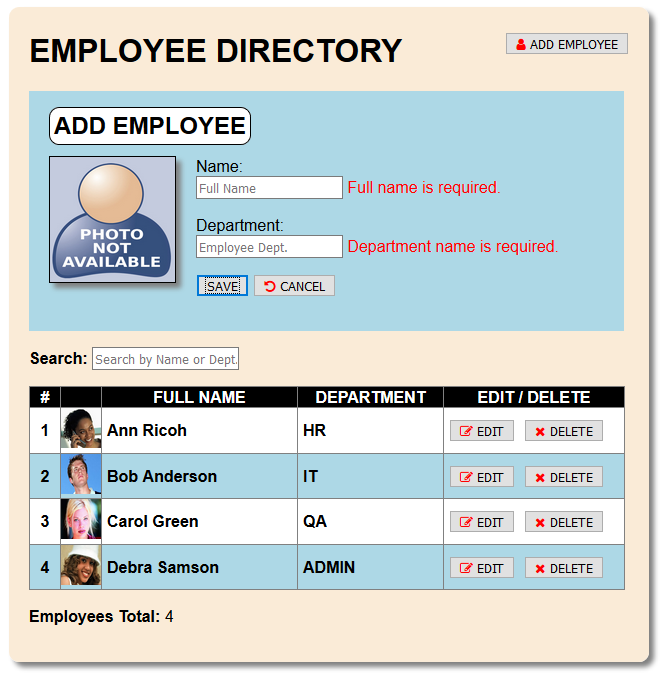
- The data-ng-submit="validateForm()" directive is used to submit the form when the SAVE button is pressed. - Add the following highlighted required attributes and <span> tags to the input tags for Name and Department:
<img data-ng-model="image" alt="" class="thumbnail_image" src="e-DirectoryEmployees/{{image}}">
<p>
<label for="full_name">Name:</label><br/>
<input data-ng-model="fullName" name="full_name" id="full_name"  type="text" placeholder="Full Name" required>
<span data-ng-show="addEditForm.full_name.$touched && addEditForm.full_name.$invalid" style="color:red">
Full name is required.</span>
</p>
<p>
<label for="department">Department:</label><br/>
<input data-ng-model="department" name="department" id="department" type="text" placeholder="Employee Dept."
required>
<span data-ng-show="addEditForm.department.$touched && addEditForm.department.$invalid" style="color:red">
Department name is required.</span>
</p> - Comment out or delete the
<button>
tag for the SAVE button and replace it with the highlighted
<input>
tag:
<!--  <button data-ng-click="saveEmployee()"><span class="fa fa-save"></span> SAVE</button>-->
<input type="submit" value="SAVE" />
CODE EXPLANATION:
- Notice that we replaced the button with an input field which is a self-closing tag so it does not have
an icon associated with it. - Add the following highlighted code
// DELETE EMPLOYEE FUNCTIONILITY ----------------------
$scope.deleteEmployee = function (x) {
// alert("Delete Employee");
$scope.message = "Are you sure you want to delete " + $scope.employeesJSON[x].fullName + "?";
var choose = confirm($scope.message);
if (choose === true) {
//alert("You pressed the OK button!");
// Remove from EmployeesJSON object
$scope.employeesJSON.splice(x, 1);
localStorage.setItem('employeeLS', JSON.stringify($scope.employeesJSON));
$scope.totalNumberEmployees = $scope.employeesJSON.length;
if($scope.totalNumberEmployees === 0){
alert("All employees have been deleted.");
$scope.hideMessage = false;
}

} else {
// alert("You pressed the Cancel button!");
}

};
// Validate form ------------------------------------
$scope.validateForm = function(){
alert("You have submitted the form");
$scope.saveEmployee();
};

// Leave this line blank so that you don't inadvertantly add code OUTSIDE of the cotroller code block.
}); // end of app.controller function - CHECK POINT: Save the file and preview it in a browser. Click the ADD Employee button and then tab key repeatedly to tab through the Name and Department input fields. You should see error messages stating that these fields are required.
Comment out the alert statement in the Validate Form code block:
// Validate form ------------------------------------
Click the SAVE button. You should see the tool-tip "Please fill out this field." Also, note that the data has not been submitted because the two fields were nfilled out.
$scope.validateForm = function(){
// alert("You have submitted the form");
$scope.saveEmployee();
}