Introduction
Any good Content Management System (CMS) will have five key functionalities.
The ability to:
- Add records to a data source
- View records from a data source
- Edit records in a data source
- Delete records from a data source
- Search records in a data source
SPECIAL NOTE: The generic term user will be used (e.g., deleteUser) instead of employee (e.g., deleteEmployee) in the main code to make the code reusable. For example, the term user can refer to employee, student, worker, etc. So if you wanted to make another app from this one, you would not have to update these refereneces since it is generic.
In this training module, we will implement these functionalities.
All the CRUD operations (view, add, edit, and delete) will be done on a single page app (SPA) and without page reload or refresh. The front end work is done with HTML, CSS, AngularJS, and jQuery. The back-end work is done with a PHP database using PDO (PHP Data Objects) extensions to help connect to the database and perform the select, insert, update, and delete operations.
CORNELIUS’ CONCISE CONDENSED CRUD GRID
|
C |
R |
U |
D |
|---|---|---|---|---|
CRUD Operations |
Create |
Read |
Update |
Delete |
App Functions |
Add |
View |
Edit |
Delete |
SQL Statements |
INSERT (INTO) |
SELECT (fetch) |
UPDATE |
DELETE |
All operations, functions, and statements deal with getting and setting records from a database. (e.g., create record, add record, insert record, etc.). Sometimes you see the acronym SCRUD where the “S” represents Search (e.g., search or filter a record or records from a database) |
||||
This triaining uses PDO instead of mysql_ * and mysqli_: Remember, PDO is the way to GO!!!
Except from https://forums.phpfreaks.com/

Switching from the old mysql_* functions to the new mysqli_* functions takes a lot more than adding an “i” everywhere.
Or adding connection arguments.You first have to unlearn plenty of wrong practices: Your code has SQL injection
vulnerabilities all over the place, and printing error messages on the screen isn't very smart either.

It gives attackers valuable information about your system, and it makes legitimate users think your website is fudged up.

Then you need to actually learn mysqli. The old extension represented the technology of the 90s, mysqli is a database
interface for the 21st century and often takes a very different approach. For example, passing data to queries is
now implemented with prepared statements, which provides much better protection against SQL injection attacks. mysqli
also supports exceptions to properly indicate errors.

Unfortunately, mysqli is fairly difficult to learn, especially when you don't like to read manuals. A much better
alternative is the PDO extension. Since you haven't invested any time into mysqli yet, now would be a great time to
jump straight to PDO.
SQL Injection
SQL injection (SQLi) refers to an injection attack wherein an attacker can execute arbitrary SQL statements by tricking a web application in processing an attacker’s input as part of an SQL statement. This post will focus on how to prevent SQL injection vulnerabilities within PHP applications and fix them.
CAUTION: SQLi should not be confused with my_sqli extensions.
SeePrevent SQL injection vulnerabilities in PHP applications and fix them for an excellent article and examples on SQL injection and a tool that you can use to check for vulnerbility.
Download Exercise Files
Before we get started we will download the necessary exercise files that we need to use in our project. This file contain the following assets:
- images - folder with images in it
- main.css - use to style the app.
- DB.php - this class file handles all the CRUD operations using PHP PDO extension and MySQL.
- action.php - this file handles the requests coming from the HTML page by AngularJS and DB class to help with database related operations. Based on the request, user data would be read, added, updated, deleted from the database. The code is executed based on its type:
- view: fetch the records from the database, records and status message returns as JSON format.
- add: insert the record in the database, inserted data and status message returns as JSON format.
- edit: update the record in the database, status message returns as JSON format.
- delete: delete the record from the database, status message returns as JSON format.
NOTE: The closing tag (?>) is omitted as preferred in files containing pure PHP code.
- Download the EmployeeDirectoryAngularJS.zip file and place it in the c:/xampp/htdocs folder.
- Right-click the zip file you downloaded, and then select Extract All... from the menu.
Create Database
It is best to start by creating a database with a few records in it before you create a database driven application or web site. To save time, we have a script for the database here.
- Open phpMyAdmin and click the New Database link in the left panel.
- Type employeedirectoryajs into the Create Database text field and then click the Create button.
- Select the database from the panel on the right.
- Click the Import tab, click the Browse... button and navigate to the test_database.sql in the EmployeeAngularJS folder in htdocs folder and in the File Upload dialog box that appears click the Open button.
- Click the OK button at the bottom of the Import screen.
- CHECK POINT: You should see the message "Import has been successfully finished, 13 queries executed. (test_database.sql)"
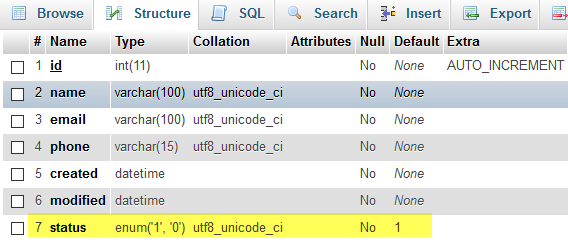
- For the selected table, click the Structure tab to review the column names and table structure. Note the status row with the enum('1','0') that will be used later to check the "status" of the database.
- Click the Browse tab to review the default records.

Setup Site and Testing Server
Now, let's set up both the site and the testing server.
- Open Dreamweaver and select Site > New Site.. from the menu.
- In the Site Setup dialog box that appears, add a Site Name (Employee Directory), click the folder icon next to the Local Site Folder text field, navigate to C:/xampp/htdocs/EmployeeDirectoryAngularJS and then click the Select Folder button.
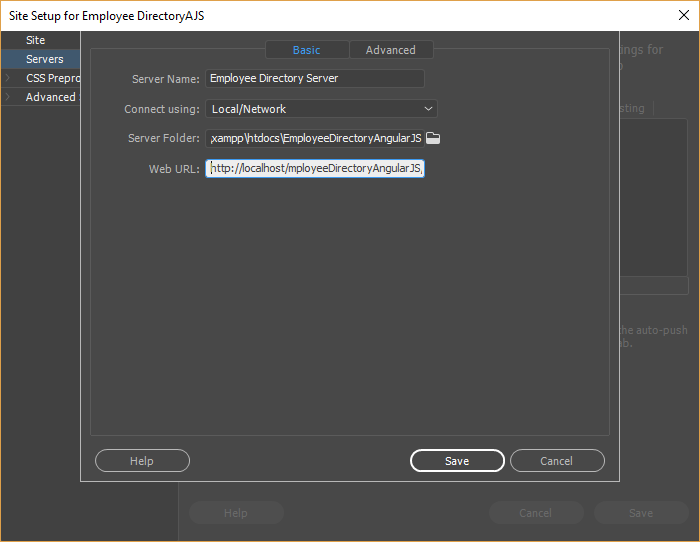
- In the left pane, click the Servers link and then click the Add new server (plus sign icon) and in the Site Setup dialog box that appears
- Server Name: Employee Directory Server
- Connect using: Local/Network
- Server Folder: c:/xampp\htdocs\EmployeeDirectoryAngularJS
- Web URL: http://localhost/EmployeeDirectoryAngularJS
- Click the Advanced tab and in the Server Model dialog box select PHP MySQL and then click the Save button
- Click the Testing Server radio button and then click the Save, OK and then the Done button.
- In the file panel, double-click on the DB.php file to open it.
- Change the $dbHost, $dbUsername, $dbPassword, and $dbName variables based on your database credentials that you used to create the table:
If you don't have any credential:
class DB {CAUTION: When you don't have any credential, you will see the following message at the bottom of the phpMyAdmin screen, "Your configuration file contains settings (root with no password) that correspond to the default MySQL privileged account. Your MySQL server is running with this default, is open to intrusion, and you really should fix this security hole by setting a password for user 'root'."
// Database credentials
private $dbHost = 'localhost';
private $dbUsername = 'root';
private $dbPassword = '';
private $dbName = 'employeedirectoryajs';
public $db;
OR (if you have credentials)
class DB {
// Database credentials
private $dbHost     = 'localhost';
private $dbUsername = 'CorneliusChopin';
private $dbPassword = 'admin';
private $dbName     = 'employeedirectoryajs';
public $db; - Save and close this file.
Create Static Content for Main Section
First, let’s create content that is needed for our application by creating the HTML framework and then adding the static view components.
Create HTML Framework
Let’s first create a blank framework and tweak it for mobile devices if necessary.
- Open Dreamweaver, select File > New… (or CTRL+N), and in the dialog box that appears:
- Ensure that the New Document option is selected
- Document Type is set to HTML
- Framework set to NONE
- Doc Type set to HTML5
- In the Title field, type Employee Directory
- Click the Create button
WHY: To create a blank HTML framework
- Select File > Save (or CTRL+S) and in the dialog box that appears navigate to where you want to save the file. In the File name text field, type a descriptive HTML name (index.html) and then click the Save button.
- If the app is intended to be viewed on a mobile device, add the following highlighted code:
<!doctype html>
<html lang="en">
<head>
<meta charset="utf-8">
<meta name="viewport" content="width=device-width, initial-scale=1">
<title>Employee Directory</title>
</head>
<body>
</body>
</html>
CODE EXPLANATION:
- The lang attribute is used to define the default language for the app.
- the viewport attribute is used to set the device width and scale.
Create Static View
Now that we have the basic HTML framework established, let’s add some static view components to it.
- In between the
<body>
tags, add the following THREE highlighted NESTED <div> tags with the BootStrap classes::
WHY: To create container, row, and panel for the BootStrap framework:
<body>
<div class="container">
   <div class="row">
       <div class="panel panel-default users-content">

       </div>
   </div>
</div>
</body>
CODE EXPLANATION:
- This container BootStrap class is used to "contain" any BootStrap related content.
- The row BootStrap class is used to create a "row" within the Bootstrap container
mentioned in the previous bullet. - The panel BootStrap is used to ...(REPLACE PANEL WITH CARD IN BOOTSTRAP 4) - In between the THIRD nested
div
(e.g. <div class="panel panel-default users-content">) add the following
<div>
and
<table>
tags, classes, attributes, and static placeholders.
<body>
<div class="container">
   <div class="row">
     <div class="panel panel-default users-content">

   <div class="panel-heading">EMPLOYEE DIRECTORY<a>ADD EMPLOYEE</a></div>

   <table border="1px" class="table table-striped">
      <tr>
        <th width="5%">#</th>
        <th width="20%">Name</th>
        <th width="30%">Email</th>
        <th width="20%">Phone</th>
        <th width="14%">Created</th>
        <th width="10%"></th>
      </tr>
      <tr>
         <td>index</td>
         <td>name</td>
         <td>email</td>
         <td>phone</td>
         <td>created</td>
         <td>
           <a>Edit</a>
           <a>Delete</a>
         </td>
       </tr>
     </table>

     </div>
   </div>
</div>
</body>
CODE EXPLANATION:
- The first <tr> tag holds static <td> text content.
- The second <tr> tag holds static placeholder content.
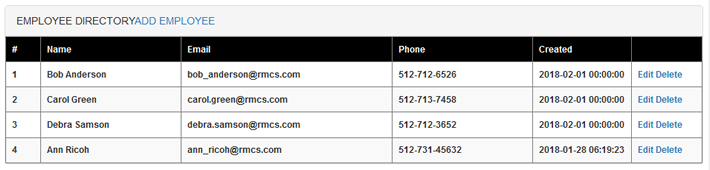
- CHECK POINT: Save the file and preview it in a browser. You should see static content for the the app header and the table displayed.

- Replace the first five static placeholders with the following highlighted dynamic placeholders within double curly braces.
TIP: Double-click each word and replace them with their dynamic counterpart.
<body>
<div class="container">
   <div class="row">
     <div class="panel panel-default users-content">

   <div class="panel-heading">EMPLOYEE DIRECTORY<a>ADD EMPLOYEE</a></div>

   <table border="1px" class="table table-striped">
      <tr>
        <th width="5%">#</th>
        <th width="20%">Name</th>
        <th width="30%">Email</th>
        <th width="20%">Phone</th>
        <th width="14%">Created</th>
        <th width="10%"></th>
      </tr>
      <tr>
         <td>{{$index+1}}</td>
         <td>{{user.name}}</td>
         <td>{{user.email}}</td>
         <td>{{user.phone}}</td>
         <td>{{user.created}}</td>
         <td>
           <a>Edit</a>
           <a>Delete</a>
         </td>
       </tr>
     </table>

     </div>
   </div>
</div>
</body>
CODE EXPLANATION:
- The $index+1 will be used to create the row number from an array later.
- Remember, an array is zero-based indexed so a "+1" is added to start the first row number as 1. - Save the file and preview it in a browser. You should see that the static placeholders have been replaced by dynamic placeholders:""

Implement Framework and CSS
Now let's implement the necessary frameworks and CSS file to "style" our application.
Implement jQuery and BootStrap
Now that we have a header and table established, let's add some BootStrap CSS goodness
WHY: To make the HTML page, header, and table look more appealing.
- Add the following CSS
<link>
and
<script>
tags BELOW the
<title>
tag:
WHY: To implement the remote jQuery and BootStrap frameworks:
<title>Employee Directory</title>
<!-- Bootstrap CSS ----------------->
<link href="https://maxcdn.bootstrapcdn.com/bootstrap/3.3.5/css/bootstrap.min.css" rel="stylesheet">
<!-- jQuery and Bootstrap frameworks ----------------->
<script src="https://ajax.googleapis.com/ajax/libs/jquery/2.2.4/jquery.min.js"></script>
<script src="https://maxcdn.bootstrapcdn.com/bootstrap/3.3.5/js/bootstrap.min.js"></script> - CHECK POINT: Save the file and preview it in a browser. You should see the page elements now styled.

Add CSS
Let's add some standard CSS styles:- Open the CSS Designer Panel and click the plus (+) icon and select Attach Existing CSS File from the drop-down menu.
- In the Attach Existing CSS File dialog box that appears, click the Browser button and in the Select Style Sheet dialog box that appears, navigate to the new css folder, select the main.css file, and then click the OK button.
- CHECKPOINT: You should see the new CSS file added below the existing
<link>
tag in the
<head>
tag. You should also see the table and text changed.

Add AngularJS Framework
Now that we have some HTML to work with, let's add the AngularJS framework to create an app. The following functions are used to handle the CRUD operations:
- $scope.getRecords: send a request to the action.php file and store the response data into $scope.users.
- $scope.saveUser: send user data to the action.php file and insert or update the database data. When updated, the data is stored in the respective index of $scope.users. When inserted, the inserted data is pushed to $scope.users. Once the operation is completed, the form data is reset and the status message is shown.
- $scope.addUser: called with "add" request.
- $scope.editUser: User data is stored in $scope.tempUserData, $scope.index is defined and the form is shown.
- $scope.updateUser: $scope.saveUser is called with "edit" request.
- $scope.deleteUser: send request to the action.php file for delete database data. Based on the response, user data is removed from the user list and status message is shown.
- $scope.messageSuccess: Displays the success message.
- $scope.messageError: Displays the error message.
- Add the comments and scripts ABOVE the closing
</head>
tag:
<!-- AngularJS framework ------------------------------>
<script src="https://ajax.googleapis.com/ajax/libs/angularjs/1.5.7/angular.min.js"></script>
<!-- php and js files use for app  ------------>
<script src="app.js"></script>
<script src="action.php"></script>
</head>
CODE EXPLANATION: - The action.php needs to be updated if you are creating a different app. The only lines you need to
add or change corresponds to the columns from the database. See example below:
$userData = array(
'name' => $_POST['data']['name'],
'email' => $_POST['data']['email'],
'phone' => $_POST['data']['phone']
CAUTION: DO NOT include a comma at the end of the LAST data property.
EX: 'phone' => $_POST['data']['phone'],
CAUTION: The newer version of AngularJS framework (version 1.6.4 or higher) will
not work with this app. This will be fixed later. - Add the following highlighted data-ng- directives to the
<body>
and
<div>
tag below:
WHY: To provide "hooks" to associate them tags with the application code create in the next step.
<body data-ng-app="employeeDirectoryApp">
<div class="container" data-ng-controller="employeeDirectoryCtrl">
    <div class="row">
CODE EXPLANTION:
- The two directives are used to provide "hooks" the AngularJS framework
to make these tags behave like an app and a controller, respectively. - Create a new JavaScript file name app.js and save it in the same folder as the rest of the application.
- Add the following highlighted code in the app.js file and add blank spaces as shown:
// AngularJS module ------------------------------
var app = angular.module('employeeDirectoryApp',[]);
// AngularJS controller --------------------------
app.controller('employeeDirectoryCtrl', function($scope) {
"use strict";
$scope.message = "Hello World";


}); // End of controller code block
- Add the following highlighted expression BELOW the following
<div>
tag:
WHY: To test to see if the app is working correctly before we add real code.
<div class="container" data-ng-controller="employeeDirectoryCtrl">
    {{message}}
- CHECK POINT: Save the file and preview it in a browser. You should see the message "Hello World" displayed at the top of the page.
Create Master View (Table)
Now that we know that our app is working, let's create the Master View so that we can "see" data from the database get populated in the table.
- Add the following highlighted data-ng-init directive to the
<div>
tag BELOW the
<body>
tag:
<body data-ng-app="employeeDirectoryApp">
<div class="container" data-ng-controller="employeeDirectoryCtrl" data-ng-init="getRecords()">
CODE EXPLANATION:
- When the page is first loaded, the getRecords() function defined by ng-init is initialized
which will fetch the records from the database.
- Add the data-ng-repeat directive to the SECOND
opening <tr>
tag:
<tr data-ng-repeat="user in users | orderBy:'-created'">
<td>{{$index +1}}</td>
<td>{{user.name}}</td>
<td>{{user.email}}</td>
<td>{{user.phone}}</td>
<td>{{user.created}}</td>
<td>
<a>Edit</a>
<a>Delete</a>
</td>
</tr>
CODE EXPLANATION:
- The AngularJS data-ng-repeat directive loops through the JSON object and create rows for
the table dynamically.
- The "user in users" is used to loop through the users array.
- The "| orderBy: " is an AngularJS filter that will sort the record by date created. There is
a created column in the employeedirectoryajs database.
- Delete the initial scope ($scope.message = "Hello World";) and replace it with the following highlighted code:
WHY: To create a blank array and object that will be populated later and then create the getRecords() method to retrieve records from the database.
// AngularJS module ------------------------------
var app = angular.module('employeeDirectoryApp',[]);
// AngularJS controller --------------------------
app.controller('employeeDirectoryCtrl', function($scope, $http) {
"use strict";

$scope.users = [];
$scope.tempUserData = {};
// function to get records from the database
$scope.getRecords = function(){
        $http.get('action.php', {
            params:{
                'type':'view'
            }
        }).success(function(response){
            if(response.status === 'OK'){
                $scope.users = response.records;
            }
        });
    };


}); // End of controller code block
CODE EXPLANATION:
- The $scope.users = [] represents an empty array.
- The $scope.tempUserData = {} representes an empty object - The getRecord() method is used to get (retrieve) the action.php file and if successful create the users array of objects.
- CHECK POINT: Save the file and preview it in a browser. You should see the table gets populated with data from the database.
Create Detail View (Form)
Now that we see a list of default records from the database in the table, let's see how we can add additional functionality to Add, Update, and Delete records from the database.
Create Static Form Elements
Let's create the form that is needed to add and update records from the database.
- Add the following highlighted code ABOVE the opening
<table>
tag.
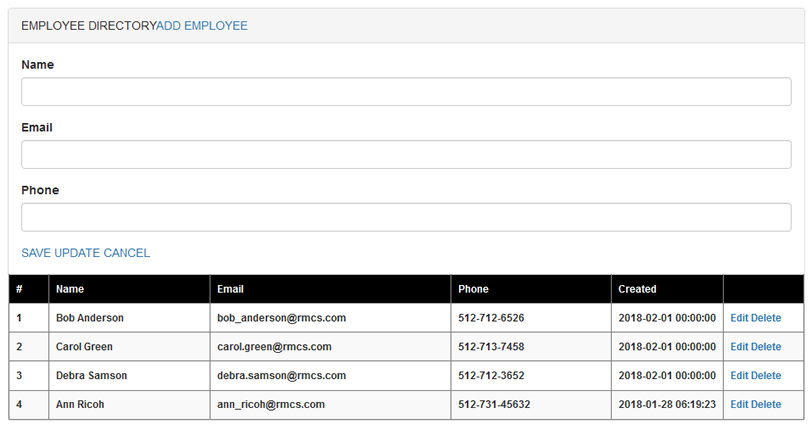
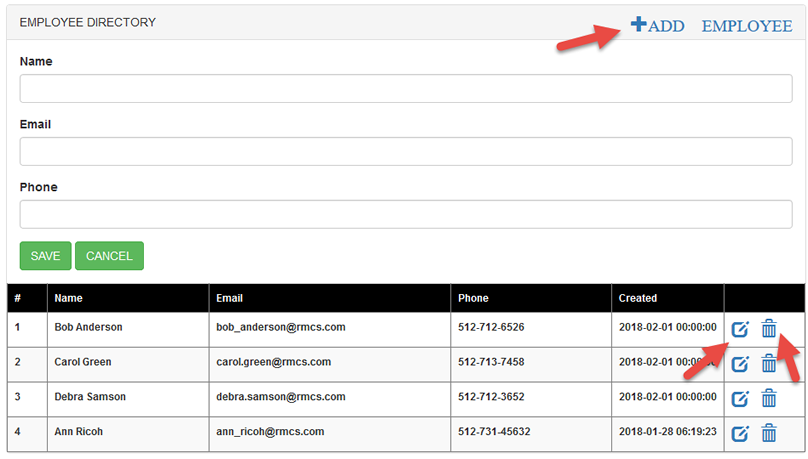
<div class="panel-body formData"> <form class="form" name="userForm"> <div class="form-group"> <label for="name">Name</label> <input type="text" class="form-control" name="name"/> </div> <div class="form-group"> <label for="email">Email</label> <input type="text" class="form-control" name="email"/> </div> <div class="form-group"> <label for="phone">Phone</label> <input type="text" class="form-control" name="phone"/> </div> <a>SAVE</a> <a>UPDATE</a> <a>CANCEL</a> </form> </div> <table> - CHECK POINT: Save the file and preview it in a browser. You should see the form being displayed above the table.
- Add the following data-ng-model directives to each of the form's input fields:
<div class="panel-body formData">
<form class="form" name="userForm">
   <div class="form-group">
      <label for="name">Name</label>
      <input type="text" class="form-control" name="name" data-ng-model="tempUserData.name"/>
   </div>
   <div class="form-group">
     <label for="email">Email</label>
     <input type="text" class="form-control" name="email" data-ng-model="tempUserData.email"/>
   </div>
   <div class="form-group">
      <label for="phone">Phone</label>
      <input type="text" class="form-control" name="phone" data-ng-model="tempUserData.phone"/>
   </div>
<a>SAVE</a>
<a>UPDATE</a>
<a>CANCEL</a>
</form>
</div>
<table>
CODE EXPLANATION:
- The data-ng-model directives are used to "bind" the value IN each of the <input> fields with the application data with the same name.
Style and Program Buttons
Now let's add some classes, directives and JavaScript to each of the buttons:
- Add the following classes, directives, and JavaScript code to each of the button in the <form> tag:
<div class="panel-body formData">
<form class="form" name="userForm">
   <div class="form-group">
      <label for="name">Name</label>
      <input type="text" class="form-control" name="name" data-ng-model="tempUserData.name"/>
   </div>
   <div class="form-group">
     <label for="email">Email</label>
     <input type="text" class="form-control" name="email" data-ng-model="tempUserData.email"/>
   </div>
   <div class="form-group">
      <label for="phone">Phone</label>
      <input type="text" class="form-control" name="phone" data-ng-model="tempUserData.phone"/>
   </div>
<a href="javascript:void(0);" class="btn btn-success" data-ng-hide="tempUserData.id" data-ng-click="addUser()">SAVE</a>
<a href="javascript:void(0);" class="btn btn-success" data-ng-hide="!tempUserData.id" data-ng-click="updateUser()">UPDATE</a>
<a href="javascript:void(0);" class="btn btn-success" onclick="$('.formData').slideUp();">CANCEL</a>
</form>
</div>
<table>
CODE EXPLANATION:
- While it is not best practice to embed JavaScript code in an HTML tag (e.g., onclick="$('.formData').slideUp();"),
  for simply animation this is not much of an issue.
- Since the button is not use for its intended purpose (to go to another page), the javascript:void(0) method is used to suppress its functionality.
- The data-ng-hide directives are used to show the SAVE button and hide the UPDATE button. Notice the NOT operation (e.g., !tempUserData.id)
- The data-ng-click directives are event handlers. Their code will be written later for each of these buttons click events. - CHECK POINT: Save the file and preview it in a browser. You should see the SAVE and CANCEL buttons displayed. However, the UPDATE button is hidden. If you click the CANCEL button the form will animate close because of the in-line JavaScript code written in the CANCEL button (e.g., onclick="$('.formData').slideUp();").

- Add the following classes, directives, and JavaScript code to each button in the
<body>
and
<table>
tag:
<body>
<div class="container">
   <div class="row">
     <div class="panel panel-default users-content">

   <div class="panel-heading">EMPLOYEE DIRECTORY
    <a href="javascript:void(0);" class="glyphicon glyphicon-plus" onclick="$('.formData').slideToggle();">ADD EMPLOYEE</a></div>

   <table border="1px" class="table table-striped">
      <tr>
        <th width="5%">#</th>
        <th width="20%">Name</th>
        <th width="30%">Email</th>
        <th width="20%">Phone</th>
        <th width="14%">Created</th>
        <th width="10%"></th>
      </tr>
      <tr>
         <td>{{$index +1}}</td>
         <td>{{user.name}}</td>
         <td>{{user.email}}</td>
         <td>{{user.phone}}</td>
         <td>{{user.created}}</td>
         <td>
            <a href="javascript:void(0);" class="glyphicon glyphicon-edit" data-ng-click="editUser(user)"></a>
            <a href="javascript:void(0);" class="glyphicon glyphicon-trash" data-ng-click="deleteUser(user)"></a>
         </td>
       </tr>
     </table>

     </div>
   </div>
</div>
</body>
CODE EXPLANATION:
- The class="glyphicon glyphicon-edit" and class="glyphicon glyphicon-trash" are a set of BootStrap classes used
  to define the edit and delete icons.
- The data-ng-click directives will be used to create functions with the same name in code for the click events of these buttons.
- The glyphicons have been depreciated in BootStrap 4. Framework and code will be updated later. - CHECK POINT: Save the file and preview it in a browser. You should see the ADD EMPLOYEE button moved to the right and now has a plus icon. You should also see the EDIT and DELETE icons displayed. Moreover, if you click the ADD EMPLOYEE button repeatedly, it will open and close the form because of the jQuery slideToggle() method.
Show / Hide Form
Currently, if you click the CANCEL button, the form will slide up so that it will be hidden or if you click the ADD EMPLOYEE button it will slide up or down as well.
We want the form to be hidden when the app initially opens.
- Add the following class to the
<div>
tag ABOVE the opening
<form>
tag:
<div class="panel-body none formData">
<form class="form" name="userForm">
CAUTION: Be careful to place the class on the <div> tag and NOT the <form> tag.
- CHECK POINT: Save the file and preview it in a browser. You should see that the form is now hidden when opened because of the CSS rule in the main.css file (e.g., .none{display:none;).
Save/Update Buttons Helper Function
Before we create the add, edit, and delete functionalities, we need to create a "helper" function to assist us with these operations.
- Add the following code ABOVE the closing controller code block.
// function to insert or update user data to the database
$scope.saveUser = function(type){
    var data = $.param({'data':$scope.tempUserData,'type':type});
    var config = {headers:{'Content-Type': 'application/x-www-form-urlencoded;charset=utf-8;'}};
    $http.post("action.php", data, config).success(function(response){
      if(response.status === 'OK'){
         if(type === 'edit'){
            $scope.users[$scope.index].id = $scope.tempUserData.id;
            $scope.users[$scope.index].name = $scope.tempUserData.name;
            $scope.users[$scope.index].email = $scope.tempUserData.email;
            $scope.users[$scope.index].phone = $scope.tempUserData.phone;
            $scope.users[$scope.index].created = $scope.tempUserData.created;
        }else{
             $scope.users.push({
               id:response.data.id,
               name:response.data.name,
               email:response.data.email,
               phone:response.data.phone,
               created:response.data.created
                });
              }

             $scope.userForm.$setPristine();
             $scope.tempUserData = {};
             $('.formData').slideUp();
             $scope.messageSuccess(response.msg);
           }else{
              $scope.messageError(response.msg);
                 }
           });
      };

}); // End of controller code block
CODE EXPLANATION:
- The saveUser() method is used to pass the data and config arguments along with action.php into the $http.post() method.
- If the type is edit, prepopulate the users array. Othewise (else statement), push (save) the data into the users array.
- The $setPristine() method is used to make the input fields in the form as they were never touched and then have the
form slide up and show the success message. Otherwise (else statement), display error message.
Save Button Functionality
Now that we can view employees data from the database, let's see how we can add an employee to the database.
- Add the following code ABOVE the closing controller code block.
// function to add user data
$scope.addUser = function(){
   $scope.saveUser('add');
};

}); // End of controller code block
CODE EXPLANATION:
- When a user click on the ADD EMPLOYEE button, it will invoke the addUser() method which in turn
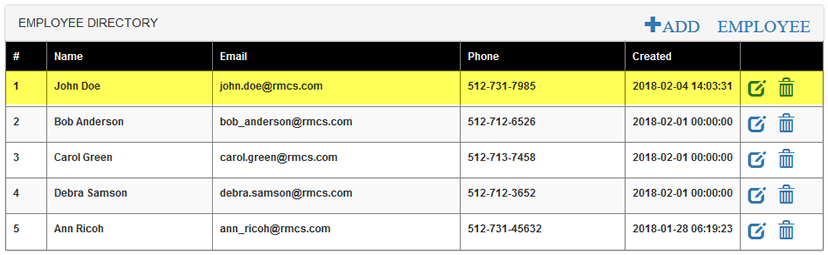
invoke the saveUser() method. - CHECK POINT: Save the file and preview it in a browser. Click the ADD EMPLOYEE button, enter information in the all text input fields, and then press the SAVE button. You should see the information get placed as a row in the table and then the form closes.
Edit Functionality
- Add the following code ABOVE the closing controller code block.
// function to edit user data
$scope.editUser = function(user){
   $scope.tempUserData = {
      id:user.id,
      name:user.name,
      email:user.email,
      phone:user.phone,
      created:user.created
 };
$scope.index = $scope.users.indexOf(user);
$('.formData').slideDown();
};

}); // End of controller code block
CODE EXPLANATION:
- The editUser() method is used to populate the tempUserData with property/value pairs. - CHECK POINT: Save the file and preview it in a browser. Click the EDIT button. You should sed that the form is displayed and ALL of the form fields are PRE-POPULATED from data from the database based on the selected row.
Update Button Functionality
- Add the following code ABOVE the closing controller code block.
// function to update user data
$scope.updateUser = function(){
   $scope.saveUser('edit');
};

}); // End of controller code block
CODE EXPLANATION:
- Like the addUser() method, when a user click on the UPDATE EMPLOYEE button, it will invoke the updateUser() method which in turn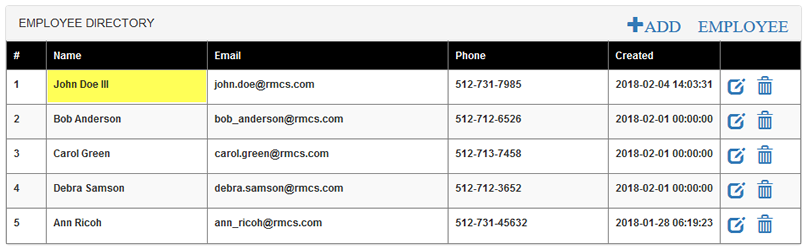
invoke the saveUser() method. - Save the file and preview it in a browser. Click one of the EDIT icon and you should see the form animate open. Then make a change to one of the input text field and then click the UPDATE button. You should see the data get updated in the table and then the form closes.
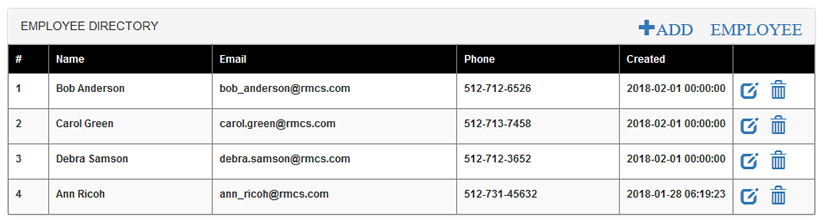
Before UPDATE button is clicked:

After UPDATE button is clicked:
Delete Functionality
- Add the following code ABOVE the closing controller code block.
// function to delete user data from the database
$scope.deleteUser = function(user){
   var conf = confirm('Are you sure you want to delete this employee?');
   if(conf === true){
      var data = $.param({'id': user.id,'type':'delete'});
      var config = {headers : {'Content-Type': 'application/x-www-form-urlencoded;charset=utf-8;'}};
      $http.post("action.php",data,config).success(function(response){
          if(response.status === 'OK'){
             var index = $scope.users.indexOf(user);
             $scope.users.splice(index,1);
             $scope.messageSuccess(response.msg);
           }else{
             $scope.messageError(response.msg);
                 }
             });
          }
  };

}); // End of controller code block
CODE EXPLANATION:
- The confirm() method is assigned to the message variable so that it can be used in the "if"
  statement to determine if the OK or the Cancel button has been pressed. If the OK button is
  pressed, it will return  true and the first part  of the "if" statement will be executed.
  If the Cancel button is pressed, it will return false and the second part of the "if" statement
  (the else statement) will be executed.
- The conf variable is created so that it can be passed into the confirm() method. The message
  could have been written inside of the confirm dialog box but it is best practice to create a
  variable for a long statement and then use that variable as an argument to make the code easier
  to read and update.
- The (conf === true) conditional statement could have been written simply as (conf)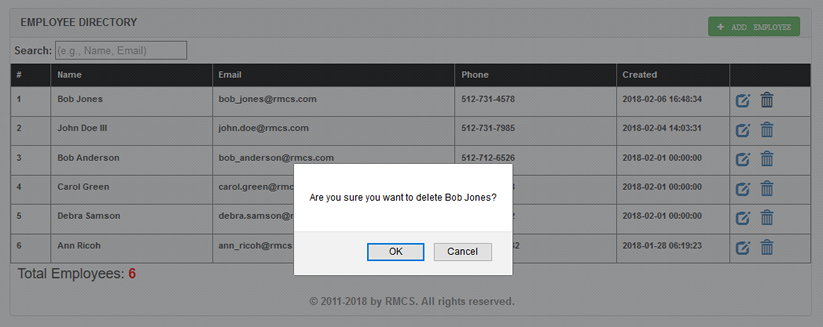
because it default to true. - Save the file and preview it in a browser. Click one of the DELETE icon. You will be presented with a confirmation dialog box with an option to click the Cancel button to abort the request or click the OK button to commit to the deletion. If you click the OK button, you should see that record get deleted from the table.
Before DELETE button is clicked:
After DELETE button is clicked:
Create Result Messages
While optional, we will create the functionality to display a message if the result of a given operation was successful or not.
- Add the following highlighted two "empty"
<div>
tags ABOVE the
<div>
and
<form>
tag:
<div class="alert alert-danger none"><p></p></div>
<div class="alert alert-success none"><p></p></div>
<div class="panel-body none formData">
<form class="form" name="userForm">
CODE EXPLANATION:
- There are empty <p> tags nested inside of the <div> tags that will be used by the CSS
  for to target them from the code (e.g., $('.alert-success > p').html(msg);)
- The class alert-danger (red) will be used for the error message background color
- The class alert-success (green) will be used for the success message background color
- The none class is used to hide both of the <div> tags when the app first load. - Add the following code ABOVE the closing controller code block.
// function to display success message
$scope.messageSuccess = function(msg){
    $('.alert-success > p').html(msg);
    $('.alert-success').show();
    $('.alert-success').delay(2000).slideUp(function(){
    $('.alert-success > p').html('');
     });
};

// function to display error message
$scope.messageError = function(msg){
    $('.alert-danger > p').html(msg);
    $('.alert-danger').show();
    $('.alert-danger').delay(2000).slideUp(function(){
    $('.alert-danger > p').html('');
      });
};

}); // End of controller code block
CODE EXPLANATION:
- Both of these functions (messageSuccess and messageError) works basically the same.
- However, the success function target the div tag with an alert attribute of success and a child <p> tag.
- Whereas, the error function target the div tag with an alert attribute of danger and a child <p> tag.
- The div tag is delayed for two seconds before it slideUp and the HTML content is set to an empty string (""). - Save the file and preview it in a browser. Test the app:
- Click the ADD EMPLOYEE button and then click the SAVE button without entering anything.
- You should see the error message, "Some problem occurred, please try again." and then it fades away - Click the ADD EMPLOYEE button and then fill out the form and click the SAVE button.
- You should see the message, "User data has been added successfully." and then it fades away - Click one of the DELETE icon and then click the OK button.
- You should see the message, "User data has been deleted successfully." and then it fades away.
- Click the ADD EMPLOYEE button and then click the SAVE button without entering anything.
Add Search Feature
Another key feature of a CMS is the ability to be able to perform a search of records. While we could perform a database search, we will use AngularJS to perform a search with a AngularJS filter instead:
- Add the following code ABOVE the opening
<table>
tag but BELOW the closing
</form>
tag:
<p style="margin:5px"><strong>Search:</strong>
<input type="text"  data-ng-model="searchword" placeholder="(e.g., Name, Email)"></p>
<table border="1px" class="table table-striped"> - Add the following highlighted filter in the SECOND
<tr>
tag:
<tr data-ng-repeat="user in users | orderBy:'-created' | filter:searchword track by $index">
- CHECK POINT: Save the file and preview it in a browser. Type a search (e.g., name) in the search field. You should see the list filtered to your input.
Enhancements
While the app is basically complete, there are some things that we can do to enhance it both aesthetically and functionally.
These enhancements are optional and you can add them as you see fit:
- Add personalized delete confirmation message
- Style Add Employee Button
- Add Dynamic Copyright Notice
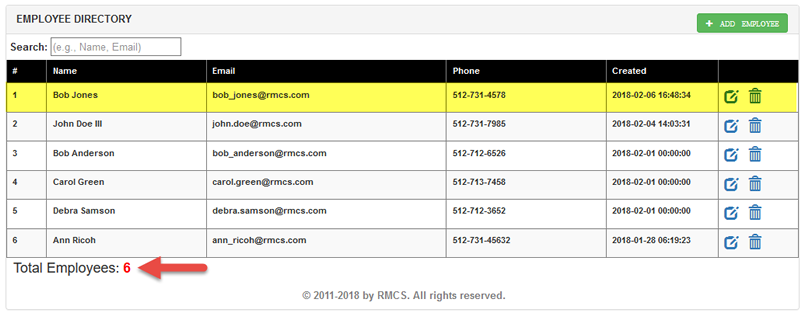
- Add total number of employees
- Style Panel and Table
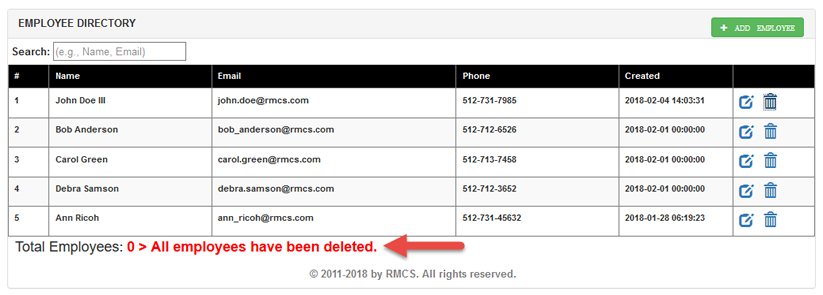
- Add “All employees have been deleted.” message
- Add validation
- Add thumbnails
- Add combo box
- Add upload ability
- Add pagination
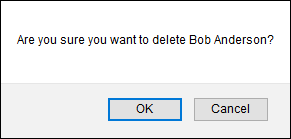
Personalize Delete Dialog
Currently the Delete function works; however, we will improve on it by adding a personalized delete message.
- Modify the delete function with the highlighted code:
// function to delete user data from the database
$scope.deleteUser = function(user){
var employee_name = $scope.users[$scope.users.indexOf(user)].name;
var conf = confirm('Are you sure you want to delete ' + employee_name + '?'); - CHECK POINT: Save the file and preview it in a browser and then click the DELETE button on one of the rows. You should see the "Are you sure you want to delete [EMPLOYEE NAME]?" personalized message displayed in a CONFIRMATION dialog box. Click the OK button and you should see that row deleted from the table. If you click the Cancel button, nothing will happen except the dialog box will close.
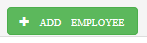
Style Add Employee Button
Let's give the ADD EMPLOYEE button a little more style.
- Add the following highlighted BootStrap class to the ADD EMPLOYEE
<a>
tag:
<div class="row">
<div class="panel panel-default users-content">
<div class="panel-heading">EMPLOYEE DIRECTORY<a  href="javascript:void(0);" class="btn btn-success
glyphicon glyphicon-plus" onclick="$('.formData').slideToggle();"> ADD EMPLOYEE</a></div> - Add the following CSS style to the main.css file:
.glyphicon-plus{float: right; font-size:10px;}
- CHECK POINT: Save the file and preview it in a browser. You should see that the ADD EMPLOYEE button has been styled.
Add Dynamic Copyright
Currently, the app is done with an HTML page (e.g., index.html). It is important to note that ALL of the PHP script is done in other pure PHP pages (e.g., DB.php and action.php) so it was not necessary to have the app created with a *.php extension since there were NO PHP script on THIS page. However, we would like to do a simply PHP script to create a dynamic copyright notice so we will have to convert this page to a *.php page.
- Save the index.html page as index.php.
- Add the following HTML and PHP code below the closing
</table>
tag:
</table>
<p class="copyright"><strong>© 2011-<?php echo (date('Y')); ?> by RMCS. All rights reserved.</strong></p>CODE EXPLANATION:
- The PHP script (e.g., <?php echo (date('Y')); ?>) is EMBEDDED within a HTML tag.
- The PHP date('Y') method is used to return the current year. - Add the following CSS at the bottom of the main.css file:
/* Copyright Notice -------------------------- */
.copyright {
padding-top:5px;
padding-left:5px;
text-align:center;
color:gray;
} - CHECK POINT: Save the file and preview it in a browser. You should NOT see the dynamic copyright notice at the bottom of the app. This is because the current page is an HTML page instead of a PHP page.
NOTE: So far we have not used any PHP script so we could get by with saving the page as an HTML page. However, the minute you add a PHP script, you will have to save the page as a PHP page.
- Save the file as index.php (instead of index.html).
- CHECK POINT: Notice the PHP code in the code view is now highlighted in Dreamweaver in several colors to denote that the code is recognized as PHP.
- CHECK POINT: Save the file and preview it in a browser. You should see the dynamic copyright notice at the bottom of the app. When a new year occurs, it will automatically update to the new year.

- In the File panel, delete the index.html file.
WHY: It is no longer needed and you don't want to open it up inadvertently later to do the other enhancements.
Add Employees Total
Now, let's write some HTML, CSS and JavaScript to keep track of how many employees are listed in the table. We'll write some code to update the total number of employees when:
- the app loads
- an employee is added
- an employee is deleted
NOTE: There is not change when edited because NO record is added or deleted only changed.
- Add the following highlighted code at the BOTTOM of the closing
</table>
tag:
</table>
<p class="totalEmployees">Total Employees: {{totalUsers}}</p>
<p class="copyright"><strong>© 2011-<?php echo (date('Y')); ?> by RMCS. All rights reserved.</strong></p> - Add the following CSS to the BOTTOM of the main.css file:
/* Employee Total -------------------------- */
.totalEmployees {margin-left: 10px; font-size: 20px;}
.totalEmployees span {font-weight:bold; color:red;} - Add the following highlighted variable at the TOP of the controller code:
$scope.users = [];
$scope.tempUserData = {};
$scope.totalUsers = 0;
CODE EXPLANATION:
- The $scope.totalUsers variable is created OUTSIDE of the method (function) that we will use it in
to make is GLOBAL. If you add it just to the function, it will be LOCAL to that function. By creating
it outside of the function allow it to be used repeatably later. - Add the following highlighted code to the getRecords() method INSIDE the success() method AND INSIDE of the "if" statement:
// function to get records from the database
$scope.getRecords = function(){
$http.get('action.php', {
params:{
'type':'view'
}
}).success(function(response){
if(response.status === 'OK'){
$scope.users = response.records;
$scope.totalUsers = $scope.users.length;
}
});
};
CODE EXPLANATION:
- The $scope.totalUsers variable was added within the getRecords() method to get the
total number of employees when the app first loads. - CHECK POINT: Save the file and preview it in a browser. You should see the message Total Employee [X] when the app first load. X is the total number of employees.
- Add the following highlighted code within the ELSE part of the saveUser() method:
else{
$scope.users.push({
id:response.data.id,
name:response.data.name,
email:response.data.email,
phone:response.data.phone,
created:response.data.created
});
$scope.totalUsers = $scope.users.length;
}
CODE EXPLANATION:
- The $scope.totalUsers variable was added within the saveUser() method to UPDATE the
total number of employees when an employee is ADDED. - CHECK POINT: Save the file and preview it in a browser. Add another employee by clicking the ADD EMPLOYEE button, fill out the input fields, and then click the SAVE button. You should see that the Total Employees value gets updated accordingly.
BEFORE clicking the SAVE button:
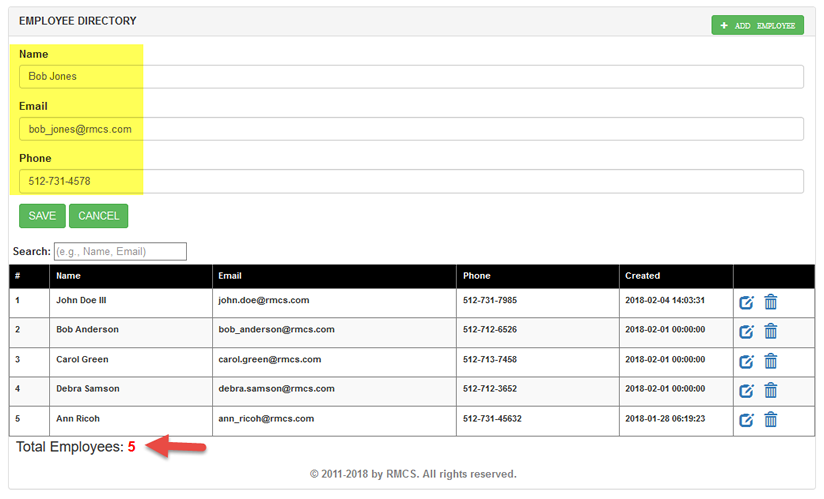
AFTER clicking the SAVE button:
- Add the following highlighted code within the IF part of the deleteUser() method:
if(response.status === 'OK'){
var index = $scope.users.indexOf(user);
$scope.users.splice(index,1);
$scope.messageSuccess(response.msg);
$scope.totalUsers = $scope.users.length;
}else{
$scope.messageError(response.msg);
}
});
}
CODE EXPLANATION:
- The $scope.totalUsers variable was added within the deleteUser() method to UPDATE the
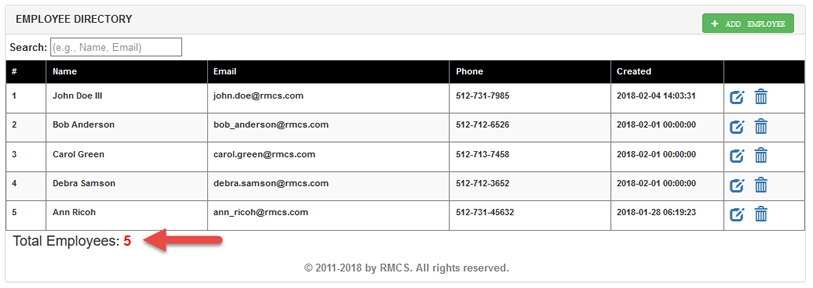
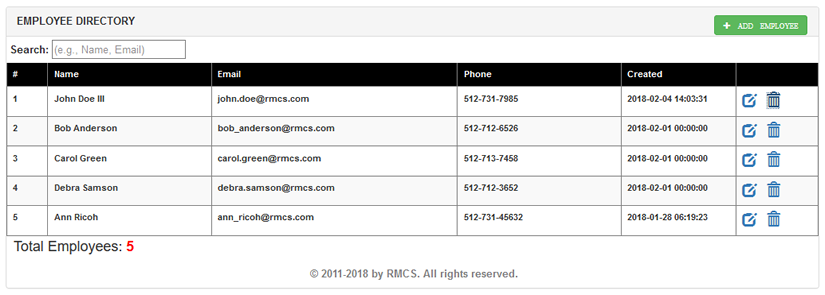
total number of employees when an employee is DELETED. - CHECK POINT: Save the file and preview it in a browser. Delete an existing employee by clicking the DELETE EMPLOYEE icon, and then click the OK button. You should see that the Total Employees value gets updated accordingly.
BEFORE clicking the DELETE and the OK button:
AFTER clicking the DELETE button:
No Record Found
Let's add some code to display another message if ALL of the employees are deleted from the table.
- Add the following
<span>
tag INSIDE the
<p>
tag below the closing
</table>
and copyright notice tag:
</table>
<p><strong>Employees Total:</strong> {{totalNumberEmployees}}
<span style="color:red; font-weight: bold" data-ng-hide="hideMessage">
> All employees have been deleted.</span></p>
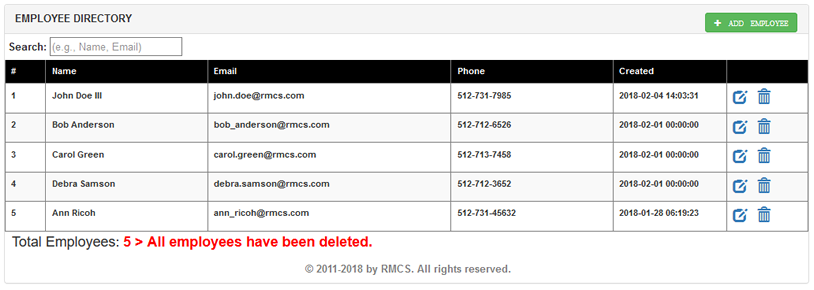
<p class="copyright"><strong>© 2011-<?php echo (date('Y')); ?> by RMCS. All rights reserved.</strong></p> - CHECK POINT: Save the file and preview it in a browser. You should see the message displayed in red after the Employees Total.
- Add the following highlighted variable below the other variables:
$scope.users = [];
$scope.tempUserData = {};
$scope.totalUsers = 0;
$scope.hideMessage = true; - CHECK POINT: Save the file and preview it in a browser. You should see the RED message is HIDDEN after the Employees Total.
- Write the following variable and "if" statement INSIDE of the "if" statement of the deleteUser function:
if(response.status === 'OK'){
  var index = $scope.users.indexOf(user);
  $scope.users.splice(index,1);
  $scope.messageSuccess(response.msg);
	$scope.totalUsers = $scope.users.length;
  $scope.totalUsers = 0; // TEST ONLY, DELETE AFTERWARD
	if($scope.totalUsers === 0)
     {
       $scope.hideMessage = false;
     }
  }else{
CODE EXPLANATION:
- The $scope.totalUsers = 0; statement was added to test the "if" statement without having to delete
ALL of the employees in the current table. - CHECK POINT: Save the file and preview it in a browser. Click the ADD EMPLOYEE button, fill out three form fields and then click the SAVE button.. Click the Delete icon for the newly created employeed and then click the OK button. You should see the message displayed in red after the Employees Total.
NOTE: You will only see this message after you delete an employee becaust the code was added to the Delete functionality.
- Delete the $scope.totalUsers = 0; // TEST ONLY, DELETE AFTERWARD statement above the "if" statement.
Style Table and Panel
Currently, the table is "hugging" the edge of the panel. Let's give the panel some "breathing room" and make the table more responsive.
- Add the following CSS to the BOTTOM of the main.css file:
/* Style Panel ---------------------------- */
.panel{padding:20px;} - CHECK POINT: Save the file and preview it in a browser. You should see that the panel now has a 20 px padding on ALL sides. If you scale the browser window, you see that the table does not adjust based on the window size. This will be resolved in the next step:
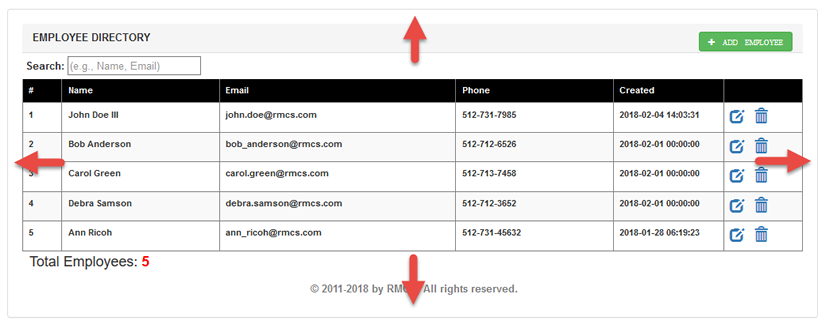
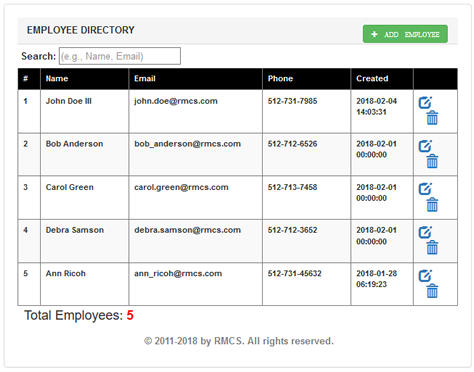
- Add the following highlighted class to the opening <table> tag:
<table border="1px" class="table table-striped table-responsive">
- CHECK POINT: Save the file and preview it in a browser. If you scale the browser window now, you see that the table is responsive to the browser window size.
BEFORE scaling the browser:
AFTER scaling the browser:
Validate Form
When you create a form, you should always validate particular form elements to determine if required form elements have been filled out (e.g., required) or that the correct format is given (e.g., email address). There are a host of techniques on how to validate form elements.
- Add the following highlighted data-ng-submit directive to the opening
<form>
tag:
<form data-ng-submit="addUser()" class="form" name="userForm">
CODE EXPLANATION: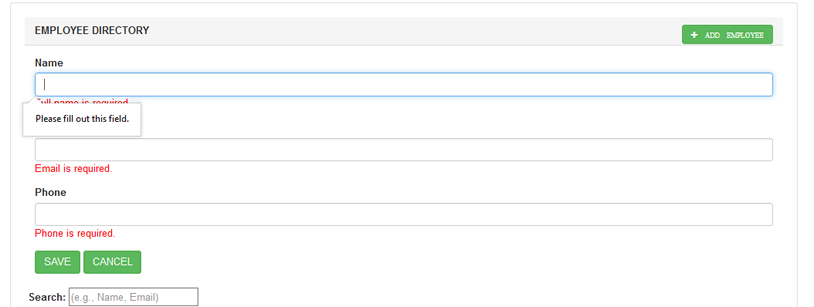
- The data-ng-submit="addUser()" directive is used to submit the form when the SAVE button is pressed. - Add the following highlighted required attributes and <span> tags to each input tag:
CAUTION: Ensure the required keyword is OUTSIDE of the double quote.
<form data-ng-submit="validateForm()" class="form" name="userForm">
   <div class="form-group">
      <label for="name">Name</label>
      <input type="text" class="form-control" name="name" data-ng-model="tempUserData.name" required/>
      <span data-ng-show="userForm.name.$touched && userForm.name.$invalid" style="color:red">
Full name is required.</span>
   </div>
   <div class="form-group">
     <label for="email">Email</label>
     <input type="text" class="form-control" name="email" data-ng-model="tempUserData.email" required/>
     <span data-ng-show="userForm.email.$touched && userForm.email.$invalid" style="color:red">
Email is required.</span>
   </div>
   <div class="form-group">
      <label for="phone">Phone</label>
      <input type="text" class="form-control" name="phone" data-ng-model="tempUserData.phone" required/>
      <span data-ng-show="userForm.phone.$touched && userForm.phone.$invalid" style="color:red">
Phone is required.</span>
   </div>
<!--<a href="javascript:void(0);" class="btn btn-success" data-ng-hide="tempUserData.id" data-ng-click="addUser()">SAVE</a> -->
<input type="submit" value="SAVE" class="btn btn-success" data-ng-hide="tempUserData.id"/>
<a href="javascript:void(0);" class="btn btn-success" data-ng-hide="!tempUserData.id" data-ng-click="updateUser()">UPDATE</a>
<a href="javascript:void(0);" class="btn btn-success" onclick="$('.formData').slideUp();">CANCEL</a>
</form> - Comment out or delete the
<button>
tag for the SAVE button and replace it with the highlighted
<input>
tag:
<!--<a href="javascript:void(0);" class="btn btn-success" data-ng-hide="tempUserData.id" data-ng-click="addUser()">SAVE</a> -->
<input type="submit" value="SAVE" class="btn btn-success" data-ng-hide="tempUserData.id"/>
CODE EXPLANATION:
- Notice that we replaced the button with an input field which is a self-closing tag. - CHECK POINT: Save the file and preview it in a browser. Click the ADD Employee button and then tab key repeatedly to tab through the input fields. You should see red error messages stating that these fields are required. If you click the SAVE button, you should see the tool-tip "Please fill out this field." Also, note that the data has not been submitted because the fields were NOT filled out.
Add Thumbnails
While all text is great, let's add some thumbnails to make our app a little more appealing.
- Type localhost in a browser and then click on the phpMyAdmin to start it.
- In the left panel, click the employeedirectoryajs database.
- Click the Structure tab and then click the Go button at the bottom:
WHY: To insert a new column in the database.

- Add the following three highlighted values to the screen that appears and then click the Save button.
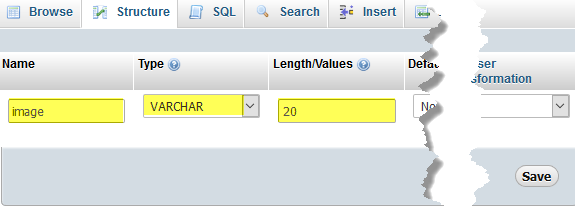
- Click the Browse tab and in the image column, double click on each cell in the image column and enter a name with the format firstname_lastname.jpg:

- Add or modify the following highlighted code:
<table border="1px" class="table table-striped table-responsive">
  <tr>
  <th width="2%">#</th>
  <th width="10%">Image</th>
  <th width="20%">Name</th>
  <th width="20%">Email</th>
  <th width="20%">Phone</th>
  <th width="14%">Created</th>
  <th width="10%"></th>
  </tr>
  <tr data-ng-repeat="user in users | orderBy:'-created' | filter:searchword track by $index">
  <td>{{$index+1}}</td>
  <td>{{user.image}}</td>
  <td>{{user.name}}</td>
  <td>{{user.email}}</td>
  <td>{{user.phone}}</td>
  <td>{{user.created}}</td>
  <td>
    <a href="javascript:void(0);" class="glyphicon glyphicon-edit" data-ng-click="editUser(user)"></a>
    <a href="javascript:void(0);" class="glyphicon glyphicon-trash" data-ng-click="deleteUser(user)"></a>
  </td>
  </tr>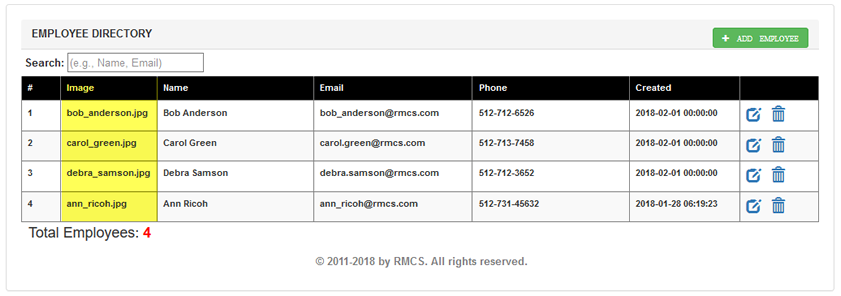
</table> - CHECK POINT: Save the file and preview it in a browser. You should see the image names that were retrieved from the newly created column in the database. However, the literally names are shown instead of the actual images. This will be resolved in the next few steps.
- Modify the SECOND
<td>
tag in the SECOND
<tr>
tag to read:
WHY: To hardwire a STATIC image initially.
<td>{{$index+1}}</td>
<td><img width="50px" height="50px" src="images/ann_ricoh.jpg"></td>
<td>{{user.name}}</td>
<td>{{user.email}}</td>
<td>{{user.phone}}</td>
<td>{{user.created}}</td>
<td> - Add the following CSS styles to BOTTOM of the main.css file:
WHY: To style the image, text, and header.
/* Text and imagesin table and the header -------- */
.table.table-striped tr td {
vertical-align: middle;
}
.table.table-striped tr td img {
border: 1px solid gray;
padding: 2px;
}.row .panel.panel-default.users-content .panel-heading {
height: 55px;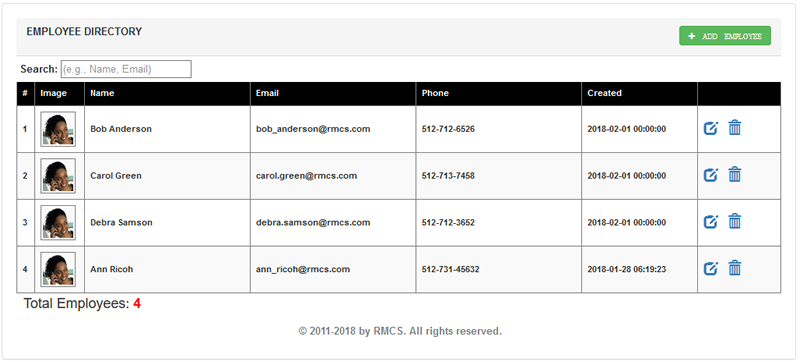
} - CHECK POINT: Save the file and preview it in a browser. You should see only one image (ann_ricoh) repeated in all rows. This will be resolved in the next step. You should also see that the header height was made larger to better accomodate the ADD EMPLOYEE button. Also, the text is now centered within the table cells.
- Replace the static hardwired placeholder (ann_ricoh.jpg) with its dynamic placeholder.
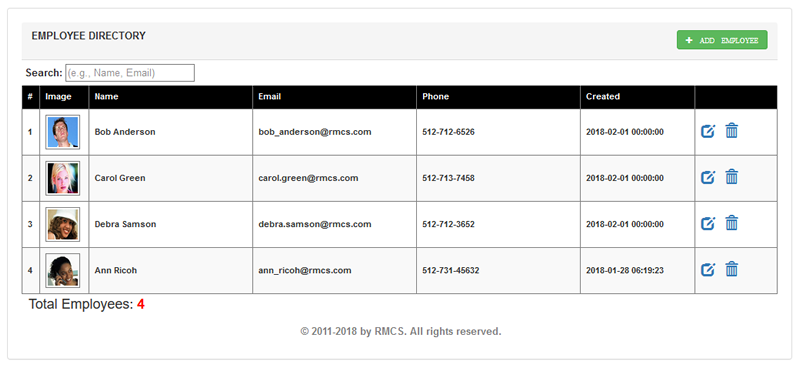
<td><img width = "50px" height = "50px" src="images/{{user.image}}"></td> - CHECK POINT: Save the file and preview it in a browser. You should see the correct image for all rows.
- You will need to manually add the image in the images folder for each employee within phpMyAdmin. This will be resolved later in the Add Upload Ability section.
Populate Menu Dynamically (Add later)
While the a drop-down menu can be populated MANUALLY, it is best practice to DYNIMICALLY populate a menu if the SAME menu will be used on MULTIPLE pages. This way, if there are any changes (additions or deletions) to the menu, it can be done from one table in the database and all of the pages will reflect the change.
Add Pagination (Add later)
While the app is small, there is little to no need for pagination. However, as the app grows, it would be need to add pagination (e.g., 1 to 10 of 100).
Add Upload Ability (Add later)
Currently, the images has to be manually added to the images folder so it can be available when you enter a new employee. It would be better if you could upload the image to the image folder during the Add or Edit function.