Android Studio is based on JetBrains IntelliJ software (http://www.jetbrains.com/idea) that is the official Integrated Development Environment (IDE) for creating Android apps for Windows, Mac OS X and Linux. There are two versions:
- Community Edition (free version)
- Ultimate Edition (paid version) that includes additional tools for working with JavaScript, Java Enterprise Edition (JEE) apps and databases
It includes the following features:
- Android JAR file (app framework classes)
- WYSIWYG editor for multiple screen sizes and resolutions and orientation
- Templates to create common layouts (e.g., Login, Master/Detail)
- Gradle-based build system to customize building of apps for multiple APKs
- Lint inspection tool to check for performance, usability, etc.
- ProGuard tool to minimized app size (by removing unused code) and obfuscate code (by renaming classes, fields and methods with obscure names). NO LONGER NEEDED WITH ANDROID STUDIO 2.0 or above.
- App signing capability
- Documentation
- Samples
Using Older Versions of Android and Android Studio
Below is a list of information regarding the use of older verisons of Andriod Studio and Andriod OSes.
Android versions are in alphabetical order and are based on some type of confectionery-themed code name starting with Cupcake. The earlier versions 1.0 and 1.1 were not released under specific code names — Wikipedia
- Cupcake—1.5
- Donut—1.6
- Eclair—2.0-2.1
- Froyo—2.2x (Significant release-(e.g., push notification, memory/performance optimization))
- Gingerbread—2.3-2.3.4
- Honeycomb—3.0.x-3.2 (Original for tablets only but was later merged into the next versions)
- Ice Cream Sandwich—4.0-4.04 (Voice recognition, Roboto font, etc.)
- Jelly Bean—4.1-4.2.2
- KitKat—4.4 (4.4w for wearable)
- Lollipop—5.0 (Material Design Graphical language and ART-Android Run Time Virtual Machine)
- Marshmallow—6.0-6.01
- Nougat—7.0-7.1
See features associated with Android versions at https://en.wikipedia.org/wiki/Android_version_history.
End-user features:
- Split-screen view—it allows you to split the screen to see two apps at the same time by going to the recent apps list and then touch-and-hold the app you want to display and then drag it up to the top of the screen in portrait mode or to the left in landscape mode. Notice there is a separator bar that you can drag up or down to change the size of the viewport. If you want to remove an app, drag the separator bar all the way to the top or bottom of the screen. If you change orientation, the views switch from top-and-bottom to left-and-right or the other way around.
- Google Now on Tap—allows you to select any text in any app by touch-and-hold the Home button. Google will scan the text (e.g., a song, a movie name) in your app and offer suggestions within Google.
- Improved cut, copy and paste—allows a user to touch-and-hold a word to cut, copy and paste it, search for it on the internet or send text to other apps without having to cut and paste.
- Notification—updates apps from the Notification screen instead of using the Settings icon. If you touch-and-hold a notification, you will see the option to block notification for that app.
- App Waterfall—allows a user to search for an app from a SINGLE screen instead of multiple screens as in previous versions of Android. Also, there is a list at the top of the screen for the four most used apps.
- Auto Backup and restore—allows a user to automatically backup and restore data.
- Better Memory Usage reporting—provides better insight into memory usages.
- Battery life—enhanced using Doze which places background services to sleep when the device is not being used.
- App recompilation—Once Android is updated, each app is only compiled once it is opened so that the upgrade process will not be delayed.
- Quick Setting changes—you can now add your favorite shortcuts with multiple screens.
Developer features:
- OpenJDK—Google moved from its own implementation of Java to OpenJDK with support for Java 8 syntax (e.g., lambda expression, interface default method) and some Java 8 APIs.
- API changes—updates to some existing APIs (e.g., notification, messaging, direct boot process, directory access).
- Jack-and-Jill compiler—new compiler that replaces the Proguard tool (tech-doc/jackandjill on tools.android.com)
New Permission Framework
While, permissions are still registered INDIVIDUALLY in the manifest (e.g., <uses-permission android:name="android.permission.SEND_SMS"/>, devices using Android 5.1 (API 22) or earlier still have to accept permissions during installation or upgrade. However, with Android 6 (APID 23) or later:
- normal permissions are granted automatically and does not require notification; whereas,
- dangerous permissions (e.g., location, etc.) must be requested when the permission is needed by the app not when the app is installed or upgraded
When a user request permission at runtime, he will see the entire group of permissions (e.g., CALL_PHONE and READ_PHONE_STATE are part of the SAME GROUP.)
Authenticate Users
You can authenticate users with their preferred screen lock methods. You can also use the fingerprint scanner.
Backup Apps Data
Back up using a physical device or Google server
Send Specific Data To Another App
You can control which apps handle specific data type
Direct Share API
Users can now define direct share targets that launch a specific activity in an app when a particular type of data is shared from another app.
Assist API
The Assist API allows you to work with the new Google Now on Tap.
Adoptable Storage Devices
Allows a device to adopt EXTERNAL storage (e.g., micro SD) and use it as INTERNAL storage.
Bluetooth Stylus Support
Support for Bluetooth stylus that are connected with a device.
New features for Audio, Video and Camera
There are many improvements for audio, video and camera.
Chrome Custom Tabs
This allows a user to open a web content using the device's built-in Chrome browser so that the device can share cookies, etc.
Enhance Features
Additional enhancements include:
- Email with line
- App with intent filter
- Using multiple apps
- Voice interaction
- New data binding framework
Go to http://developer.android.com/about/versions/marshmallow/android-6.0.html for details and sample apps.
CAUTION: You should NOT build production apps with PREVIEW software and you should only load it on a device that you are using for development testing or use virtual devices and NOT your regular device that you use daily.
To see a list of recent previews for Android Studio, go to http://tools.android.com/recent
You can upgrade an existing version of Android Studio you already have installed by watching the Canary channel (Help > Check for Update… on Windows/Linux and Android Studio > Check for Updates on the Mac) and following the upgrade notifications. CAUTION: This will download and install a patch rather than the full Android Studio IDE.
However, it is safer to install a new version in a separate directory from the old version so that they can have their own separate setting and cache directories. For more info on how to install multiple versions simultaneously, go to http://tools.android.com/tips/using-multiple-android-studio-versions
- Install the latest version of Java 8 from Oracle (java.oracle.com) if it is not already installed by:
- Clicking on the Java SE and then the Download button under JDK.
- Download the most current version for your operating system.
- Download the most recent Android Studio installer for Windows, Mac or Linux at: http://tools.android.com/download/studio/canary/latest.
- Mac OSX—if necessary, rename the old version of the Android Studio application in the Applications folder and then drag the new Android Studio app from the DMG folder to Applications folder.
- Windows/Linux—extracts the zip file anywhere you want to create a separate copy of Android Studio and rename it if necessary (e.g., C:\Users\Cornelius\Android Studio 2.2 Preview). Then, from the bin folder, run Studio.exe or Studio64.exe depending if you are running a 32- or 64-byte version of Windows.
- When prompted to install the Android SDK (this is not Android Studio), create a separate SDK directory from the original SDK directory under the Android Studio directory.
NOTE: You will have two (or more) Android Studio and SDK directories. The production version will have multiple API levels while the new version will have only the Android 2.X and will only have the Android X SDK. By keeping the installations separate, you ensure that no unstable changes will creep into your apps. Once you are done with an older version, you can delete the settings folder for that version to free up a significant amount of disk space particularly the index caches.
BOTTOM LINE: You can download two (or more) versions of Android Studio and then set the Stable version to Stable and set the Preview Version to Canary. If you are on a Mac, it is important to rename the new version before you drag-and-drop the Android Studio app icon into the Applications folder.
In order to create apps using Android 7, you will need to ensure that your SDK includes all required components and make some minor changes to the application Gradle script.
Target version:
- From the Android Studio 2.X Welcome screen, from the Configure menu at the bottom of the screen, select SDK Manager.
- On the SDK platforms tab click on the Show Package Details checkbox and ensure you have Android 7 platforms installed AND at least one system image (32-bit or 64-bit) for creating virtual devices. If they are not installed, select them and click the Apply button to download them.
NOTE: 64-bit was having some trouble as of 4/6/16. (Delete if resolved) UPDATE SCREEN SHOT TO SHOW 7 INSTEAD OF N

- Click on the SDK Tools tab and then click on the Show Package Details checkbox and ensure you have at a minimum the following installed:
- Build-Tools version 24.0.0 rc1 or greater
- Google Repository 24 or greater
- Local Maven Repository for Support Libraries version 28 or later
- Platform tools 24rc1 or greater
- Intel x86 Emulator Accelerator (HAXM installer)
NOTE: If you don't have any of these versions, click on the Apply button to upgrade to them.

Start A New Project:
- Start a new Android Studio project and give it a name (e.g., Android Test App).
- On the Target Android Devices dialog that appears, set up the minimum SDK to Android N API 23.
NOTE: Even though API 23 (Marshmallow) has the same API number you want to use the one mentioned in the previous step because this is the new preview.

- Click the Next button, and choose any activity template you want (e.g., Empty) and then click the Finish button.
NOTE: The first time you create a project in Android Studio, it may take some time for everything to be downloaded and integrated into your build. Afterward, additional builds should go rather quickly.
Modify Gradle script:
- In the Project window under Gradle Scripts, open up the build.gradle(Project. AndroidNApp) file.
NOTE: You should see that is has a Gradle plug-in 2.1.0-alpha 1 or greater.

- Click on the build.gradle (Module app) file.
NOTE: You should see: - The compile SDK version is set to android-N
- The build Tools Version is set to 24.0.0 rc1
- The minimum and the target SDK versions are set to uppercase N
- In the dependencies section, the compatibility support library version 24.0.0 alpha 1.

NOTE: You can build this app now but you would be using the old compiler tool chain. It is best to change the build script to update the app using the new Jack and Jill compiler tool chain and Java 8 syntax:
Add Code to reference the new Jack And Jill Compiler and the Java 8 syntax:
- In the defaultConfig section, add the following highlighted code block:
defaultConfig {
applicationID "com.examples.android.androidtestapp"
minSdkVersion 'N'
targetSdkVersion 'N'
versionName "1.0"
jackOptions {
enabled true
}
NOTE: The project can now use the Jack and Jill tool chain to compile and build the app. However, you have to add some additional lines of code to use the Java 8 syntax.
- In the buildTypes section, add the following highlighted complileOptions code block:
buildTypes {
release {
minifyEnabled false
proguardFiles …
}
}
compileOptions {
sourceCompatibility JavaVersion.VERSION_1_8
targetCompatibility JavaVersion.VERSION_1_8
}
NOTE: This will allow the Jack And Jill Compiler to recognize the Java 8 syntax.
- Delete the line that references the proguard tool because it is replaced by the Jack and Jill compiler.
proguardFiles getDefaultProguardFile(…)
- CHECK POINT: click the Sync Now link in the upper right corner and your app should build correctly without any errors.
There is no substitute for testing an app on a real supported physical device (e.g., phone or tablet). There are two ways to upgrade a device to the a newer version of Android (e.g., Android 7). Either use the Android Beta Program or manually flashing the device.
Unlock the bootloader:
Before you update, it is strongly recommend that you unlock the device's bootloader. This will make sure that if anything goes wrong that you'll be able to easily restore the device to an older version.
- Go to the device Settings and ensure you have Developer option enabled.
- Click on the OEM unlocking option and you will be presented with a dialog to allow OEM unlocking. You will also see a warning that device protection features will not work on this device while this setting is turned on. Click on the Enable button to do so.
- Boot into the bootloader's screen and follow the Flashing Instructions on the developer website (e.g., https://developers.google.com/android/nexus/images#instructions) on how to use the ADB and fastboot tool.
NOTE: You only need the bootloader instruction. You don't need the other instructions if you're going to use the Android Beta Program because then you can reboot into normal mode and follow the described steps for downloading and installing the update.
Enroll device:
- Go to the Android Beta Program at google.com/android/beta
- Ensure you are logged into your device with your Google account and also into the browser with the same account, and then your device should appear here on the page.
- Click the ENROLL DEVICE button.
- In the Enroll device agreement page that appears, click on the "I agree to the terms of the beta program" checkbox and the click the Join Beta button at the bottom of the page.
- You will see a dialog informing you that your device is enrolled. Click the OK button to close the dialog box.
Flash Device Manually:
If you have trouble using the beta program, you can download the factory images and flash them manually at developer.android.com/preview/download.html.
- Search for flashing a device manually, and you'll find links to the factory images for the supported devices.
NOTE: If you're not sure whether your device is supported, go to the Android Beta Program, under the frequently asked questions (FAQ) for a complete listing.
Using Shortcuts
There are several types of shortcuts (keyboard, menu and code) that you can used to make writing code and working in Android Studio easier.
TIP: The sooner you learn these shortcuts that more proficient you will be and the more time you will save coding. So it is best to learn them upfront.
Below is a list of "vital few" shortcuts that will make you more productive when using Android Studio.
TIP: To learn all of Android Studio keyboard shortcuts go to Help > Default Keymap Reference. If you don't like the default keyboard options, you can change it by selecting Settings (PC) or Preferences (Mac) and select Keymap. To change them, you need to click on the Copy button, make changes and then click the OK button.
[NEED TO BE CLEAN UP AND CHECK]
The following keys represent the Windows OS. On the Mac, unless otherwise stated, replace these PC keys with their corresponding Mac keys
- ALT with OPT
- CTRL with CMD
- ENTER with RETURN
- DELETE with BACKSPACE
- F1—Show documents
- F4—Jump to source
- SHIFT key twice—open the Search Everywhere feature of Android Studio and type a search word (e.g., MainActivity).
- ENTER or TAB—autocomplete code. (e.g., Start typing a class and then press ENTER or TAB to auto-complete the class name. If the class is in a different package, it will automatically import the package at the top of the code.
- DOUBLE-CLICK ON A TAB to view full screen of panel.
- ALT + 0—open Message Panel
- ALT + 1—open Project Panel
- ALT + 2—open Favorites Panel
- ALT + 4—open Run Panel
- ALT + 5—open Debug Panel
- ALT + 6—open Android Monitor Panel
- ALT + 7—open Structure Panel Panel
- ALT + 8—open Version Control Panel
- CTRL + /—comment or uncomment selected line(s) of code with single line comments (e.g., //)
- CTRL + SHIFT + /—comment or uncomment selected line(s) of code with block comment (e.g., /* ... */).
- CTRL + CLICK on a method or a resource - open method or resource file.
- CTRL + SPACEBAR—bring back up Auto-complete if it has disappear AND shows documentation.
- CTRL + D—copy and duplicate code repeatedly below existing selected code.
- CTRL + Y (PC) or CMD + BACKSPACE (MAC)—cut selected code.
- CTRL + J—jump to documentation for a class, etc.
- CTRL + SHIFT + J—add a Javadoc comment to a method or a class
- CTRL + P—brings up a list of valid parameters for a constructor when the cursor is in between a blank constructor parenthesis.
- CTRL+Q—Show documents
- CTRL + SHIFT + SPACEBAR—show the various type of constructor assigned to the class.
- CTRL + SHIFT + ENTER—complete a statement with a semicolon.
- SHIFT + ALT + UP ARROW or DOWN ARROW—MOVE a line of code up or down.
- SHIFT + CMD + UP ARROW or DOWN ARROW—MOVE a complete statement up or down.
- CTRL + ALT + L—reformat code to make is easier to read.
- CTRL + ALT + T—surround with programming constructs (if/else, while, catch/try, do/while, etc.).
- ALT + ENTER and click on a string and then enter a resource name - convert a string (e.g., Hello, World) to a string resource (e.g., @string/resource_name).
- F2/SHIFT + F2—jump between highlighted syntax errors.
- ALT + UP and ALT + DOWN ARROW keys—to quickly move between methods.
- CMD + SHIFT + RETURN—to complete a statement with a semicolon.
- CTRL + SHIFT + A—Command look up
- CTRL+ALT+L—Reformat code
- ALT+INSERT— Generate method
- CTRL + ALT + SHIFT + N—Search for symbol
- CTRL + F9—Build
- SHIFT + F10—Build and run
- ALT + 1—Toggle project visibility
- ALT + LEFT ARROW or ALT + RIGHT ARROW—navigate open tabs
- ALT + F8—Evaluate Expression
- CTRL + MOUSE CLICK—Drill Down
- ALT + INSERT— Generate method
- CTRL+P—Show method parents
- CMD+N— Generate method
- CTRL+BACKSPACE—Delete line
- OPTION+CMD+O—Search for symbol
- CMD+F9—Build
- CTRL+R—Build and run
- CMD+1—Toggle project visibility
- CTRL+LEFT ARROW or ALT+RIGHT ARROW—navigate open tabs
- CMD + MOUSE CLICK—Drill Down
- CTRL+SHIFT+ UP_ARROW or DOWN_ARROW—to MOVE a line of code or a complete method. Select it and then press the key combination.
- To reformat code, select Code > Reformat Code…
- You can fold (collapse or expand) code by clicking on Code > Folding and choosing one of the options (e.g., Expand, Collapse, Expand Recursively, Collapse Recursively).
- You can show various views of the editor:
- Double-click on the tab to expand the editor
- View > Enter/Exit Full Screen
- View > Enter/Exit Distraction Free Mode (hide tools)
- View > Enter/Exit Presentation Mode (larger font size but still editable)
- Right-click on an editor tab and select Split Vertically/Horizontally (create two instance of view)
NOTE: You can make changes in one view while freezing the other view. - Right-click on an editor tab and select Move Right/Down
- To move a window:
- Click on the gear icon at the top right-corner of the window and then uncheck the Docked Mode
- Go back and choose Floating Mode. Now you can move or resize the window.
- To return it back, uncheck the Floating Mode and then choose Docked Mode.
- You can also move the tab and window by clicking on the gear and selecting Move To and then select a direction (Top, Bottom, Left, or Right).
- You can also just drag the tab where you want it to be.
- To hide a window, click the hide window icon at the top-right corner of the window.
- To restore the windows back to their original settings, select Window > Restore Default Layout. Once you have the windows set up the way you like them, you can select Window > Store Current Layout as Default.
- If you are in a *.java file, you can easily get to the related XML file that is associated with it by clicking on the related file icon on the left side of the code view window and you will be immediately taken to the XML file.
Live Templates are code snippets that can be created by writing a code shortcut that will be expanded to the complete code stub when you click the TAB or the ENTER key. They are defined in the Preference (Mac) or Settings (Windows) menu under Editor > Live Templates. They are used to speed up your coding and fall in five categories:
- Android
- AndroidComments
- AndroidLog
- AndroidParcelable
- AndroidXML
Below are some of the Live Templates shortcuts for Android:

Examples:
- Type Toast and then press the TAB or the ENTER key:
Toast.makeText(MainActivity.this, "", Toast.LENGTH_SHORT).show();
NOTE: If you have automatic import turned on in the Preferences or Settings, an import statement will be added to the top of the code.
- CHECK POINT: You should see the word Toast expand to Toast.makeText(MainActivity.this, "", Toast.LENGTH_SHORT).show();. Now, you can replace the word MainActivity if you need to. If you press the ENTER key, you will be taken to a place in the Live Template (between the double quotes) to give the Toast a string for the Toast message (e.g., "message goes here...).
- Move the cursor after a Class declaration and then type const and then press the TAB key and then enter a constant name where the cursor was placed (e.g., MYCONSTANT).
public class MainActivity extends AppCompatActivity {
  private static final int MYCONSTANT = 331;
- CHECK POINT: You should see the word const has been REPLACED with private static final int MYCONSTANT = 331;. Now, if you press the ENTER key, you will see the value of the constant gets updated. That's because the constant value is randomized and it does NOT matter what the value is as long as it is CONSTANT (does NOT change). It is best practice to with a constant with ALL CAPS (e.g., MYCONSTANT).
- Type logi and then press the TAB or the ENTER key and then complete or change the string to whatever you need it to be.
Log.i(TAG, "onCreate: onCreate was fired");
NOTE: The TAG constant does not exist. You can click inside of it and press ALT+ENTER and then select Create constant field 'TAG" from the menu and then give the constant a string value (e.g., MainActivity).
- CHECK POINT: You should see the word logi expands to Log.i(TAG, "onCreate: "); before you changed it.
Create Your Own Live Template
You can review the default Live Templates to see how to create your own. Since setting the text property is a common task that you perform often, it may be helpful to create a Live Template to speed up writing code.
- Give a TextView an id property that will be used later (e.g., myTextView).
- Write a code sample of what you want to use as a Live Template. For this example, we will use:
TextView tv = (TextView) findViewById(R.id.myTextview);
tv.setText("Set text property for TextView here...");
- Select the lines of code and then from the menu select Tools > Save As Live Templates...
- In the Live Templates dialog box that appears, give the template an abbreviation and a description and then modify the code by:
- Removing all of the instances of android.widget. (including the period)
- Deleting the path before the R object
- Wrapping what you want to be variables with a pair of dollar signs with variable names (e.g., $myVariable$)
- Removing space on the second line
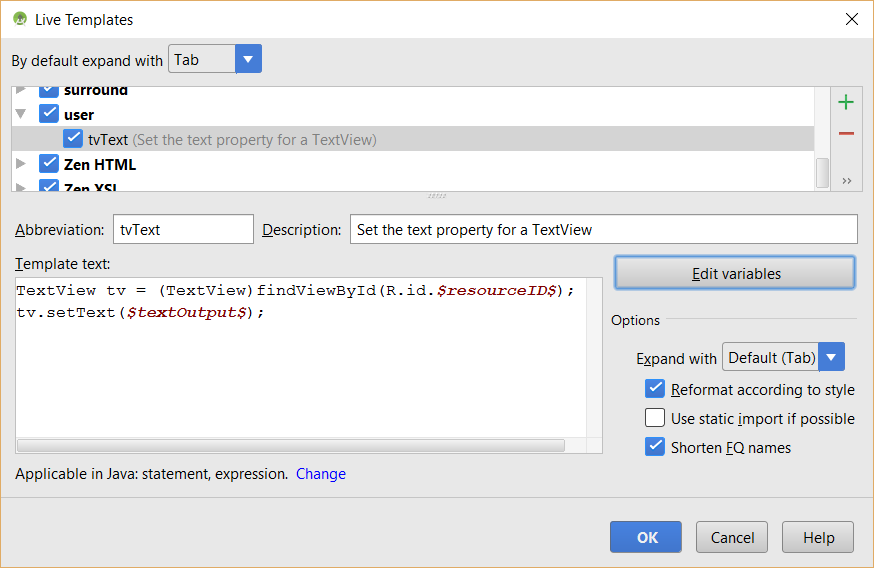
NOTE: Notice a user defined template will show up in the user section of the Live Templates dialog box above..
- Click the OK button to create the Live Template.
- CHECK POINT: Delete the original lines of code and then type the abbreviation tvText in some code and then press the TAB or ENTER key. You should see the abbreviation expands. Press the TAB key and enter the TextView id (e.g., myTextView) and then press the TAB key again and enter a string message for the TextView.
TextView tv = (TextView) findViewById(R.id.myTextView);
tv.setText("My text is set here...");
- CHECK POINT: Run the app in an emulator and you will see the text that you set appear in the TextView.
TIP: DESIGN VS CODE (TEXT) VIEW
IMPORTANT CONCEPT TO REMEMBER: Whatever original value is CREATED in Design View with XML attributes can be OVERWRITTEN OR CHANGED to a new value in Text (Code) View with Java code. This is an important concept that you will see as you create more advanced code. For example, you can create STATIC or PLACEHOLDER content in Design view and then REPLACE them at RUNTIME with DYNAMIC content from a data source (e.g., an array, XML, JSON, Database, Java Code, etc.). Content that does not need to be changed can remain at their “design” values at runtime. To demonstrate this:
- In the Text View, make note of the id attribute for the TextView component (It should be textView).
- Add the following highlighted code in the MainActivity.java file within the onCreate() method AFTER the setSupportActionBar() method. You can add whatever short text you want within the quotes:
protected void onCreate(Bundle savedInstanceState) {
    super.onCreate(savedInstanceState);
    setContentView(R.layout.activity_main);
    Toolbar toolbar = (Toolbar) findViewById(R.id.toolbar);
    setSupportActionBar(toolbar);

    TextView myNewText = (TextView) findViewById(R.id.textView);
    myNewText.setText("How are you doing?");
CODE EXPLANATION:
- The TextView myNewText = (TextView) findViewById(R.id.textView); code is used to bind the component of the XML file to the Java file so that it can be used in code.
- Now that we have a reference (myNewText) to the TextView component from the XML file, we can now use a setText() method to set the text of that view to whatever text we want (In this case, "Howe are you doing?). - CHECK POINT: Run the app in an emulator. You should see that even though the text field “Hello, World” is written in the Design view’s xml file by default. It is DISPLAYED in the emulator with the phrase, “How are you doing?”
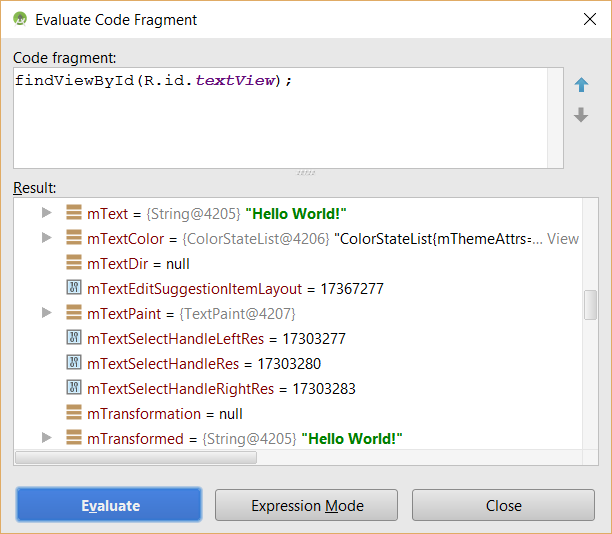
TIP: EVALUATING AN EXPRESSION
IMPORTANT CONCEPT TO REMEMBER: While not real useful now, it is important to learn early how to evaluate expressions in your code to see if your code is working as expected. This is done by setting a breakpoint where you want the code to stop and then evaluating an expression in the code:
- Set a breakpoint on the findViewById line
- Press the Debug button
 (not the Play button) to run the app in debug mode.
 - Choose a virtual device from the list and press the OK button.
NOTE: Notice that the app stop executing at the break point.
- Copy an expression from the code. In this case, (TextView) findViewById(R.id.textView);
NOTE: You will need to add a semicolon to complete the expression.
- Then, select Run > Evaluate Expression... or press ALT+F8 to open the Expression Evaluation dialog box and then paste the expression in the Expression text field.
- CHECK POINT: Press the Evaluate button. You should see A LOT of the values for that expression with two of them with the phrase "Hello World!" in it. Notice is says, "Hello, World!" instead of "How are you doing?" because that line of code is AFTER the breakpoint so the setText() method has not yet been executed.
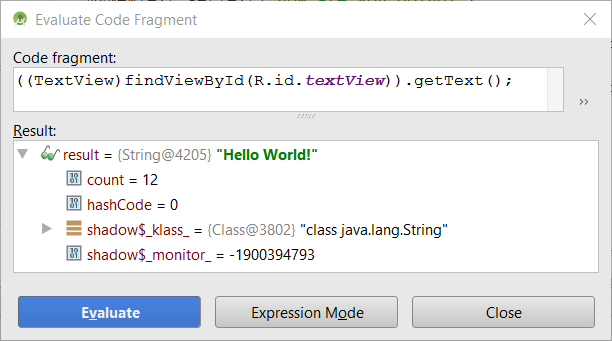
- Now, type the following expression [((TextView)findViewById(R.id.textView)).getText(); ] and press the Evaluate button again. You should see the a short list of values being displayed along with the "Hello World!" phrase.
- Delete both the text field in the XML file and the two lines of code that was added in the Java file.
Creating Programming Constructs
In CONJUNCTION with the shortcuts listed above, you can create common programming constructs (e.g., classes, methods, getters/setters, event handlers, etc.)
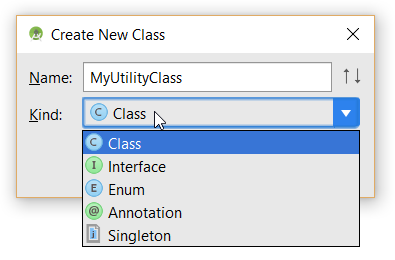
You can create all kind of components (e.g., Class, Interface) from one menu option:
- Choose File > New > Java Class from the menu.
- In the Create New Class dialog box that appears, give the component a name and then choose the Kind from the menu:
NOTE: It it best practice to start a class with a capital letter (e.g., MyUtilityClass).
- Click the OK button to create the component.
- CHECK POINT: By default, the class is placed in the main package. If you want to move it to another package:
- Right click on the base package and choose New Package.
- In the New Package dialog box that appears give package a name and then click the OK button.
- Drag-and-drop the newly created class into the new package.
- In the Move dialog box that appears, click the Refactor button to move the class and change any code (package declaration) to match the new location.
- You can optional remove the comments.
To create a Java class:
- Right-click on a package and select New > Java Class and enter a class name.
- Select Kind (Class, Interface, Enum, Annotation or Singleton) and then click the OK button.
To crease class stub:
- Right-click on a class and select Generate...
- Choose what you want to Generate from the list:
- Constructor
- Getter
- Setters
- Getters and Setters
- equals() and hashCode()
- toString()
- Override Methods
- Copyright
NOTE: To create getters and setters, you must first create fields for the class.
EXAMPLE: Create Getters and Setters
You can create a set of getters and setters from a list of private instance variables.
- Create a class with a list of instance variables:
public class CustomClass{
private String myString;
private int myInteger;
private String myString2;
}
- Position the cursor below the variables and right-click and select Source > Generate Getters and Setters.... from the list.
- In the Select Fields To Generate Getters and Setters dialog box that appears, select the fields that you want and then click the OK button.
You can define a method in one class and have it automatically created in another class. For example, let's say you have define a method name in the MainActivity.java class as highlighted below:
MyUtilityClass utility = new MyUtilityClass();
utility.addNumbers();
- CHECK POINT: Since the method addNumbers() does not exist yet, it will be highlighted in red.
- Click inside of the addNumbers() method and then press ALT+ENTER and select Create method 'addNumbers'.
- CHECK POINT: Notice that the addNumbers() method stub was created in the MyUtilityClass.java file and open this file because this is the class it is based on.
public void addNumbers() {

}
- Click the ENTER key to accept the default return type (void) and to place the cursor between the curly braces. Now you can populate the method with your own code.
Instead of writing the stub for an event handler, you can let Android Studio do it for you.
- Create or select an object and add an event handler to. Typically, this is a button:
<Button android:onClick="buttonClickHandler" />
CAUTION: The event handler will become a Java method so you need to use the correct naming convention.
- Press ALT+ENTER key and choose Create onClick event handler for the list of intention action.
NOTE: If the project has more than one class, you would see it listed.
- If there is only one class, click the OK button; otherwise, select the correct class and then click the OK button.
- CHECK POINT: You should see a method is created in the selected class.
public void buttonClickHandler (View view) {

}
- Add the necessary code between the curly brace pairs.
public void buttonClickHandler (View view) {
Log.d ("myClassName", "A message here...");
}
Refactoring Code
You can easily update multiple areas of your code at the SAME time using a technique called refactoring. This is a big time saver compared to the normal cut/copy and paste or search/replace operations.
There are a host of ways to use refactoring in Android Studio that allows you to rename, move and extract code. Most of the tasks can be access by selecting Refactor from the menu and then choosing an option:
- Refactor This... (CTRL+ALT+SHIFT+T) This menu item will show all of the options in a list.
- Rename... (SHIFT+F6)
- Change Signature... (CTRL+F6)
- Move... (F6)
- Copy... (F5)
- Safe Delete...(ALT+DELETE)
- and more...
For example, continuing with the code from the previous section:
- Place the cursor either in the method declaration in the MyUtilityClasss.java file OR in the MainActivity.java file where it is called and then press SHIFT+F6 and then RENAME the method (e.g., addTwoNumbers) and then press the ENTER key.
- CHECK POINT: Notice that the method was rename in both the MainActivity.java and the MyUtilityClass.java file even though it was change in one place.
- Click inside of the utility variable and press SHIFT+F6 to RENAME the variable and you will be presented with several options. myUtilityClass was accepted for this example below:
MyUtilityClass utility = new MyUtilityClass();
utility.addNumbers();
- CHECK POINT: You should see that both the declaration and usage reference to the variable have been changed to myUtilityClass even though only one was changed.
MyUtilityClass myUtilityClass = new MyUtilityClass();
myUtilityClass.addTwoNumbers();
Beside dragging and dropping a class from one package to another to move it, you can also use the Refactor method to move a package as will be demonstrated in the next step. Continuing with the code from the previous section:
- Open the MyUtilityClass.java file and click INSIDE of the MyUtilityClass method and then choose Refactor > Move... In the Move dialog box that appears, change the path where you want the package to be moved to and then click the Refactor button.
- CHECK POINT: You should see the package has been move in the Android scope panel. Notice also that the package declaration has been changed at the top of the file and if the package was move into the main package, the import statement will be removed.
You can also EXTRACT CODE to other programming constructs as will be demonstrated in the next steps:
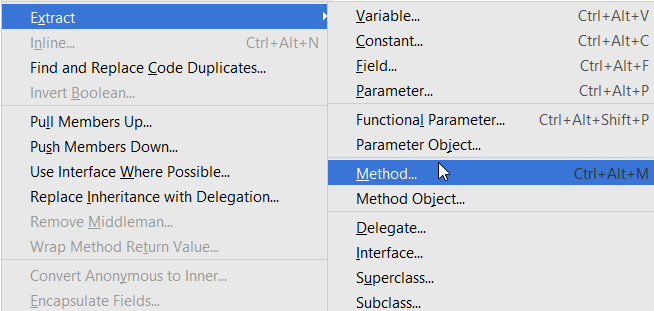
- Select the line(s) of code that you want to extract from some existing code. See the highlighted code below from the previous example:
public class MainActivity extends AppCompatActivity {
    @Override
    protected void onCreate(Bundle savedInstanceState) {
        super.onCreate(savedInstanceState);
        setContentView(R.layout.activity_main);
        MyUtilityClass myUtilityClass = new MyUtilityClass();
        myUtilityClass.addTwoNumbers();
    }
}
- Right-click and from the menu select Refactor > Extract > Method... (CTRL+ALT+M). In the Extract Method dialog box that appears, give the method a name and then click the OK button.
- CHECK POINT: You should see the the line(s) of code has been extracted and placed in a method with the name you gave it and the extracted code was replaced by a method call (e.g., myMethods()).
public class MainActivity extends AppCompatActivity {
    @Override
    protected void onCreate(Bundle savedInstanceState) {
        super.onCreate(savedInstanceState);
        setContentView(R.layout.activity_main);
        myMethod();
    }

    private void myMethod() {
        MyUtilityClass myUtilityClass = new MyUtilityClass();
        myUtilityClass.addTwoNumbers();
    }
}