To test and enable an Android device for development requires several settings to be configured. While these processes are tedious, most of them are one-time setup unless you have to upgrade to a newer version:
The initial installation of Android Studio includes a basic SDK which includes operating system images, compilers and other tools you need to build Android apps.
- Open Android Studio and from the Welcome screen, click the Configure drop-down menu at the bottom of dialog box and then click SDK Manager. When the SDK Manager opens, you should see several packages already selected and installed. If you plan to do development for Android TV or Android Wear, you will need to select those options as well for installation. Notice, you should have the latest version of Android is installed when Android Studio was installed.
- Click the Show Package Details checkbox for each tab in the next step.
- In the SDK Platforms and SDK Tools tabs, check these platforms and tools to ensure you have the latest version of each installed:
- Android tools:
- Android SDK tools
- Android platform tools
- Android Build tools
- Android Support Repository
(Java libraries and other resources that are need for new apps)
- Google tools:
- Google API
- Google API Intel x86 Atom System Image
- Google Play Services (all)
- Google USB Driver (Windows only)
- SDK tools:
- Source for Android SDK
- Documentation for Android SDK
- Samples for SDK
- SDK platform
- Others:
- Intel x86 Emulator Accelarator (HAXM installer)
- ARM (Only if you cannot use HAXM)
TIP: Select only the options that you are going to use (e.g., Intel x86 Atom System Image).
NOTE: A USB driver is not needed for the Mac because it will automatically connect to a physical Android device. System images are virtual device images use with an emulator.
NOTE: The platforms (e.g., Android 7) and SDK tools (e.g., AVD) are located in the ...Android/sdk/ directory.
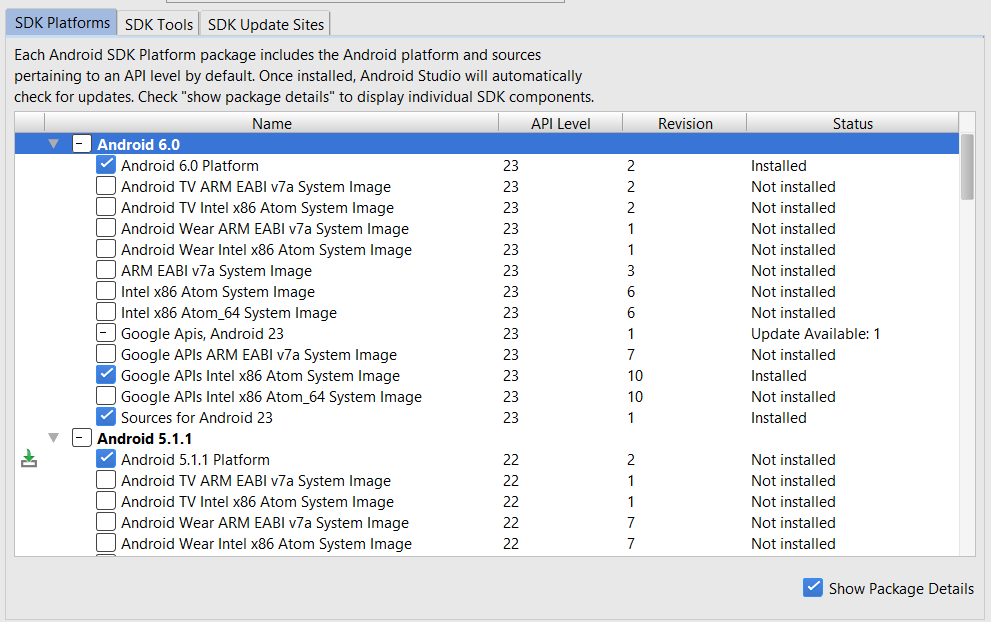
NOTE: It is recommended that you create a few AVDs with different API levels and hardware configurations so that an app can be tested on different Android OSs. An Android SDK Platform and a ARM System Image is the minimum components for an given Android version.
Later, when you set up an emulator, you will see how to set the Scale display to real size so that you can set the emulator to a smaller size if you have a small monitor. [CONFIRM]
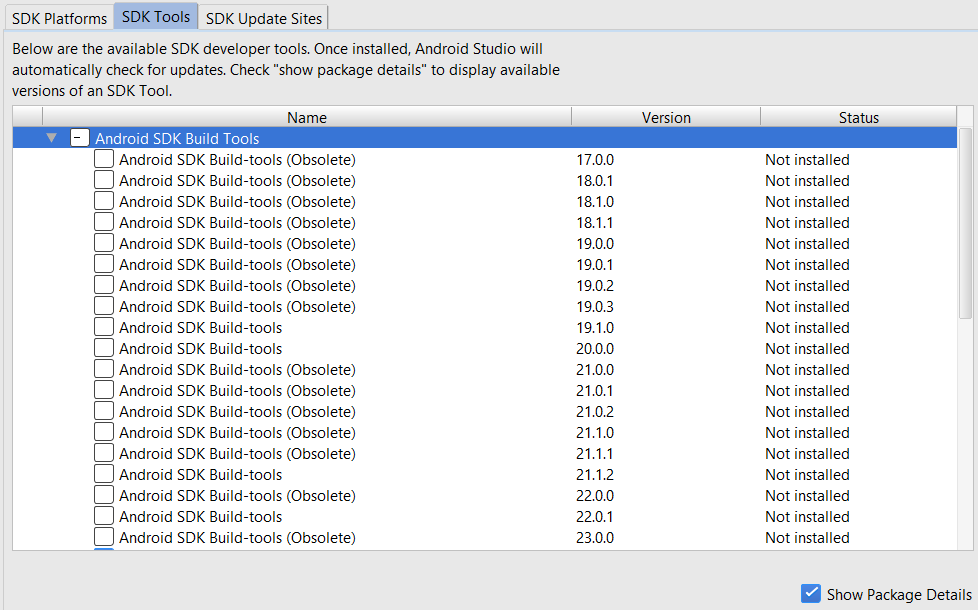
NOTE: The SDK Tools tab will show what versions of the build tools are installed. If you attempt to use a project that is based on an OLDER SDK version, you will be prompted to install that copy of the SDK tool. You can have multiple versions of SDK Tools installed to support DIFFERENT projects.
NOTE: The SDK Update Sites tab list the web sites that Android Studio uses. You don't have anything to do in this tab.
- Click the Apply button to install the packages.
- Select the Accept license.
- Click the Install button.
NOTE: It may take a while to install packages, etc. - In the Confirm Change dialog box that appears, review the list of components that will be added and then click the OK button.
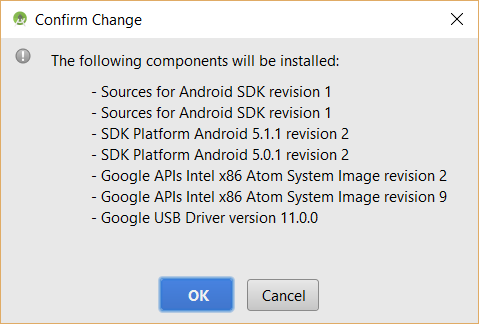
- On Windows, if you get a Windows Firewall dialog box, check the Private network checkbox, uncheck the Public checkbox and then click the Allow Access button.
- Click the Finish and then the OK button.
- Once the install is complete, close Android SDK Manager and restart it again to see if the changes are made. [Not sure if you have to restart to see changes-CONFIRM]
Before you start creating Android apps, you will want to configure certain aspects of Android Studio to control its appearance and behavior.
There are a few settings that are highly RECOMMENDED that you can change to make your environment easier to work in:
-
Go to File > Settings... (CTRL+ALT+S) on Windows or go to the Android Studio menu and select Preferences (CMD + ,) on the Mac.
TIP: To reset the settings to the defaults, close Android Studio and then delete the folder .Android Studio under the Home folder in Windows and in the /Library/Preferences/Android Studio on the Mac and then restart Android Studio. [CONFIRM] - Select Editor > General > Auto Import.
- In the Java section, select all four options.
IMPORTANT NOTE: This will help to AUTOMATICALLY import packages, etc. THIS IS HIGHLY RECOMMENDED FOR THE TUTORIALS IN THIS TRAINING MODULE. Otherwise, you will have to MANUALLY imports as needed which can be very time-consurming.
[ADD EXAMPLE HERE]
- Click on the Appearance option and select Show line numbers AND show method separators checkboxes and then click the Apply button.
NOTE: The show method separators will draw horizontal lines to separate methods.
[ADD SCREEN SHOT HERE]
- Click on System Settings > Updates and then select checkbox to check for updates and the select Stable channel and then click the Apply button.
NOTE: Stick to the Stable channel. Once, you are versed with Android Studio, you can switch to the Canary channel which has Beta versions of Android Studio that you can download.
CAUTION: You should never use a Beta version for a production app.
- Click Editor > General > Code Folding, DESELECT the following checkboxes and then click the Apply button:
- File header
- import
- One line methods
- "Closures"
NOTE: Code Folding hides some of the code from you. If you are a beginner developer, you will want to SEE all of the code. Once you become proficient, you can check these options as needed.
[SHOW BEFORE AND AFTER EXAMPLE HERE]
- Click Editor > Color and Fonts > Fonts and then select a scheme.
NOTE: You cannot change a DEFAULT scheme; however, you can save it as different name and then make changes.- Click the Save As... button and in the Save Color Scheme As dialog box that appears, give the scheme a name and press the OK button.
- Change whatever settings you want (e.g., font/font size).
- Change any other options that you see fit.
- Click the OK button.
- Go back to the Configure drop-down on the Welcome screen and select Project Defaults > Project Structures and ensure that the Use embedded JDK (recommended) checkbox is selected. If you are running a 32-bit OS, uncheck this option because it is not compatible and navigate to the JDK on your computer.(e.g., C:\Program Files\Java\javajdk1.8.0_66) and then click the OK button.
Unlike the Windows installation, you have to install the HAXM software as a separate process for the Mac. The Intel HAXM allow you to manage FAST virtual devices on an Intel emulator instead of an ARM-based emulator.
IMPORTANT NOTE: Even though you install HAXM using the SDK manager, it may only be downloaded. To install it, you still need to do so from the ...sdk/extras/intel/Hardware_Accelerated_Execution_Manager directory and install the intelhaxm_android file.
- Open Android Studio and on the Welcome screen, go to Configure > SDK Manager.
- Click on the SDK Tools tab.
- CHECK POINT: Check to see if the Intel x86 Emulator Accelerator (HAXM Installer) checkbox is selected. If so, it is already installed. However, you can use the next steps to update to a newer version.
- Go to the Finder on Mac or File Explorer on Windows and navigate to the SDK directory:
- Mac: Press CTL + SHIFT + G and type ~/Library/Android and press the Go button.
- Windows: Go to where the SDK directory was installed.
- From the Android directory, navigate to sdk/Extras/intel/Hardware...:
- Mac: Look for the installer with a *.dmg extension (e.g., IntelHAXM 6.0.1.dmg)
- Windoww: Look for the installer with a *.exe extension
- Then:
- Mac: Open the *.dmg file to start the installer and in the dialog box that appears, click the Continue button.
- Windows: Open the *.exe file and if you see the User Access file, accept it.
- If you already have the software installed, you will be notified. However, you can reinstall or undate it by clicking the OK button.
- Click the Continue button.
- On the screen for the Memory limit, adjust the memory based on the amount of memory you have on your computer:
- If you have 8G, accept the default but you may be only able to run a SINGLE virtual device at a time.
- If you have more than 8G and you plan to use MULTIPLE virtual devices, you can allocate more memory. As a rule of thumb, you should allocate 1-2 G per virtual devices that you intend to use.
- Click the Next button several times and then click the Finish button.
- Enter your username and password and then press the Install Software button.
- Click the Close button to install the software.
NOTE: If you have problem with the HAXM emulator or you are running an AMD computer, you will have to install the ARM emulator instead.
An AVD is a configuration that combines the profiles of:
- hardware/software
- device itself
- Android OS versions to emulate
By default, Android Studio will AUTOMATICALLY create a virtual device (e.g., Nexus 5) for you that you can use. However, you can create your own as well. However, if you delete all of the virtual devices, you will start with a screen like this where you will have to click the Create Virtual Device... button:
NOTE: You can create as many virtual devices as you need to represent different screen sizes and pixel densities.

- Choose Tools > Android > AVD Manager There are two views
- The Android Virtual Devices shows any existing AVDs and allows you to edit, delete or launch in the emulator.
- The Device Definitions displays a list of devices. It can also be used as a starting point to create your own AVD.
- Click on the Create Virtual Device button at the bottom of the screen.
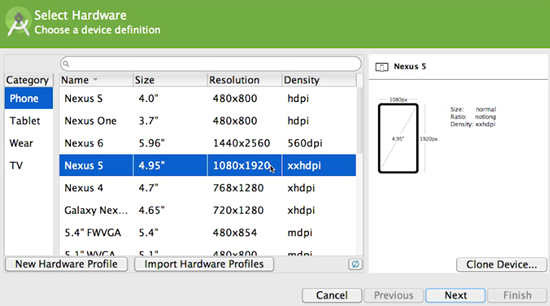
- In the Select Hardware (Choose a device definition) dialog box that apears, select a device (e.g., Nexus 5) that is similar to what you need and then click Next button.
- In the System Image (Select a system image) dialog box that appears, click on a version type (e.g., Marshmallow) and then click the Next button.
CAUTION: If you don't have HAXM installed, you will have to choose a arm... ABI instead of an x86 ABI.
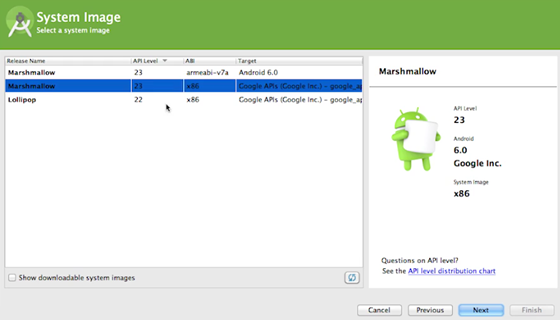
NOTE: If you see a download link that means that you have to click on it to download a system image first before you can use it.
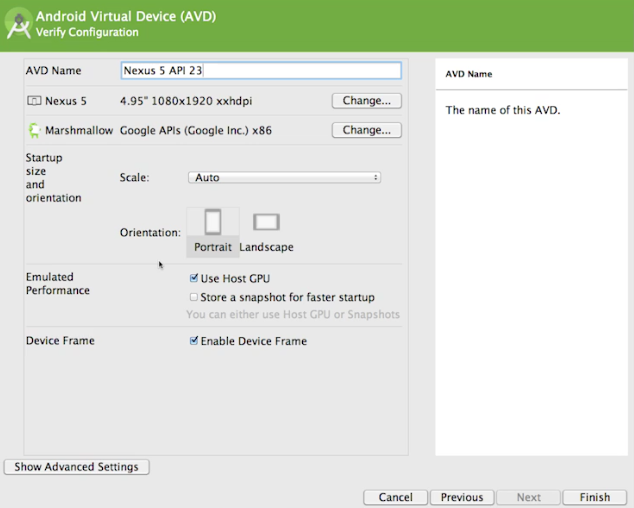
- In the Android Virtual Device (AVD) - Verify Configuration dialog box that appears, change the following options if necessary:
- AVD Name (Change if you have more than one of the same device type)
- Device Name
- Device API (May need to change from x86 to ARM if you do not have HAXM installed)
- Startup size and Orientation (This is the initial orientation for the app)
- Emulated Performance (Use Host GPU, if you have HAXM installed)
- Device Frame (This is the actual graphic that surround a device)
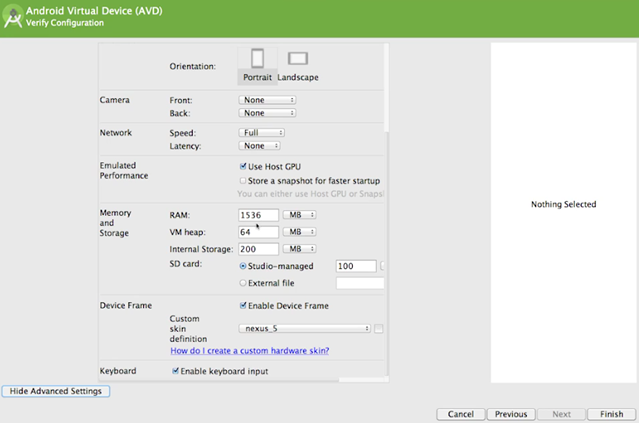
- In the AVD dialog box, click the Show Advanced Settings button at the bottom of the dialog box to show more options and set the following if necessary. You may need to scroll to see all additional options.
- Camera and Network
- Scale (Set scale to another value if you have a small screen)
- Memory and Storage (RAM, VP heap, Internal Storage, and SD card)
- Enable keyboard input (ensure this is checked so that you can use your own keyboard instead of the virtual device keyboard when testing.)
TIP: Change the amount of RAM if you don't have enough or choose another device that requires less RAM.
- CHECK POINT: Click on the Finish button and Android Studio will create the AVD and list it in the Your Virtural Devices dialog box.
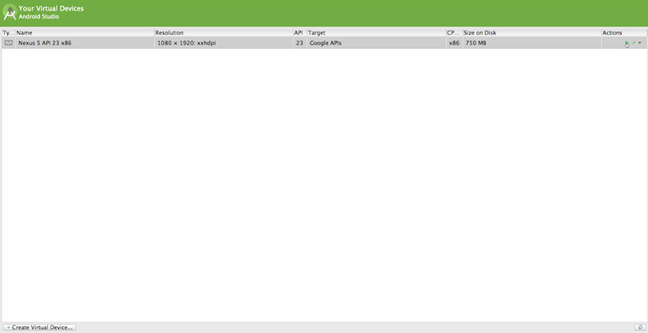
- Click an AVD (e.g., Nexus 5) and then click the small green play icon on the right side of the dialog box to run the emulator.
NOTE: You may be prompted to send usage statistices to Google. You can uncheck the checkbox is you don't want to and then click the Proceed button. - CHECK POINT: You should see an Android emulator divice displayed on your screen.
NOTE: It is important to note the this will open the emulator but not run an app. To do that see the next steps. - Go back to Android Studio and with an app loaded, click on the Run icon at the top of the screen.
- In the Choose Device dialog box that appears, click on the emulator that you would like to run and then click the OK button.
NOTE: If you have a physical device connected you would see it listed here as well. - Go back to the emulator (ALT+Tab) and you should see your app in the emulator
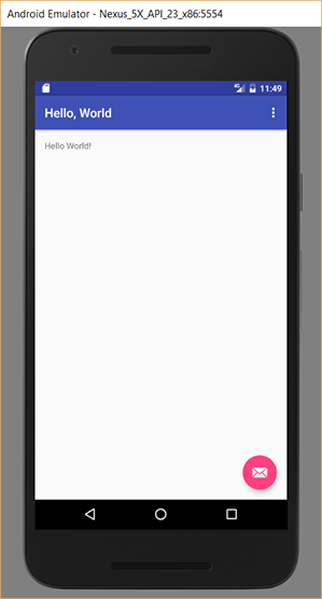
- CHECK POINT: You can click on the back button on the emulator to close it and then click on the icon list to see a listing of the apps on the device. You should see your app listed (e.g., Hello, World with a green Android icon). If you click on this icon, it will load the app again.
If you have a fresh installation, you will not have to check for updates. However, you may want to come back to the menu every now-and-then to see how to check for updates to ensure you have the latest version.
- Open Android Studio and click the Help > Check for Updates Now link.
- If there's a newer version available, you can update and restart immediately.
NOTE: It is important to note that there are multiple channels for updates. The Stable Channel is the default. However, you can change it to another channel. To get the latest version that have not be fully tested, change to the Canary Channel.The Canary Channel will offer early beta software that may not have been fully tested but has new features and improvements. After a few days of testing, it will be promoted to the Beta Channel.
- Click the Configure button and then on Windows, click on Settings and on Mac, click on Preferences.
- Click on the Updates option to change to another channel.
NOTE: On Windows, you might be prompted with the User Account Control dialog box. And on Mac, you might need to type in your administrative password.
- Restart Android Studio.
Another place to check for updates in in the SDK Manager.
- Open the SDK Manager:
- From the Welcome screen, click on the Configure > SDK Manager from the bottom of the window..
- From the menu, select Tools > Android > SDK Manager.
- From the of the window, select the SDK Manager icon.
- Use the SDK Platforms tab to download different versions of the Android SDK. Each API level corresponds to an Android version (e.g., Android 6 (Marshmellow) refers to API Level 23). The minimum API Level the is set by default is Android 4.0.3 (IceCreamSandwich) or API Level 15 so you will need to download that version as well.