Install Android Studio for Windows and Mac
Android Studio is a free app based on JetBrains IntelliJ software and is the official Integrated Development Environment (IDE) for creating Android apps and include the following features:
- Available for Windows, Mac and Linux
- SDK / AVD / HAXM
- Android JAR file (app framework classes)
- WYSIWYG editor for multiple screen sizes, resolutions and orientation
- Templates to create common layouts (e.g., Login, Master/Detail)
- Gradle-based build system to customize building of apps for multiple APKs
- Lint inspection tool to check for performance, usability, etc.
- Jack and Jill toolchain - Jack (Java Android Compiler Kit) and Jill (Jack Intermediate Library Linker) replaced ProGuard ( javac + dx pipeline) which is used to minimized app size (by removing unused code) and obfuscate code (by renaming classes, fields and methods with obscure names).
- App signing capability
- Documentation
- Samples
NOTE: If you are from a web design background using Dreamweaver, it is helpful to think of the Android IDE as the "Dreamweaver for Android" app that is used to create an app just like Dreamweaver is used to create a web site.
There are two versions of IntelliJ Idea:
- Community Edition which Android Studio is based on and it is free
- Ultimate Edition which has tools for JavaScript, Java Enterprise Edition (JEE), and databases
Software Development Kit (SDK)
Like JDK, which as the name implies is a kit (set of tools) that is used to develop Java apps. SDK is also as the name implies, a kit (set of tools) that is used to develop Software apps (In this case, Java software apps).
Android SDK includes tools to create, debug and analyze apps along with documentation and code samples:
- Emulators
- Debugging tools
- Analyzing and optimizing tools
- Documentation and source code
- Code samples
SDK Manager
In order to use the tools, documents and code mentioned above, the Android SKD Manager is used to download these resources:- Build Tools—to build and compile apps (e.g., Tools > Android SDK Build-tools Rev 24 Installed)
- Android Versions—(e.g., Android 5.01 (API 21), Android 4.4S. (API 19)) Which include system images, samples, APIs and source code.
- Extras folder—support libraries, additional tools, and drivers
- Install the Java Developer Kit (JDK) first if you have not already done so. (See previous menu for details).
- Go to http://developer.android.com/sdk.
- Click the DOWNLOAD ANDROID STUDIO FOR WINDOWS or MAC button.
- On the Download Android Studio page that appears, read the Android SDK License Agreement Terms and Conditions, select the "I have read and agree with the above terms and conditions" checkbox and then click the DOWNLOAD ANDROID STUDIO ... FOR WINDOWS (or MAC) button.
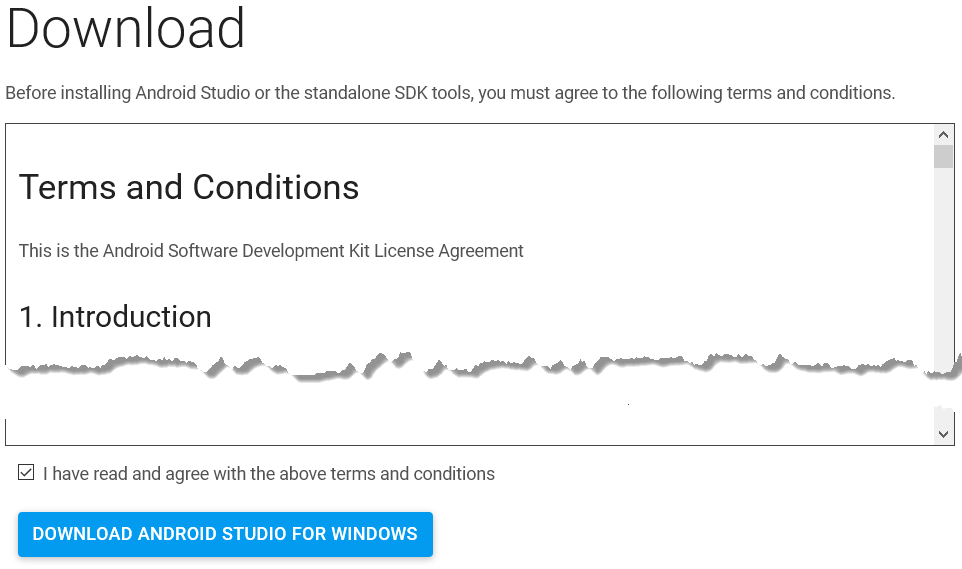
- In the dialog box that appear, click the Save File button to save the installer to your computer (e.g., Download folder).
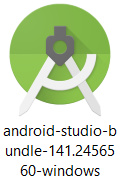
- Depending on your browser, you may be given the option to click a Run button; otherwise, navigate to the folder where the file was downloaded (typically, the Download folder) and double-click the installer:
- On Windows, double-click on the *.exe (executable) file:
- On Windows, if a User Account Control dialog appears, click the Yes button.
- On the Mac, it is a dmg file. Once the download is complete, using the Finder, go the the Downloads folder and double-click on the Android Studio app. In the Android Studio dialog box that appears, drag-and-drop the Android Studio icon to the Applications folder.
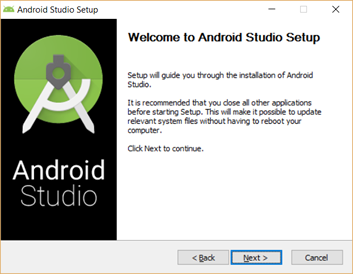
Open the Applications folder and double-click on the Android Studio app. You will be prompted that you are downloading an application from the Internet. Click the Open button. - On the Welcome to Android Studio Setup screen that appears, click on the Next button.
- On the Android Studio Setup dialog box that appears, accept the default components (Android Studio, Android SDK, and Android Virtual Device) and then click the Next button:

TIP: Hover over each checkbox to see a description of each components in the Description field.
Android Studio - The Android developer environment to design and develop your app...
Android SDK - The collection of Android platform APIs, tools and utilities that enable you to debut, profile, and compilie your app
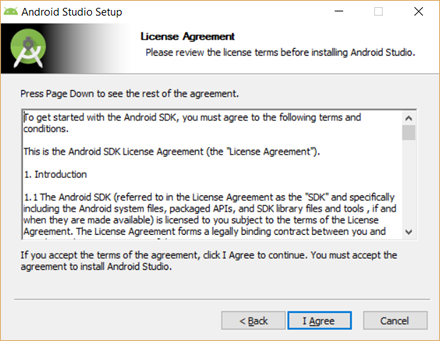
Android Virtual Device - A preconfigured and optimized Andriod Virtual Device for app testing on the emulator - On the License Agreement diaolg box that appears, click on the I Agree button.
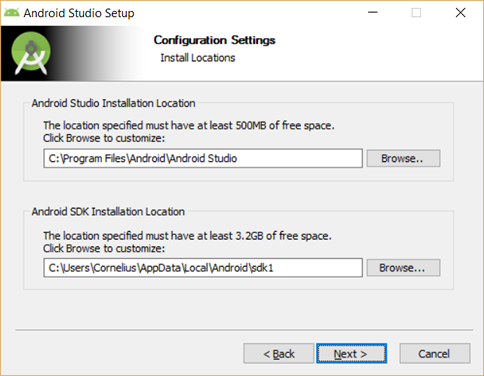
- In the Configuration Settings (Install Locations) dialog box, accept the defualt locations for Android Studio and Android SDK and then click the Next button:
- In the Choosse Start Menu Folder dialog box that appears, accept the default (Android Studio) and click the Install button:

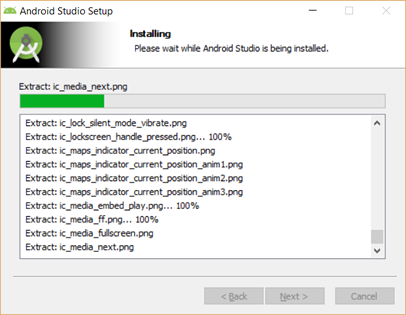
- In the Installing dialog box that apears, click on the Show details button and then wait for the installation to complete. Then, when you see the Installation Complete... statement at the top of the dialog box, click the the Next button:
NOTE: Installation will take a while depending on the speed of your computer.
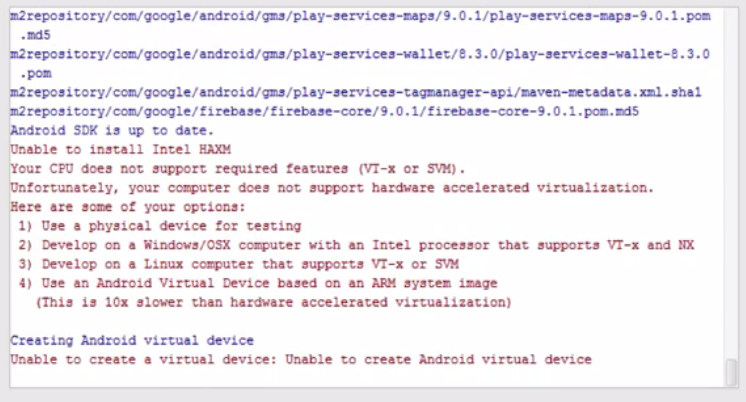
CAUTION: On an older Mac, AMD PC or PC that does not have 8G of memory, you see an error for the says "Unable to install Intel HAXM". You will not be able to take advantage of the HAXM features so you will need to install the ARM emulator instead of x86 emulator wihich run slower than the x86 emulator when you install and configure the SDK later. Newer Macs have Intel processor virtualization enabled so you should not have this problem.
You have three options to choose from:
- Instead of using an emulator, use a real physical device.
- Develop on Windows or OSX with VT-x or NX suport or develop on Linux wiht VT-x or SVM support
- Use an ARM emulator
For details, go to https://support.apple.com/en-gb/HT203296.
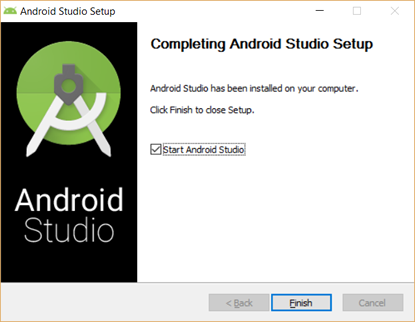
- In the Completing Android Studio Setup dialog box that appears, click the Finish button:
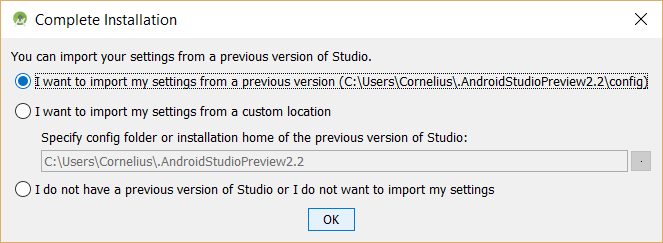
- In the Complete Installation dialog box that appears, click on one of the radio button depending on if you want to import previous settings or if you don't have a previous version installed and then click the OK button.
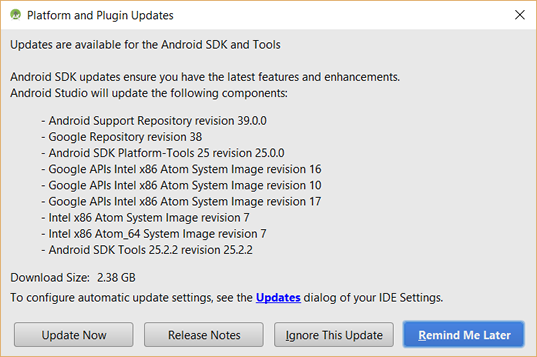
- Once Andriod Studio opens, you may be prompted to update components. Click on the upgrade link. In the Platform and Plugin Upgrades dialog box that appears, click on the Update Now button.
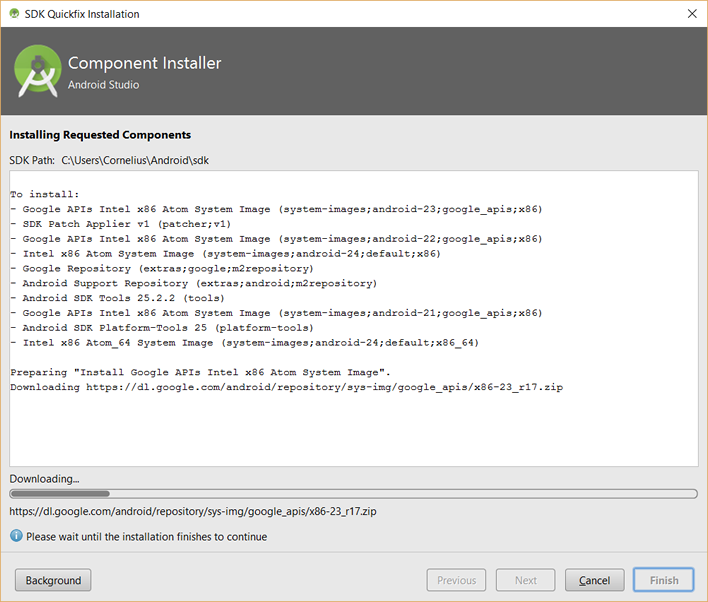
- In the Component Installer dialog box that appears, wait for the files to download and be installed and then click the Finish button:
NOTE: Installation and installation will take a while depending on the speed of your computer.
- If you get the Windows Security Alert dialog box, click on the Allow access.
- In the Complete Installation dialog box that appears, if this is your first version of Android Studio or you want to start with a fresh copy, click the last option. If you do want to import the settings, select the second or third option to import the settings.
- Click the OK button and in the dialog box that appears, click the OK button to allow access.
- CHECK POINT: If this is the first time Android Studio has been installed, you will see the Setup Wizard where you will download additional SDK components. Click the Next button.

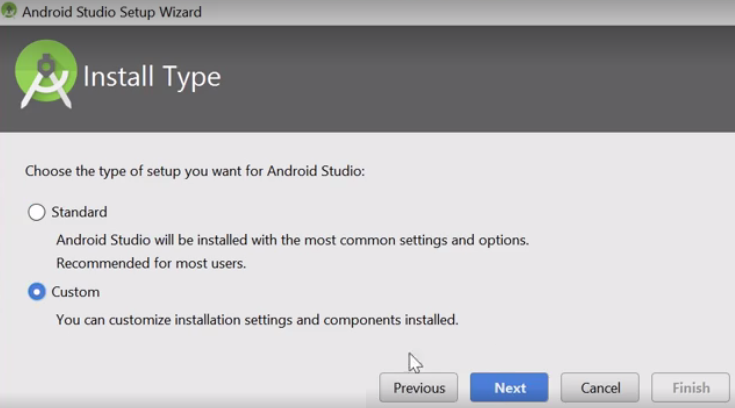
- In the Install Type dialog box that appears, click either the Standard or the Custom radio button and then click on the Next button.
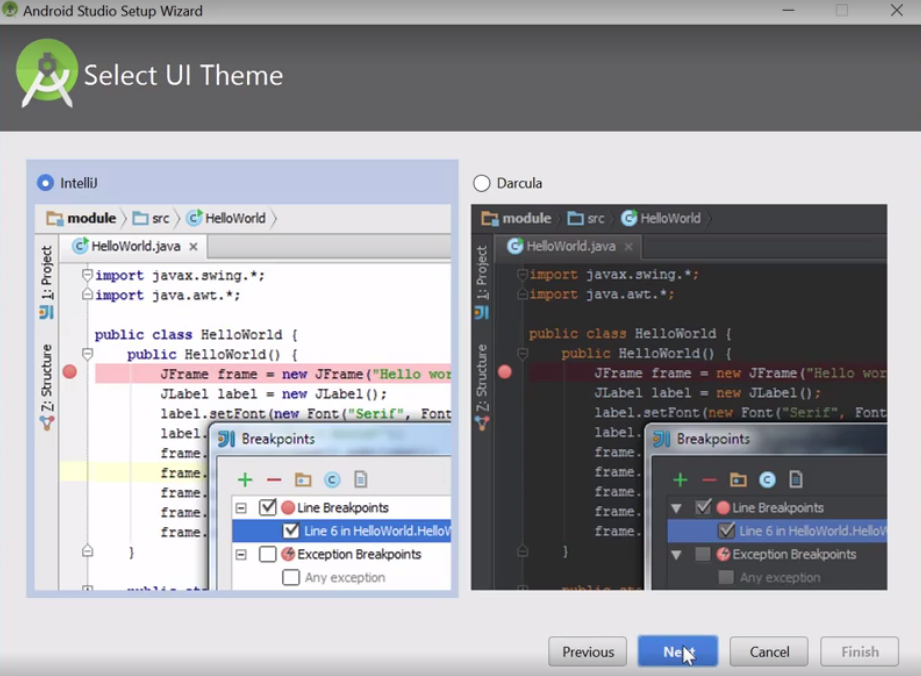
- If you clicked the Custom radio button, in the Select UI Theme dialog box that appears, select either the IntelliJ or Darcula radio button and then click on the Next button.
NOTE: Darcula is not to be confused with Dracula. This setting can be changed later in the Settings dialog in Android Studio.
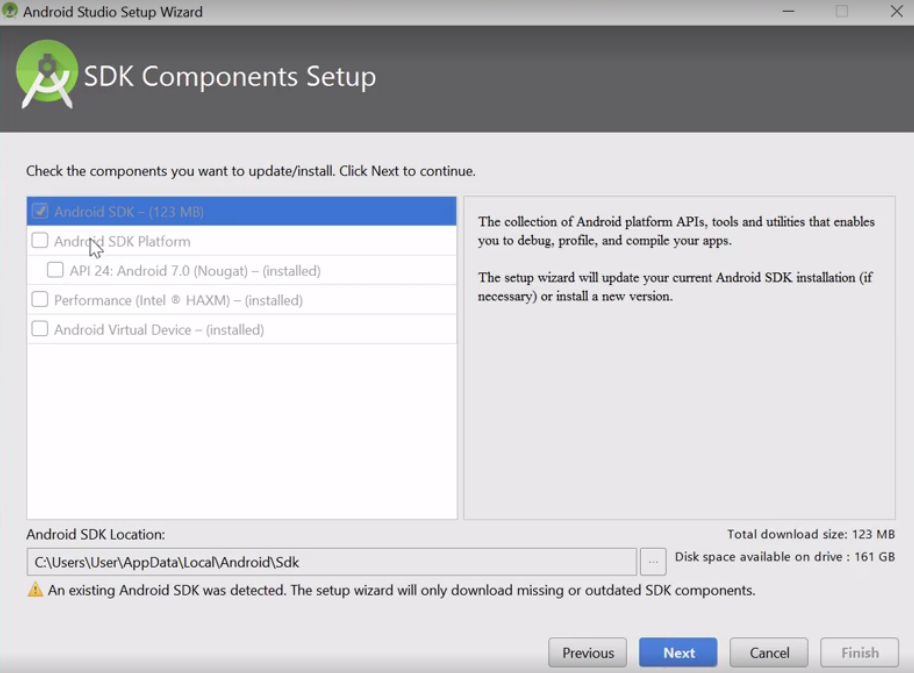
- In the SDK Components Setup dialog box that appears, accept the defaults and then click on the Next button.
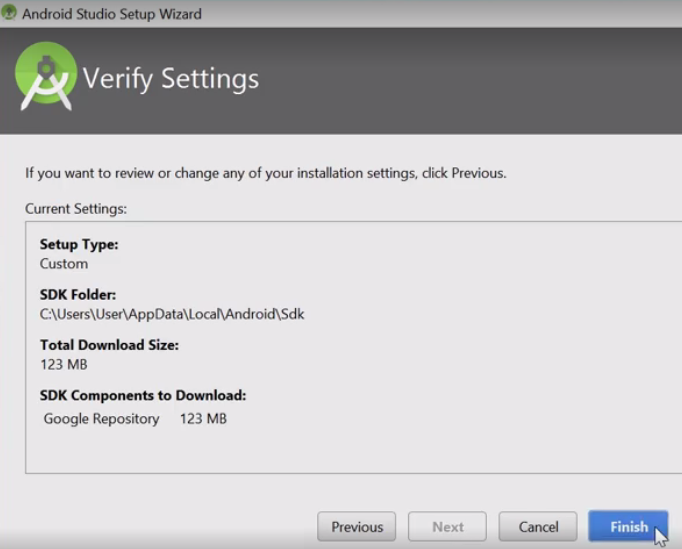
- In the Verify Settings dialog box that appears, click the Finish button.
- CHECK POINT: Android Studio will download the additional files that it needs. This will take some time to download.
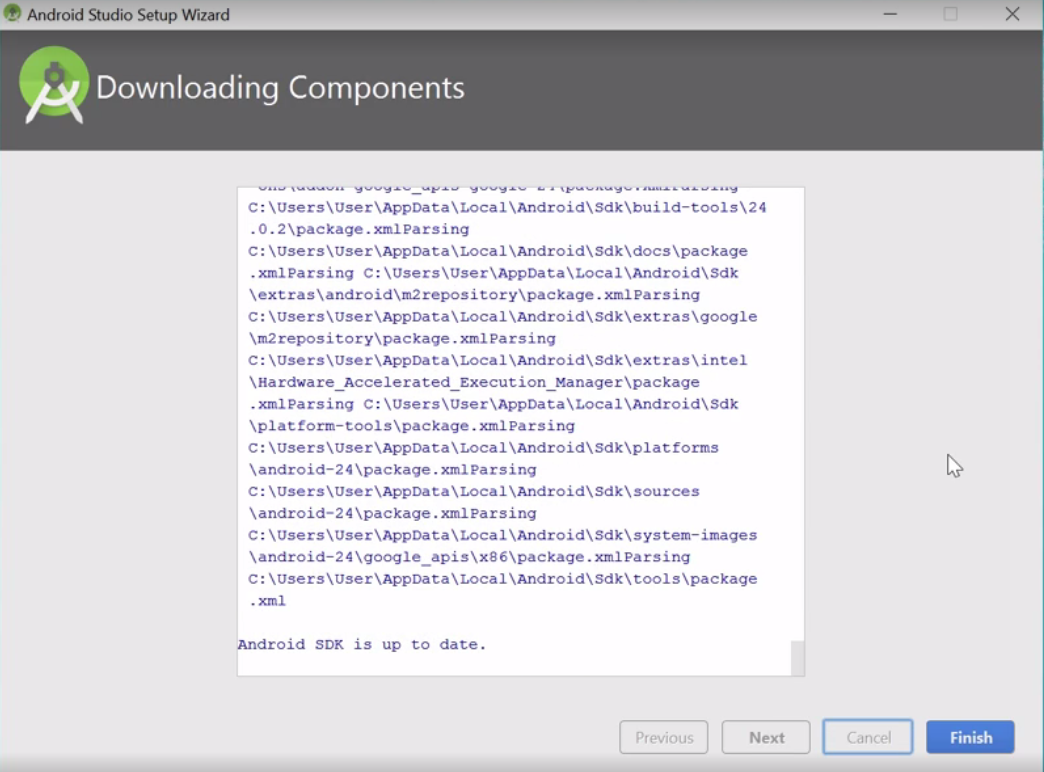
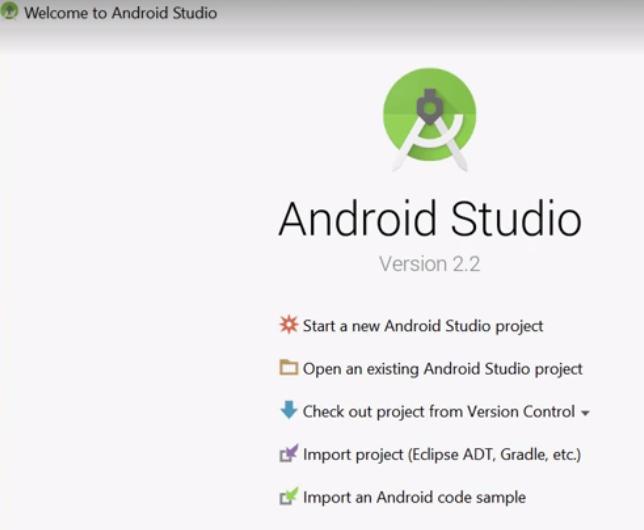
- Click the Finish button once you see the last sentence that says, "Android SDK is up to date." Then, you should see the folllowing screen:
Installing BETA Version of Android Studio
If you are an experience developer, you can download a Beta Version of Android Studio before it is released to the general public
If you want to get the most recent BETA version:
- Go to https://sites.google.com/a/android.com/tools/download/studio/canary/latest
- Click the link for the download page to find links for zip files for each operating system.
- Download the zip file to your desktop and right-click and select Extract all to unzip it any where you want (e.g., Desktop) or double-click on it on the Mac to unzip it.
- CHECK POINT: You should see the Android Studio icon for the latest version. Android Studio allows you to have multiple versions side-by-side as long as they have different name.
- On the Mac, if you have an older version already installed, you need to rename it in the Applications directory
- Drag the new version into the Applications directory and then double-click to install it.
- In the dialog box that appears, click the OK button.
- In the Complete Installation dialog box that appears, select the third option and then click the OK button.
- The first time you start Android Studio, you will have an opportunity to set your preferences: (ADD TO ABOVE and THEN DELETE)
- In the Install Type diaog box that appears, select Custom and then click the Next button.
- In the Setup UI theme dialog box, select your perferred theme (IntelliJ or Darcula) and then click the Next button.
- In the SDK Components Setup dialog box that appears, select all of the options and optional if you want to install the SDK in anothe location.
- In the Emulator Settings dialog box that appears, select the default if you only have 8G for the Intel HAXM software. However, if you have more memory and you plan to run multiple emulators at the time then increase the amount of memory. As a rule of thumb, you should allocate 1-2G per virtual device.
- In the Verify Settings dialog box that appears, click the Next button
- CHECK POINT: In the Download Components dialog box that appears, you should see the a progress bar showing that the SDK components files are being downloaded. You can click on the Show Details button to see details. Once the file are downloaded, click the Finish button and you should see the Android Studio Welcome screen.
In the SDK manager: (ADD TO ABOVE and THEN DELETE)
- Uncheck all options that are checked automatically.
- Go to the Extras section and check Intel x86 Emulator Accelerator (HAXM Installer).
- Click the Install 1 package... button and in the dialog that appears click on the Accept License radio button. and then click the Install button.
- When you see the message "Done loading packages" in the lower left corner, you can close the SDK Manager dialog and close Android Studio.
- Go to the SDK > Extras > Intel folder, and then I'll click the sub-folder Hardware_Accelerated_Extension_Manager
- Choose the correct installer for your version of Mac OS 10 to mount the DMG file.
- Click the Continue button until you get to the Memory Limit screen.
- The default is two gigabytes. accept it and click the Continue button twice and install the software.
- CHECK POINT: If prompted for your administrator password, type it in. You should see the HAXM software installed. If you already have it installed, it will be overwritten.
Using A Command Line Interface
This section is for advanced users only that would like to use the Command Line Interface (CLI) to create or build an app.
On Mac, the JDK will now be available. On Windows, you have more steps to do:
- In the File Explorer, navigate to the ...Android/android-sdk/platform-tools directory and then select the path and Copy it to the clipboard.
CAUTION: Ensure that you selected the JDK folder and NOT the JRE folder.
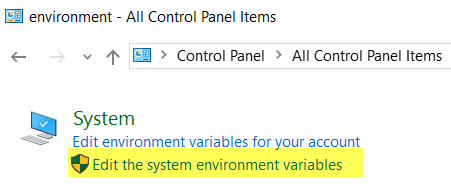
- On newer versions of Windows, open the Control Panel and type environment variables in the search field and then click the Edit the system environment variables
CAUTION: Be careful not to select Edit the environment variables for your account link.
- In older versions of Windows, click the Start button, right-click on Computer, select Properties, click on the Advanced system settings link and then click on the Environmental Variables... button.
- Under the Advanced tab, click the Environment Variables button.
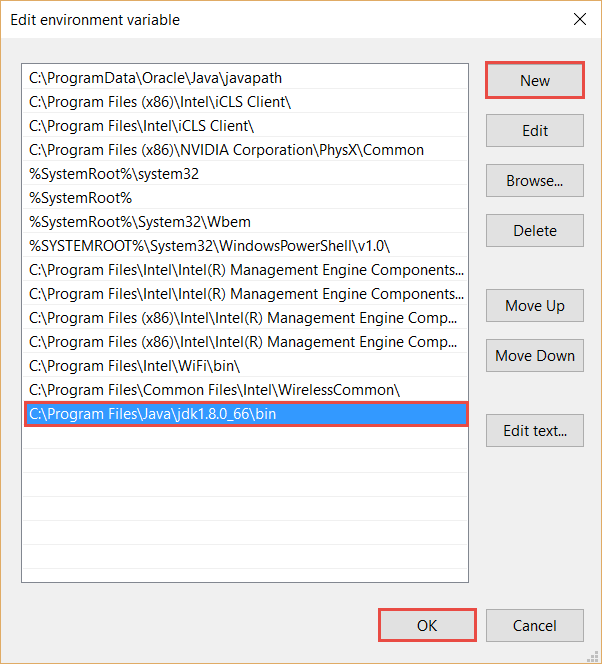
- Under the System Variable section, click on the New... button and create a new variable called JAVA_HOME and give its value the location of the JDK folder that you wrote down earlier (e.g., C:\Program Files\Java\jdk1.8.0_66) and then click the OK button.
CAUTION: Be careful to create the variable in the System variables and not the User variables section.

OPTIONAL: If you will ONLY be working in Android Studio and not the command line, you don't need to edit the next variable. However, if you are going to use the command line than you will need to set this variable so that you don't have to switch to the folders where the commands are stored.
- Scroll to the Path variable and double-click to select it and then click the NEW... button.
- Add the Path you copied earlier as the location of your JDK's folder and then append \bin to it. (e.g., C:\Program Files\Java\jdk1.8.0_66\bin).
- Click the OK button to commit the changes.
NOTE: The JAVA_HOME variable references the JDK's folder; whereas, the PATH variable references the JDK bin's folder.
NOTE: On older versions of Windows, you can click on the Edit button for Path and scroll to the end of the path and add a semicolon and then paste the path you copied earlier and then add another semicolon and paste again but delete "platform-" from the path and then click the OK button.?????
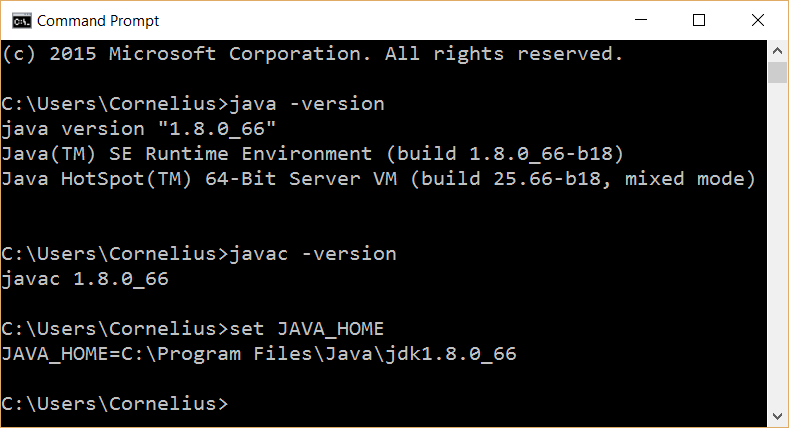
CHECK POINT: To test the JDK environment, open the Command Prompt (Windows) or the Terminal (Mac) and type each of the following commands and press the Enter or Return key:
- java -version - You should see the Java version installed.
- javac -version - You should see the version again. (c is for compiled).
- set JAVA_HOME - You should see the JAVA_HOME variable and its value displayed.
If you go to the Command Prompt on Windows and type dir *.tools, you will see the following three folders with executable files in them.
- build tools - include at least one version number folder that contains the commands that are used to compile and build app packages
- platform tools - contains:
- ADB (Android Debug Bridge) is used to work with devices during development and testing to create a connection to either a virtual or physical devices so it can be debugged, send messages, etc.
- fastboot is used to work with the low-level interface on an Android device.
- sqlite3 is used to manage databases
- tools - contains essential emulator tools
To use these commands from a command line interface (CLI), follow the steps below for both Windows or Mac to add them to the system path so that you can invoke them without having to switch to the folders in which they are stored:
Windows
- Go to the Control Panel and type the word environment in the search box.
- Click the edit the system environment variables link.
- Click the Environment Variables button.
- Scroll down in the System Variables list, and double-click the Path to open it.
- Add additional paths for the tools and the platform tools folders at the end of the string using absolute locations and separate the paths with a semi-colon.
- Click the OK button three times to close all three dialog boxes and to commit the changes.
- Go to a command prompt.
NOTE: On Windows 7, go to the Start menu, and type cmd. On Windows 8 or 10, open the command prompt from the Context menu in the lower left corner.
- CHECK POINT: Type the word android and press the ENTER key. You should see the Android SDK manager open regardless of what the current directory is.
Mac OS
- Create a file named .bash_profile in home directory and add the tools and platform tools folders to the path.
NOTE: You can create this file in any text editor (Mac OS has one named Nano) - Go to the the Terminal app and ensure that you are in the home directory by typing CD ~.
NOTE: On a Mac, the ~ represents the home directory.
- Type sudo nano .bash_profile.
NOTE: If the file does not exist, the editor will open with a blank screen.
- Type the following path: export PATH=$PATH:~/Library/Android/sdk/tools:~/Library/Android/sdk/platform-tools
- Press Ctrl+X to exit.
- If prompted to save it, click the Yes button.
- When returned to the command prompt execute the script type source .bash_profile to execute the script.
NOTE: The script will run automatically when the user with the same profilePOINT: Type adb to see the help screen. Type adb device to see a listing of current devices. - log in again.
- CHECK
Once the command line tool folders are added to path, you can run any commands without having to switch to folder. Once a command prompt has been open, you can write the following commands:
- android - will open the Android SDK Manager application.
- android list avd - show a list of current AVDs.
- emulator -avd Nexus_5_API_21_x86 - (The Nexus can be replaced with any AVD) - opens the virtual device in the emulator software. You need to keep the Virtual device open. Then, open another command prompt to communicate with that virtual device.
- adb devices - show list of all attached devices. Communicate with physical or virtual devices when debugging and testing.
- adb reboot - to reboot physical device. It is best to close a virtual deve and restart it.
- monitor - when virtual or physical devices are attached, it will show in the device view and can be selected to see the logcat output.
You can even create a complete app at the command line.
Windows:
- Open command prompt, switch to Desktop folder by type cd desktop and then clear the screen by typing cls.
NOTE: Before creating a project you need to know what API levels (targets) are available.
- Type android list target and press the Enter key to show installed APIs.
NOTE: Notice the ID number that will be needed to create the project.
- Clear the screen again by typing cls.
- Type android create project --target 2 --name MyAwesomeApp --path ./MyAndroidProject --activity MainActivity --package com.example.android.HelloWorld
NOTE: Make sure to use two dashes for each parameter name which are self-explanatory. "./" represent the current folder.
- Press Enter to create project.
- Return to the desktop to see MyAwesomeApp and double-click on it to see content.
- To edit in Android Studio imported it with the defaults settings.
Mac:
- Open the terminal app and go the the tools directory (cd/tools)
- Type ./android create project --target 1 --name MyAwesomeApp --path ~/Desktop/MyAndroidProject --activity MainActivity --package com.example.android.MyAndroidProject
NOTE: Make sure to use two dashes for each parameter name which are self-explanatory. "./" represent the current folder.
- Press Return to create project.
- CHECK POINT: If you open the directory where the app was created, you will see that it created the following files.:
- AndroidManifest.xml
- ant.properties
- res folder
- src folder
- Close the terminal screen and return to Android Studio and select the Import project (Eclipse, Gradle, etc.) link which allows you to import app that was created from the command line.
- In the Select Eclipse or Gradle Project to Import, navigate to the folder with the app in it and then click the OK button.
- In the Import Project from ADT (Eclipse Android), and navigate to where you want to place the project and then click the Next button.
- On the next screen that appears, select all of the default options and click the Finish button to import the project.
NOTE: Each time you import a project, you will get a file named import-summary.txt that shows which files were ignored or moved, what steps you need to take, bugs, etc.
- Select Build > Clean Project to start a fresh app.
- Click the Run button and connect it to a virtual or physical device and then click the OK button.
Review Android developer documentation for additional information and more detail.