There are a variety of ways to advertise your app or create advertisement for your app.
AbMob by Google
AbMob by Google show ads from millions of Google advertisers and access programmatic demand, or use AdMob Mediation to earn from 40+ networks.
- Go to Abmob by Google (http://www.google.co.uk/admob/) and click on the Sign up for AdMob button to sign up.
- Open an app that you want to add an advertisement.
- Select Android > SDK Manager, click the SDK tools and ensure that you have the Google Repository rev XX installed or if it needs to be updated. If not install or upgrade it to the newer version by selecting the checkbox and then click the OK button.
- In the Installing Requested Component dialog box that appears, wait for the files to download and then click the Finish button.
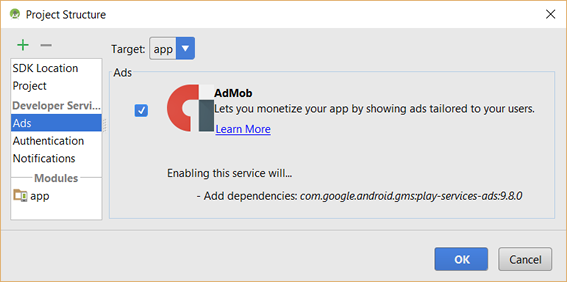
- Select File > Project Structures..., click Ads in the left panel and then click the checkbox in the Ads section:

- CHECK POINT: In the Android View, click the Gradle Scripts and then double-click the build.gradle (Module: app) and in the file that appears, you should see the dependency file added from the previous screenshot.
NOTE: Don't use the build.gradle (Project: myApplication2) option. You could have type the dependency code here as well but the previous step will prevent you from making a mistake typing or using an older version.
- Open the AndroidManifest.xml file and add the following highlighted permissions, meta-data and activity:
- internet - allow internet permission
- access network state - set permission to tell if internet is active
- meta-data - required to use Google Play services to use AdMob
- new activity - used for add an activity for the ad
<?xml version="1.0" encoding="utf-8"?>
<manifest xmlns:android="http://schemas.android.com/apk/res/android"
    package="com.example.myapplication">

    <uses-permission android:name="android.permission.INTERNET"/>
    <uses-permission android:name="android.permission.ACCESS_NETWORK_STATE"/>

    <application
        android:allowBackup="true"
        android:icon="@mipmap/ic_launcher"
        android:label="@string/app_name"
        android:supportsRtl="true"
        android:theme="@style/AppTheme">

        <meta-data android:name="com.google.android.gms.version" android:value="@integer/google_play_services_version" />

        <activity
            android:name=".MainActivity"
            android:label="@string/app_name"
            android:theme="@style/AppTheme.NoActionBar">
            <intent-filter>
                <action android:name="android.intent.action.MAIN" />

                <category android:name="android.intent.category.LAUNCHER" />
            </intent-filter>
        </activity>

        <activity android:name="com.google.android.gms.ads.AdActivity" android:configChanges="keyboard|keyboardHidden|orientation|screenLayout|uiMode|screenSize|smallestScreenSize" android:theme="@android:style/Theme.Translucent" />

    </application>

</manifest>
- Open the strings.xml file and add the following highlighted string resource:
NOTE: The banner_add_unit_id text is string that will be used to test the ad on your computer. Once you are ready for production, this string needs to be replaced with the one you get from the AdMob account.
<resources>
    <string name="app_name">My Awesome App</string>
    <string name="action_settings">Settings</string>
    <string name="banner_ad_unit_id">ca-app-pub-3940256099942544/6300978111</string>
</resources>
- Open the content_main.xml file and add the following highlighted code to add a name space and the ad's layout:
NOTE: The namespace allows Google to use the correct resolution for the ad. It will be in gray until you use is later in the code:
<?xml version="1.0" encoding="utf-8"?>
<RelativeLayout xmlns:android="http://schemas.android.com/apk/res/android"
    xmlns:app="http://schemas.android.com/apk/res-auto"
    xmlns:ads="http://schemas.android.com/apk/res-auto"
    xmlns:tools="http://schemas.android.com/tools"
    android:id="@+id/content_main"
    android:layout_width="match_parent"
    android:layout_height="match_parent"
    android:paddingBottom="@dimen/activity_vertical_margin"
    android:paddingLeft="@dimen/activity_horizontal_margin"
    android:paddingRight="@dimen/activity_horizontal_margin"
    android:paddingTop="@dimen/activity_vertical_margin"
    app:layout_behavior="@string/appbar_scrolling_view_behavior"
    tools:context="com.example.myapplication.MainActivity"
    tools:showIn="@layout/activity_main">

    <TextView
        android:layout_width="wrap_content"
        android:layout_height="wrap_content"
        android:text="Hello World!" />

    <com.google.android.gms.ads.AdView
        android:layout_width="wrap_content"
        android:layout_height="wrap_content"
        android:layout_centerHorizontal="true"
        android:layout_alignParentBottom="true"
        ads:adSize="BANNER"
        ads:adUnitId="@string/banner_ad_unit_id"
        android:id="@+id/adView">
    </com.google.android.gms.ads.AdView>

</RelativeLayout>
- CHECK POINT: Click on the Design view tab. You should see the Ads By Google banner.
- Go to the MainActivity.java file and add the following highlighted code in the onCreate method to request an ad:
NOTE: Notice the import statement that is automatically added.
package com.example.robpercival.admobdemo;

import android.app.Activity;
import android.os.Bundle;
import android.view.Menu;
import android.view.MenuItem;

import com.google.android.gms.ads.AdRequest;
import com.google.android.gms.ads.AdView;

public class MainActivity extends Activity {

    @Override
    protected void onCreate(Bundle savedInstanceState) {
        super.onCreate(savedInstanceState);
        setContentView(R.layout.activity_main);

        AdView adView = (AdView) findViewById(R.id.adView);
        AdRequest adRequest = new AdRequest.Builder().build();
        adView.loadAd(adRequest);

    }
- CHECK POINT: Run the app in an emulator. You should see the ad on the screen.