Set Device Environment
Testing on a real devices is more reliable than testing on a virtual device. Moreover, there are somethings that cannot be done on a virtual device (e.g., geo-location, sensors). However, you have to:
- set security on device
- install USB device driver if you are connecting with the Windows OS
- test on real device
Set Security
- On your Android device, go to the Settings option.
- Select the Security option.
- Enable the setting that say something like "Unknown sources: Allow installation from both trusted and unknown sources" in order to load an app onto a device.
- On a virtual device, this setting is turned on by default.
- On a physical device, this setting is turned off by default.
- Now, any app can be installed onto your device.
CAUTION: Be careful, you can download an app that could be potentially harmful.
Install Device Driver (Windows only)
If you are using a Google Nexus device, the device driver can be loaded by:
- Go to Tools > Android > SDK Manager.
- Click on the SDK Tools tag and select the Google USB Driver rev xx (where xx is the current version).
- Click the Apply button.
- Go to the Window Device Manager:
- Windows 8, 8.1 and 10: Right-click on the Window icon in the lower left corner and select Control Panel.
- Windows 7: Use the Start menu.
- Type Device Manager in the Search field and then click the Device Manager link.
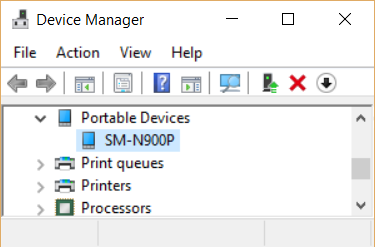
- CHECK POINT: Connect your device to your computer using a USB cable. The device (e.g., Nexus 5) should show up in the Device Manger under Android Phone, Portable Devices, or Other devices.
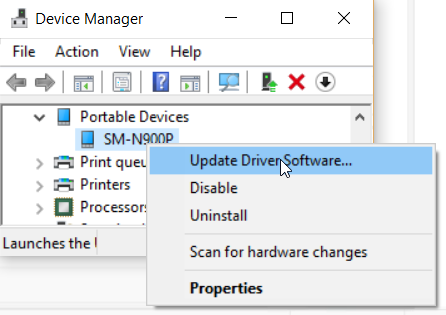
- If the device driver is already installed, you can right-click on the device and select Update Driver Software… from the menu to install the latest version.
- In the dialog box that appears, click the Browse My Computer for Driver Software and then click the Browse button to go to the USB driver folder.

- In the dialog box that appears, click the browser button to the SDK directory to locate the device driver under the extras\google\usb_driver\i386 directory and then click the Next button.
- Complete the other dialog prompts to install or upgrade the device driver.
NOTE: Once the installation is complete, it should show in the Control Panel. If not, reboot your computer and then un-attach and reattach the device using the USB cable.
If you need a device driver from another vendor other than Google, go to http://developer.android.com/tools/extras/oem-usb.html and then click on the OEM Driver link to navigate to a page with a listing on all of the Original Equipment Manufacturers (OEM) drivers. Click on the appropriate link for your device vendor to download the device driver.
Set USB Debugging
In order to connect a physical device to Android Studio you have to be in Developer mode.
- On your device, locate the Settings option and click on it.
NOTE: If you see the Developer options, you are already a developer and you can skip the remaining steps.
- Click on the About Phone option and then click on the Build Number three times.
- After the third click, you will see a prompt that says, "You are now 4 steps away from being a developer" , click 4 more times until you see the message, "You are now a developer."
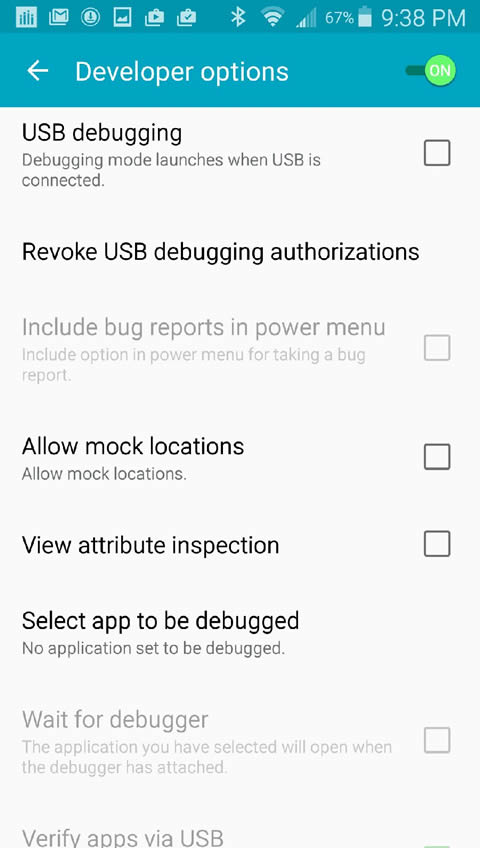
- Click the Back button to return to the Settings screen and you should now see the Developer options, click on it and turn on USB debugging and then click the OK button to the prompt "Allow USB Debugging...".
- CHECK POINT: You should see another prompt but this time showing the computer's RSA Key fingerprint which identifies the computer
- (Optional) If you always want to connect from this computer easily and not have to deal with this dialog box again, click on the checkbox option and then click the OK button.
TIP: If you do not want the device to connect every time, Go to Settings > Developer options > Revoke USB debugging authorization and then in the dialog box that appears, click the OK button. Unplug and then replug the device and you will see the option again to choose Allow USB debugging each time you attach your device. However, it is best to select this option as a developer so that you don't see this prompt again and again.
- Select the Stay Awake checkbox.
NOTE: With this option turned on, when the phone is plugged in using the USB cable it will not go to sleep. - There is a host of other options you can set:
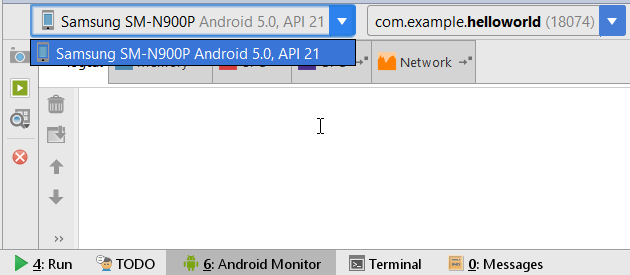
- CHECK POINT: When you click the Run button, you should now be able to select the device from a list of connected devices then click the OK button. You can also select the option Use same seletion for future launches checkbox if you want to use it again. After a while, you should see the app load on your device. You may also see the Run panel showing the app being launch and loaded onto the device.
- For additional information on how to run an app on a real Android device go to: http://developer.android.com/training/basics/firstapp/running-app.html
Connect to Real Device
It is best to test on a physical device wherever possible. Steps may vary depending on devices.
Mac:
- After connecting a device, you need to ensure that it is connected correctly.
- On to the launcher screen and drag down from the top to reveal the notification(s).
- Touch the USB for charging notification and change the setting to Photo Transfer (PTP) to open the photo app
- From the main menu, click the Import option
- If the photo app does not work, you need to check the cable, etc.
Windows:
- (Windows only) Ensure that you have the correct Windows USB driver installed.
- CHECKPOINT: (Optional) Open the Android Monitor panel and you should the statement No Connected Devices on the top of the panel if you do not have a device connect or you don’t currently have a virtual devices running.
- Connect your device to your computer with a USB cable.
- On your phone, select Settings and if you don’t see Developer Options, you will need to turn it on.
- Click on the About phone and tap on the Build Number three times and you will see a brief Toast prompt that “You are now 4 steps away from being a develop.” (Steps are actually taps). Tap four more times.
- CHECK POINT: You should see a Toast prompt that states “You are now a developer!”
- Go back to the previous Settings screen and you should now see the Developer options listed.
- Click on the Developer options and then turn on the USB debugging option to enable it.
- On the Allow USB debugging? Dialog that appears, click the OK button.
- CHECK POINT: In Android Studio in the Android Monitor panel, you should see your device listed in the drop down menu. If you don’t see the device, go back to your phone and click the OK button on a permission dialog box. You may also see an option to allow connecting to your computer every time. If you want to turn this option off, go to the Settings > Developer options > Revoke USB debugging authorizations. In the dialog box that appears, click the OK button.
NOTE: If this is the first time you've worked with this device in Developer mode, you might see this question asking if you want to allow Google to check the device for security problems. Click OK to allow Google's malware scan to run on apps that you install on your device.
- Create or load an app and then click the Run button and select the physical device you are connect to from the list and then click the OK button.
TIP: You can also select the checkbox Use same selections for future launches to run the same device.
- CHECK POINT: After a while, you should see the app loaded onto your physical device. You may also see the Run window appears showing the apps being installed and running on your device. If you exit the app and return to the Home screen you should see the app listed there. If you press and hold the app's icon, you can drag it to the Home screen for convenience.