Install Android Studio for Windows and Mac
Android Studio is free app based on JetBrains IntelliJ software and is the official Integrated Development Environment (IDE) for creating Android apps and include the following features:
- Available for Windows, Mac and Linux
- Android JAR file (app framework classes)
- WYSIWYG editor for multiple screen sizes and resolutions and orientation
- Templates to create common layouts (e.g., Login, Master/Detail)
- Gradle-based build system to customize building of apps for multiple APKs
- Lint inspection tool to check for performance, usability, etc.
- ProGuard tool to minimized app size (by removing unused code) and obfuscate code (by renaming classes, fields and methods with obscure names).
- App signing capability
- Documentation
- Samples
There are two versions of IntelliJ Idea:
- Community Edition which Android Studio is based on and it is free
- Utlimate Edition which has tools for JavaScript, Java Enterprise Edition (JEE), and databases
Software Development Kit (SDK)
Android SDK includes tools to create, debug and analyze apps:
- Emulators (with Android Studio) and simulators (with Xcode)
- Debugging tools
- Analyzing and optimizing tools
- Documentation and source code
- Code samples
SDK Manager
In order to use the tools, documents and code mentioned above, the Android SKD Manager is used to download these resources.- Build Tools—to build and compile apps (e.g., Tools > Android SDK Build-tools Rev 24 Installed)
- Android Versions— (e.g., Android 5.01 (API 21), Android 4.4S. (API 19)) Which include system images, samples, and APIs and source code.
- Extras folder—support libraries, additional tools and drivers
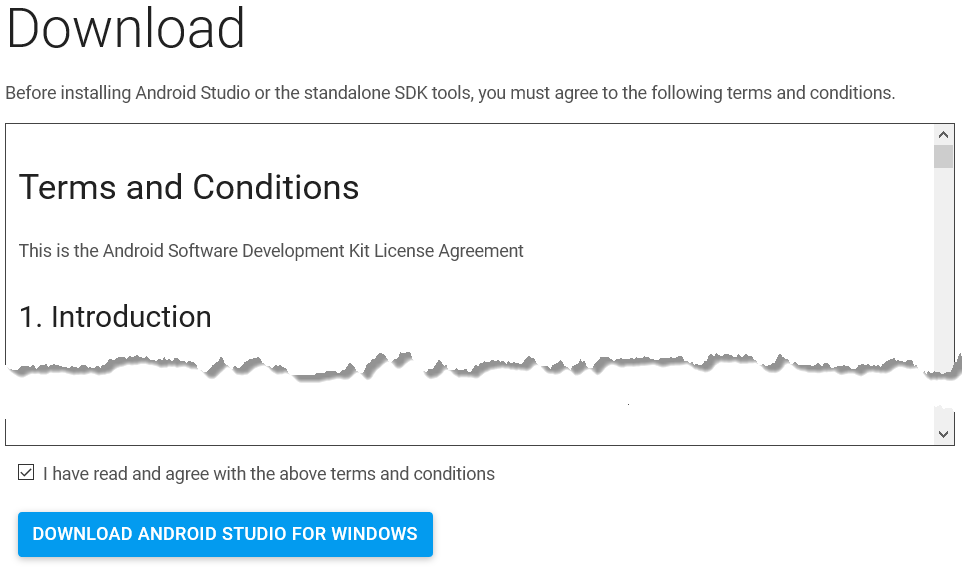
- Go to http://developer.android.com/sdk.
- Click the DOWNLOAD ANDROID STUDIO FOR WINDOWS or MAC button.
- On the Download page that appears, read the Android SDK License Agreement Terms and Conditions, select the "I have read and agree with the above terms and conditions" checkbox and then click the DOWNLOAD ANDROID STUDIO FOR WINDOWS button.
- In the dialog box that appear, save the installer to your computer (e.g., desktop).
- Double-click on the installer:
- On Windows it is an exec (executable) file.
NOTE: If a User Account Control dialog appears, click the Yes button.
- On the Mac, it is a dmg file. In the Andriod Studio dialog box that appears, drag-and-drop the Android Studio icon to the Applications folder. Using the Finder, go the the Applications folder and double-click on the Android Studio app. You will be prompted that you are downloading an application from the Internet...click the Open button.
ADD SCREEN SHOT HERE FOR MAC
- On Windows it is an exec (executable) file.
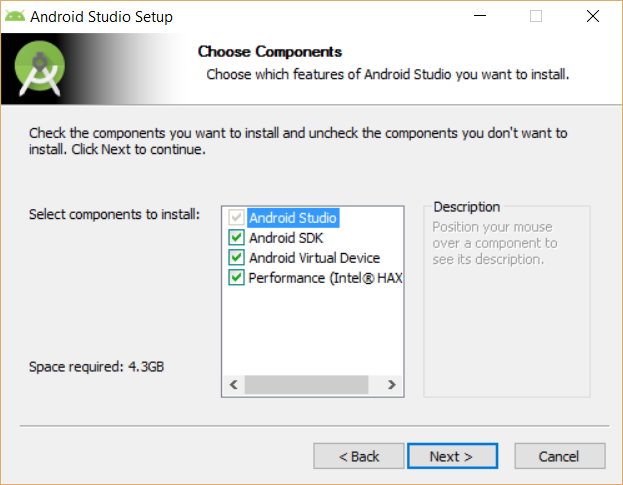
- Click the Next button and on the Android Studio Setup dialog box that appears, select all options:
- Android Studio - The Android developer environment to design and develop apps.
- Android SDK - collection of Android platform APIs, tools and utilities that enable you to debug, profile, and compile apps.
- Android Virtual Device - preconfigure and optimized Android Virtual Device for app testing on emulator.
- Performance (Intel HAXM) - a hardware-assisted virtualization engine (supervisor) which speeds up Android emulation on your development computer. The Intel HAXM allow you to manage FAST virtual devices on an Intel emulator instead of an ARM-based emulator.
NOTE: This only works with Intel processors AND only if you have 8G of memory or more installed. Otherwise, you will have to select ARM (Android Runtime Machine) as the option to install.
- Click the Next button.
- On the next screen that appears, review the License Agreement and then click the I Agree button to accept it.
- On the next screen that appears, accept the default location for the Android Studio but change the location for the Android SDK (e.g., Home directory--Android/SDK) so that it can be easier to get to.
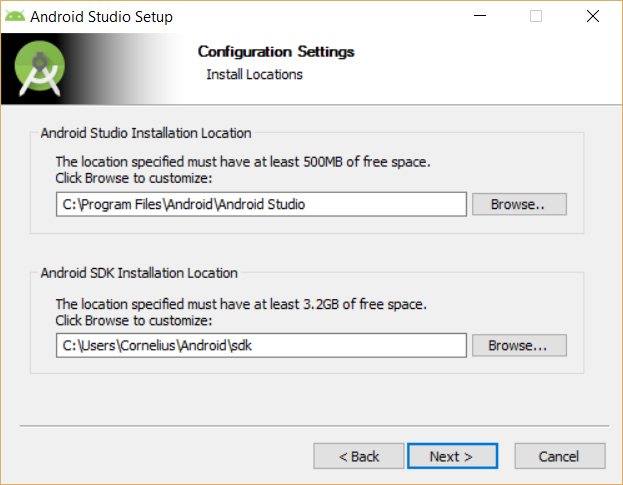
- Click the Next button.
- On the next screen that appears, accept the default GB of memory if you have 8G or least. If you have more than 8G and you plan to run more than one virtual device ata time you can increase the amount to about 1-2G for each virtual device you intent to run.
WHY:To configure Intel HAXM software that is used to speed up the Android emulator.
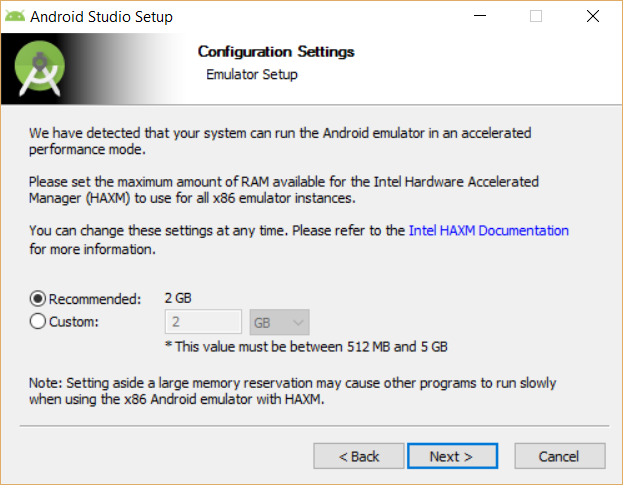
- Click the Next button and then the Install button.
NOTE: It will take a while to install all of the components onto your computer from the installer and from the web. You will later be asked to install the SDK.????
- Once you see the notice that indicates the setup was completed successfully, click the Next button and then click the Finish button to start Android Studio for the first time.
- In the Complete Installation dialog box that appears, if this is your first version of Android Studio or you want to start with a fresh copy, click the second option. If you do want to import the settings, select the first option to import the settings.
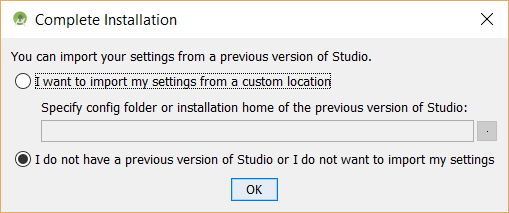
- Click the OK button and in the dialog box that appears, click the OK button to allow access.
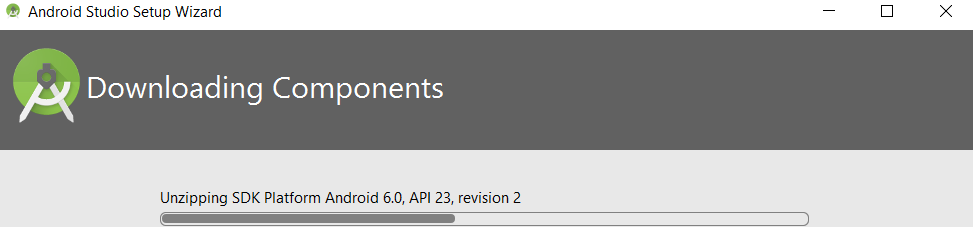
- CHECK POINT: If this is the first time Android Studio has been installed, you will see the Setup Wizard where you will download additional SDK components.
- Click the Finish button.
If you want to get the most recent BETA version:
- Go to http://tools.android.com/recent.
- Click the link for the download page to find links for zip files for each operating systems.
- Download the zip file onto the desktop and right-click and select Extract all to unzip it any where you want (e.g., Desktop)
- CHECK POINT: You should see the Android Studio icon for the latest version. Android Studio allows you to have multiple versions side-by-side as long as they have different name.
- If you have an older version already installed, you need to rename it in the Application directory.
- Double-click to open the folder and then in double-click on the bin folder to open it.
- In the bin folder, double-click on the 32 bit (Studio.exe) or 64 bit (Studio64.exe) version of Android Studio to install it.
- When Android Studio start up, click on the update link to update Android SDK Tools and then click the Update Now button.
- In the Warning dialog box that appears, click the Attempt to install all packages buttton.
- CHECK POINT: In the Install Requested Components dialog box that appears, you will see a progress bar showng the components being installed. Once it is completed, click the Finish button and Android Studio will start with its Welcome screen.
Configure Android Studio Settings
There are a few settings that are highly RECOMMENDED that you change to make your environment easier to work in:
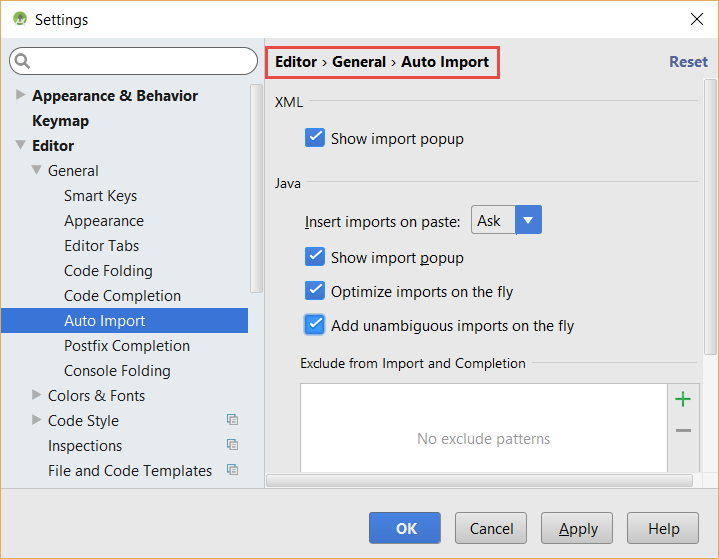
- Select File > Settings (Windows) or File > Preferences (Mac) and then select Editor > General > Auto Import.
- Select all three options.
IMPORTANT NOTE: This will help to AUTOMATICALLY import packages, etc. THIS IS HIGHLY RECOMMENDED FOR THE TUTORIALS IN THIS TRAINING MODULE. Otherwise, you will have to MANUALLY import packages as needed which can be very time-consurming.
- Click on the Appearance option and select Show line numbers and show method separators checkboxes and then click the Apply button.
NOTE: The show method separator will draw a horizontal line to separate methods.
- Click on System Settings > Updates and then select both checkboxs to check for updates and select Stable channels for both as well and then click the Apply button.
NOTE: Stick to the Stable channels, Once, you are versed with Android Studio, you can switch to another channel like the Canary channel.
- Click Editor > General > Code Folding and then DESELECT File header, import and one line methods checkboxes and then click the Apply button.
NOTE: If you are a beginner developer, you will want to SEE all of the code, once you become proficient, you can check these options.
- Click Editor > Color and Fonts > Fonts and then select a scheme.
NOTE: You cannot change a scheme; however, you can save it as different name and then make changes.- Click the Save As... button and in the Save Color Scheme As dialog box that appears, give the scheme a name and press the OK button.
- Change whatever settings you want (e.g., font/font size).
- Change any other options that you see fit.
- Click OK button.
If you want to get the most recent BETA version:
- Go to http://tools.android.com/recent.
- Click the link for the download page to find links for zips files for each operating systems.
- Download the zip file onto the desktop and double-click on it to unzip it.
- CHECK POINT: You should see the Android Studio icon for the latest version. Android Studio allows you to have multiple versions side-by-side as long as they have different name.
- If you have an older version already installed, you need to rename it in the Application directory.
- Drag the new version into the application directory and then double-click to install it.
- In the dialog box that appears, click the OK button.
- In the Complete Installation dialog box that appears, select the third option and then click the OK button.
- The first time you start up Android Studio, you will have an opportunity to set your preferences:
- In the Install Type diaog box that appears, select Custom and then click the Next button.
- In the Setup UI theme dialog box, select your perferred theme (IntelliJ or Darcula) and then click the Next button.
- In the SDK Components Setup dialog box that appears, select all of the options and optional if you want to install the SDK in anothe location.
- In the Emulator Settings dialog box that appears, select the default if you only have 8G for the Intel HAXM software. However, if you have more memory and you plan to run multiple emulators at the time then increase the amount of memory. As a rule of thumb, you should allocate 1-2G per virtual device.
- In the Verify Settings dialog box that appears, click the Next button
- CHECK POINT: In the Download Components dialog box that appears, you should see the a progress bar showing that the SDK components files are being downloaded. You can click on the Show Details button to see details. Once the file are downloaded, click the Finish button and you should see the Android Studio Welcome screen.
Install or Upgrade The Intel HAXM
Unlike the Windows installation, you have to install the HAXM software as a separate process for the Mac. The Intel HAXM allow you to manage FAST virtual devices on an Intel emulator instead of an ARM-based emulator.
- Open Android Studio and on the welcome screen, go to Configure > SDK Manager.
- Click on the SDK Tools tab.
- CHECK POINT: Check to see if the Intel x86 Emulator Accelerator (HAXM Installer) checkbox is selected. If so, it is already installed. However, you can use these next steps to update to a newer version.
- Go to the Flie Manager (Finder on Mac or Explorer on Windows) and navigate to the SDK directory
- Mac: Press CTL + SHIFT + G and type ~/Library/Android and press the Go button.
- Windows: Go to where the SDK directory was installed.
- From the Android directory, navigate to sdk/Extras/intel/Hardware...
- Mac: Look for the installer with a *.dmg extension (e.g, IntelHAXM 6.0.1.dmg)
- Windoww: Look for the installer with a *.exe extension
- Then,
- Mac: Open the *.dmg file to start the installer and in the dialog box that appears, click the Continue button.
- Windows: Open the *.exe file and if you see the User Access file, accept it.
- If you already have the software installed, you will be notified. However, you can reinstall it by clicking the OK button.
- Click the Continue button.
- On the screen for the Memory limit, adjust the memory based on the amount of memory you have on your computer
- If you have 8G, accept the default but you may be only able to run a SINGLE virtual device at a time.
- If you have more than 8G and you plan to use MULTIPLE virtual devices, you can allocate more memory. As a rule of thumb, you should allocate 1-2G per virtual devices that you intend to use.
- Click the Continue button several times and then click the Install button.
- Then, enter your username and password and then press the Install Software button.
- Click the Close button to install the software.
Go to the SDK monitor and:
- Uncheck all options that are checked automatically.
- Go to the Extras section and check Intel x86 Emulator Accelerator (HAXM Installer).
- Click the Install 1 package... button and in the dialog that appears click on the Accept License radio button. and then click the Install button.
- When you see the message "Done loading packages" in the lower left corner, you can close the SDK Manager dialog and close Android Studio.
- Go to the SDK > Extras > Intel folder, and then I'll click the sub-folder Hardware_Accelerated_Extension_Manager
- Choose the correct installer for your version of Mac OS 10 to mount the DMG file.
- Click the Continue button until you get to the Memory Limit screen.
- The default is two gigabytes. accept it and click the Continue button twice and install the software.
- CHECK POINT: If prompted for your administrator password, type it in. You should see the HAXM software installed. If you already have it installed, it will be overwritten.
Add Components
The initial installation of Android Studio includes a basic SDK which includes operating system images, compilers and other tools you need to build Android apps.
- From the Welcome screen, click the Configure button and then click SDK Manager button. When the SDK Manager opens, you should see several options already selected. If you plan to do development for Android TV or Android Wear, you will need to select those options as well. The latest version of Android is installed when Android Studio is installed.
- Check these tools to ensure you have the latest version of each installed:
- Android SDK tools
- Android platform tools
- Android Build tools
- Documentation for Android SDK
- SDK platform
- Samples for SDK
- Google API
- Google API Intel x86 Atom System Image
- Source for Android SDK
- Android Support Repository (Java libraries and other resources that are need for new apps)
- Google USB Driver (Windows only)
- Intel x86 Emulator Accelarator (HAXM installer)
TIP: Select only the options that you are going to use (e.g., Intel x86 Atom System Image)
NOTE: A USB driver is not needed for the Mac because it will automatically connect to a physical Android device. System images are virtual device images use with an emulator.
NOTE: It is recommended that you create a few AVDs with different API levels and hardware configurations so that an app can be tested on different Android OSs. If you have a small monitor, select the Scale display to real size checkbox so that you can set the emulator to a smaller size. An Android SDK Platform and a ARM System Image is the minimum components for an given Android version.
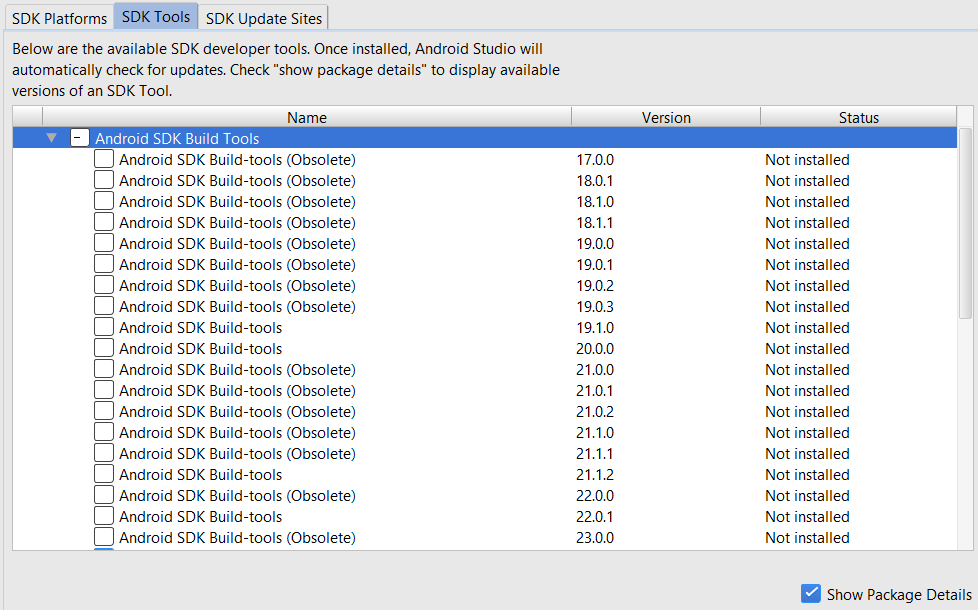
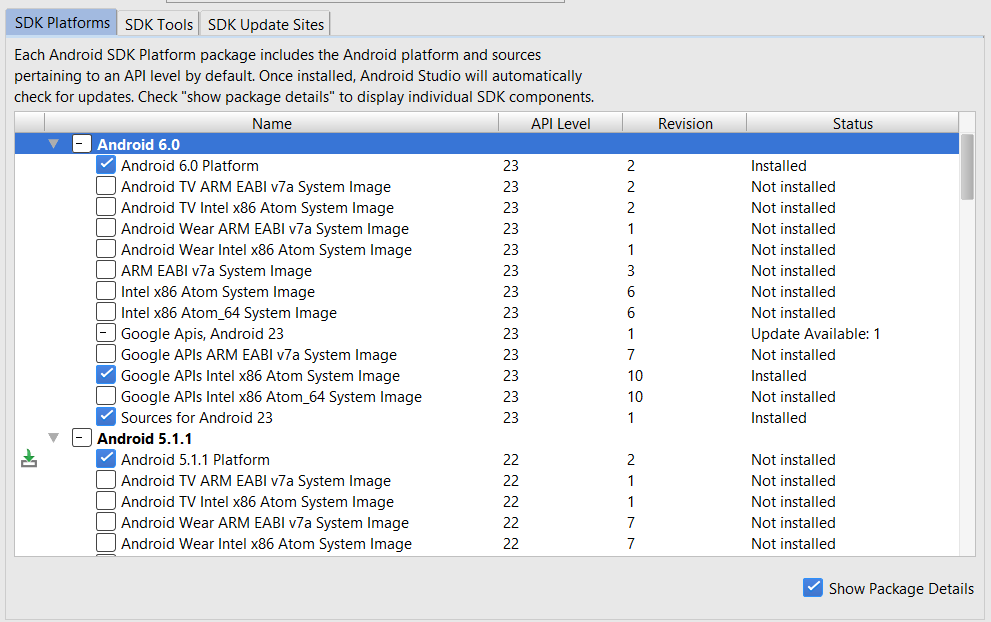
NOTE: The SDK Tools tab will show what versions of the build tools are installed. If you attempt to use a project that is based on an OLDER SDK version, you will be prompted to install that copy of the SDK tool.You can have multiple versions of SDK Tools installed to support DIFFERENT projects.
NOTE: The SDK Update Sites tab list the web sites that Android Studio use. You don't have anything to do in this tab.
- Click the Apply button.
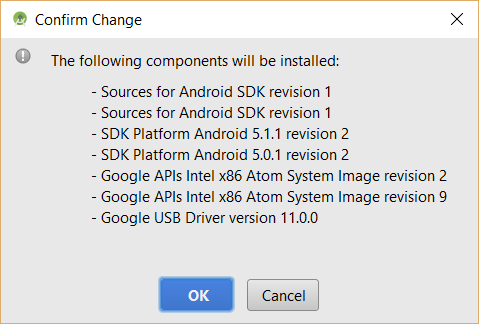
- In the Confirm Change dialog box that appears, review the list of components that will be added and then click the OK button.
- Click the Finish button and then the OK button.
- Once the install is complete, close Android SDK Manager and restart it again
=============================================================================================================================================
Setting up an Android work emulator environment allows you to fully test an application for the Android market on a variety of OS versions.
- To download the Android SDK, go to developer.android.com and click on the "Get the SDK" link at the bottom of the page. (or simply go to developer.android.com/sdk)
NOTE: If you are using Eclipse, you can also download the Eclipse ADT. - Click on "GET THE SDK FOR AN EXISTING IDE" and then click the Downloading the standalone Android SDK Tools for Windows button or Downloading the standalone Android SDK Tools for Mac button.
- Click on the checkbox to agree with the terms and conditions and then click on the download button.
NOTE: The download comes on a Mac as a .zip file and on Windows as a standard installer. You will need to install the Java SE development kit (JDK) for Windows and Mac. If the installer doesn't find it, you will be alerted to install it before you can install the SDK. - Once downloaded, double-click to install it to the default folder (e.g., C:\Users\Cornelius Chopin\AppData\Local\Android\android-sdk).
TIP: Create a shortcut to this folder. NOTE: You may need to show hidden folders in order to navigate to SDK. - Launch the SDK Manager. On the PC, double-click the icon. On the Mac, right-click and then select "Open."
NOTE: On the Mac, copy the downloaded folder (AndroidSDK-MacOSx) to the desktop in a new folder called Android and then open the folder tools.- In the Android SDK Manager dialog box, select the latest stable releases of the Android Tools.
- Select the latest stable releases of the APK, etc. for the phones/tablets devices you like to install.
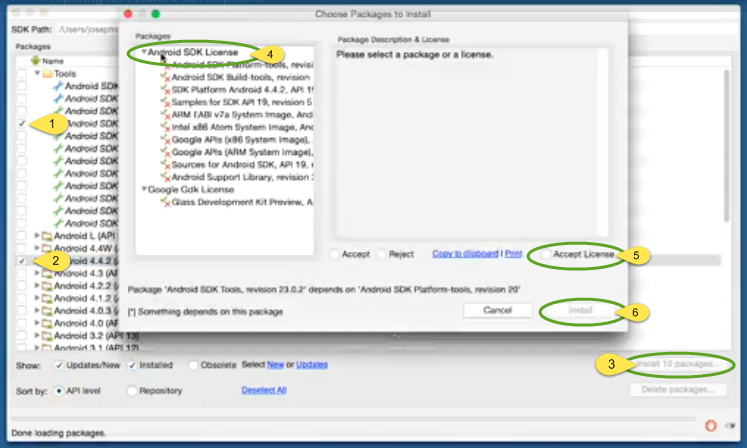
TIP: You don't need to select the previews or wearables if you are just wanting to demo standard handheld devices. - Click to Install the XX packages... button (where XX represents the number of packages)
- Choose a license (Android SDK License)
- Select the Accept license checkbox
- Click the Install button
NOTE: It may take a while to install packages, etc.
- On the Android SDK Manager log dialog box that appears, click the Close button.
- CHECK POINT: You should see the packages the word "installed" in the Status column of the Android SDK Manager for each package.
Manage Android Virtual Device (AVD)
An AVD is a configuration that combines the profiles of:
- hardware/software
- device itself
- Android OS versions to emulate
- With the Android SDK manager opened, choose Tools > Manage AVDs.... There are two views:
- The Android Virtual Devices shows any existing AVDs and allows you to edit, delete or launch in the emulator.
- The Device Definitions displays a list of devices. It can also be used as a starting point to create your own AVD.
- Select a phone type (e.g., Nexus One) that is similar to what you need and then click Create AVD... button.
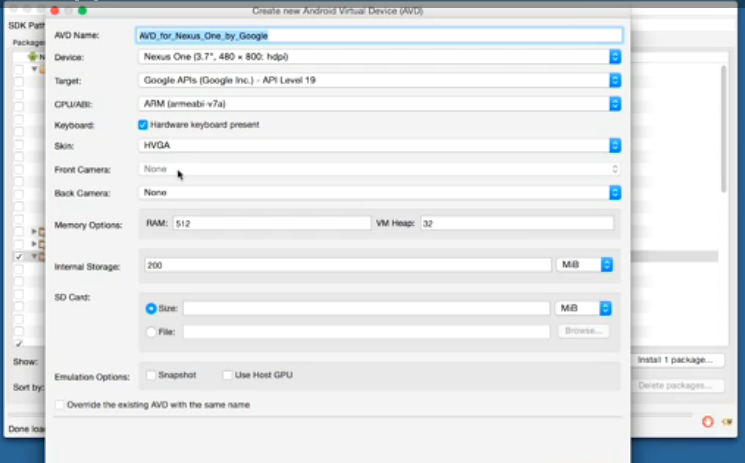
- In the Create New AVD dialog box that appears with some of the fields already completed if you chose a Device definition, add the following options:
- Select a Target: (e.g., Android 7.0 - API Level 31). NOTE: A target is a version of the SDK that you want to use
- CPU/ABI: Arm NOTE: Most manufactures uses ARM.
- Skin: HVGA NOTE: HVGA is a standard baseline skin. The OK button should now be enabled letting you know you meet the minimum requirement that is needed. However, you can add other options as necessary (camera, memory, storage, etc.)
- SD Card: 128
- Click the OK button.
- In the Confirming dialog box that appears that shows the details, click the OK button again.
- CHECK POINT: In the Android Virtual Devices view, you should see the new AVD:

Test App In Emulator
The next step is to test your app using an emulator.
- Select from one of the AVDs created earlier (e.g., Nexus One).
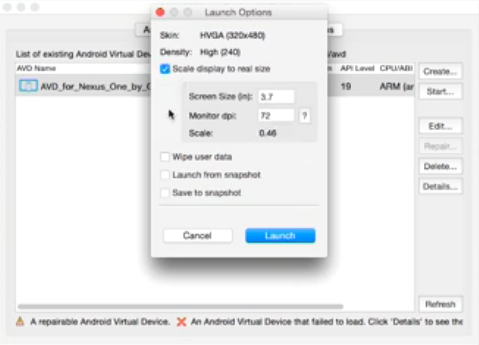
- Click Start... button to launch the emulator.
NOTE: What you choose in the dialog box that appears will vary depending on the emulator size you want to display and you current system - Set the following options:
- Choose the scale display to real size checkbox.
NOTE: Otherwise, the display will be small. - Change the screen size to a multiple of 3.7 so it will fit the monitor better. (e.g., 7.4)
- Click the Launch button.
- Choose the scale display to real size checkbox.
- Once the emulator is displayed, drag out that lock icon to open it.
NOTE: If this is the first time using the emulator, you may see the learn how-to-use-Android-type screens.
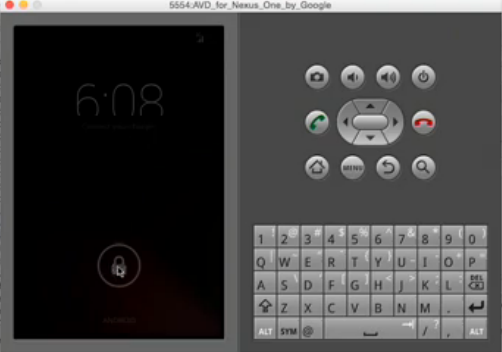
- Click the browser icon button.
NOTE: Once the browser loads, you should see the current version of the Google homepage. - Type in the URL to your app using the following syntax: http://10.0.2.2/path_to_app/index.html.
CAUTION: Android doesn't recognize the localhost or 127.0.0.1. - Click the Return button and navigate the app using either the app itself or the navigation keys.
It is important that you set up as many different emulators as needed to provide you with feedback on how an app is working.