Install JDK
In order to develop Android apps, you'll need to first install the latest version of the Java Developer Kit (JDK) if you don't already have it.
TIP: To check to see if you have the environment varibles set correctly and the JDK installed, open up the command prompt or the terminal app and type javac -version or java -version at the prompt. If you see a message that says, "... is not recognized as an internal or external command...", on Windows and you will be prompted to install it on the Mac.
- Go to http://java.oracle.com/.
- Click on the Java SE link under Top Downloads.
- Click the JDK Download button.

- On the next screen that appears, select the Accept License Agreement radio button and then choose the link for your OS version (e.g., jdk-8u31-windows-x64.exe or jdk-8u31-macosx-x64.dmg).
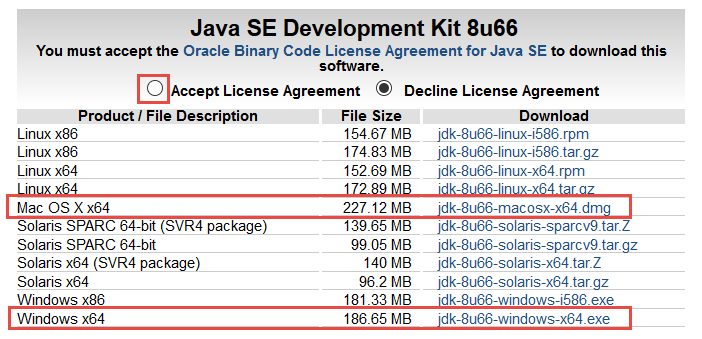
NOTE:x86 is for a 32-bit OS and x64 is for a 64-bit OS. Ensure you download the correct version.
TIP: To check if you have a 32-bit or 64-bit OS on Windows:- Go to the Control Panel and select System and Security and then Security again
- Open File Explorer and right-click on This PC and select Properties
- CHECK POINT: You will see what type you have in the System section (e.g., 64-bit Operating System, x64-based processor)
- Double-click on the downloaded file and follow the installation prompts
- On the second installation screen next to the phrase installed to: write down the location where the JDK will be installed. (e.g., C:\Program Files\Jave\jdk1.8.0_66\).
- On the Mac, there was a bug with the latest version of the JDK that interacted with IntelliJ Idea. If you open Android Studio and a dialog box tells you there is a problem with working with dialog boxes, you may need to downgrade to avoid the bug. To file out what version you have on your Mac, open the terminal app and type java -version.
- To get an older version go to http://www.oracle.com/technetwork/java/archive-139210.html. You will need to register with Oracle which is free to download older versions.
- (MAKE NEED TO DELETE IF NO LONGER AN ISSUE).
Set Variables
On Mac, the JDK will now be available. On Windows, you have more steps to do:
- In the File Explorer, navigate to the ...Android/android-sdk/platform-tools directory and then select the path and Copy it to the clipboard.
- In older versions of Windows, click on the Start button and then right-click on Computer and select Properties and then click on the Advanced system settings link and then click on the Environmental Variables... button.
- On newer versions of Windows, open the Control Panel and type environment variables in the search field and then click the Edit environment variables... link.
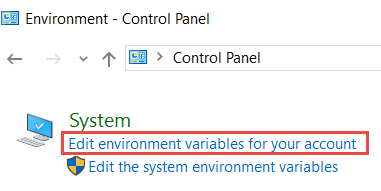
- Under the Advanced tab, click the Environment Variables button.
- Under the System Variable section, click on the New... button and create a new variable called JAVA_HOME and give its value the location of the JDK folder that you wrote down earlier (e.g., C:\Program Files\Java\jdk1.8.0_66) and then click the OK button.
CAUTION: Be careful to select the JDK folder and not the JRE folder.
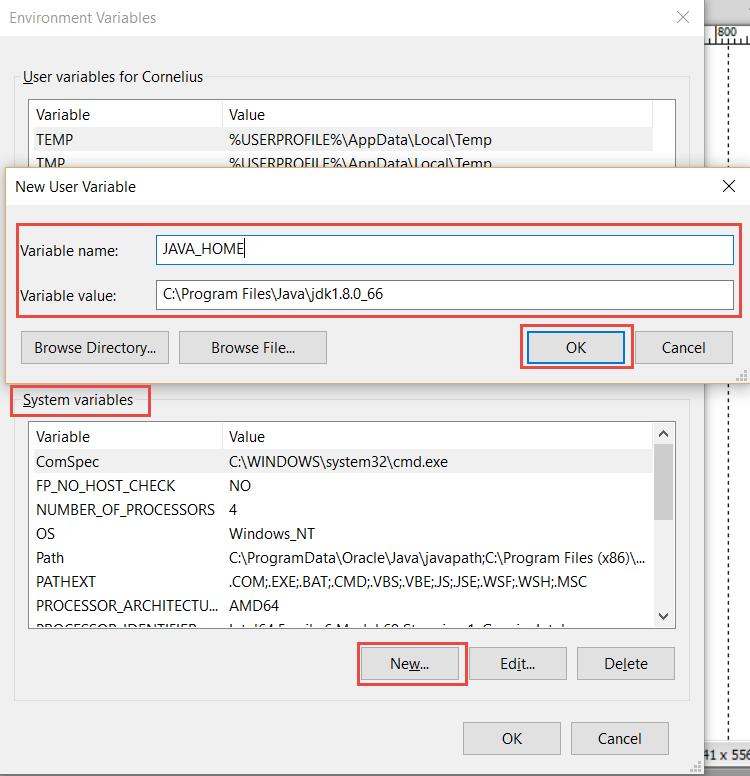
OPTIONAL: If you will only be working in Android Studio, you don't need to edit the next variable. However, if you are going to use the command line than you will need to set this variable so that you don't have to switch to the folders where the commands are stored.
- Scroll to the Path variable or double-click on it to select it and then click the NEW... button.
- Add another Path you copied earlier as the location of your JDK's bin folder.(e.g., C:\Program Files\Java\jdk1.8.0_66\bin).
- Click the OK button to commit the changes.
NOTE: JAVA_HOME points to the JDK's folder; whereas, the PATH points to the JDK bin's folder.
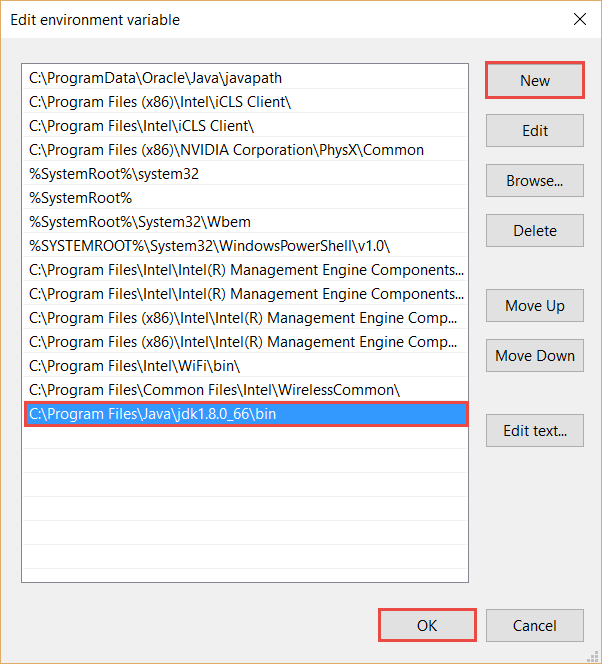
NOTE: On older versions of Windows, you can click on the Edit button for Path and scroll to the end of the path and add a semicolon and then paste the path you copied earlier and then add another semicolon and paste again but delete "platform-" from the path and then click the OK button.
Test JDK Environment
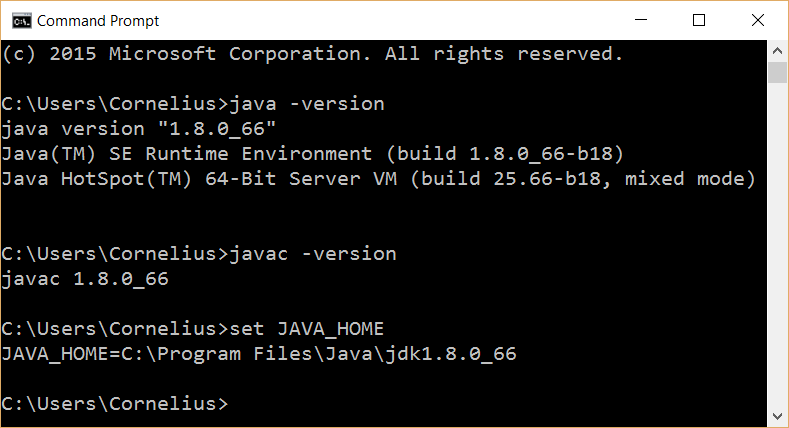
- CHECK POINT: To test the JDK, open the Command Prompt (Windows) or the Terminal (Mac) and type each of the following commands and pressing the Enter or Return key:
- java -version - You should see the Java version installed.
- javac -version - You should see the version again. (c is for compiled).
- set JAVA_HOME - You should see the JAVA_HOME variable and its value displayed.
Add Tool Commands To Path
If you go to the Command Prompt on Windows and type dir *.tools you will see the following three folders with executable files in them.
- build tools - include at least one version number folder that contains the commands that are used to compile and build app packages
- platform Tools - contains:
- ADB (Android Debug Bridge) is used to work with devices during development and testing to create a connection to either a virtual or physical devices so it can be debugged, send messages, etc.:
- fastboot is used to work with the low-level interface on an Android device.
- sqlite3 is used to manage databases
- tools - contains essential emulator tools
To use these commands from a command line interface (CLI), follow the steps below for both Windows or Mac to add them to the system path so that you can invoke them without having to switch to the folders in which they are stored:
Windows
- Go to the Control Panel and type the word environment in the search box.
- Click the edit the system environment variables link.
- Click the Environment Variables button.
- Scroll down in the System Variables list, and double-click the Path to open it.
- Add additional paths for the tools and the platform tools folders at the end of the string using absolute locations and separate the paths with a semi-colon.
- Click the OK button three times to close all three dialog boxes and to commit the changes.
- Go to a command prompt.
NOTE: On Windows 7, go to the Start menu, and type cmd. On Windows 8, open the command prompt from the Context menu in the lower left corner. - CHECK POINT: Type the word android and press the ENTER key. You should see the Android SDK manager open regardless of what the current directory is.
Mac OS
- Create a file named .bash_profile in home directory and add the tools and platform tools folders to the path.
NOTE:You can create this file in any text editor (Mac OS has one named Nano) - Go to the the Terminal app and ensure that you are in the home directory by typing CD ~.
NOTE: On a Mac, the ~ represents the home directory. - Type sudo nano .bash_profile.
NOTE: If the file does not exist, the editor will open when a blank screen.
- Type the following path: export PATH=$PATH:~/Library/Android/sdk/tools:~/Library/Android/sdk/platform-tools
- Press Ctrl+X to exit.
- If prompted to save it click the Yes button.
- When returned to the command prompt execute the script type source .bash_profile to execute the script.
NOTE: The script will run automatically when the user with the same profile log in again. - CHECK POINT: Type adb to see the help screen.
- CHECK POINT: Type adb device to see a listing of current devices.
Command Line Tools Examples
Once the command line tool folders are added to path, you can run any commands without having to switch to folder. Once a command prompt has been open, you can write the following commands:
- android - will open the Android SDK Manager application.
- android list avd - show a list of current AVDs.
- emulator -avd Nexus_5_API_21_x86 - (The Nexus can be replaced with any AVD) - opens the virtual device in the emulator software. You need to keep the Virtual device open. Then, open another command prompt to communicate with that virtual device.
- adb devices - show list of all attached devices. Communicate with physical or virtual devices when debugging and testing.
- adb reboot - to reboot physical device. It is best to close a virtual deve and restart it.
- monitor - when virtual or physical devices are attached, it will show in the device view and can be selected to see the logcat output.
You can even create a complete app at the command line.
Windows:
- Open command prompt, switch to Desktop folder by type cd desktop and then clear the screen by typing cls.
NOTE: Before creating a project you need to know what API levels (targets) are available. - Type android list target and press the Enter key to show installed APIs.
NOTE: Notice the ID number that will be needed to create the project. - Clear the screen again by typing cls.
- Type android create project --target 2 --name MyAwesomeApp --path ./MyAndroidProject --activity MainActivity --package com.example.android.HelloWorld
NOTE:Make sure to use two dashes for each parameter name which are self-explanatory. "./" represent the current folder. - Press Enter to create project.
- Return to the desktop to see MyAwesomeApp and double-click on it to see content.
- To edit in Android Studio imported it with the defaults settings.
Mac:
- Open the terminal app and go the the tools directory (cd/tools)
- Type ./android create project --target 1 --name MyAwesomeApp --path ~/Desktop/MyAndroidProject --activity MainActivity --package com.example.android.MyAndroidProject
NOTE:Make sure to use two dashes for each parameter name which are self-explanatory. "./" represent the current folder. - Press Return to create project.
- CHECK POINT: If you open the directory where the app was created, you will see that it created the following files.:
- AndroidManifest.xml
- ant.properties
- res folder
- src folder
- Close the terminal screen and return to Android Studio and select the Import project (Ecliplse, Gradle, etc.) link which allows you to import app that was created from the command line.
- In the Select Eclipse or Gradle Project to Import, navigate to the folder with the app in it and then click the OK button.
- In the Import Project from ADT (Eclipse Android), and navigate to where you want to place the project and then click the Next button.
- On the next screen that appears, select all of the defualt options and click the Finish button to import the project.
NOTE: Each time you import a project, you will get a file named import-summary.txt that shows which files were ignored or moved, what steps you need to take, bugs, etc.
- Select Build > Clean Project to start a fresh app.
- Click the Run button and connect it to a virtual or physical device and then click the OK button.
Review Android developer documentation for additional information and more detail.