Google takes a very different approach to unlocking a device for development purposes from Apple. Android allows you to install and run apps that have not been digitally signed for public release (debug built version). But in order to do so, you must first enable a setting on a device that is turned off by default on a real device. And since there are so many types of Android devices and versions of the Android OS, the exact instructions on how to set it might be different. If you're having trouble locating it, do a quick online search.
There are two build variants for an app. The Android SDK creates:
- a debug build that is used during development to preview the app on a real device or on an emulator.
- a release build that is used to create a signed APK version of the app that is used for distribution to an app store (e.g., Google Play, Amazon) that can than be downloaded and installed by a user.
The Android platform requires that all installed apps be digitally signed with a certificate whose private key is held by the application's developer as a way to identify the app's author before they can be installed. The certificate does not need to be signed by a certificate authority, it can use a self-signed certificate. (http://developer.android.com/guide/publishing/app-signing.html).
Create a Keystore
As the name implies, a keystore is a store (a place) where a key (or several keys) are "stored." In essence, it is a file that contains a private key or a set of private keys that is held by the app developer and is used to identify the app developer.
CAUTION: A keystore can be created ONCE but you can have ONE or MORE private keys stored in it. That is why is is so important to keep the KEYSTORE and ITS PASSWORDS in a safe and secure place. Since all UPDATES must use the SAME KEY, don't lose the keystore after you publish an app. The only way to recover from this is to delete the current version and use the basic version again.
NOTE: You can have one private key per app or you can have a diffrent private key for each app.
After a *.keystore file is created, the next time the app is exported, the Use Existing Keystore option can be selected by clicking on the Browse button to select an app and then entering its password.
When you create a debug version of an app (either virtual or physical), Android Studio will automatically create and sign a debug keystore file and automatically transfer it to an emulator or a real device.
When you create a release version of an app, a private key needs to created and stored in the keystore that can then be used to "sign" the app so that it can be publish in an app store.
The steps for creating and distributing an app is:
- Build and test app
- Export app
- Create a keystore with a private key or a set of private keys
- Generate APK*
- Use private key to "sign" app
- Publish App to Google Play, etc.
*APK - Android app package that is a SINGLE file with all of the resources (e.g., xml files, java files, graphics, icons, manifest file) you need to distribute and install an app onto a device.
- Open an app that you want to create an APK for.
- Select Build > Clean.
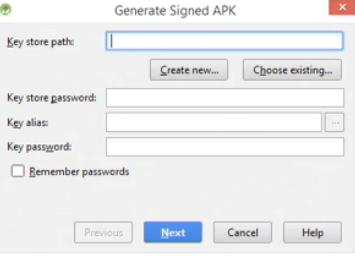
- From the menu, select Build > Generate Signed APK.
NOTE: To generate a signed APK, you will first need a KeyStore file which will be done in the next step.
- In the Generate Signed APK dialog box that appears, click the Create new... button OR if you have an exsiting keystore click the Choose existing... button and in the Set Path dialog box that appears, navigate to the existing keystore file:
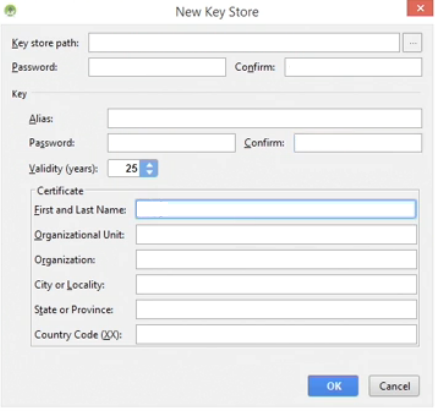
- In the New Key Store dialog box that appears, click the browse-to-file button denoted with three dots (...) and in the New Key Store dialog box navigate to where you want the file to be saved (e.g., the desktop is a convenient place) OR click the new folder icon and type in a new folder name, give the file a name (e.g., myAppNameKeyStore) and then click the OK button.
NOTE: Your should see the file name will an extension of jks.
- Back in the New Key Store dialog box, in the Password and Confirm password field, enter same password twice.
CAUTION: It is important to save the keystore in a safe place AND remember its password.
- In the Alias field, type an alias (e.g., ChopinismKey)
NOTE: This can be any string with no spaces and no special characters.
- Under the Key section, in the Password and Confirm password, enter the same password twice.
NOTE: The first set of password was for the keystore. This set is for the key itself. Again, save the password in a safe and secure place for the key.
- Leave the Certificate Validity at its default value of 25 years.
- In the appropriate fields, enter your full name, Organization Unit or Organization, City of Locallity, and State or Province (XX).
- Click the OK button.
- To use the keystore in the Generate Signed APK dialog box, enter the Keystore password, the Key alias from the combo box and the Key password you created earlier.
NOTE: You can also click the Remember passwords checkbox so that each time you use the keystore file, you won't need to reenter the passwords again.
- Click the Next button.
- In the Generate Signed APK dialog box that appears, enter destination folder (e.g., desktop) for the APK file.
- Set Build Type to Release.
- Click the Finish button.
NOTE: Android Studio will build the app as before but instead of preview it on a real device or in an emulator it will be saved as an APK in the folder you specified earlier.
- After a while, in the Generate signed APK dialog box that appears, you should see the message "Signed APK's generated successfully."
- Click the Show in Explorer button to open the APK file or click the Close button to dismiss the dialog box.

- You can rename the APK default name (app-release.apk) to something more descptive (e.g., Chopinisms.apk)
- You can now submit this released version of the APK to an app store (e.g., Google Play, Amazon).