Before you start the final testing of your app, you may need to:
- update the title of your app that Android created by default
- replace the default icon (ic_launcher) with your custom icon and add any other additional icons that you need.
- create screenshots
- think of a short and long description for your app and keywords that can be used (will be implemented later)
- turn off logging and debugging
For addtional information go to Prepare for Release
Update Title
Android will create default title name that may need to be replaced with a more descriptive name with spaces between the words.
- Open the AndriodManifest.xml file and notice the icon and the label attributes.
NOTE: The icon will be addressed in the next section. Notice that the label has a string reference to @string/app_name.
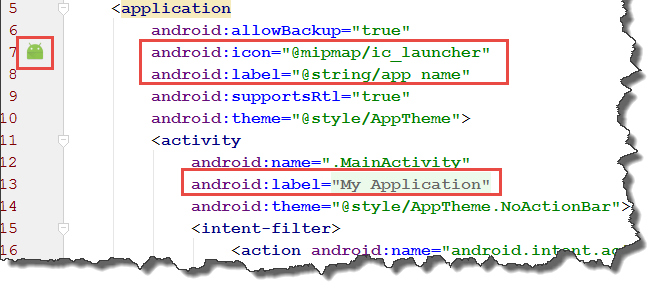
- Press CTRL + Click @string/app_name to open the strings.xml file.
- In the strings.xml file that opens, change the app_name attribute value to something more description.
From:<string name="app_name">My Application</string>
To:
<string name="app_name">Calorie Counter</string>
- Run the app in an emulator to see the changes.
Replace or Add Icons
To replace the default ic_launcher app icon (the green Android), you can use a host of tools to create the icons and then replace them all at once in the mipmap folder.
- Create new icons to replace the defualt ic_launcher (See below).
- Select the newly created icon and then in Android Studio, right-click on the mipmap folder and select Paste to paste them into that folder.
- Create icons for any other area of your app (See Icon Tools, Icon Types and Icon Prefixes and Sizes below).
- Run the app in an emulator. You should see that the icon has been replaced for the app in two places (the icon and the list view).
Beside Photoshop and Illustrator which can create icons, there are a number of tools that you can use to create multiple icons at one time. Follow the instruction on their website for details.
- Make App Icon – best icon resizer for mobile app developers.
- Android Asset Studio – Launcher Icon Generator. Create icon from imager, clipart or text. Need to use the Chrome browser for successful results.
- Android Asset Studio – Generic Icon Generator. Create icon from imager, clipart or text. Need to use the Chrome browser for successful results.
- Android Material Icon Generator – Create simple icons for Android Studio with that long Material Design shadow!
- Android Icon Generator – create icon for menu, status bar, tab, dialog, and list view.
- Icon Slayer – App Icon Generator for IOS and Android. Exported icons are neatly organized into folders
- Icon Generator for Corona SDK – Another icon generator but only works with *.png files.
There is a host of icons that you may need to create. They are all graphical elements:
- Launcher Icons–represent an app on the device's Home screen and in the Launcher window.
- Menu Icons–placed in the options menu shown to users when they press the Menu button.
- Action Bar Icons– represent action items in the Action Bar.
- Status Bar Icons–represent notifications from app in the status bar.
- Tab Icons–represent individual tabs in a multi-tab interface.
- Dialog Icons – represent pop-up dialog boxes that prompt the user for interaction.
- List View Icons–represent ListView to graphically represent list items.
Below is a list of icon asset and their corresponding prefixes and sizes. For more details, go to http://developer.android.com/guide/practices/ui_guidelines/icon_design.html
Asset Type |
Prefix |
Sizes |
Google Market hi-res |
market_ |
512 xhdpi |
Button Status / Notify |
btn_stat_notify |
24 ldpi |
Launcher icons |
ic_launcher |
36 ldpi |
Menu icons and Action Bar icons |
ic_menu |
36 ldpi |
Status bar icons |
ic_stat_notify |
19 ldpi |
Tab icons |
ic_tab |
24 ldpi |
Dialog icons |
ic_dialog |
24 ldpi |
Lists |
ic_list |
24 ldpi |
Create Screenshots
Google Play requires a minimum of least two screenshots that show what the app will look like on a mobile device. Optionally, you can also add screenshots that show what it looks like on 7'' and 10'' tablets if you have optimized your app for tablets. You can even add screenshots for an Android TV.
While not needed now, this is a good time to create screenshots based on your app. While you could use Photoshop or another graphic editor to create screenshots, you can let Android Studio create the screenshots for you:
- Click the Build Variants tab and ensure that the debug option is selected.
- Run an app in an emulator or on a real phone using a USB cable with USB debugging turned on.
NOTE: You can confirm that a device is attached (in this case, a Motorola Nexus 6) correctly by selecting the Android button at the bottom of the screen.
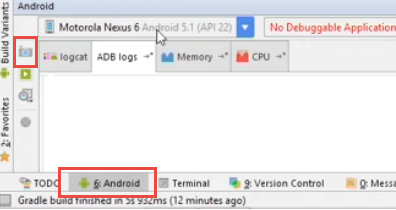
- In the Android Monitor panel, click the Screen Capture camera icon to take a screenshot fo the current screen (shown highlighted in the screenshot above on the left of the screen).
NOTE: You should see a message stating "Obtaining screenshot from device..." and then you should see the image.
- In the window that appears, used the zoom in and zoom out icon to show the complete device and then select the options you want:
- Frame Screenshot
- Phone Type (e.g., generice, Nexus, etc.)
- Drop Shadow
- Screen Glare
NOTE: Use the four options for marketing material but avoid using them for Google Play.
- Click the Save button.
- Copy the image to a convenient place (e.g., desktop) so that it can be uploaded to Google Play Store later.
- Repeat previous steps for as many screenshots as you need that will be used to upload to Google later.
NOTE: When taking screenshots from the emulator or a real phone, you can switch to a new screen on the emulator or phone and then capture that screen by clicking on the Recapture button. Repeat for as many screen that differ in your app. While not required, it is highly recommended that you also take screen shots for the 7” and 10” tablet. The only different you have to do is use a 7” and 10” emulator or 7” and 10” tablet.
ALTERNATIVELY: You can open the app in an emulator and then click on the camera icon to capture an image of the screen. The image will be displayed on your desktop.
High-res Icon and Feature Graphic
You also need to create REQUIRED screenshots for:
- Hi-res-icon 512w x 512h 32-bit PNG with alpha (transparency)
- Feature graphics 1024w x 500h JPG or 24-bit PNG WITHOUT alpha (transparency)
The high-res icon and feature graphic are required promotional graphics. The high-res icon should be the same image used for your app's launcher icon.
Below is an example of how to create a high-res icon:
- Open your original artwork. It shoud be a 32 bit large image (e.g., 1024x1024) with transparency.
- Select File > New > Image Assets... from the menu and make the necessary changes to:
- Icon Type (e.g., Launcher Icons, Action Bar and Tab Icons, and Notification Icons)
- Name (e.g., ic_launcher is the default name)
- Asses Type (e.g., Image, Clip Art, or Text)
- Clip Art (Click on icon and then select a new one from the list)
- Path (For images only: Select path)
- Text (For text only: Select font)
- Trim
- Padding
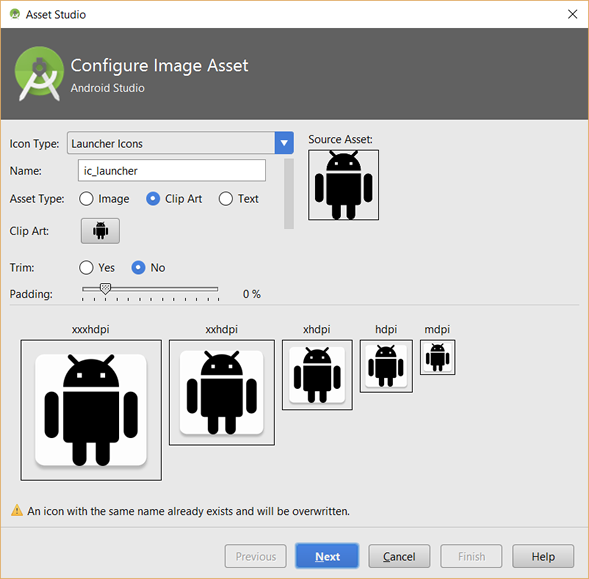
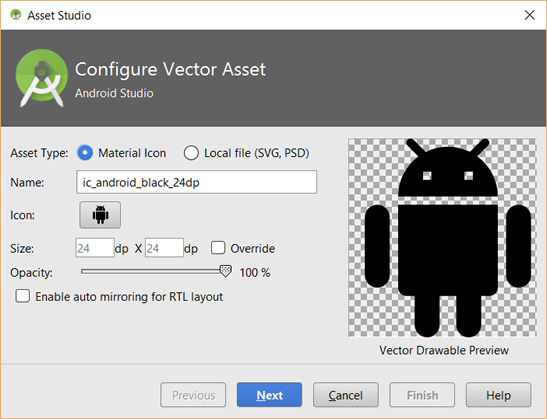
NOTE: While File > New > Image Assets... is used to create BITMAP images, you can also use File > New > Vector Assets... to create VECTOR images.
- Click the Next button and in the screen that appears, review the options and then click the Finish button.
ALTERNATIVE: You could also go to the Android Asset Studio website.
- You can go to the Android Asset Studio website (http://romannurik.github.io/AndroidAssetStudio).
- Click the Launcher icons link.
- In the launcher icon generator page that appears, click on the Image button.
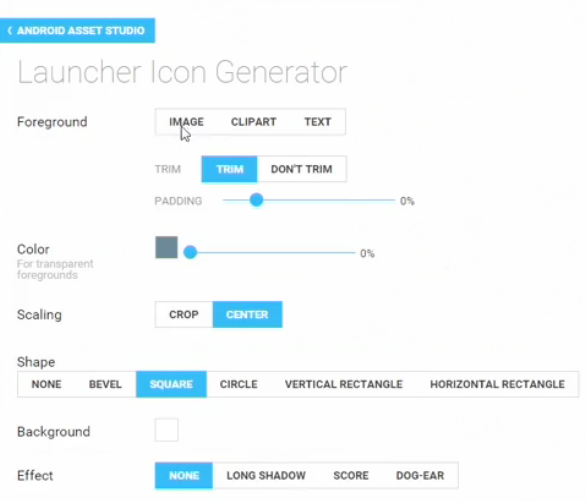
- Navigate to your high-res icon image.
- Scroll down and click on the GENERATE WEB ICON button.

- Click on the DOWNLOAD .ZIP file (See screenshot above).
NOTE: It created a 512x512 image that is needed.
- Download the .zip file and locate it and in Windows, drill down and locate the image and copy it to the clipboard. On a Mac, extract the .zip file and then drill down and copy it.
- Paste the image (web_hi_res_512.) to a convenient place (e.g., desktop) so that it can be upload to GooglePlay later.
Other Graphics
Optionally, you can also create:
- Promotional Graphic180w x 120h JPG or 24-bit PNG WITHOUT alpha (transparency)
- TV Banner 320 x 180h JPG or 24-bit PNG WITHOUT alpha (transparency)
- Promo video for YouTube
TIP: If you have an image that is not the correct size, open it in Photoshop and press CTRL + ALT + I and in the Image Size dialog box that appears, uncheck Constrain Proportion but ensure the Resample Image is selected and then enter the correct width and height and then press the OK key. Then, press CTRL + SHIFT + S to save it.
Descriptions and Key Word
While not needed now, it is best to create these items so that you can spend some quality time thinking of the correct words to use:
- Short Description of the app (0-80 characters) - (e.g., A list of quotes from Cornelius Chopin)
- Long Description of the app (0-4000 characters) - what the app does and a list of its features (e.g., Chopinisms are an ever growing collection of memorable quotes from Cornelius Chopin or others that I have placed my own "twist" on that will inspire you, comfort your heart and may even make you laugh. There is a story behind many of these quotes based on my life experiences.).
- Key words that describle the app - keywords that can be used for Search Engine Optimization.
Use Proguard To Optimize Code
The Android SDK includes a free tool called ProGuard that can be used to minify the size of the APK file and to remove debugging code.
ProGuard (proguard.sourceforge.net) is a free Java class file that does the following:
- Shrinker - detects and removes unused classes, fields, methods and attributes.
WHY: To create more compact code, faster network transfer and loading. - Optimizer - optimizes bytecode and removes unused instructions.
WHY: To list dead code so it can be removed from the source code.
- Obfuscator - renames the remaining classes, fields and methods using short meaningless names
WHY: To make programs and libraries harder to reverse-engineer.
- Preverifier - preverifies the processed code for Java 6 or higher or for Java Micro Edition.
WHY: To retarget and to preverify existing class to take full advantage of faster class loading.
ProGuard's main advantages compared to other Java obfuscators is:
- It is a compact template-based configuration. A few intuitive command line options or a simple configuration file are usually sufficient. The user manual explains all available options and shows examples of this powerful configuration style.
- It is fast. It only takes seconds to process programs and libraries of several megabytes. The results section presents actual figures for a number of applications.
- It is a command-line tool with an optional graphical user interface. It also comes with plugins for Ant, for Gradle, and for the JME Wireless Toolkit.
Minify APK
- Navigate to your current APK file and write down the current file size (e.g., 1.05M).
NOTE: Even though an APK file may be small, every byte matters when dealing with mobile devices.
- Launch Android Studio and open the build.gradle file and add the following highlighted code to the buildType method:
NOTE: If neccesary, change the minifiedEnabled from false to true to enable ProGuard to optimize your apk.
WHY: This tells ProGuard to reduce the size of the APK file by:
- looking for libraries that are not used and removing them.
- renaming methods, packages and classes to reduce the size of their identifiers.
- obscuring the code making it harder to read or reverse engineer.
buildTypes {
    release {
        minifyEnabled true
        proguardFiles getDefaultProguardFile('proguard-android.txt'), 'proguard-rules.pro
    }
}
CAUTION: This may be a problem if your app is using advanced Java techniques (e.g., indirect call to classes) that are not named in your code. - (OPTIONAL) Move the original apk files to a new location so that you don't overwrite it.
- In Android Studio, re-sync the app.
- CHECK POINT: Navigate to the APK and check file size again. You should see that it is smaller.
- Test APK to ensure that it works the same as it did before you minified it.
Remove Debugging Code
The Android development guidelines recommend that you "stripped out" certain classes that are only used for debugging (e.g., Log()).While the log method calls are good for debugging, they should be removed before the app is published especially if you have a lot of them because they can slow down your app. While you can comment out all of the log method calls yourself, you can let ProGuard do it for you.
NOTE: You may want to leave the log methods in your code for later development and save another version of your APK using Proguard.
Let us say that you're using logcat statements thoughout your app to trace certain actions in the app.
- In Android Studio, open the gradle.build file and add the following highlighted code:
NOTE: Notice that there's a call to proguardFiles that refers to two files. The first one (proguard-android.txt) points to a file that is part of your SDK installation that is shared among all projects. The other file (proguard-rules.pro) is unique to your app. The proguard-android.txt is the default and has been replaced with an optimized version (e.g., proguard-android-optimize.txt).
buildTypes {
    release {
        minifyEnabled true
        proguardFiles getDefaultProguardFile('proguard-android-optimize.txt'), 'proguard-rules.pro
    }
}
- Go back to the Project window and under the build.gradle file, open the proguard-rules.pro file and add the following highlighted code to add some of the ProGuard rules:
NOTE: Notice that it's at the module root and not the project root.
- Go to the ProGuard website, click on Manual, Examples and then click on Removing logging code link.
- Select the code sample and copy it.
- Go back to Android Studio and paste the code at the end of the proguard-rules file.
NOTE: This rule is used to remove Log method calls from your app.
WHY: To make any call to the Log class method be stripped from the APK file.
#-keepclassmembers class fqcn.of.javascript.interface.for.webview {
#   public *;
#}
-assumenosideeffects class android.util.Log {
    public static boolean isLoggable(java.lang.String, int);
    public static *** d(...);
    public static *** v(...);
    public static *** i(...);
    public static *** w(...);
    public static *** e(...);
}
- Re-sync the app.
- Test APK to ensure that it works the same.