 Although you used to could configure a few settings using the PhoneGap Build detail page, this option is no longer available. Each app you submit to the PhoneGap Build service now requires a configuration file that is named config.xml that MUST be included with the zip file when an app is loaded to PhoneGap Build. This file is used to set general/advanced settings, app icons, splash screens, permissions, developer info and plugins.
Beside writing the entire file yourself, there are two major ways to create this file:
- Use a starter templates from an online or training source and make any other changes manually to the file.
- Use a free third-party app called ConfigGap and then make any other changes manually to the file that the app doesn't include
CAUTION: This file must be at the same level as the index.html file, otherwise PhoneGap Build will not be able to locate it.
Use Starter Template
You can use the a starter template from an online resource like Github. For example, you could use the sample template from https://github.com/phonegap/phonegap-start/blob/master/www/config.xml.
Below are some details about the various settings.
Minimum Properties
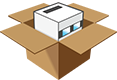
The config.xml file is used as the name implies to "configure" an app settings. It should be at the app root level and it is used to specify the app's metadata.
The <widget> is the root element for the config.xml file that has the following attributes:
- xmlns - are xml namespace attributes.
- id - is a unique app identifier that support all platforms that is written in a reverse-domain syntax (e.g., com.companyname.appname).
- version - is the version number using the major/minor/patch syntax (e.g., 1.0.0).
- versionCode (optional for Android only) - is used to set the versionCode.
Inside of the set of <widget> tag, you can add the following elements:
- name - app's name
- description - app's description
- author - author's name with href and email attributes
- platform - you can have a host of platform elements that represent:
- name - app(s) you want to build for (e.g., iOS, Android, or Windows)
View sample of minimum properties.
Other Properties
You can the following additional properties to the config.xml file:
- Permissions
- Icons
- Splash Screens
- Access
- Plug-ins
Permissions
Once you add the bare basics, you can add app's permission. If you do not need any permissions for your app, add the following line. You will still have the INTERNET permission which is required by PhoneGapBuild:
<preference name="permissions" value="none"/>
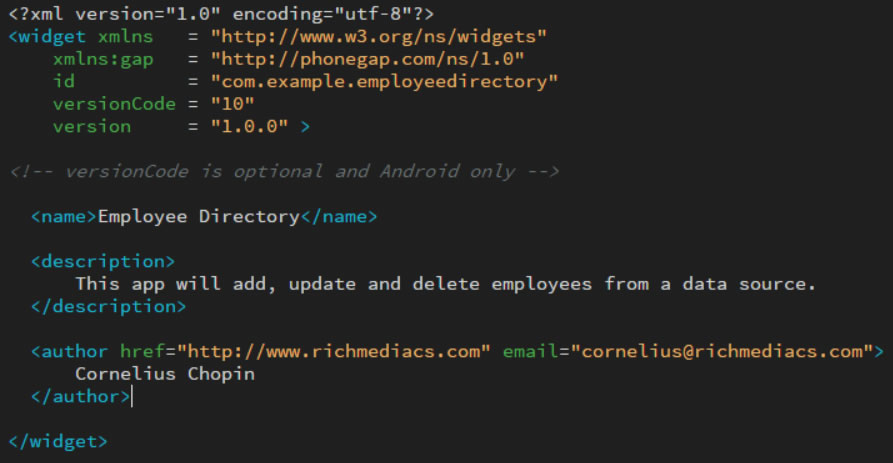
Otherwise, you can add a host of permissions inside of the <widget> element.
NOTE: You can define a specific version of PhoneGap to build your app to by adding the following preference:
<preference name="phonegap-version" value="3.6.0" />
View sample of minimum properties and preferences settings.
Icons
You need to specific icons for each platform you are building for.
NOTE: The icon.png is the default icon that will be used and must allays be named as such.
View sample of minimum properties, preferences and icon settings.
Splash Screens
You need to specific splash screens for each platform you are building for.

NOTE: You can also add the following to... (find out what this does):
<gap:config-file platform="ios" parent='CFBundleShortVersionString">
<string>100</string>
</gap:config-file>
View sample of minimum properties, preferences, icon and splash screen settings.
Access
You can also define various access to external domains.
- <access /> - a blank access element denies access to all external resources.
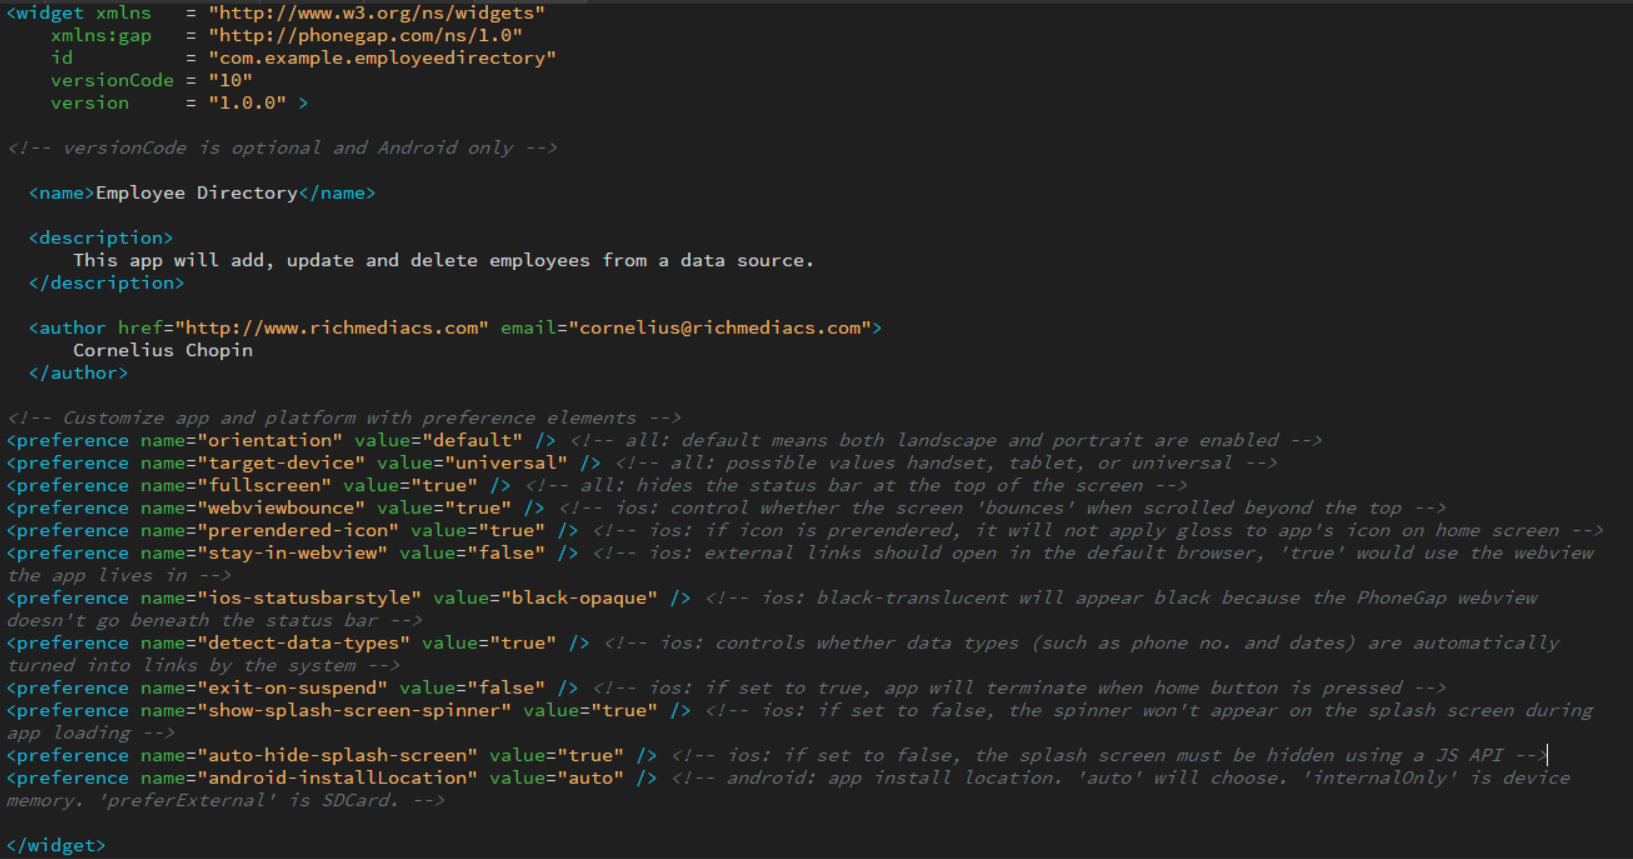
- <access origin="*" /> - a wild-card access element allows access to all external resource.
Otherwise, you can specify specific domains:
- <access origin="http://richmediacs.com" /> - allow any secure requests to http://richmediacs.com.
- <access origin="http://richmediacs.com" subdomains="true" /> - all access to top level domain as well as any subdomains (e.g.,. http://training.richmediacs.com/) same as above, but including subdomains, such as http://build.phonegap.com/
- <access origin="http://richmediacs.com" browserOnly="true" /> - only allows http://richmediacs.com to be opened by the child browser.
View sample of minimum properties, preferences, icon, splash screen, and access settings.
Plug-ins
Last but not least, you can add some plug-ins to the config.xml file. There are core-plug-ins and third-party plug-ins.
A list of available plugins are available at https://build.phonegap.com/plugins
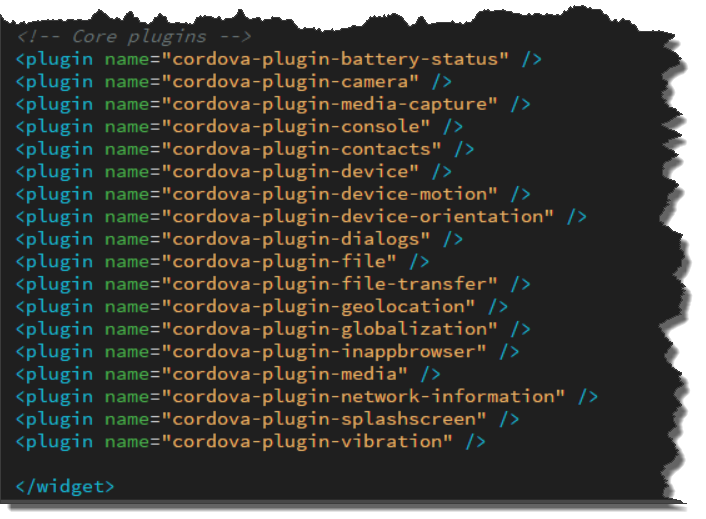
View sample of minimum properties, preferences, icon, splash screen, access and plug-in settings.
Use ConfigGAP
Another way to create the config.xml file is to use an app called ConfiGAP that is designed to help you create the config.xml files used by Adobe® PhoneGap™ Build. If you have ever used PhoneGap Build, you know that creating the config.xml file can be a complex chore. ConfiGAP was built to make that process a bit easier by defining the following items:
- Go to ConfiGAP at http://www.configap.com/.
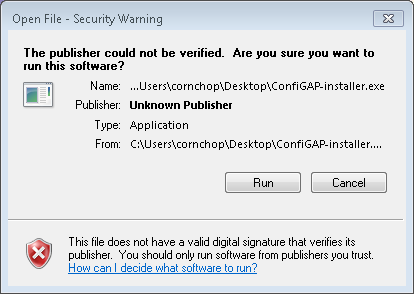
- Click on the Download button to download the ConfiGAP app to your computer.
- Double-click on the installation file and in the Open File - Security Warning dialog box that appears, click the Run button to open the app.
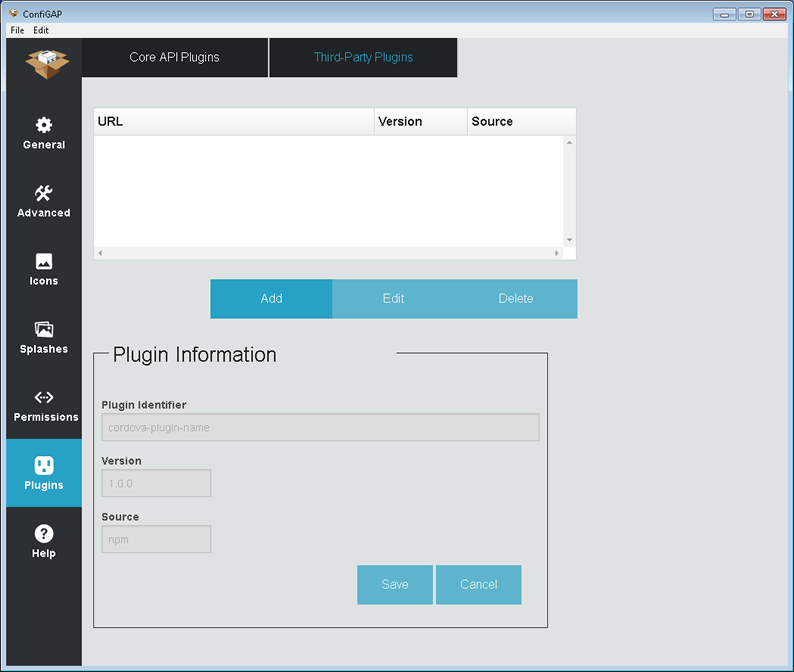
Create New Config.xml File
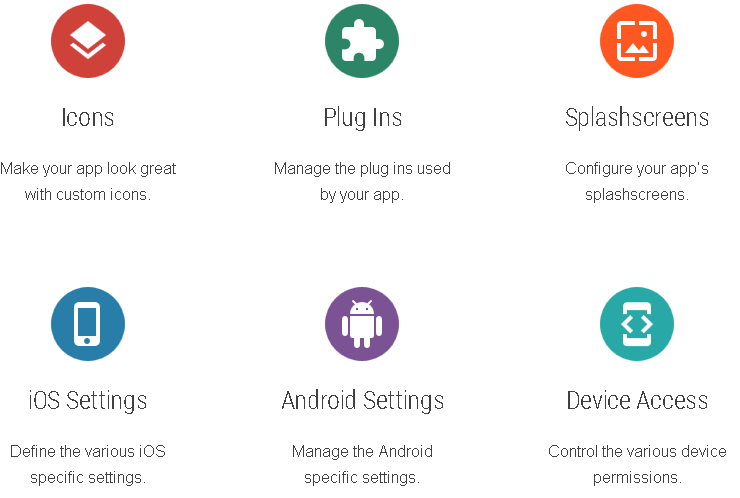
Click the ConfiGAP icon if necessary to start the app. You will be presented with the General Settings screen. Additional settings include:
- Advanced
- Icons
- Splash screens
- Permissions
- Plugins
PhoneGap utilizes <preference> tags in the config.xml to customize an app configuration.
General Tab
The default screen is General where you set multi-platform preferences.
- Fill out ALL of the options on this screen. (See below for explanation of each field)
- Click the Advanced tab.
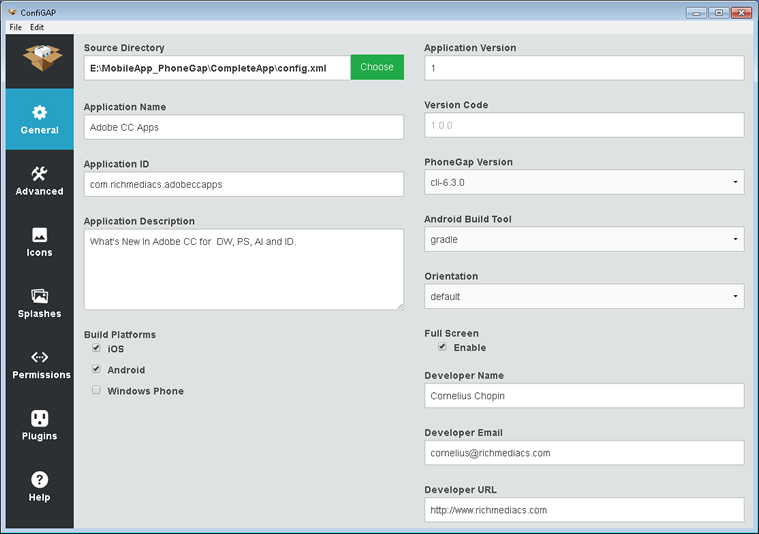
Multi-Platform Preferences:
- Source Directory: Click on the Choose... button and navigate to where the index.html file is located for your app.
- Application Name: (e.g., Adobe CC Apps)
- Application ID: typically uses reversed domain notation. (e.g., com.companyname.appname)
- Application Description: self-explanatory.
- Build Platforms: Select the checkboxes that represents the platforms you are building for (iOS, Android, or Windows Phone)
- Application Version: (e.g., 1.0.0)
- Version Code (
 Optional and used by Android only): (e.g., 1)
- it is a string
- it is what a user sees.
- By default, it'll have the same value as the versionCode with a fractional value after a period but it could be anything. (e.g., 1.0 Demo)
- can have more than one APK with different versionCodes (e.g., one APK that supports older versions of Android and one that supports newer versions.)
- PhoneGap Version - currently supported versions (cli-6.3.0 (default))(e.g., <preference name="phonegap-version" value="cli-6.3.0" /> )
- If you don't specify a version, it will be set to the current default version.
- An app will not build if you specify an unsupported version number
- Android Built Tool: Specifies which build tool to compile the application. (gradle or ant). (e.g., <preference name="android-build-tool" value="ant|gradle" />).
- Orientation - device orientation (e.g., default, landscape, or portrait). Default means both landscape and portrait are enabled. (e.g.,<preference name="orientation" value="landscape" />)
- Full Screen - makes an app display full screen by hiding the status bar at the top, (e.g., <preference name="fullscreen" value="true" />). NOTE: May not be supported by newer versions of iOS, but users can use the config-file element on phonegap build and set UIViewControllerBasedStatusBarAppearance to false and UIStatusBarHidden to true.)
- Developer Name: (e.g., Cornelius Chopin)
- Developer Email: (e.g., cornelius@richmediacs.com)
- Developer URL: (http://www.richmediacs.com)
EXAMPLE CODE:
<?xml version="1.0" encoding="UTF-8" ?>
<widget xmlns   = "http://www.w3.org/ns/widgets"
    xmlns:gap   = "http://phonegap.com/ns/1.0"
    id          = "com.richmediacs.com/adobeccapps"
    versionCode = "1"
    version     = "1.0.0" >
    <name>ADOBE CC APPS</name>
    <description>
        What's New in Adobe CC
    </description>
    <author href="http://richmediacs.com" email="cornelius@richmediacs.com ">
          Cornelius Chopin
    </author>

    <platform name="ios"/>
    <platform name="android"/>
    <platform name="winphone"/>

    <preference name="phonegap-version" value="cli-6.1.0" />
    <preference name="orientation" value="portrait" />
    <preference name="fullscreen" value="false" />
    <preference name="webviewbounce" value="false" />
    <preference name="DisallowOverscroll" value="true" />
    <preference name="disallowOverscroll" value="true" />
    <preference name="target-device" value="universal"/>
    <preference name="deployment-target" value="7.0"/>
    <preference name="exit-on-suspend" value="false"/>
    <preference name="detect-data-types" value="true"/>
    <preference name="prerendered-icon" value="false"/>
    <preference name="StatusBarOverlaysWebView" value="false" />
    <preference name="ios-statusbarstyle" value="default"/>
    <preference name="StatusBarStyle" value="default" />

    <preference name="android-minSdkVersion" value="24" />
    <preference name="android-installLocation" value="auto" />

[REST OF THE MARKUP GOES BETWEEN THE OPENING AND CLOSING (E.G. <WIDGET> ... </WIDGET>)TAGS]
</widget>
CODE EXPLANAITON
Cross-platform settings:
- The first line in the XML declaration (e.g., <?xml version="1.0" encoding="UTF-8" ?>)
- The <widget> element contains two XML namespace (xmlns) attributes: w3 and phonegap which are the same for all apps. - The id attribute should uses the reverse domain notation of your website along with the app name (e.g., com.richmediacs.com/adobeccapps). This id attribute is used for the app store and for plug-in configurations.
- The versionCode attribute (e.g., versionCode = "1") is an number value within a set of double quote and is only used by Android. It should be updated by one for each release of an app.
- The version attribute representS the version number for major/minor/point syntax.- The <name> element contains the display name of the app.
- The <description> element contains a short description of the app.
- The <author> element contains the author name as well as the author href (or url) and email attributes.
- Each <platform> element represents that platform(s) you want PhoneGap to compile for you
Each <preference> element represents preferences that you want to set for a given platform with a set of name/value pairs attributes. Below are some of the most common preferences:
General Preferences:
- phonegap-version/cli-6.1.0 - represents the current version that you would like to target. If this preference is not included in the config.xml, it will default to the latest version.
- orientation/portrait | landscape | default - represents the initial orientation and where the orientation will change. If you use the default both orientations will be used otherwise, it will be fix to portrait or landscape.
- fullscreen/true | false - represents where the status bar (e.g., time/battery indicator, etc.) appears in the app. If set to true, status bar will be supressed.
- webviewbounce/ true | false - represents the "rubber-band" effect when a user scroll to the top or bottom of the page. If set to false, this effect will be disabled.
- DisallowOverscroll/ true | false - same as above
- disallowOverscroll/ true | false - same as above
iOS Specific Preferences:
- target-device/ phone | tablet | universal - represent the type of device you want the app to run on. If you set the value to universal it will run on both phones and tablets.
- deployment-target-device/version number (e.g., "7.0") - represents what version you want the app to run on. (
 iOS Only): universal is best
 - exit-on-suspend/ true | false - determine if the app will run in the background when the user presses the home key. If you set the value to true, the app will not run in the background when the home button is pressed.
- detect-data-types/ true | false - allow your app to work with other apps.
- prerendered-icon/ true | false - determine if the app's icon will have a glare on it.
- StatusBarOverlaysWebView/ true | false - addresses an issue with iOS 7 overlay in the status bar.
- ios-statusbarstyle - same as above
- StatusBarStyle - same as above
Android Specific Preferences:
- android-minSdkVersion/version number - determine the minimum vesion of the SDK that will be used.
- android-maxSdkVersion/version number - determine the maximum vesion of the SDK that will be used. RECOMMENDATION: Do not set this preference unless there is a good reason to do so. Not setting this version will ensure that your app runs on ALL FUTURE versions unless there is an issue running on that version.
- android-installLocation/internal | external | auto - determine where the app will be installed. If the value is set to auto, it can be installed internal or external depending on the user preference.
- Look for additional Android preferenes at http://cordova.apache.org/.
Advanced Tab
The Advanced tab is where you set advanced features (e.g., SDK versions, loading options) for all of the platforms
- If necessary, click on the Advanced tab
- Set Advanced preferences for one or more platforms you are targeting:
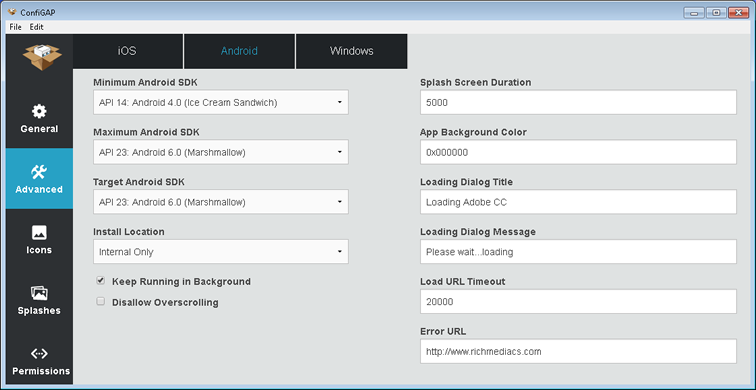
- Minimum SDK Version: Corresponds to the usesSdk attributes in the AndroidManifest.xml file. For more details, go to http://developer.android.com/guide/topics/manifest/uses-sdk-element.html. (e.g., <preference name="android-minSdkVersion" value="10" />).
- Maximum SDK Version: Limit the maximum Android OS. Although this is not recommend unless there is a specific reason. Corresponds to the usesSdk attributes in the AndroidManifest.xml file. Unset by default. For more details, go to http://developer.android.com/guide/topics/manifest/uses-sdk-element.html. (e.g., <preference name="android-maxSdkVersion" value="21" />).
- Target SDK Version:
- Install Location: Where an app can be installed - defaults to Internal Only (as the Android SDK). Because the internal storage size is rather small many users opt to install their applications own external SD card. To enable this ability, to let the user select the install location, use Android-installLocation with the value of either auto or prefer external - this can lead to unexpected behavior. For more details, go to http://developer.android.com/guide/appendix/install-location.html. (e.g., <preference name="android-installLocation" value="auto" />).
- Keep Running in Background: Select checkbox if you want to keep the app running in the background
- Disallow Overscrolling: Select checkbox if you want to disallow overscrolling.
- Splash Screen Duration: (default 5000) Deprecated - use SplashScreenDelay instead.
- App Background Color: (default 0x000000) Supports a four byte hex value (e.g., first byte is alpha value and three bytes are the standard RGB values. 0xff000000 represents black).
- Loading Dialog Title: (e.g., Loading Adobe CC)
- Loading Dialog Message: (e.g., Please wait...loading)
- Load URL timeout: (default 20000)
- Error URL: Link you want the user to go to if there is an error
- WindowSoftInputMode: How the main window of the activity interacts with the window containing the on-screen soft keyboard. For more details, to to http://developer.android.com/guide/topics/manifest/activity-element.html#wsoft. (e.g., <preference name="android-windowSoftInputMode" value="stateVisible|adjustResize" />). MAY NEED TO DELETE
![]() iOS Preferences:
iOS Preferences:
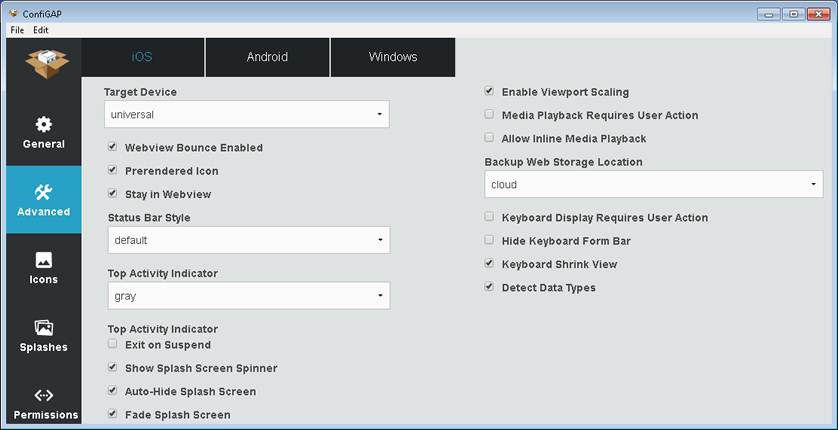
- Target Device: Target a specific device (e.g., handset, tablet, or universal (default)). (e.g., <preference name="target-device" value="universal" />).
- WebView Bounce Enabled: Since PhoneGap apps run in a web view like a web page there is a notably bounce when a page is scrolled to the top or bottom. To disable this user feedback, add disallow overscroll preference and set its value to true in the config.xml file.
- Prerender Icon: This will cause iOS to not apply its gloss to the app's icon on the user's home screen; possible values are true or false, default is false. (e.g., <preference name="prerendered-icon" value="true" />).
- Status Bar Style: You can select either deault, black-opaque or black-transparent
- Top Activity Indicator: You can select either gray, whiteLarge or white
- Exit On Suspend: If set to true, app will terminate when suspended, for example when home button is pressed; default is false. (e.g., <preference name="exit-on-suspend" value="true" />).
- Show Splash Screen Spinner:
- Auto-Hide Splash Screen:
- Fade Splash Screen:
- Enable Viewpoint Scaling:
- Media Player Requires User Action:
- Allow Inline Media Playback:
- Suppress Incremental Rendering:
- Backup Web Storage Location: You can select cloud, local or none
- Keyboard Display Requires User Action
- Hide Keyboard Form Bar:
- Keyboard Shrink View:
- Detect Data Types: Controls whether certain data types (such as phone numbers and dates) are automatically turned into links by the system. Defaults to "true" (as does the system web view). In preference to this, try using meta-tags: And use detect-data-types if meta tags don't work for you. (e.g., <preference name="detect-data-types" value="true" />)
Window Preferences:
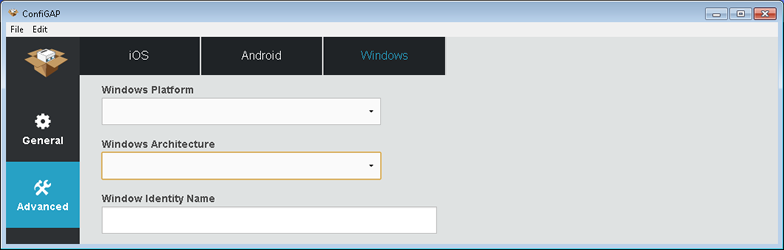
- Windows Platform: You can select Windows 10, 8.1 or 8
- Windows Architecture: Any CPU, ARM, X86, X64
- Window Identity Name:
Icons Tab
If you do not specify a icon, then the PhoneGap logo will be used as the app's icon. The attributes for the icon element are:
src: (required) specifies the location of the image file, relative to your site directory
width: (optional) but recommended, width in pixels
height: (optional) but recommended, height in pixels
See screenshot in Creating Graphic Assets under the Test App menu on how to create icons.
(MOVE TO CREATING GRAPHICS ASSETS)
- res/icons:
- android
- ios
- windows
- Click on the Apps tab
- Click on the corresponding button (iOS7+, iOS6, Android or Default) for a given platform and for iOS click on both the Apps icons and Setting & Spotlight Icons options.
- Click the Plus (+) button for each type and navigate to the images that were created in the Creating Graphics Assets section of this tutorial.
iOS7+
- iPhone App Icons: 60 x 60, 120 x 120 and 180 x 180
- iPad App Icons: 76 x 76 and 152 x 152
- Settings App Icons: 29 x 29, 58 x 58 and 87 x 87
- Spotlight App Icons: 40 x 40 and 80 x 80
iOS6
- iPhone App Icons: 57 x 57 and 144 x 144
- iPad App Icons: 72 x 72 and 114 x 114
- Settings & Spotlight Icons: 100 x 100
EXAMPLE: The <icon> element is used with the "src" (source), width and height attributes for sixteen types of icons to support all of the current devices.
NOTE: Notice that the retina icon name is used used the the "2x" suffix before the file extension
<platform name="ios">
   <icon src="res/icon/ios/icon.png" width="57" height="57"/>
   <icon src="res/icon/ios/icon@2x.png" width="114" height="114"/>
   <icon src="res/icon/ios/icon-40.png" width="40" height="40"/>
   <icon src="res/icon/ios/icon-40@2x.png" width="80" height="80"/>
   <icon src="res/icon/ios/icon-50.png" width="50" height="50"/>
   <icon src="res/icon/ios/icon-50@2x.png" width="100" height="100"/>
   <icon src="res/icon/ios/icon-60.png" width="60" height="60"/>
   <icon src="res/icon/ios/icon-60@2x.png" width="120" height="120"/>
   <icon src="res/icon/ios/icon-60@3x.png" width="180" height="180"/>
   <icon src="res/icon/ios/icon-72.png" width="72" height="72"/>
   <icon src="res/icon/ios/icon-72@2x.png" width="144" height="144"/>
   <icon src="res/icon/ios/icon-76.png" width="76" height="76"/>
   <icon src="res/icon/ios/icon-76@2x.png" width="152" height="152"/>
   <icon src="res/icon/ios/icon-small.png" width="29" height="29"/>
   <icon src="res/icon/ios/icon-small@2x.png" width="58" height="58"/>
   <icon src="res/icon/ios/icon-small@3x.png" width="87" height="87"/>
</platform>
Android
All Android resource qualifiers which refer to device density and language.
- Android App Icons: 36 x 36, 48 x 48, 72 x 72, 96 x 96, 144 x 144 and 192 x 192
EXAMPLE: The <icon> element is used with the "src" (source) and the qualifier attribute for all six screen densities:
NOTE: The "src" and "drawable-xxx" name conventions follow what is used in Android Studio which is the official Integrated Device Environment (IDE) for creating Android apps using JAVA.
 <platform name="android">
    <icon src="res/icon/android/drawable-ldpi-icon" qualifier="ldpi"/>
    <icon src="res/icon/android/drawable-mdpi-icon" qualifier="mdpi"/>
    <icon src="res/icon/android/drawable-hdpi-icon" qualifier="hdpi"/>
    <icon src="res/icon/android/drawable-xhdpi-icon" qualifier="xhdpi"/>
    <icon src="res/icon/android/drawable-xxhdpi-icon" qualifier="xxhdpi"/>
    <icon src="res/icon/android/drawable-xxxhdpi-icon" qualifier="xxxhdpi"/>
</platform>
/Default
The default icon must be named icon.png and must reside in the root of your application folder.
- Default App Icons: 72 x 72
Splashes Tab
The Splashes tab is where you set the various splash screens images that are needed for the app store to market your app. They are requied on iOS but optional but highly recommended on Android.
- Click on the Splash Screens tab. See screenshot in Creating Graphic Assets under the Test App menu on how to create splash screens.
- Click on the corresponding button (iPhone, iPad, or Android)
- Click the Plus (+) button for each type and navigate to the images that were created in the Creating Graphics Assets section of this tutorial.
NOTE: It is helpful to note the following dimensions:- the pair of values represents portrait (e.g. 640 x 960) and lanscape (e.g., 960 x 640) with the width and height being reversed.
- the Non-Retina dimensions are half the height and width of the Retina dimensions.
- the iOS6+/iOS6 iPhones dimensions are the same as the iPad - Retina and iPad Non-Retina.
iPhone
- iOS6+: 1242 x 2208 and 2208 x 1242
- iOS6: 750 x 1334 and 1334 x 750
- iOS5: 640 x 1136 and 1136 x 640
- Retina: 640 x 960 and 960 x 640
- Non-Retina: 320 x 480 and 480 x 320
iPad
- iPad - Retina: 1242 x 2208 and 2208 x 1242
- iPad - Non-Retina: 750 x 1334 and 1334 x 750
EXAMPLE:
<platform name="ios">
    <splash src="res/screen/ios/Default~iphone.png" width="320" height="480"/>
    <splash src="res/screen/ios/Default@2x~iphone.png" width="640" height="960"/>
    <splash src="res/screen/ios/Default-Portrait~ipad.png" width="768" height="1024"/>
    <splash src="res/screen/ios/Default-Portrait@2x~ipad.png" width="1536" height="2008"/>
    <splash src="res/screen/ios/Default-736h.png" width="2208" height="1242"/>
    <splash src="res/screen/ios/Default-667h.png" width="750" height="1334"/>
    <splash src="res/screen/ios/Default-568h@2x~iphone.png" width="640" height="1136"/>
</platform>
Android
All Android resource qualifiers which refer to device density and language.
- ldpi: 240 x 320 and 320 x 240
- mdpi: 320 x 480 and 480 x 320
- hdpi: 480 x 800 and 800 x 480
- xhdp: 720 x 1280 and 1280 x 720
- xxhdpi: 960 x 1600 and 1600 x 960
- xxxhdpi: 1280 x 1920 and 1920 x 1280
EXAMPLE CODE: The <icon> element is used with the "src" (source) and the "qualifier" attributes all six screen densities. You can also add "-port" or "-land" to each screen densities to specify if it will be in the portrait or landscape mode.
<platform name="android">
    <splash src="res/screen/android/drawable-port-ldpi-screen" qualifier="ldpi"/>
    <splash src="res/screen/android/drawable-port-mdpi-screen" qualifier="mdpi"/>
    <splash src="res/screen/android/drawable-port-hdpi-screen" qualifier="hdpi"/>
    <splash src="res/screen/android/drawable-port-xhdpi-screen" qualifier="xhdpi"/>
    <splash src="res/screen/android/drawable-port-xxhdpi-screen" qualifier="xxhdpi"/>
    <splash src="res/screen/android/drawable-port-xxxhdpi-screen" qualifier="xxxhdpi"/>
</platform>
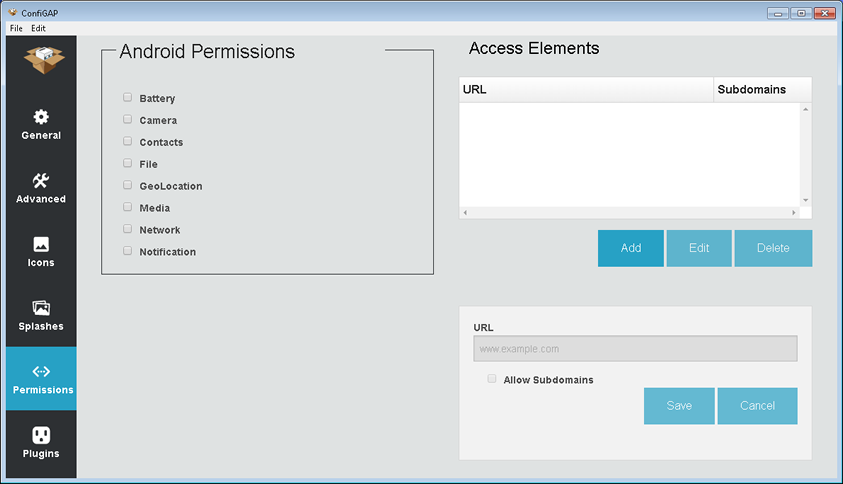
Permissions Tab
The Permissions Tab is where you set the various types of permission and access to other web sites.
Permissions are only used by Android [and Windows??]. Users will see a request when they install an app about what permissions are needed (e.g., camera, location) for a given app. These permissions are mapped to a PhoneGap API.
Because an app runs in a browser, if it needs to access resources from another domain, you need to give it access to those remote resources by supplying the URL names and sub-domains (Instead of specifying sub-domain, you can get it full access by using the asterisk (*) as a wildcard (e.g., <access origin="*" subdomains="true"/>).
- Click the Permissions tab.
- Set Android permissions and access elements.
EXAMPLE CODE:
<preference name="permissions" value="none"/>
<access origin="*" subdomains="true"/>

<allow-intent href="http://*/*"/>
<allow-intent href="https://*/*"/>
<allow-intent href="tel:*"/>
<allow-intent href="sms:*"/>
<allow-intent href="mailto:*"/>
<allow-intent href="geo:*"/>

<platform name="android">
  <allow-intent href="market:*"/>
</platform>

<platform name="ios">
   <allow-intent href="itms:*"/>
   <allow-intent href="itms-apps:*"/>
</platform>
- Android and Windows phone users will get request for permission to use certain features (e.g., camera, location) when they attempt to install an app.
- The <feature> tag was used in previous versions of PhoneGap Build. However, permissions are now automatically set when a plug-in in added to an app. However, you can set the permission to none (e.g.,<preference name="permissions" value="none"/>).
- The <access origin="*" subdomains="true"/> tag is used to set the access level. Since a PhoneGap app runs within a WebView component within the app, the ssame security restrictions that applies to a web app applies to a mobile app when attempting to access resources from an outside domain.
- The origin attribute is used to set the outside domain name. If you use the wildcard asterisk (*), it will allow access to all domains.
- The subdmain attribute is used to allow access to a subdomain within the primary domain.
- The allow-intent element is used to allow access to various resources (e.g., phone, SMS, geolocation, Android market, Apple iTunes)
CODE EXPLANATION:
Plugins Tab
You can include API Plugins or Available Plugins (e.g., scanner, social sharing) to extend the functionality of your app.
- Click the Plugins tab.
- Select the plug-ins you need for your app.
API Plugins:NOTE: You will still need to write code for the plug-in to work in your app.

Third-Party Plugins:
- After you have made all of the modification you need, select File > Save... from the menu to save all of the changes to the config.xml file.:
- (OPTIONAL) Open the config.xml file to see the configuration settings that it created.
- If necessary, move the config.xml file to the same level as the index.html file in the site.
NOTE: You can manually edit the config.xml file. However, a better approach is to reopen confiGAP again by selecting File > Open... from the menu to make any changes you want and then select File > Save... from the menu to save the updates.
EXAMPLE CODE:
Complete Sample File Explanation
The config.xml file is an XML file that is used to set the various attributes for the app:
- The first line is the XML declaration.
- The <widget> element contains the following attributes and children elements:
- Two namespace attributes based on the W3C Widget Packaging specification. One for PhoneGap and one for widget spec that is the same for all apps.
- id attribute - unique identifier that typically uses reverse domain notation (e.g., com.richmediacs.myappname) NOTE: It is CRITICAL that this id matches the IOS app id.
- version code attribute - used only by Android that is a integer value that should be incremented by one for each app release. (e.g. 1). For more info, go to http://developer.android.com/guide/publishing/versioning.html.
- version number attribute - uses three values (e.g., major/minor/patch) (e.g., 1.2.3)
- <name> element - contain the app name
- <description> element - only used by PhoneGap Build and not the app stores
- <author> attributes and element - author url, email and name
- <preference> element - a host of preferences (only a few are shown)
- <preference name="phonegap-version" value="cli-5.2.0" /> will target for a specific version of PhoneGap Build. NOTE: If not preference is given, PhoneGap Built will use the latest version.
- <preference name="orientation" value="default" /> will allow the app to change from landscape to portrait or vica-versa. If you want the orientation to work in a single orientation, set the value to portrait or landscape.
- <preference name="fullscreen" value="false" /> will allow the app to show fullscreen without the status bar.
- <gap:platform> element - a list of platforms (e.g., ios, android, winphone) NOTE: If you don't specify a platform, PhoneGap Build will build for all supported platforms for a given version of PhoneGap Build.
- <icon> elements - a list of icons (only a few are shown). NOTE: For Android, you have to specify the screen density:low, medium, high, extra high and extra extra high without specifying the height or the width like you do for iOS.
- <gap:plugin> - included for each core and non-core API (plug-in) needed for app; otherwise the app may crash. For info on non-core plugins, visit PhoneGap Build Plugins repo.
<?xml version="1.0" encoding="UTF-8"?>
<widget xmlns="http://www.w3.org/ns/widgets" xmlns:gap = "http://phonegap.com/ns/1.0"
id="com.richmediacs.adobeccapps" versionCode="1.0" version="1">
<name>Adobe CC Apps</name>
<description>What's New In Adobe CC for  DW, PS, AI and ID.</description>
<author href="http://www.richmediacs.com" email="cornelius@richmediacs.com">Cornelius Chopin</author>
<preference name="phonegap-version" value="cli-5.2.0" />
<preference name="orientation" value="default" />
<preference name="fullscreen" value="false" />
.
.
.
<gap:plugin name="org.apache.cordova.device" />
<gap:platform name="ios" />
<gap:platform name="android" />
<icon src="icons/icon36x36.png" gap:platform="android" gap:density="ldpi" />
<icon src="icons/icon48x48.png" gap:platform="android" gap:density="mdpi" />
<icon src="icons/icon72x72.png" gap:platform="android" gap:density="hdpi" />
<icon src="icons/icon96x96.png" gap:platform="android" gap:density="xhdpi" />
<icon src="icons/icon144x144.png" gap:platform="android" gap:density="xxhdpi" />
<icon src="icons/icon192x192.png" gap:platform="android" gap:density="xxxhdpi" />
<icon src="icon.png" />
</widget>
Configure Multiple Flavors (MOVE TO ANDROID STUDIO)
You can also use Android Studio to create multiple flavors.
In a new Android Studio project in the gradle.build file, the default config is called the default flavor. However, you can define multiple flavors with each flavor resulting in a unique APK file.
There are several reasons for creating multiple flavors:
- one flavor for recent versions of Android and one for older versions.
- one flavor for a full version of the app and one for demo version.
- Select File > Project Structure... from the menu.
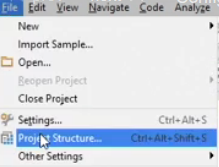
- In the Project Structure dialog box that appears, select or enter the following options:
- Choose the app module and click on the Flavors tab.
NOTE: You see the default config flavor. Each flavor defines the properties on the right side of the screen. - Click the plus (+) icon.
WHY: To create a new flavor. - Type a flavor (e.g., Demo) in the name field.
NOTE: You should see it updated in the side panel. The new flavor will inherit all of the properties from the default configuration so you only need to set properties that you want to change for that flavor. - Go back to my default configuration, and copy the application ID.
- Go to the new flavor (e.g., Demo), and paste that application ID and I'll add .demo to the end (e.g., com.myAwesomeApp.demo).
WHY: So the Demo flavor has its own unique application ID. - Click the plus (+) icon again.
WHY: To create another flavor. - Name the flavor Full but don't reset any values.
WHY: So that it inherit all of the properties from the default configuration. - Click the OK button.
NOTE: You will be returned to the gradle.build file and see the message that the "Gradle project is sync om progress." - Select Build > Generate Signed APK... from the menu.
- Click the Next button (If you selected the Remember Passwords checkbox initially.)
- Click the Next button.
NOTE: Notice now you see the two flavors that you created earlier. - Select both flavors from the list and then click the Finish button.
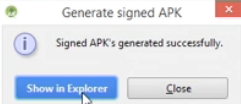
- After a while, in the Generate signed APK dialog box that appears, you should see the message "Signed APK's generated successfully."
- Click the Show in Explorer button or Show in Finder button to open the APK file or navigate to where you saved it.
- Navigate to the directory where the APK were saved (e.g., desktop)
NOTE: You should see there is one for demo and one for full. You can now submit this release version of the APK to the app store. You can create different behavior and different appearances in the different flavors. Go to the Google developer. website.(http://developer.android.com/tools/building/configuring-gradle.html) and click on the work with build variants link for details.
- Choose the app module and click on the Flavors tab.